


Notolog is an open-source markdown editor developed with Python and PySide6. Born from a personal endeavor to tackle daily programming challenges and deepen Python proficiency, Notolog serves as a proof-of-concept that seamlessly blends simplicity with functionality. It offers an intuitive user experience across various platforms, ensuring users can efficiently manage and edit markdown files with ease.
- Notolog is open-sourced under the MIT license, promoting full transparency and encouraging collaboration.
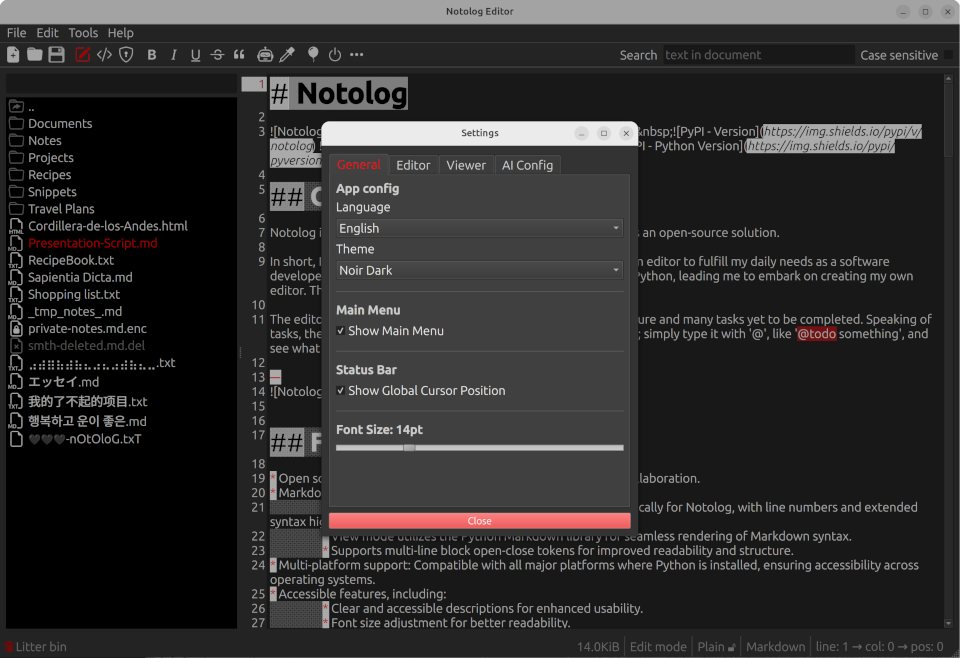
- Markdown syntax highlighting:
- Editor mode offers smooth highlighting tailored specifically for Notolog, with line numbers and extended syntax highlighting.
- View mode utilizes the Python Markdown library for seamless rendering of Markdown syntax.
- Supports multi-line block open-close tokens for improved readability and structure.
- Multi-platform support: Compatible with all major platforms where Python is installed, ensuring accessibility across operating systems.
- Accessible features, including:
- Clear and accessible descriptions for enhanced usability.
- Font size adjustment for better readability.
- Background and cross-action save changes experience:
- Automatically saves changes in the background to ensure data integrity and minimize user intervention.
- Seamlessly handles unsaved changes when performing cross-actions, providing a smooth user experience.
- Search functionality:
- Allows users to search within the opened file.
- Quick search by file name within the tree, enabling efficient navigation and content retrieval.
- Password-based File Encryption and Decryption:
- Utilizes Fernet for encryption, providing a secure and user-friendly method for symmetric (also known as "secret key") encryption.
- Fernet employs AES-128 in CBC mode. Plans to introduce AES-256 in future updates are aimed at further enhancing security.
- File Meta-Headers:
- Notolog employs file meta-headers to store encryption/decryption parameters and other essential file information.
- To minimize visibility, these meta-headers are formatted as HTML comments.
- Translations-friendly file structure:
- Supports several languages out of the box, with provisions for adding and supporting additional languages.
- Color themes support:
- Comes with a few predefined color themes to customize the editor's appearance, for both light and dark modes.
- Hotkeys support:
- It currently supports hotkeys like Ctrl+S for saving and Ctrl+F for searching, with plans for further expansion.
- In-line context menus:
- Right-click context menu options in the file tree for file rename and delete actions.
- Customizable toolbar with right-click functionality to show/hide icons based on user preferences.
- Includes a suite of unit tests to ensure code reliability and maintainability, providing confidence in the editor's functionality.
- AI Assistant UI to get all things you need in one place:
- At the moment the OpenAI API is supported with plans to extend support with other providers.
- Notolog includes specialized highlighting for TODOs. Simply type '@todo something' to mark tasks, enhancing the ability to track and manage future plans efficiently.
There is no classical web engine integration to make overall package more lightweight and to achieve the best possible performance.
The Notolog Editor supports several language translations out of the box. Here is the list of languages included alongside the default English translation:
- Chinese (Simplified)
- Dutch
- Finnish
- French
- Georgian
- German
- Greek
- Hindi
- Italian
- Japanese
- Korean
- Latin
- Portuguese
- Russian
- Spanish
- Swedish
- Turkish
Here's an example of what it looks like in the actual UI, featuring the lovely Strawberry theme and Japanese translation:

Python 3.9 or higher installed on your system.
Ensure Python 3.9 or higher is installed on your system. Visit python.org for more details.
Check the version of Python available with this command python3 -V.
pip (Python package installer) should be available.
You can check if pip is installed by running pip --version in your terminal/command prompt.
Virtual Environment
It is highly recommended to use as it helps avoid version conflicts and interference from other packages. Below is a description of how to set up a virtual environment on your machine.
pip install notologThat's it! Starting the app is as simple as notolog.
To update to the latest version, use:
pip install --upgrade notolog- Open Terminal.
- Clone project's GitHub repository to get a latest version.
git clone https://github.com/notolog/notolog-editor.git
- Navigate to the just cloned project's directory using the cd command.
- Make sure the virtual environment is activated as it's a common practice to isolate project code (activation described below).
- Simply run this command to set up project dependencies:
pip install -r requirements.txtThat's it! Starting the app is as simple as python -m notolog.main form the project's root directory.
To minimize installation overhead and streamline dependency management, dependencies required solely for testing are isolated in test_requirements.txt. This separation helps manage test dependencies independently from the main application dependencies.
pip install -r test_requirements.txtRun Tests
To execute all available tests:
pytestTo run tests from a specific file:
pytest tests/test_pkg_integration.pyRun Tests with Coverage Reports
To run all tests with a coverage report:
pytest tests/ --cov=notolog --cov-report=termAlternatively, to exclude UI tests from execution:
pytest tests/ --cov=notolog --cov-report=term --ignore=tests/ui_tests/The instructions below contain steps of how to set up venv virtual environment to run a Python app safely. Starting from Python 3.6 venv is a recommended way to create virtual environments. For more information check Creation of virtual environments. Alternatively, you can execute the Notolog code and set up virtual environment with your favorite Python code editor.
- Open Terminal.
- Navigate to your project directory using the cd command.
- Create a virtual environment by running
python3 -m venv notolog. Replace notolog with the desired name for your virtual environment.
To activate the virtual environment, run:
source notolog/bin/activateTo deactivate environment just run this command:
deactivateInstall venv on Linux systems
While Python itself comes pre-installed on many Linux distributions, including Ubuntu, some distributions may not include the venv module by default. Therefore, you need to install it separately using the package manager before you can use it to create virtual environments.
Ubuntu/Debian
sudo apt-get update
sudo apt-get install python3-venv
Fedora
sudo dnf install python3-venvCentOS/RHEL
sudo yum install python3-venv- Open Command Prompt or PowerShell.
- Navigate to your project directory using the
cdcommand. - Create a virtual environment by running
python -m venv notolog. Replace notolog with the name you want to give to your virtual environment.
To activate the virtual environment, run:
notolog\Scripts\activate
Mind the environment name (notolog or any other selected before).
If you encounter any issues or would like to contribute to the project, please don't hesitate to open an issue or submit a pull request on the project's GitHub page.
The Notolog project is licensed under the MIT License - see the LICENSE file for details.
This project incorporates numerous third-party libraries, each subject to its own licensing terms. Below is a detailed list of these libraries, categorized by license type to facilitate understanding of what each license permits and requires. This organization helps ensure compliance with legal terms for the use, modification, and distribution of these components.
- Qt (open-source): A framework for graphical user interfaces and more. Project Details, Qt Licensing
- PySide6: Enables GUI creation with Qt6 in Python. Project and License Details, PyPI
- PySide6_Addons: Provides additional modules for PySide6. Project and License Details, PyPI
- PySide6_Essentials: Core libraries for PySide6. Project and License Details, PyPI
- shiboken6: Binding generator for the Qt framework. Project and License Details, PyPI
- Bootstrap Icons: Icons for UI elements. Project Details, License Details
- cffi: For interfacing with C code. License Details, PyPI
- iniconfig: For parsing and managing INI configuration files. License Details, PyPI
- tomli: Effortlessly parses TOML configuration files. License Details, PyPI
- tomli_w: For writing TOML configuration files effortlessly. License Details, PyPI
- pluggy: Facilitates the creation and management of plugin systems. License Details, PyPI
- Python-Markdown: Converts Markdown to HTML. Project Details, BSD 3-Clause License
- Emoji library: Converts emoji text-codes to emojis. New BSD License, PyPI
- qasync: Adds async support to Python. BSD 2-Clause "Simplified" License, PyPI
- Pygments: Provides syntax highlighting for programming languages. Project Details, BSD 2-Clause "Simplified" License
- click: Creates command-line interfaces. Project Details, BSD-3-Clause License
- pycparser: A C code parser; generates Abstract Syntax Trees in Python. BSD 3-Clause License, PyPI
- cryptography: Provides cryptographic functions and primitives. Apache License 2.0 and BSD 3-Clause License, PyPI
- packaging: Handles metadata and distribution for Python packages. Apache License 2.0 and BSD 2-Clause "Simplified" License, PyPI
- typing_extensions: Enhances support for type hints on older versions of Python. Licensed under the Python Software Foundation License, PyPI.
- Standard Python Libraries: Includes commonly used libraries such as
asyncioandunittest. All are part of the Python standard library and are licensed under the Python Software Foundation License. This includes any other standard libraries not explicitly mentioned but used in the project.
- Codehilite CSS Themes: Basic themes for code highlighting. The Unlicense
Please note that while the majority of this project is licensed under the MIT License, certain components may have different licensing terms. Always refer to the documentation of each library for detailed information about its license and terms of use.
Disclaimer: This project is independent and not affiliated with, endorsed by, or sponsored by OpenAI. The integration of the OpenAI API is provided on an "as is" basis, and the creators disclaim all liability for any misuse or consequences resulting from the use of the OpenAI API.
Usage: This project uses the OpenAI API to access AI assistant capabilities and enhance natural language processing. Users must provide their own OpenAI API keys and should refer to the OpenAI API reference for detailed usage guidelines.
Responsibility: Users are responsible for obtaining and managing their OpenAI API keys in compliance with OpenAI's terms of service.
Security: Users are expected to handle their API keys securely to avoid unauthorized access.
This section was generated with the assistance of AI to ensure accurate and concise information regarding the use of the OpenAI API.
This application is designed for educational purposes and offers security features through optional file encryption and protected application settings.
- Encryption Details: The application uses PBKDF2HMAC for key derivation and Fernet for encryption, utilizing AES-128 in CBC mode. Although the key material generated is 256 bits, only the first 128 bits (16 bytes) are used for encryption.
- File Headers: The encryption salt and iteration counts are stored unencrypted in the file's header. This approach is primarily intended for non-critical applications where data exposure has limited risk.
- Strong Passwords: Users are encouraged to use strong passwords to enhance the protection of their encrypted data.
- Settings Encryption: The application may encrypt sensitive data like API keys because these Qt app settings might otherwise be stored as open data. However, the encryption key used is stored on the PC and can be accessed by anyone with physical or user-level access to the computer. This could expose sensitive data to potential unauthorized access.
- Open Source: This application is open-source and distributed under the MIT License. Users must comply with applicable laws and regulations when using this software.
- Liability: The developers disclaim any liability for misuse or legal non-compliance related to the use of this software.
To maintain high standards of code quality and ensure comprehensive test coverage, we use several tools:
- coverage: Measures the code coverage of our tests, helping to ensure that all parts of the application are properly tested. License, PyPI.
- flake8: A tool that enforces coding style and checks the quality of Python code by combining PyFlakes, pycodestyle, and McCabe's complexity checker. MIT License, PyPI.
- mccabe: Analyzes code complexity, which can help in identifying overly complex code that may need simplification. License, PyPI.
- pycodestyle: A tool to check Python code against coding style conventions in PEP 8. License, PyPI.
- pyflakes: Analyzes Python programs and detects various errors like undefined names. License, PyPI.
- pytest: Provides a powerful framework for writing and running Python tests, including support for complex test setups. License, PyPI.
- pytest-asyncio: Enables testing of asyncio Python code with pytest, making it easier to test asynchronous functions and classes. License, PyPI.
- pytest-cov: A pytest plugin that produces test coverage reports, showing how well the tests cover the code. License, PyPI.
- pytest-mock: Enhances pytest with mock functionality for unit tests, providing a simpler interface to powerful mocking tools. License, PyPI.
These tools are essential for maintaining high standards of code quality and ensuring that all functionality is robustly tested. For each package, the versions listed within the test_requirements.txt are those currently in use; updates may be applied as newer versions are released.
This README.md file has been carefully crafted and edited using the Notolog editor itself.