Implementation of Image Super Resolution CNN in Keras from the paper Image Super-Resolution Using Deep Convolutional Networks.
Also contains models that outperforms the above mentioned model, termed Expanded Super Resolution, Denoiseing Auto Encoder SRCNN which outperforms both of the above models and Deep Denoise SR, which with certain limitations, outperforms all of the above.
pip install git+https://github.com/fchollet/keras.git --upgrade
I saw issues with Keras 2.0, downgarding to Keras 1.2.2 helped $ pip install keras==1.2
The model weights are rovided in the weights folder (need to train the model first), therefore simply running :
python main.py "imgpath", where imgpath is a full path to the image.
The default model is DDSRCNN (dsr). To switch models,
python main.py "imgpath" --model="type", where type = sr, esr, dsr, ddsr
If the scaling factor needs to be altered then :
python main.py "imgpath" --scale=s, where s can be any number. Default s = 2
If the intermediate step (bilinear scaled image) is needed, then:
python main.py "imgpath" --scale=s --save_intermediate="True"

The model above is the simplest model of the ones described in the paper above, consisting of the 9-1-5 model. Larger architectures can be easily made, but come at the cost of execution time, especially on CPU.
However there are some differences from the original paper:
[1] Used the Adam optimizer instead of RMSProp.
[2] This model contains some 21,000 parameters, more than the 8,400 of the original paper.
It is to be noted that the original models underperform compared to the results posted in the paper. This may be due to the only 91 images being the training set compared to the entire ILSVR 2013 image set. It still performs well, however images are slightly noisy.
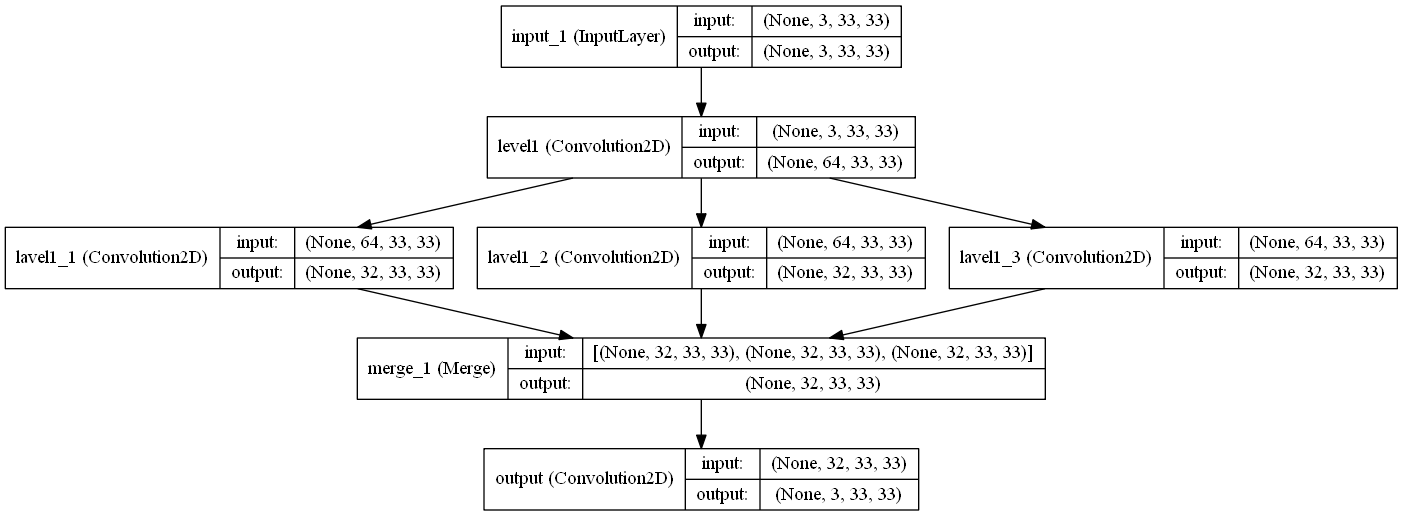
The above is called "Expanded SRCNN", which performs slightly worse than the default SRCNN model on Set5 (PSNR 31.78 dB vs 32.4 dB).
The "Expansion" occurs in the intermediate hidden layer, in which instead of just 1x1 kernels, we also use 3x3 and 5x5 kernels in order to maximize information learned from the layer. The outputs of this layer are then averaged, in order to construct more robust upscaled images.
The above is the "Denoiseing Auto Encoder SRCNN", which performs even better than SRCNN on Set5 (PSNR 32.57 dB vs 32.4 dB).
This model uses bridge connections between the convolutional layers of the same level in order to speed up convergence and improve output results. The bridge connections are averaged to be more robust.
Since the training images are passed through a gausian filter (sigma = 0.5), then downscaled to 1/3rd the size, then upscaled to the original 33x33 size images, the images can be considered "noisy". Thus, this auto encoder quickly improves on the earlier results, and reduces the noisy output image problem faced by the simpler SRCNN model.

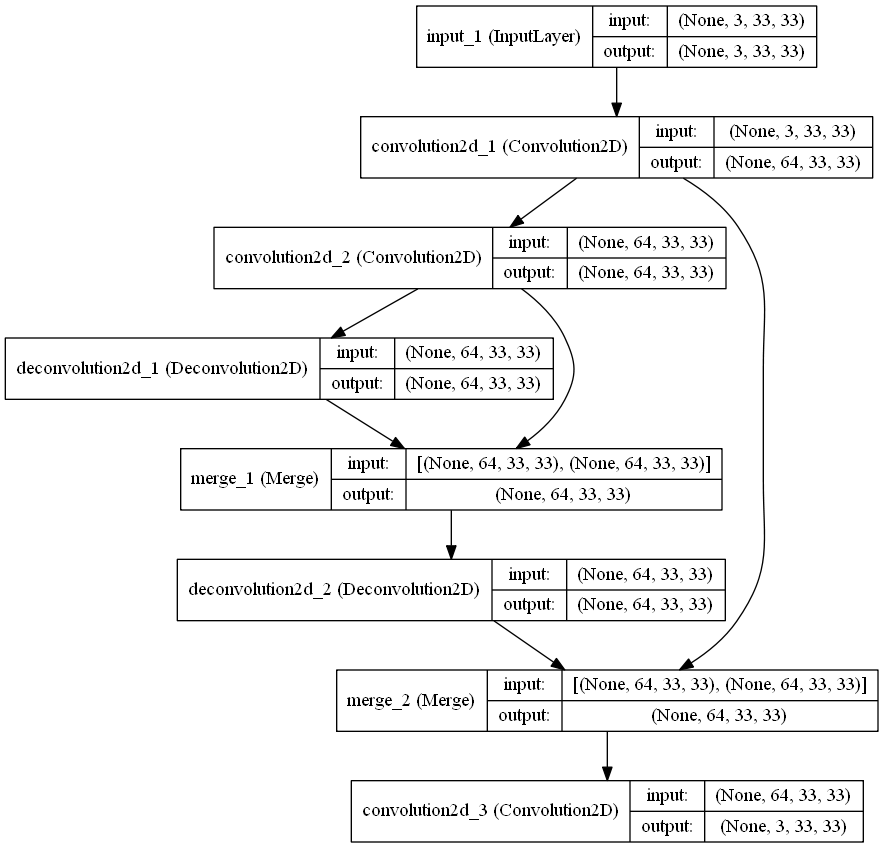
The above is the "Deep Denoiseing SRCNN", which is a modified form of the architecture described in the paper "Image Restoration Using Convolutional Auto-encoders with Symmetric Skip Connections" applied to image super-resolution. It can perform far better than even the Denoiseing SRCNN, but is currently not working properly.
Similar to the paper Image Restoration Using Convolutional Auto-encoders with Symmetric Skip Connections, this can be considered a highly simplified and shallow model compared to the 30 layer architecture used in the above paper.

If you wish to train the network on your own data set, follow these steps (Performance may vary) :
[1] Save all of your input images of any size in the "input_images" folder
[2] Run img_utils.py function, transform_images(input_path, scale_factor). By default, input_path is "input_images" path.
Note: Unless you are training ESPCNN, set the variable true_upsampling to False and then run the img_utils.py script to generate the dataset. Only for ESPCNN training do you need to set true_upsampling to True.
[3] Open tests.py and un-comment the lines at model.fit(...), where model can be sr, esr or dsr, ddsr.
Note: It may be useful to save the original weights in some other location.
[4] Execute tests.py to begin training. GPU is recommended, although if small number of images are provided then GPU may not be required.
Very large images may not work with the GPU. Therefore,
[1] If using Theano, set device="cpu" and cnmem=0.0 in theanorc.txt
[2] If using Tensorflow, set it to cpu mode
On the CPU, extremely high resolution images of the size upto 6000 x 6000 pixels can be handled if 16 GB RAM is provided.
There are 14 extra images provided in results, 2 of which (Monarch Butterfly and Zebra) have been scaled using both bilinear, SRCNN, ESRCNN and DSRCNN.
Bilinear
 SRCNN
SRCNN
.jpg)
ESRCNN
.jpg) DDSRCNN
DDSRCNN
.png)
Bilinear
 SRCNN
SRCNN
.jpg)
ESRCNN
.jpg) DDSRCNN
DDSRCNN
.png)