SDK for using OneAll on iOS in order to allow users to login with 30+ social networks and make posts on their walls.
- Login using OneAll authentication using UIWebView (30+ Social Networks supported)
- Login using OneAll by using the native Facebook or Twitter SDKs (iOS6 and later)
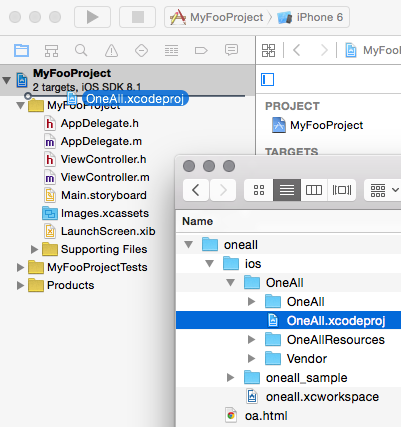
Using Finder drag the OneAll.xcodeproj file into the XCode and place in your project:
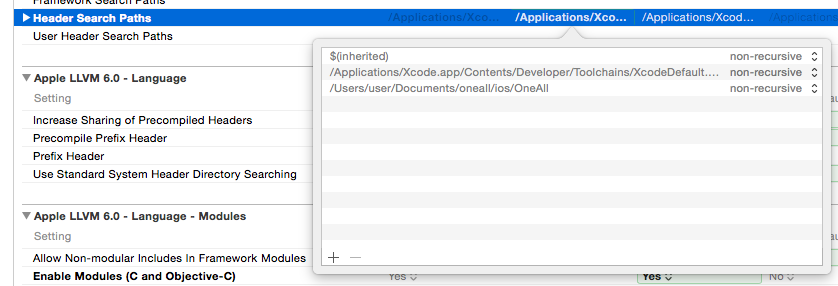
Select your project in the project explorer and click on “Build Settings”.

Make sure your target is selected on the left of the panel, then find “Header Search Paths” in the list of settings and add the folder in which the OneAll library is located. This would normally be the folder from which you dragged the OneAll.xcodeproj from:
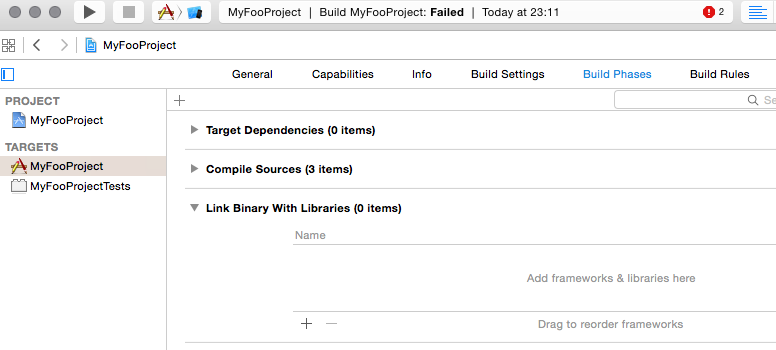
Now, go into “Build Phases”, expand the “Link Binary With Libraries” section and click “+” in this section.
The add the libOneAll.a from the top of the list:
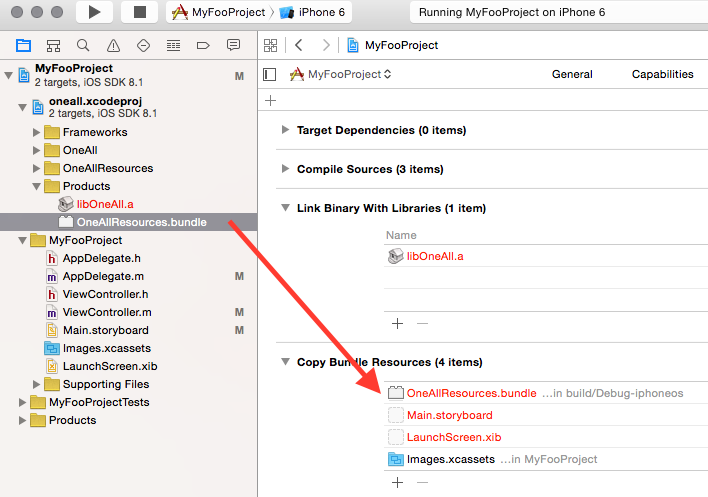
While at the same screen, make sure the resources of the library are added to the final executable by dragging them from the project explorer to the “Copy Bundle Resources” section:
Import the SDK main include file at the top of AppDelegate.m.
#import <OneAll/OneAll.h>In your AppDelegate.m file, add the following initialization code to application:didFinishLaunchingWithOptions:
- (BOOL)application:(UIApplication *)application
     didFinishLaunchingWithOptions:(NSDictionary *)launchOptions
 {
     [[OAManager sharedInstance] setupWithSubdomain:@"your-oneall-subdomain"];
 }
Make sure to replace your-oneall-subdomain by your own OneAll subdomain.
Add a button to one of the forms and create an action for it in the corresponding controller.
In this handler add the following code:
[[OAManager sharedInstance] loginWithSuccess:^(OAUser *user) {
    NSLog(@"User logged in: %@", user);
}
                                  andFailure:^(NSError *error) {
    NSLog(@"Failed to login user: %@, %@", error.localizedDescription, error.userInfo);
}];
You are all set! Now run the project and tap the new button. You should see the login screen with a selection of the social networks.
If you receive an error like for example Unrecognized selector sent to class 0x1ada5dae8 when trying to login with a social network, then please add the -ObjC flag (note the captial C) in the build settings under Other Linker Flags. This must be set in the linker settings for the target using the library, not in the library itself.

Instead of using the SDK’s social network selection screen, you can design your own selection and trigger the login with a specific social network by using the following call (in this example Reddit) :
[[OAManager sharedInstance] loginWithProvider:OA_PROVIDER_REDDIT
                                      success:^{ NSLog(@”Login succeeded”); }
                                      failure:^{ NSLog(@”Login failed”); }];
This will allow you to fully customise the appearance of the login window and just call the library to do an actual authentication.
Generally speaking, the network activity indicator should be controlled by the application. If the application does not use it, it may transfer the control of the indicator to the library by calling:
[[OAManager sharedInstance] setNetworkActivityIndicatorControlledByOa:true];The indicator will then be activated whenever the SDK is communicating with servers.
To use native Twitter Authentication, you have to setup the library with more settings.
- Replace the initialisation with the following call:
- (BOOL)application:(UIApplication *)application
didFinishLaunchingWithOptions:(NSDictionary *)launchOptions
{
    [[OAManager sharedInstance] setupWithSubdomain:@"your-oneall-subdomain"
                                     facebookAppId:nil
                                twitterConsumerKey:@”twitter_consumer_key”
                                     twitterSecret:@”twitter_secret”];
}- Make sure to replace
your-oneall-subdomainby your own OneAll subdomain. - Make sure to replace
twitter_consumer_keyby the consumer key of of your Twitter app. - Make sure to replace
twitter_consumer_keyby the consumer secret.
You can find your twitter apps here: https://developer.twitter.com/en/apps
Now try to login with Twitter. The SDK should attempt to login using native iOS Twitter authentication and if unavailable, fall back to the regular web based login.
First setup your Facebook application according to the Facebook tutorial available here: https://developers.facebook.com/docs/ios/getting-started.
Pay attention that you add your Facebook.framework.
- To use the native authentication, you have to pass your Facebook application ID to the initialisation code:
- (BOOL)application:(UIApplication *)application
didFinishLaunchingWithOptions:(NSDictionary *)launchOptions
{
    [[OAManager sharedInstance] setupWithSubdomain:@"your-oneall-subdomain"
                                     facebookAppId:@"11111111111"
                                twitterConsumerKey:nil
                                     twitterSecret:nil];
}- Make sure to replace
your-oneall-subdomainby your own OneAll subdomain. - Make sure to replace
11111111111by the identifier of your Facebook app.
Override application:openURL:sourceApplication and inform the manager about URL opening:
- (BOOL)application:(UIApplication *)application
            openURL:(NSURL *)url
  sourceApplication:(NSString *)sourceApplication
         annotation:(id)annotation
{
    return [[OAManager sharedInstance] handleOpenUrl:url sourceApplication:sourceApplication];
}
In addition, take care of application returning from background by overriding applicationDidBecomeActive.
- (void)applicationDidBecomeActive:(UIApplication *)application
{
    [[OAManager sharedInstance] didBecomeActive];
}
Now when trying to login, the SDK will attempt to login using Facebook SDK using installed Facebook application and if unavailable, fall back to regular web based login.