
![]()
- Introduction
- Android Studio Setup - (Developer Setup)
- App Walkthrough (End-User)
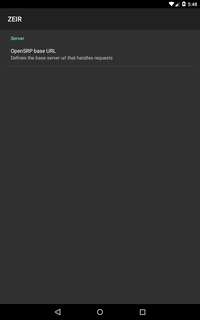
- Set Test URL (Optional)
- Login
- Main activity
- Create new patient
- Edit current patient
- View patient history
- Search patient
- Advanced Search
- Global Search
- Scanning QR Code
- Stock Control
- HIA 2 Reports
- Project Dependencies
OpenSRP Path is an app that handles infant records from child birth to 5 years of age. This mainly includes monitoring child weight, vaccination schedules and other supplements that have been proven to prevent diseases and/or improve infant growth and health.
Its main focus is Infant Health
The OpenSRP Path App enables providers to:
- Record patient immunisations
- Register new patients
- Record vaccine stock
- Record patient weights over time
- Review patient immunisation & weight history
- Determine patient health status based on weight
- Determine patient health vulnerability based on adherance to immunization schedule
- Determine patient health from above factors
- Record side-effects caused by treatments
- Follow-up with patients in the field
- Perform stock management of vaccines
- Submit HIA 2 forms monthly
- Verify HIA 2 forms monthly
- Administer to patients from different zones
- Make sure you have Java 1.7 to 1.8 installed
- Make sure you have Android Studio installed or download it from here
- Use a physical Android device to run the app
- Use the Android Emulator that comes with the Android Studio installation (Slow & not advisable)
- Use Genymotion Android Emulator
- Go here and register for genymotion account if none. Free accounts have limitations which are not counter-productive
- Download your OS Version of VirtualBox at here
- Install VirtualBox
- Download Genymotion & Install it
- Sign in to the genymotion app
- Create a new Genymotion Virtual Device
- Preferrable & Stable Choice - API 22(Android 5.1.0), Screen size of around 800 X 1280, 1024 MB Memory --> eg. Google Nexus 7, Google Nexus 5
- Import the project into Android Studio by: Import a gradle project option All the plugins required are explicitly stated therefore can work with any Android Studio version - Just enable it to download any packages not available offline
- Open Genymotion and Run the Virtual Device created previously.
- Run the app on Android Studio and chose the Genymotion Emulator
- (Optional) Open the app, open the app menu > Settings > Change url to your
server-url:port. eg Point to Ona OpenSRP test server athttp://46.101.51.199:8080/opensrp.
Note Ona OpenSRP test server may not be up. You can follow this Docker Setup and this Docker Compose Setup guide for setting up your OpenSRP and OpenMRS Server.
-
Login using Sample Credentials(Provider Credentials) eg.
Username: biddemo Password: Linda123
Note: If the genymotion emulator crashes on pressing the Login button, use the Enter Key on your keyboard - (Reason for Crash) Genymotion emulator seems to have a bug

-
An activity with a list of patients (Child/Woman) is displayed with the following information.

-
Patient pictures
-
Patient Name
-
Age - In days, months or years
-
Weight -If recorded, otherwise click on the button to record the weight currently or in the past
-
Non-recurrent vaccine which is due in terms of duration eg. 6 weeks vaccine, 1 month vaccine --> They are color-coded based on how-long-due
Color Meaning Green Administered/Given recently Red Overdue Blue Due soon (Due today OR Within 10 days after due-date ) Light Blue Upcoming White Upcoming but not due anytime soon -
Top Bar (Blue in Color) with:
- ZEIR title - Zambia Electronic Immunization Registry
- Current Health Facility OR Health Facility Zone
- Add Patient Button (Plus icon)
- Notification Icon showing total patients number who are DUE or OVERDUE
- Search Icon - Advanced search or Global Search
-
Second Bar (Dark Grey in Color) has the following:
- Search bar - Enter patient name OR Patient ID to search
- Search patient by Scanning QR Code
This opens a page which contains the immunisation history in a vaccine card.
- Patient name
- Patient Weight (Two Options Available: Record past OR Current weight)
- Patient Weight Graph
- Patient's Date of Birth - Written as
DOB: 30/04/2016 - Patient's Sibling's - Their pictures or Name Abbreviations
- Patient's Recurring Immunisation and Other Health Services eg. Vitamin A, Deworming
- Other Periodical immunization services & Their status in the Vaccine Card (Service given, service due, service overdue, service delivered in the past).
- a Ticked box which shows that is was administered
- a White box only shows that is has not not been administered due to a past service - That is, it has not been triggered or not-
- Record multiple immunisation services provided by clicking on the Record all button at the respective service provision duration eg. 6 weeks, 14 weeks, 9 months,
As shown below:

A dropdown menu appears with a list of the Health Facility Zones + Health Facility. The health facility name is the first, the rest are branches/zones of the health facility.
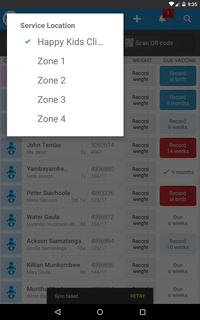
When chosen:
- A Health Facility - A list of patients in that health facility from the various health zones will be shown. Arranged in descending order with the latest patient to be served at the to.
- A Health Facility Zone - A list of patients in the specific Health Facility zone(Branch of the Health Facility) is shown. Arranged in descending order with the latest patient to be served at the to.
A form to add a new patient to the current chosen Health Facility OR Health Facility Zone is openned.
As show below:
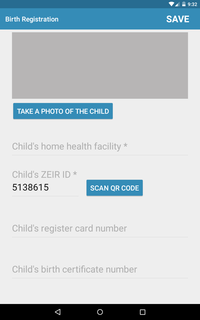
The following details can be added:
-
Photo of the Patient(Child)
-
Child's home health facility (Current Health Facility/Zone selection by the provider)
-
Child's ZEIR ID
-
Child's Registeration Card Number
-
Child's Birth Certificate Number
-
Child's First Name
-
Child's Last Name
-
Child's Sex
-
Child's Date of Birth
-
Date that the child was first seen by the provider
-
Child's Birth weight
-
Child's Mother/Guardian:
- First name
- Last name
- Date of Birth
- NRC Number
-
Child's Father/Guardian:
- Full name
- Date of Birth
- NRC Number
-
Child's Place of Birth
-
Child's Residential Area
-
Home Address
-
Landmark
-
CHW name
-
CHW Phone Number
-
HIV Exposure:
Abbreviation Option Meaning CE Child Exposed MSU Mother's State Unknown (The mother's HIV status before birth of the child was not checked) CNE Child Not Exposed
This opens another activity where the provider can perform an Advanced Search or Global Search of a patient.
This patient search enables one to search using other conditions or characteristics.
- Using other search conditions such as
- Patient/Child Active status
- First name/Last name
- Mother's/guardian's name(s)
- Date of birth within a certain range
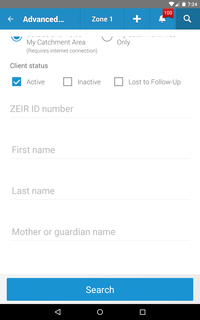
The global search enables the provider to search for a patient outside and inside the current health facility zone using the Advanced Search above
The search bar enables the provider to search for a patient by name or ZEIR ID.
Another activity will open and enable the phone camera for which one can scan the patient ID's QR Code as shown below. After the scan is complete, a patient(s) who matches the ZEIR ID scanned will be displayed.
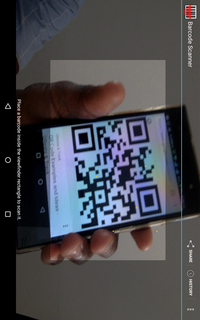
In case a match is not found

There is a slide menu on the left in the Main Menu. This slide menu displays:
- The current provider's name & their initials eg
Moh Zeir Demo-MZ - Plus Button to add a patient
- Sync Button - Manually sync records
- Submenu with:
- ZEIR - Current Page
- HIA 2 Reports - View, Send and Edit HIA2 Reports
- Stock Control - Stock Control page which enables the provider to:
- Update stock levels with
newly issued vials - Confirm stock levels
- View stock levels for all drugs, vaccines and/or supplements -
vials&dosesavailable - Perform stock planning
- Adjust stock levels to the available number - For special cases & reason has to be provided
- Update stock levels with
Coming soon...
This project depends on the following OpenSRP modules/libraries:
- OpenSRP Client native form
- OpenSRP Client Core
- OpenSRP Client Immunization
- OpenSRP Client Growth Monitoring
opensrp-client-path
|__ opensrp-path
   |_ build
   |_ src
      |_ androidTest
      |_ main
         |_ assets
             |_ fonts
             |_ json.form
         |_ java
             |_org.smartregister.path (main package)
             |_utils
   |_ test
The project mainly uses Junit & Mockito for tests which are all placed in the test folder