A web based dApp created for Playchemy that decodes playable video game characters from the Ethereum blockchain and stores them on a local database.
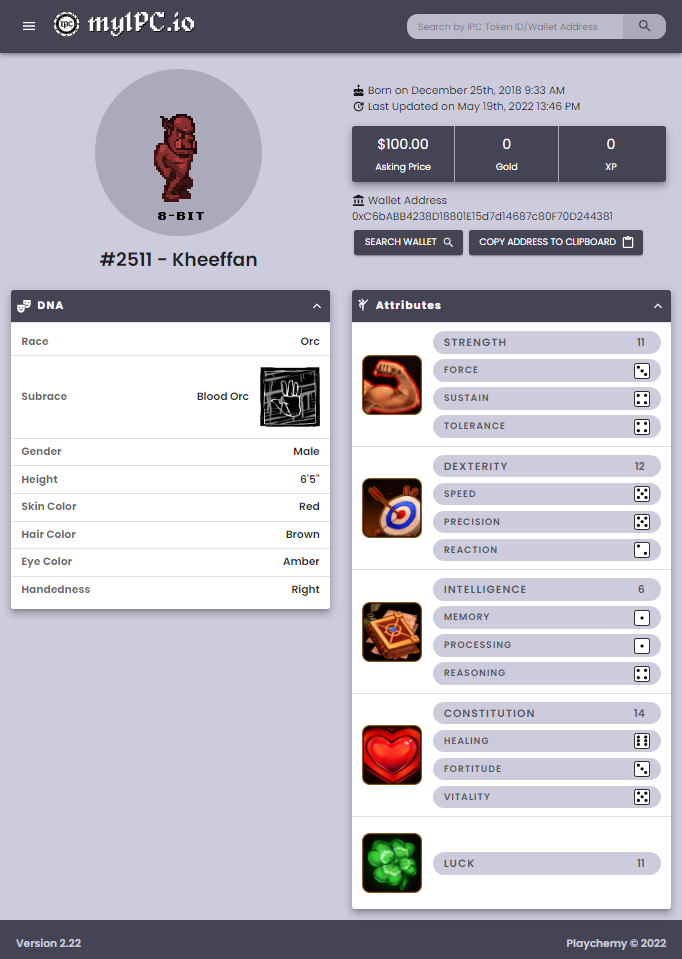


- Reads IPCs (Immortal Player Characters) from the Ethereum blockchain and parses their data.
- Uses a PostGres database to cache data in the event the Ethereum blockchain is down.
- Uses a backup JSON file in the event that both the PostGres database and Ethereum blockchain are down.
- Generates animated GIFs for each character and preview cards used for social networks.
- NodeJS backend accepts RESTful queries of IPCs and Wallets containing IPCs.
- Responsive UI designed for desktops, tablets and phones!
This is a live version of the repo.
- NodeJS
- PostGres
- Web3 Provider like Alchemy.
- ReactJS - (Optional for frontend development).
git clone https://github.com/JohnnyLdeAlba/myipc.ioGo into the folder react/src and rename _config.js to config.js.
The configruation file, config.js, contains an associative array with values that control different aspects of MyIPC.io's
services. Setting up some of these values are mandatory in order to get the system operational.
The following variables found in config.js must be properly set up.
IPCDB_USERNAMEThe username for the PostGres database.IPCDB_PASSWORDThe password for the PostGres database.IPCDB_DATABASEThe name of the PostGres database that's going to be used.IPCDB_HOST(Optional) The server the PostGres database is hosted on.IPCDB_PORT(Optional) The port used by the PostGres server.
In order to connect to the Ethereum Mainnet you're going to need a Web3 provider. Alchemy provides different service tiers including a free one. You'll need to create an account in order to get an API key.
IPCDB_WEB3_PROVIDER: "https://eth-mainnet.alchemyapi.io/v2/{API_KEY}"If you plan to use Alchemy you can use the url above, just be sure to replace {API_KEY} with your own API key.
PUBLIC_ROOT is used to set the directory where the MyIPC.io app can be found. Typically this would be set to "/" or the root directory, e.g. if you type in a website such as https://myipc.io the MyIPC.io app should be the first thing to load.
Alternatively you can set PUBLIC_ROOT to a sub directory such as "/ipc" which in turn tells the MyIPC.io app that the website is located in the sub directory https://myipc.io/ipc. This is useful when working on it in development mode as there may be setups that won't allow the MyIPC.io app to be located on the website's root directory.
PUBLIC_ROOT: "/"Once you have a PostGres database set up and have put those credentials in config.js it's time to install the database and load it with IPC data.
MyIPC.io comes with two files for generating a new database: backup.json, which is a copy of the Ethereum blockchains IPC database, and ipc-install.js,
a script that can be used for both creating a new database and restoring an existing database. This script is also responsible for generating preview cards used by Twitter and Facebook and animated gifs used for each IPC.
node ipc-installYou can generate backups of the database by using the script ipc-backup.js, this replaces the exisiting backup.json file with a fresh copy.
It is recommended to do this frequently in the situation where the backup PostGres database crashes.
node ipc-backup/The root directory where the NodeJS based backend is located.reactThe directory where the ReactJS based frontend is located.react/src/config.jsA configuration file shared by both the backend and frontend.react/public/backup.jsonA backup JSON based database used in case both the Ethereum network and PostGres databases are down.react/buildA final build of the frontend used by the backend when it is in "Production Mode".react/publicA folder used by the frontend during development with all the websites resources.
To run the MyIPC.io app in development mode be sure to set the config.js setting config.DEVELOPMENT_MODE to 1.
By doing so this signals the backend to use a proxy to ReactJS's development environment which is located at 127.0.0.1:3000.
When config.DEVELOPMENT_MODE is set to 0, the backend searches for the front end in the react/build folder, which contains
a static, final copy of the frontend produced by ReactJS.
To get the MyIPC.io app running, go to the root directory and type in the following to start the backend. The backend also doubles as a server for the app and is the overall foundation of the system.
node indexThe next step is to get the frontend loaded in ReactJS's development environment. You can do this by going into the directory react and typing the following:
npm startTo view the app, open a browser window and type in 127.0.0.1:2000.
As with any ReactJS app, you can modify the files and generate a final build by typing in the following command:
npm buildPort 2000 is used by the NodeJS backend. Port 3000 is used by the ReactJS frontend.
Running in production mode is the same as the steps above, except you'll want to have the config.js setting config.DEVELOPMENT_MODE set to 0.
After that just run the command node index to load the backend and that's it. There is no need to load the frontend as it will be
read from the build folder which contains a static copy.
config.js contains many optional settings that can alter the behavior of MyIPC.io. It is recommended to leave these settings alone unless they can remedy a possible issue.
IPCDB_WEB3_CONTRACTADDR: "0x011C77fa577c500dEeDaD364b8af9e8540b808C0"This is the contract address that controls all the IPCs, there should be no reason to change this unless all the data has been migrated over to a new contract.
IPCDB_WEB3_TIMEOUT: 1000Most WEB3 providers require a timeout period before communicating with the blockchain, this is to prevent attacks against the network. The timeout period is currently set to 1 second. If calls to the Ethereum network are failing then try extending this time.
IPCDB_IPC_NEXTUPDATE: SECONDS_DAY * 1Services like Alchemy have limits on their free tiers that if reached will prevent access to the Ethereum network. To prevent this, MyIPC.io uses two databases for backup, the main being a PostGres database. By default this database pulls data from the Ethereum network once a day. By changing the value of IPCDB_IPC_NEXTUPDATE, you can shorten that period or extend it.
IPC_LIST_LIMIT: 24IPC_LIST_LIMIT determines how many IPCs are shown per page when viewing a wallet.
A query to the MyIPC.io app can return a number of useful data regarding IPCs and Wallets that may contain them.
To query for an individual IPC, type in the following URL but replace {TOKEN_ID} with a number representing
the desired IPC you're looking for.
https://myipc.io/token_id/{TOKEN_ID}
You can also scan a wallet to see if it contains any IPCs. To do this type the following url into a browser and replace {WALLET_ADDRESS} with the desired wallet address. Then replace {PAGE} with 0, and {TOTAL_PER_PAGE} with the total number of IPCs you'd like returned (if the wallet contains any). You can also set {PAGE} to any number you like with {TOTAL_PER_PAGE} as the total number of IPCs displayed per page or list.
https://myipc.io/wallet_address/{WALLET_ADDRESS}/group_index/{PAGE}/group_limit/{TOTAL_PER_PAGE}