This repository has some basic files which you can clone or fork, add to, and then add back in to the repository using a pull request.
They provide a useful introduction to JavaScript, but also to collaborating on a project using GitHub.
Before starting, make sure you have the following:
- An account on GitHub
- You have downloaded and installed GitHub on your local machine (laptop, whatever)
- When setting up GitHub on your own machine it will create a folder to store your GitHub repositories (sub-folders and files). Make sure you know where that folder is (you will be asked where you want to put it, generally in Documents).
- You might also prefer to download a decent text editor like Atom, Sublime Text or TextWrangler rather than using your computer's own default text editor.
Log in to GitHub and go to the repository at https://github.com/paulbradshaw/jsintro
Click on the fork button in the upper right corner to add it to your own GitHub.
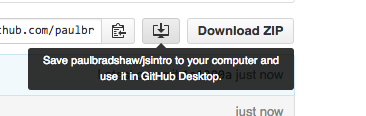
Then, in your new, forked, version of this repo click on the clone or download button: it looks like a TV/monitor with a downward arrow. You can find it next to the Download ZIP button.
This should open your GitHub client (software) and download that repository (folder). Put in plainer language: it will create a folder with the same name in your own machine's GitHub folder (this was created when you installed GitHub) and a copy of all files in that repository.
You will be asked where you want to put it, and the default option will be within your GitHub folder. That's fine.
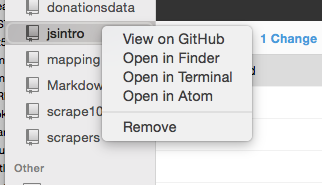
Find the folder on your machine where that new folder was just created. One way is to right-click on the name of the repository in your GitHub client and select View in Finder (on a Mac) or something similar on a PC.
This should contain all the files from the repository you just cloned. You can now edit files and add new ones.
There is a HTML file in the repository. Here is the main section:
<p id='showme'>0</p>
<img src="http://www.breederretriever.com/photopost/data/591/Picture_126_640x480.jpg" id="empty" onclick="potato()">
<script>
var score = 0;
function potato() {
score = score+1;
var image = document.getElementById('empty');
document.getElementById('showme').innerHTML = score;
}
</script>
This has a small amount of HTML, and some JavaScript within <script> tags. Open this file on your local machine using a text editor like TextEdit or Notepad. It's useful to download a better text editor like TextWrangler.
The HTML creates the page's basic elements:
- a paragraph with a 0 in it;
- an image
Note that those two elements have some attributes. These are going to be very important:
- The
<p>tag has anidattribute with a value of'showme' - The
imgtag has asrcattribute, aidattribute, and anonclickattribute. That last attribute is what starts everything off, as we'll find out.
The JavaScript does two main things:
- Create a variable:
var score = 0; - Create a function called 'potato':
function potato() { ... }
Everything else is inside that function. Here's what happens:
- Firstly, the function has no parameters (note the empty brackets after
potato) - Inside the curly brackets
{ ... }are the things that happen when this function runs. - First, the variable
scoreis changed to now be what it was, plus 1:score = score+1; - The next line is best read from right-to-left: on the right of the equals signs, it grabs any elements on the page that have an id='empty':
document.getElementById('empty') - It then puts these elements into a variable it calls 'image':
var image = document.getElementById('empty'); - Finally, it grabs any elements with an id="showme", and uses
.innerHTMLto set the HTML inside those elements to the value of the variable 'score':document.getElementById('showme').innerHTML = score; - Don't forget that all these commands inside the function need to be finished with a closing
}
Now I said that the onclick attribute of the img was key. This says 'when this image is clicked, do something'. The something in question is the name of a function, followed by (empty) parentheses.
That function is potato(), and it refers to the function created in our JavaScript.
Everything inside that function - in the curly brackets { } - is what runs. As explained above, that means the variable score is increased by 1, the function looks for anything with an id='score', and then it sets the contents of that to whatever score is.
The first time this runs, score is turned from 0 to 1, and that 1 is put in the <p> with the id attribute described.
The second time, score goes up again to 2, and that's again put in that <p> tag.
Open this HTML document in a browser and click on the image to see this happening.
Now, on your machine, make some changes to that HTML document in your text editor: start with simple additions. For example:
- What if you add another element with
id='showme'? - What if you change the function to increase by more than 1?
- What if you change the name of the function? Does it still work? How can you fix it?
- Can you add an element with a different
idattribute value? How can you change the function to affect that? - What if it was
class="showme"? How would you change your function to grab that?
Preview the effects in a browser.
Once you have made those changes on your laptop (not online), save them and go on GitHub on that machine:
- You should be able to see the changes in green (new) and red (old).
- Add a summary of those changes below
- Click on the 'commit to ...' button below
- In the upper right corner will be a Sync button. Click this to sync with your online GitHub
- In the same corner, just above, is a button which represents the pull request. Click on this to send a request to the original author of this file which you cloned - they can decide to merge your changes with their file.
Note: you will need to be added as a contributor to a repository in order to make pull requests.
For a bigger challenge, try rewriting the HTML with jQuery, which is much much better for this sort of functionality.
jQuery is a JavaScript library: libraries are collections of functions which have already been written to solve a common problem.
In the case of jQuery, that problem is 'how do I handle user interactions and webpage behaviour'. So for example it includes built-in functions to handle events such as mouseover, hover.
Those interactions are called 'events' and you can see a full list of 'event handlers' on the jQuery documentation here
Webpage behaviour is called effects and again the jQuery documentation has a list of all the effects it can help happen here
A third category is 'manipulation': changing elements of the webpage (referred to as the DOM in the jargon). A list of jQuery functionality in this category can be found here
To find out more about jQuery try one or more of the following:
- This playlist of tutorial videos by LearnCode.academy
- The free interactive ebook jQuery Fundamentals
- Mindy McAdams's jQuery tutorials and slides
D3 is pretty useful too.
And Node.js.
And Angular.
And React.js.
I could go on...