This project contains the build instructions and necessary firmware to build an escape room using MakeCode and micro:bit. This room was originally build as a birthday activity; it worked great with kids and adults!
SPOILER ALERT If you read those instructions, it will be much less fun to play the room.
The plot of the room is fairly basic and can be tweaked to fit your liking:
- play players have a fixed time to find and disable the bomb (the clock micro:bit displays countdown)
- the bomb mechanism (the bomb micro:bit) is inside in a box
- the box is locked by a physical combination lock
- the key of the combination lock is registerd in 4 micro:bit (lock micro:bit)
- each key micro:bit can be unlocked via a unique code transmitted using radio
- a micro:bit device is available in the room to transmit codes (rotary phone or binary encoder phone micro:bit)
- codes are hidden in the room one way or the other
- a game master micro:bit allows the operator to monitor the status of the system and control the clock.
Around those basic principles, you'll want to build a story that fits the theme of your party or the room ambience. Feel free to remix and modify as you need it.


The materials below are based on hiding code using UV markers and UV light. It's a fun way to place secret numbers in a room.
- 7 micro:bits, battery packs and spare batteries
- a UV light marker
- 2 UV flashlight, the same flashlight used to spot dog pee spots
- a box and a 4-digit combination lock for that box
- (optional) Music speaker and smoke machine
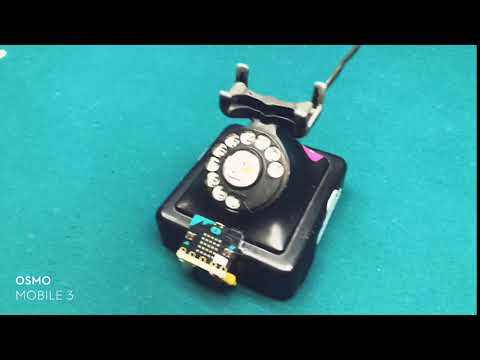
- (optional) a old rotary phone
- (optional) a old typewriter
The first task is to find and hide 4 codes in the room. Using the UV markers,
- you can draw a code as sticks on the wall,
- you can paint the numbers of a computer keyboard,
- find more ways to encode codes in your room!
If you are using the A/B encoder, keep the number short (1000-1000 range) as they will have to be encoded in binary over radio. Once you have picked 4 codes, marked them down on paper.
The room is composed of various micro:bit communicating. You will need to download the code in each micro:bit to get the room setup.
It's recommend to use double-sided tape to secure the battery pack to the back of the micro:bit and use clear tap + sharpie to mark each micro:bit with their roles.
The game master controls the clock, reset the game and log all messages.
- Update the game master source code with your codes!
- Download the program
- Connect the micro:bit game master to the editor to see the messages in the console.
Pressing A removes a minute, B adds a minute, A+B resets the clock.
If the detonator is disabed,the clock will show a WIN message.
If the time runs off, it will display a LOSE message.
The escape clock displays the time.
- Download the program
- Check that the clock displays time
Try pressing A/B on the game master and check that the clock is updating.
The escape lock is a micro:bit that controls a combination for a lock. It requires all locks to be enabled for them to show their digits.
- Change the digit for each micro:bit and download it.
Each lock is waiting for a code to be sent via radio.
The escape phone is a rotary phone driver to send codes over radio. Players use it to send codes to the locks.
- If you have a vintage rotary phone at hand, here is a guide to convert it
- Otherwise, numbers can be encoded as a binary sequence of A and B button presses (A = 0, B = 1)
The escape detonator, is a hidden micro:bit that needs to be disabled by pressing a button
- Download the program to 1 micro:bit
Once all the micro:bit have been prepared, you're ready to put it all together and get the escaping to work.
If you plan to modify the code, here's a bit of docs.
Received when a particular event happened on a device in the game.
Use this function register the code that renders the current state to the gizmo. If the game is lost or won, it will display the correct animation.
escape.onUpdate(function() {
})
This repository can be added as an extension in MakeCode.
- open https://makecode.microbit.org/
- click on New Project
- click on Extensions under the gearwheel menu
- search for the URL of this repository and import
To edit this repository in MakeCode.
- open https://makecode.microbit.org/
- click on Import then click on Import URL
- paste the repository URL and click import
- for PXT/microbit