A custom visual calendar for iOS 8 written in Swift.
This calendar is designed according to all object oriented patterns. There are a few types of objects where a particular instance does its specific stuff. I've tried to separate Views from all the stuff it shouldn't do itself (e.g. calculations, date management etc).
Types of Views:
- CVCalendarView — Control properties main container, manages practically all the init stuff.
- CVCalendarContentView — Content container, defined as a ScrollView, manages scrolling & loading.
- CVCalendarMonthView — Month container, takes responsibility for building WeekViews.
- CVCalendarWeekView — Week container, constructs DayViews.
- CVCalendarDayView — Fundamental unit, represents a simple day view.
- CVCalendarCirlceView — Auxiliary view for marking.
- CVCalendarMenuView — Menu container with weekdays' symbols.
First of all, we create an instance of CVCalendarView that creates CVCalendarContentView's one for containing all MonthViews. The CVCalendarContentView object creates a canvas for holding up to 3 CVCalendarMonthView instances. Only one MonthView can be displayed at the time so 2 other objects remain outside (on the left and right sides of the presented instance). When it's time for scrolling we figure out the direction and make a scroll either to the left or right MonthView, replacing it to the middle cell and then the empty cell is filled with a new MonthView.
Once an object of CVCalendarMonthView is created it initializes itself and creates CVCalendarWeekView instances depending on their count (which is calculated by CVCalendarManager). Each WeekView creates a set of CVCalendarDayViews. All the calculations (basically, it's about frames) are proceeded by specific (util) objects according to the user preferences (through delegates).
DayViews create CVCircleViews when they're highlighted as well as they remove circles on unhighlighting. CircleView is also used to represent a dot marker for marking some event. CVCalendarMenuView containts symbols of weekdays (it supports different languages).
Types of Utils:
- CVCalendarRenderer — Makes all frames' calculations.
- CVCalendarManager — Analyzes the given date.
- CVCalendarViewAppearance — Contains and manages all appearance delegate's input.
- CVCalendarDayViewCoordinator — Handles touch events on DayViews.
- CVCalendarViewAnimator — Manages selection animations.
Here everything is pretty obvious. CVCalendarViewAppearance represents an object that conforms to the corresponding protocol and as a result manages its stuff (either takes input from a user or gives a default value). CVCalendarViewAnimator also can be replaced with custom animations if it's necessary.
Types of Protocols:
- CVCalendarViewDelegate — Takes fundamental data.
- CVCalendarViewAppearanceDelegate — Defines methods for taking appearance stuff.
- CVCalendarViewAnimatorDelegate — The same for animation.
And there is one more type that represents a custom date:
- CVDate
Using CVCalendar isn't difficult at all. There are two actual ways of implementing it in your project:
- Storyboard setup
- Manual setup
So let's get started.
First, you have to add CVCalendar folder into your own project. (TODO: CocoaPods installation)
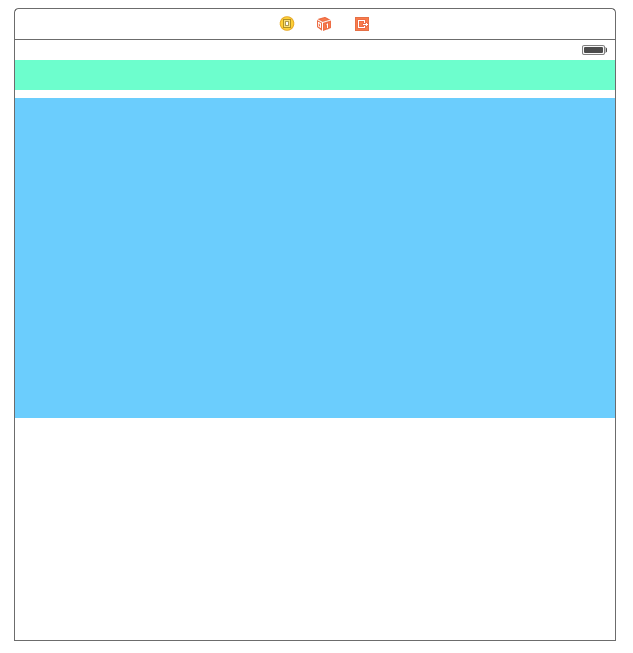
Now you're about to add 2 UIViews to your Storyboard as it shown in the picture below.
Don't forget to add 2 outlets into your code.
@IBOutlet weak var calendarView: CVCalendarView!
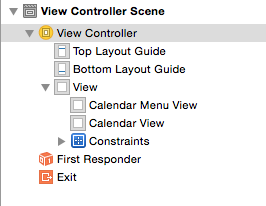
@IBOutlet weak var menuView: CVCalendarMenuView!Two views are representing ultimately a MenuView and a CalendarView so they should have corresponding classes. To change their classes go to Identity Inspector and set custom classes. When it's done, you'll see in the dock panel something similar to the picture below. (Blue UIView -> CVCalendarView, Green UIView -> CVCalendarMenuView)
Before we move to setting up delegates for customization stuff, you should know that CalendarView's initialization is devided by 2 parts: * On Init. * On Appearing.NOTE: Please note that both CalendarView and MenuView are calculating their content's frames depending on their own ones. So in your projects you may be editing the size of initial UIViews in the storyboard to reach an optimal content size.
As well as most of the developers are using AutoLayout feature UIView's size in the initialization does not match the one on UIView's appearing. Thus we have either to initialize ContentView with MonthViews and all the appropriate stuff on UIView's appearing or initialize stuff as UIView's being initialized and then simply update frames. The first option doesn't work since there will be a flash effect (the initialization will be finished after your UIView appeared) according to what the CVCalendar has 2 parts of creating.
Since CVCalendarView and CVCalendarMenuView will be created automatically all you have to do is this (in the ViewController that contains CVCalendar).
    override func viewDidAppear(animated: Bool) {
        super.viewDidAppear(animated)

        self.calendarView.commitCalendarViewUpdate()
        self.menuView.commitMenuViewUpdate()
}A long story in short or customizable properties:
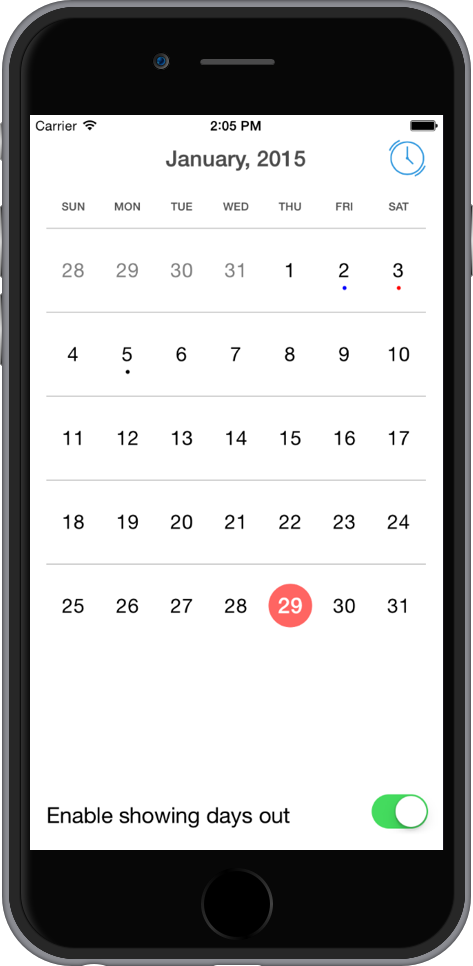
- Showing weekdays out
- Moving a dot marker on highlighting
- Showing a dot marker on a specific day view
- Dot marker's color
- Space between week views and day views
- Day view's label properties (color, background, alpha + different states (normal/highlighted))
Behaviour:
- Day view selection
- Presented date update
- Animations on (de)selecting day views
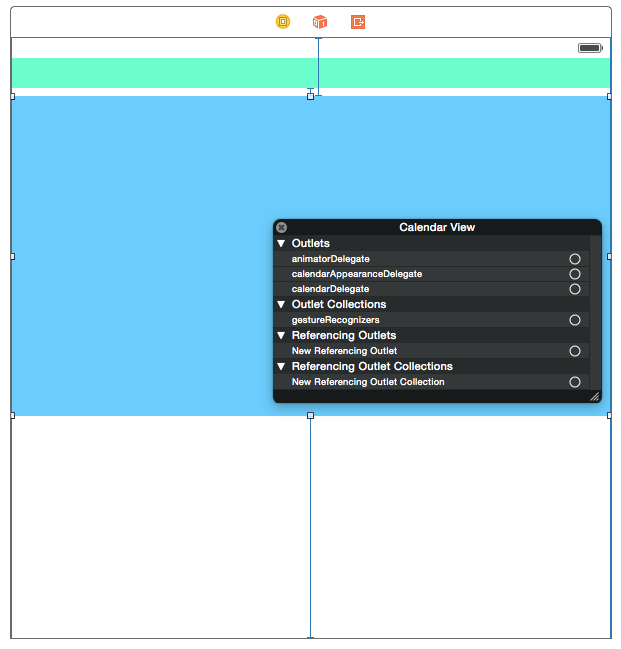
Finally we're going to customize properties. To make this possible you have to implement approptiate protocols. (You can see presented protocols and short descriptions in the Arcitecture Section). Open your Storyboard and do a right-click on CVCalendarView, you'll see the window with outlets and there are a few ones we actually need. Take a look at the picture to make sure you're doing everything properly.
Now depending on what you'd like to change you should implement a particular protocol providing methods for customizing that stuff. For delegates' API description take a look at [this page] (https://github.com/Mozharovsky/CVCalendar/wiki).
Do NOT forget to connect a particular outlet with your ViewController if you're implementing its protocol.
NOTE: CVCalendar defines default values for all the customizable properties (i.e. for ones defined in the presented protocols). Thus far if you don't implement protocols yourself the calendar will behave as it was initially designed.
If for some reason you'd like to setup CVCalendar manually you have to do the following steps.
Initialize CVCalendarView with either init or init:frame methods. I suggest to do it in viewDidLoad method. Do NOT put initialization in viewDidAppear: or viewWillAppear: methods! Then setup delegates if you're going to customize options.
For CVCalendarMenuView you simply initialize it as well as CVCalendarView and no delegates are available.
How it should look like.
    override func viewDidLoad() {
        super.viewDidLoad()

        // CVCalendarView initialization with frame
        self.calendarView = CVCalendarView(frame: CGRectMake(0, 20, 300, 450))

        // CVCalendarMenuView initialization with frame
        self.menuView = CVCalendarMenuView(frame: CGRectMake(0, 0, 300, 15))

        /*
         *  Note that setting up delegates as showed below is not necessary.
         */

        // Calendar delegate
        self.calendarView.calendarDelegate = self

        // Appearance delegate
        self.calendarView.appearanceDelegate = self

        // Animator delegate
        self.calendarView.animatorDelegate = self
    }
And do not forget to commit updates on viewDidAppear: method.
    override func viewDidAppear(animated: Bool) {
        super.viewDidAppear(animated)

        // Commit frames' updates
        self.calendarView.commitCalendarViewUpdate()
        self.menuView.commitMenuViewUpdate()
    }
Here you go.
For some additional funcionality there are a few handy techniques which can be useful for your app.
You might want to use a specific first weekday in CVCalendar. And it's possible to set any weekday as the first one.
NOTE: Initilially, CVCalendar's figuring out your system calendar's first weekday and sets it as its own.
Open your Info.plist and add a new Number cell with name CVCalendarStarterWeekday. Then set the appropriate value. Note, that the minimal value is 1 and the maximal is 7. (Sunday ... Saturday).

It's possible to toggle from any month view to any month view by calling a special method in CVCalendarView and passing any date of this MonthView you wish to present in the calendar. For example, let's make a @IBAction method that is connected with Today button and toggles to the present month.
    @IBAction func todayMonthView() {
        self.calendarView.toggleTodayMonthView()
    }
As well you're able to toggle to any month. Let's create a method that changes MonthView with the given offset of current month.
    func toggleMonthViewWithMonthOffset(offset: Int) {
        let calendar = NSCalendar.currentCalendar()
        let calendarManager = CVCalendarManager.sharedManager
        let components = calendarManager.componentsForDate(NSDate()) // from today

        components.month += offset
        components.day = 1 // CVCalendar will select this day view

        let resultDate = calendar.dateFromComponents(components)!

        self.calendarView.toggleMonthViewWithDate(resultDate)
}Also you can simply switch between next and previous MonthViews relatively to the presented one. Let's say the presented MonthView is January then the previous one is December and the next one is February if you have special buttons ("<" - to the previous, ">" - to the next) the following methods will help you easily switch between MonthViews.
For loading next MonthView.
self.calendarView.loadNextMonthView()For loading previous MonthView.
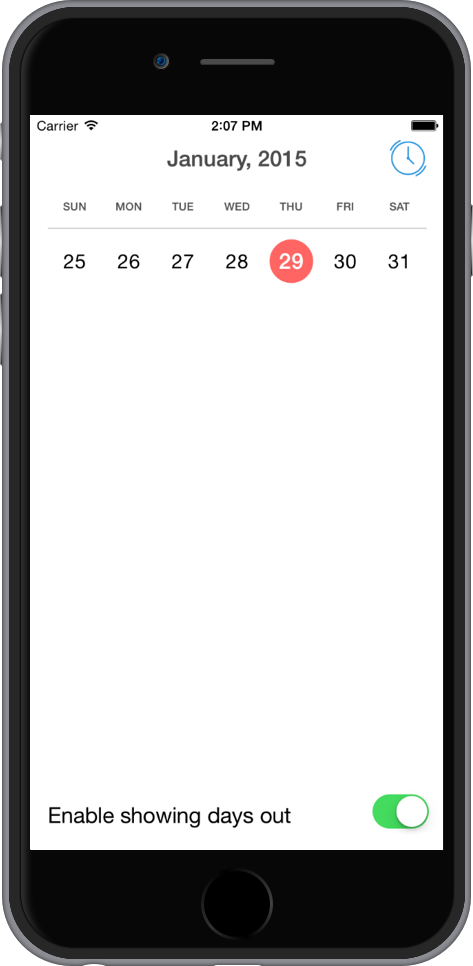
self.calendarView.loadPreviousMonthView()It's possible not to show days out of the presented month. First, CVCalendar provides a special method for (un)hiding days out with animation. Second, once you've made days out hidden ones it doesn't mean CVCalendar won't show them anymore. You also have to pass an appropriate value in shouldShowWeekdaysOut: method to notify CVCalendar you don't want to show days out.
For animatible hiding.
            self.calendarView!.changeDaysOutShowingState(true) // just hide days out in loaded Month Views
            self.shouldShowDaysOut = false // passing value for 'shouldShowWeekdaysOut:'
Unhiding.
            self.calendarView!.changeDaysOutShowingState(false) // just unhide days out in loaded Month Views
            self.shouldShowDaysOut = true // passing value for 'shouldShowWeekdaysOut:'