There are two main components that need to be deployed:
Temporal Server: This service keeps track of workflows, activities, and tasks and coordinates workers' execution.Workers: These are compute nodes that run your Temporal application code. You compile your workflows and activities into a worker executable. Next you can run the worker executable locally or deploy it on Azure and it will listen for new tasks to process.
In this sample project, you will deploy a Temporal server on Azure Kubernetes Service (AKS) and a worker application on Azure Container Instances (ACI).

A Temporal server only required dependency for basic operation is a database. This sample project uses Azure Database for MySQL.
-
In Azure portal, create an
Azure Database for MySQL Flexible Serverresource. Take note ofAdmin usernameandPasswordfor later use. -
Under
Networkingtab, selectAllow public access from any Azure service within Azure to this serverso that temporal server deployed on AKS can access the database. -
Go to the database, select
Server parameters, search forrequire_secure_transportand set it toOFF.
NOTE: This is still safe since the network policy only allows internal traffic on Azure. However, in a production environment, you should consider using the secure transport by adding an SSL certificate.

-
Create an AKS cluster:
az aks create \
  --resource-group [Resource Group] \
  --name [AKS Name] \
  --location [Region] \
  --node-count 2 \
  --node-vm-size Standard_B2ms \
  --kubernetes-version 1.25.5 \
  --verbose
-
Enable
kubectlto access the cluster:az aks get-credentials \ --resource-group [Resource Group] \ --name [AKS Name]
-
Create secrets required for deployment:
kubectl create secret generic temporal-server \
  --from-literal db=mysql \
  --from-literal hostname=[MySQL API server address] \
  --from-literal username=[MySQL admin username] \
  --from-literal password=[MySQL admin password]
-
Deploy a Temporal server using kubectl:
cd service/deployment kubectl apply -f temporal-server-deployment.yaml kubectl apply -f temporal-server-service.yaml kubectl apply -f temporal-web-deployment.yaml kubectl apply -f temporal-web-service.yaml -
Access the Temporal Web UI via its IP address:


The sample worker app is a Java Spring Boot application that you are going to deploy on ACI.
-
Build a local Docker image:
cd worker
docker build . -t temporal-worker-app
-
Get the temporal server's public IP:

-
Run the worker app locally:
docker run -e TEMPORAL_SERVER_HOSTNAME=[Temporal Server IP] temporal-worker-app

-
Create an Azure Container Registry resource:
az acr create \ --name [ACR Name] \ --resource-group [Resource Group] \ --sku Standard \ --admin-enabled true -
Login to ACR:
az acr login \
  --name [ACR Name]
-
Push the local Docker image to ACR:
docker tag temporal-worker-app:latest [ACR Name].azurecr.io/temporal-worker-app:latest
docker push [ACR Name].azurecr.io/temporal-worker-app:latest
az container create \
  --resource-group [Resource Group] \
  --name [Container Name] \
  --registry-username [ACR Login Username] \
  --registry-password [ACR Login Password] \
  --image [ACR Name].azurecr.io/temporal-worker-app:latest \
  --environment-variables TEMPORAL_SERVER_HOSTNAME=[Temporal Server IP] \
  --dns-name-label temporal-worker \
  --restart-policy always
There are many ways to invoke a temporal workflow. In this sample project, you will use the Temporal CLI.
tctl \
  --address [Temporal Server IP]:7233 \
  workflow run \
  --taskqueue MAIN_TASK_QUEUE \
  --workflow_type MoneyTransferWorkflow \
  --input '"AccountA"' \
  --input '"AccountB"' \
  --input '"REF00001"' \
  --input 10000
The money transfer workflow will run and display the following result:

A dynamic DSL workflow requires three input parameters:
tctl \
  --address [Temporal Server IP]:7233 \
  workflow run \
  --taskqueue MAIN_TASK_QUEUE \
  --workflow_type DynamicDslWorkflow \
  --input '"customerapplication"' \
  --input '"1.0"' \
--input '{"customer":{"name":"John","age":22},"results":[]}'This workflow demonstrates how to use signals to extend timeout values of activities.
tctl \
  --address [Temporal Server IP]:7233 \
  workflow run \
  --taskqueue MAIN_TASK_QUEUE \
  --workflow_type ExtendTimeoutWorkflow \
  --input 10000
After invoking the above workflow, there is a timeout issue:

The reason being the default activity timeout is 15 seconds but the second and third
activity methods take 20 seconds:
  private final ActivityOptions defaultActivityOptions = ActivityOptions.newBuilder()
      // Timeout options specify when to automatically timeout Activities if the
      // process is taking too long.
      .setStartToCloseTimeout(Duration.ofSeconds(15))
      .setHeartbeatTimeout(Duration.ofSeconds(5))
      .setRetryOptions(retryoptions)
      .build();

  @Override
  public void start(long duration) {

    // The first activity method duration should be lower than the default
    // timeout value and always complete successfully.
    longRunningActivity.activityMethodA(duration);

    // The increased duration value in the second and third activity method
    // to ensure that they'll encounter a timeout issue if there is no change.
    longRunningActivity.activityMethodB(duration * 2);
    longRunningActivity.activityMethodC(duration * 2);
}cd worker/scripts/tctl
./signal_extend_timeout.shIn the script above, after invoking the workflow, tctl sends a signal to the workflow to increase the timeout values of the activity's methods.
Although it has no effect on the first activity since it's already running, it helps the second and third ones complete successfully.
tctl \
  --address [Temporal Server IP]:7233 \
  workflow run \
  --taskqueue MAIN_TASK_QUEUE \
  --workflow_type TripBookingWorkflow \
  --input '"mytrip1"' \
  --input 1000 \
  --input '"success"' \
  --input '"success"' \
  --input '"success"'
The workflow just completes successfully.
tctl \
--address [Temporal Server IP]:7233 \
workflow run \
--taskqueue MAIN_TASK_QUEUE \
--workflow_type TripBookingWorkflow \
--input '"mytrip2"' \
--input 1000 \
--input '"success"' \
--input '"success"' \
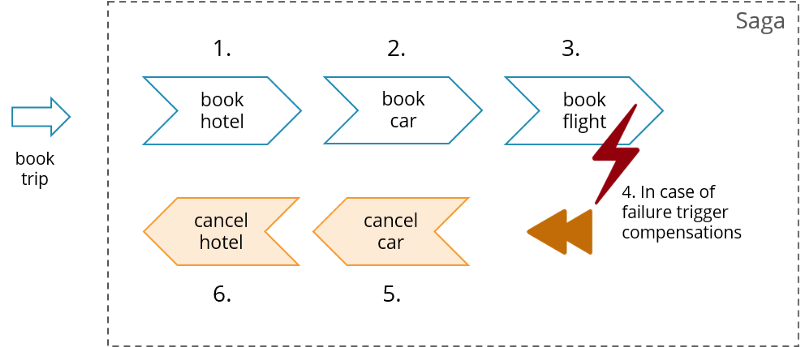
--input '"fail"'In this case, the flight booking has failed so the Saga implemention helps invoke the compensation methods for hotel and car reservations:

cd worker/scripts/tctl
./cancel_workflow.sh
In this case, an external signal is sent to cancel all running activities gracefully and the compensation methods are invoked.

./gradlew not foundissue when building Docker images on Windows:
- Solution: converting EOL to UNIX (LF) of the gradlew file.