The develope branch is the most up to date version for pupil labs glasses, if you are interested in using the software with tobii glasses 3 see the relative branch, which has been modified to work with the tobii pro 3 glasses, the software works as well as the other versions, but the documentation and part of the interface are not updated completely.
This script/application is part of my master's thesis project in MIXD developed at NTNU Gjøvik in the fall 2018 and spring 2019 semesters. The project aimed to experiment on the processing of eye tracking data, using an affordable eye tracker form Pupil Labs, for the measure of cognitive workload.
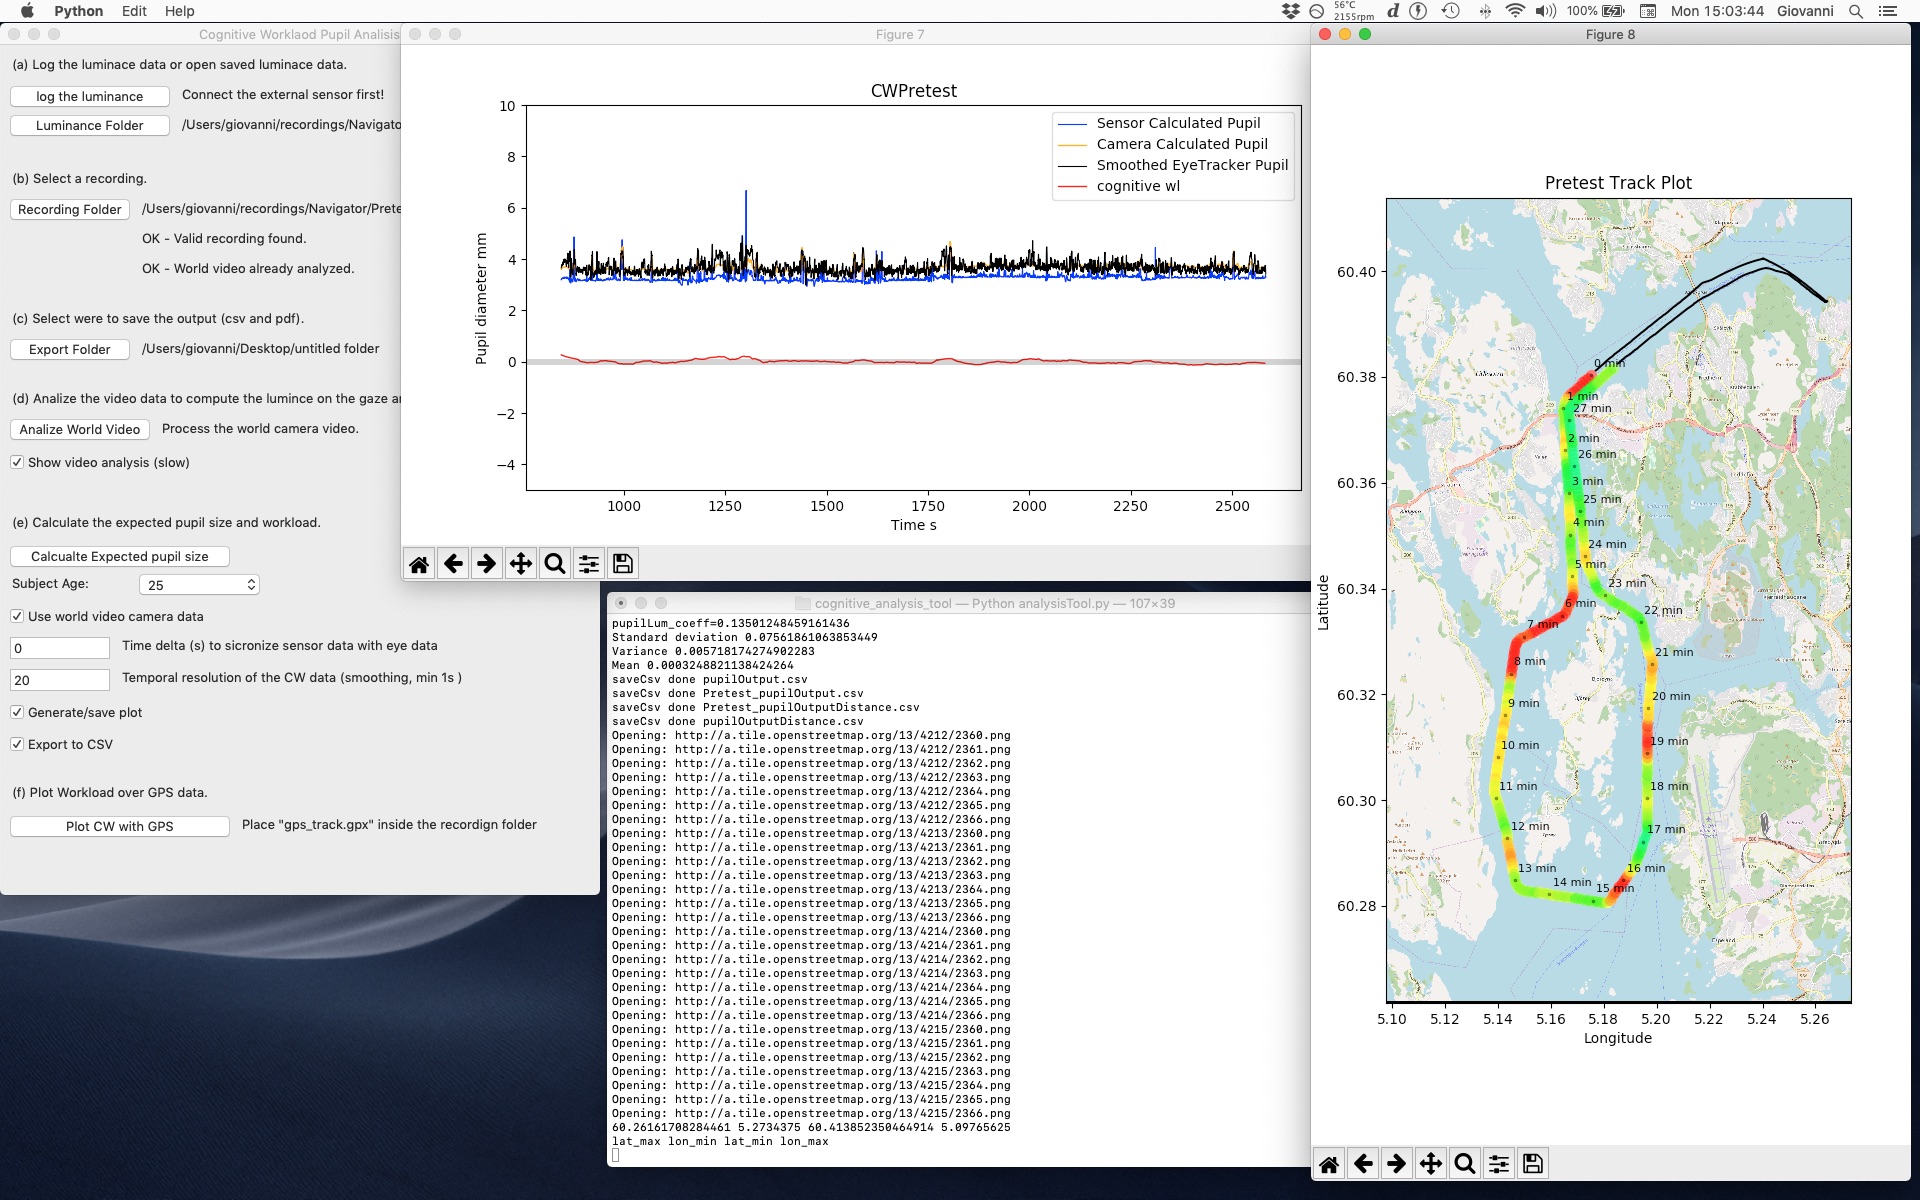 The tool user Interface.
The pupillary response (size of the pupil over time) is effected by the instantaneous cognitive workload level of the subject, higher workload results in a dilated pupil. Light intensity around the eye also has an effect on the pupil diameter as the pupil adjust to different luminosity.
This has historically limited the application of pupillometry to controlled laboratory study.
The scope of this software is to quantify the visual stimuli that the subject is receiving to subtract the effect of light from the pupillary response and allow the use of pupillometry in a filed condition with variable brightness.
This is done combining the gaze data and world video from the Pupil Mobile Eye Tracking Headset and calibrating it on the go with absolute luminance data from an external sensor Adafruit TSL2591.
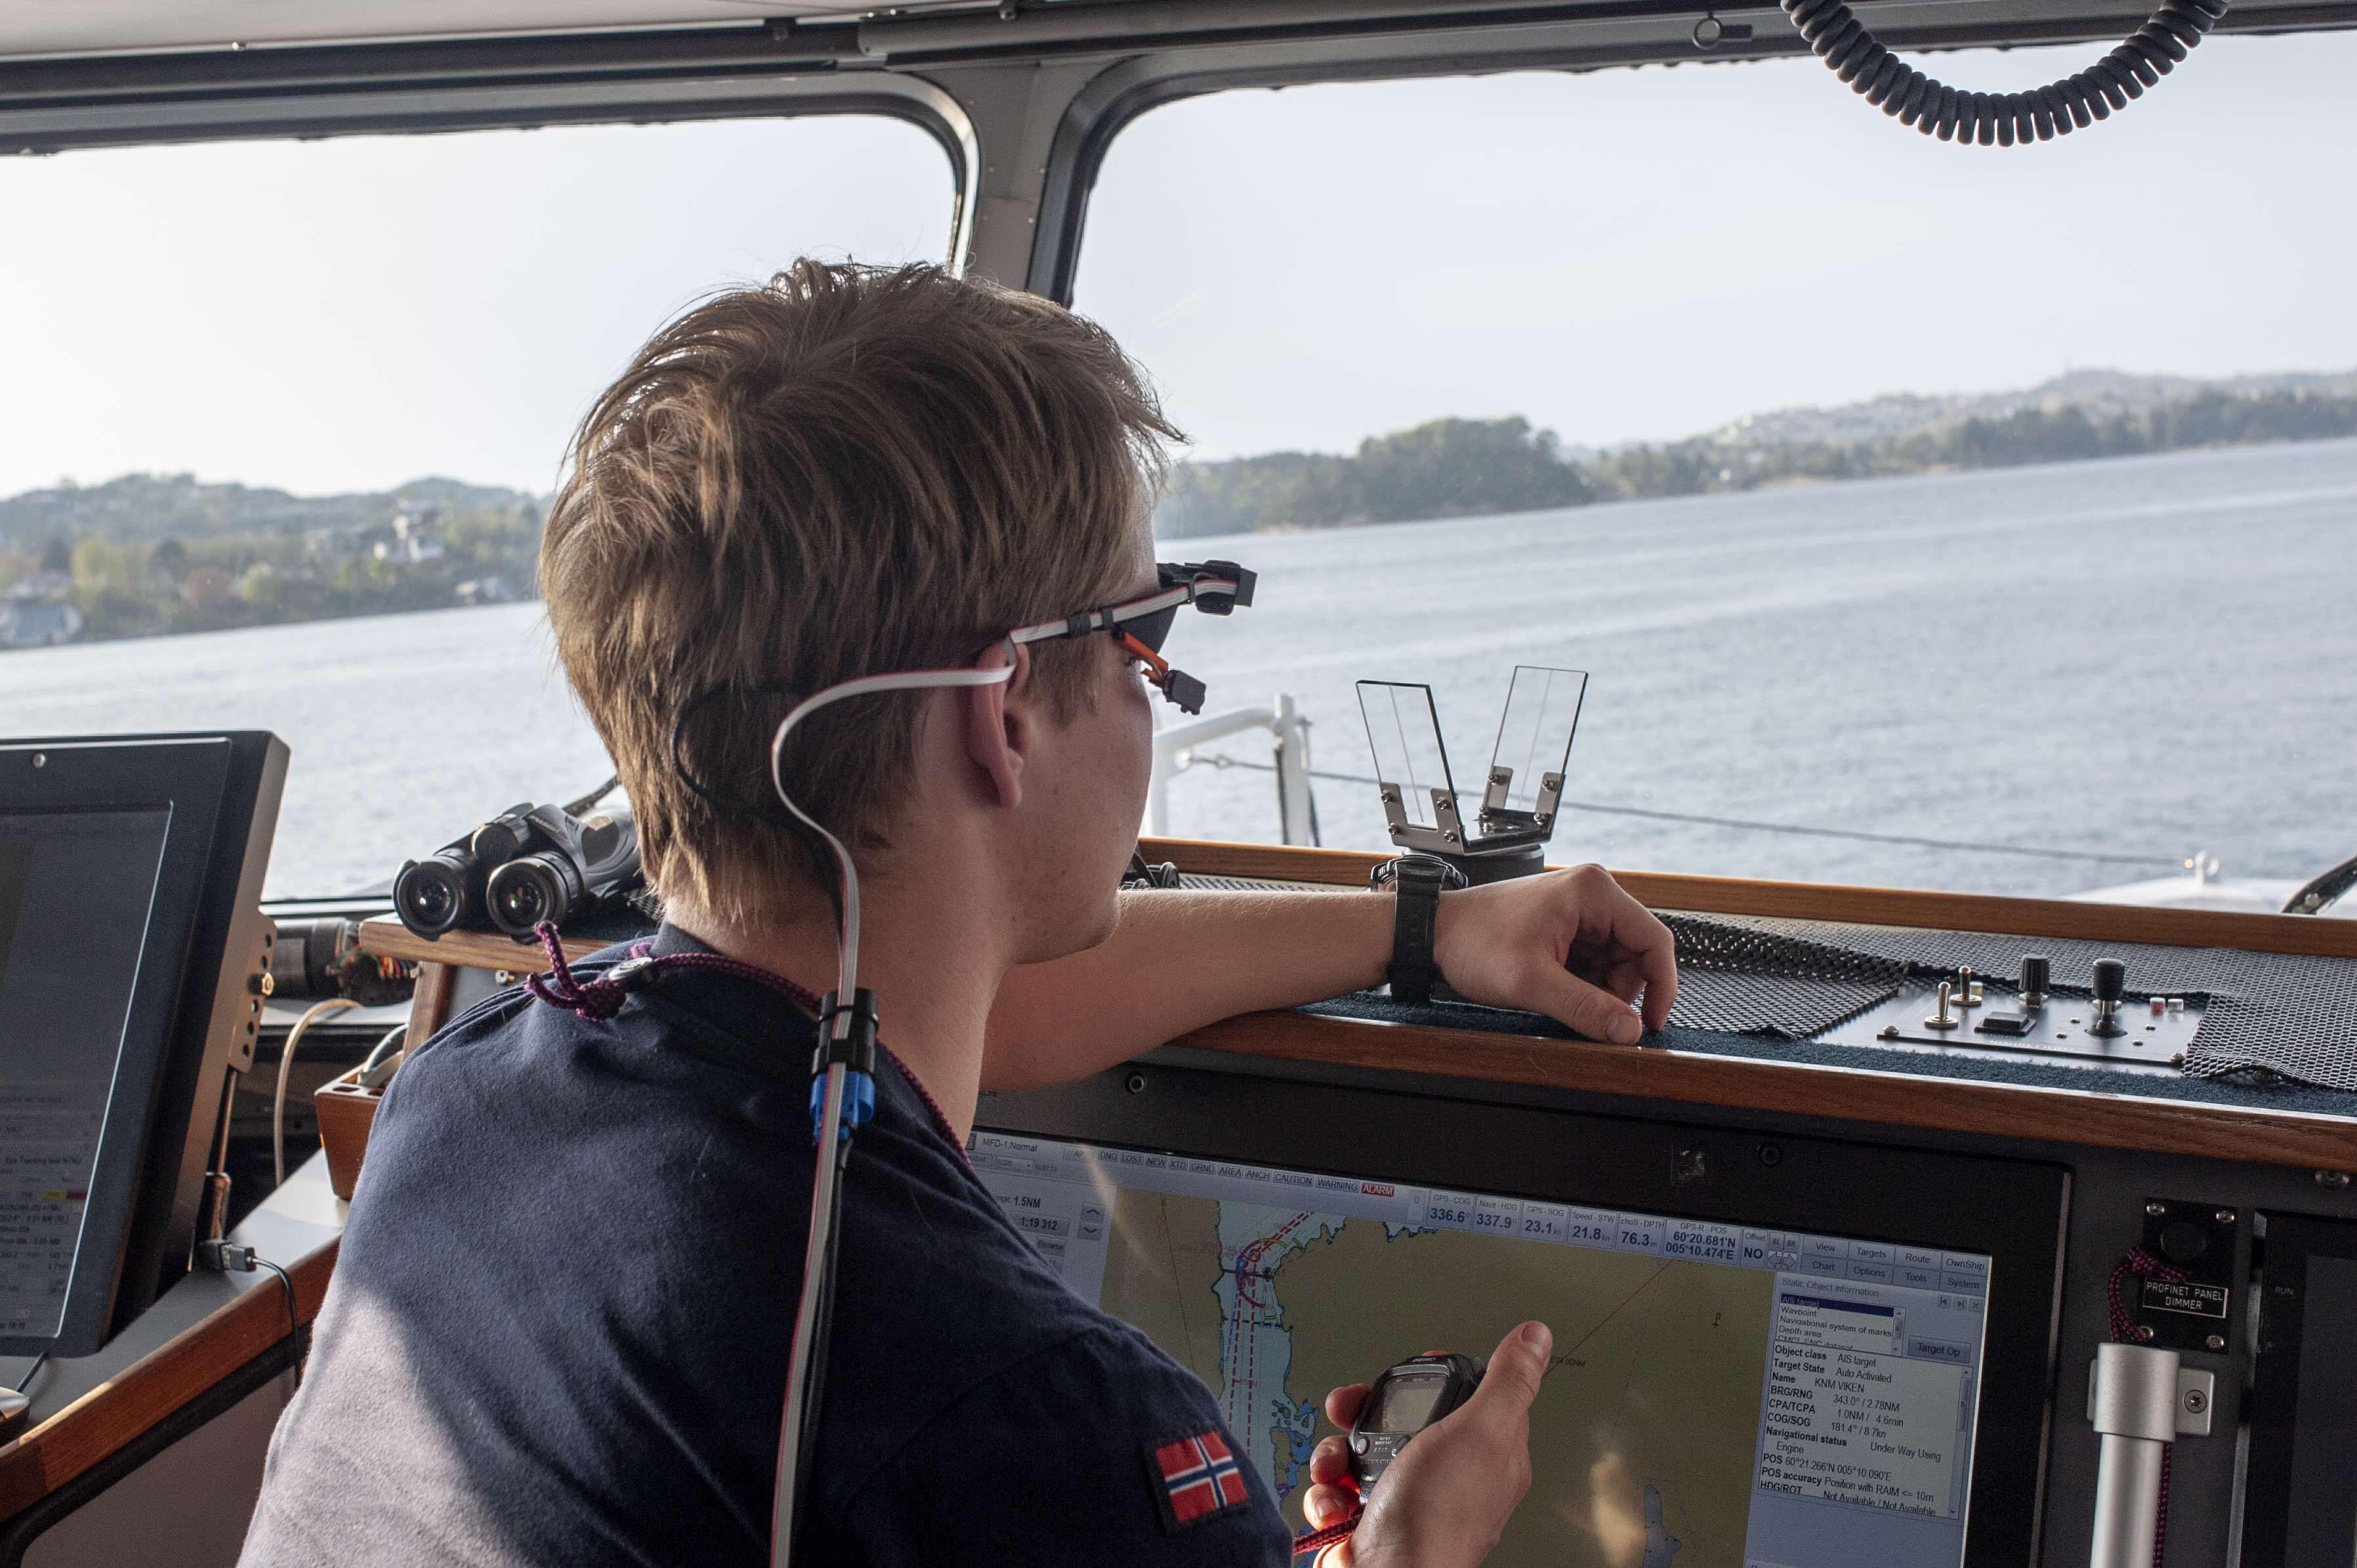 A participant wearing the eye trackers.
-
You should be familiar with the Pupil Mobile Eye Tracking Headset and the software suite that comes with it, be able to calibrate the gaze, make a recording and export it using the Pupil Player application.
-
Visit the Pupil Labs Docs for more information about the eye tracker and eye tracking software.
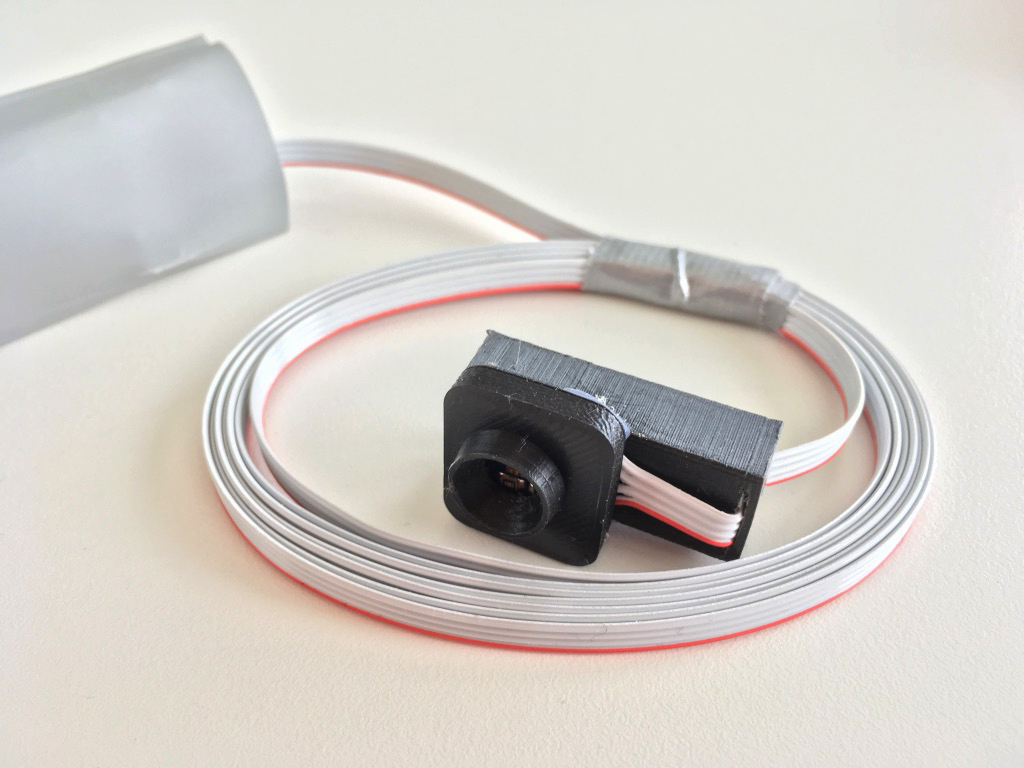
 The assembled eye tracker.
The workload analysis requires the use of an external Luminosity Sensor, the Adafruit TSL2591 board.
To be able to compute the workload you need to make sure to record the output of the light sensor during the recording. This can be done in two ways either by connecting the Microcontroller to your computer or saving the data on the SD card directly.
Saving to the computer ensures that the timing of the luminance data is in sync with the eye tracking data as both are recorded on the same machine (same clock). The RTC on the Arduino will drift several seconds every day compared with the time on your computer or smartphone. If you decide to save the luminosity data on the SD card, you will also have to manually re-sync the two, specifying how much the Arduino clock is ahead or behind the computer clock.
The luminance value is timestamped with a Unix epoch time. Unfortunately, the Arduino code doesn't handle timezones. The best way to handle this is to set the time of the RTC to your local time (if your pc says it's 11:30 the Arduino should also say 11:30) and then include the difference (e.g. for Europe CET you should include the UTC Offset: UTC +1 and add 3600 seconds to compensate).
 The Sensor and Logger.
-
To log on the Microcontroller, you only need to power it up.
-
To log on a laptop, you need to select a folder and press the "log the luminance" button.
-
In both cases, the data will be divided into one new .csv per hour, containing the luminance values saved at around 10Hz.
To mount the board on the eye-tracker, you will need a 3d printed hardware kit; it can be ordered from Shapeways or downloaded and print it with a generic filament printer. The .stl 3d model is inside the "Lux Sensor" folder; it includes the hardware to secure the sensor to the workload camera on the Pupil Headset and clips to do some basic cable management.
To assemble the data logger, you will need a four conductors flat cable and a microcontroller, code is included to use both an Arduino Nano or the more powerful Adafruit Feather M4 Express. The Adafruit Feather is quite handy because it can be connected directly to a lithium battery and be used as a portable data logger.
If you plan always to use a computer for the recordings you only need the Microcontroller, if otherwise, you wish to use The Pupil Mobile bundle and record on a smartphone you will also need a data logging shield for the Microcontroller.
Example of BOM:
-
Adafruit Feather M4, a powerful microcontroller with an included battery charger circuit.
-
Adalogger FeatherWing, shield with Real-time clock and sd-card reader.
-
CR1220 backup battery for the real-time clock.
-
Micro SD card 4-8gb is suitable for many days of logging.
-
Ribbon Cable, at least 3-4 meters if you use a computer, 1.5m if you use the battery and the data logger says on the participant.
Alternatives to the Adafruit boards is to use:
-
Arduino Nano as a microcontroller.
-
Nano Data Logging Shield Deek-Robot ID 8105 as a data logging shield.
You can flash your Microcontroller with the Arduino IDE and the respective Arduino code included in the "Lux Sensor" folder.
The Adalogger FeatherWing code requires the Adafruit_Sensor and Adafruit_TSL2591 libraries for the sensor and uses the RTC_PCF8523 RTC.
See the Adafruit documentation to get started:
-
Feather M4, how to use it with the Arduino IDE.
-
Adaloggher RTC Remember to set the time with one of the examples.
-
tsl2591, wiring of the sensor and libraries.
The Nano Data Logging Shield code requires the Adafruit_Sensor and Adafruit_TSL2591 libraries for the sensor and uses the DS1307RTC RTC.
Use the example code in the respective libraries to initialise the RTC.
The sensor connects to the Microcontroller through the SDA SCL, and it is powered with up to 5v.
Pinout of the tsl2591:
-
Vin, will take 3-5VDC safely, connect it to the 3V pin on the Feather
-
GND - common ground for power and logic, connect it to the ground pin on the Feather
-
SCL - I2C clock pin, connect to your micro-controllers I2C clock line (Labeled SCL on the Feather).
-
SDA - I2C data pin, connect to your micro-controllers I2C data line (Labeled SDA on the Feather).
The code is written in Python, but the GUI is in Cocoa, so it works only on Mac OS.
You need Python 3 installed on your machine:
To install Python, you should install Homebrew Open a new Terminal window and start typing:
/usr/bin/ruby -e "$(curl -fsSL https://raw.githubusercontent.com/Homebrew/install/master/install)"
This will also install the Command line Tools for Xcode. Then use Homebrew to install python 3 and Open CV, be patient, it will take a while.
brew install python3
brew install opencv
Measurements, calculations and plots are made with the following tools:
python3 -m pip install matplotlib
python3 -m pip install opencv-python
python3 -m pip install Pillow
python3 -m pip install numpy
python3 -m pip install adjustText
python3 -m pip install scipy
python3 -m pip install DateTime
python3 -m pip install pyserial
python3 -m pip install multitasking
This project uses pyObjC and vanilla for the user interface on macOS. You can install them with the following commands:
python3 -m pip install pyobjc
python3 -m pip install git+https://github.com/typesupply/vanilla
python3 -m pip install git+https://github.com/typesupply/defconAppKit
To run the software launch the python application Download the software folder "cognitive_analysis_tool" on your computer and execute the "analysisTool.py" file. This will assume that you have placed the folder in your home directory.
cd /Users/YOURUSER/cognitive_analysis_tool
python3 analysisTool.py
To record the luminance data select a folder to save the data by pressing Luminance Folder step (a). Press Log the luminance to start saving. The interface will freeze, but you should see the luminance value change in the terminal window. Press Ctrl + z to top the logging.
Once the Real Time Clock is set and the micro-controller is flashed with the correct software, and you have inserted a formatted (FAT32) micro SD card, you only need to power op the Microcontroller to start logging. Once finished disconnect the power and connect the SD card to your computer to retrieve the data.
Visit the Pupil Labs Docs for instruction on how successfully make an eye tracking recording. Only a few parameters should be adjusted:
-
World camera
- Use the wide-angle camera at 1280x720px to avoid excessive vignetting 30 or 60 fps at your discretion.
- Use automatic exposure.
- Keep the standard post-processing settings.
-
Eye Camera
- Preferably use the higher resolution setting 400x400px and highest frequency 120Hz.
- Use automatic exposure.
- Keep the standard post-processing settings.
-
Recording
- Gaze calibration is important if you wish to use the more advanced algorithm that uses the world video in conjunction with the luminance sensor, for static images or a diffuse field (e.g. fixed luminance in a laboratory condition) the sole luminance sensor will be sufficient.
Once you have made a recording, either with the mobile software or Pupil Capture process it with the Pupil Player to export the raw data.
- In Pupil Player Activate the "Raw Data Exporter" module and select all three options. Press the Export Button on the left side.
- It is not necessary to export the World Video.
- Pupil Player will create a "exports" folder inside your recording folder, and an incremental subfolder inside every time you press the export button, at this moment the Cognitive workload tool will always look at the first (000) Folder.
If you wish to plot the cognitive workload on a map inside the Cognitive workload tool, you can place a "gps_track.gpx" file inside the recording folder to be read by the software. Multiple applications can produce a gpx file, we tested myTracks for iOS and gpslogger for Android.
Pre-processing of the world video is required to improve the analysis of the visual stimuli; the script will go through the footage to identify the area around the gaze of the subject so that the algorithm can evaluate to what the eye was adapting (as opposed to a vaguer average luminance in front of the participant).
To pre-process the world video, select the Recording folder pressing the relative button, step(b) in the interface. Then press ** Analyse World Video** to start. If you wish to see how the algorithm is interpreting the area around the gaze select "Show Video Analysis", but consider that the process will run slower. Press "q" at any moment to abort the analysis.
An outputFromVideo.csv file will be saved inside the recording folder.
Make sure you select all the necessary folders:
-
Luminance Folder, containing the luminance data either saved with the computer or a microcontroller and then transferred over via an SD card.
-
Recording Folder, containing a recording that has been pre-processed with the Pupil Player app.
-
Export Folder, a folder to save the exported data, a copy will always be saved inside the recording folder, but it is helpful to have another in a single folder when working with multiple files.
-
Input the subject age.
-
Select whether you want to use the world video data (you need to pre-process the Wold video first).
-
Select a time delta if you need to re-synchronise the Luminance data (set to 0 if recording directly on the computer).
-
Select the temporal resolution; this is an indicative value of the usable temporal resolution of the output data, 1s is the minimum, and is to be used in a situation with low variability of luminance, in field condition values around 30s are a more reasonable compromise.
-
Decide whether to generate only a visual output or to save the output data-sheet.
RecordingNAME_pupilOutputDistance
- relative_wl, the linear distance between the expected pupil size and the measured pupil size, it represents the cognitive workload, 0 is the average workload for the given task, positive values are above average workload negative values are below average workload.
- timestamp_relative, Timestamp in seconds from the beginning of the recording.
- recording_name
- age
- timestamp_unix, Timestamp in UNIX Epoch.
RecordingNAME_pupilOutput
- timestamp_unix, Timestamp in UNIX Epoch
- timestamp_relative, Timestamp in seconds from the beginning of the recording.
- frame_n Relative frame number of the World Video.
- confidence Confidence of the pupil Algorithm
- mm_pupil_diameter_scaled Pupil Diameter in mm scaled so that the mean matches with the calculated pupil size.
- mm_pupil_diameter_calc_lux Pupil Diameter in mm Calculated using the Luminance sensor only.
- px_pupil_diameter_raw Pupil Diameter in px.
- recording_name
- age
- mm_pupil_diameter_calc_camera Pupil Diameter in mm Calculated using the Luminance sensor and the world camera.
To plot the GPS, you need to calculate the workload first and a "gps_track.gpx" file needs to be present inside the recording folder; an internet connection is necessary to download the background map from Open Street Maps.
This project is licensed under the MIT License - see the LICENSE.md file for details
The magicwand.py script has been adapted from Alexander Reynolds work magicwand, A Python+OpenCV implementation similar to Adobe Photoshop's magic wand selection tool.
The "Light Adapted Pupil Size" code has been ported from R to python and was originally written by Jose Gama CVD. And it is based on the publication by Watson A. B., Yellott J. I. (2012). A unified formula for light-adapted pupil size. Journal of Vision, 12(10):12, 1–16. http://journalofvision.org/12/10/12/, doi:10.1167/5.9.6.