Just as mentioned with my previous version, if you want to build this machine yourself you can download all the necessary files but I don't have enough time to give you much support so build it at your own risk! Also always be very careful with powertools, and only use them if you know what you're doing.
Check out the Wiki for specific milling info and parameter settings.
This work is licensed under a Creative Commons Attribution-NonCommercial-ShareAlike 4.0 International License.

If you have any suggestions on how to make the machine better, please let me know!
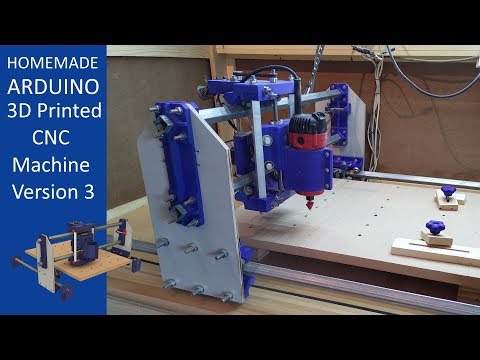
This is a modified version of my previous homemade CNC machine. Instead of using threaded rods this one uses (GT2) belts and has a larger working area of 50x70 cm or 20x27 inch. By using belts it's also faster. I'm also using microstepping now (all three jumpers) on the Arduino CNC shield. The STL files for 3D printing can be found in the STL folder.
The metal tubes are 20x20mm and approx. 1 meter long (X axis is a little shorter).
I've designed the 3D printed parts with Fusion 360 and used Inkscape for the Y axis drilling template. To control the machine I'm using an Arduino UNO with GRBL firmware and an Arduino CNC Shield. There are plenty of tutorials to find on how to connect and use it so I did not show it in the video. Here are some useful links:
The 3D printer I use is an Anet A8. The parts are printed with PLA, mostly 20% infill and 0.2 or 0.4 setting. Use higher infill for parts that must be stronger, for example the stepper motor mounts.
| 3D Printed components | x Print |
|---|---|
| Bearing Belt Guidener | 6x |
| Router Mount | 1x |
| Universal Mount | 4x |
| X Axis Belt Holder | 4x |
| X Axis Motor Mount | 1x |
| X Axis Sidepanel Mount Inside | 2x |
| X Axis Sidepanel Mount Outside | 2x |
| X Axis Spacer | 2x |
| Y Axis Motor Mount and Slider | 2x |
| Y Mount | 4x |
| Z Axis Bottom Front | 1x |
| Z Axis Top Front | 1x |
| Z Carriage Back | 1x |
| Z Carriage Top | 1x |
| Z Motor Mount | 1x |
| Z Slider Bottom | 1x |
| Z Slider Top | 1x |
| Z Spacer | 1x |
The tubes are 20mm x 20mm (0.78") square steel tubes. The length of the Y Axis tubes is 1000mm (40") and the length for the X Axis is approx. 820mm (32"). As an alternative you could also use other dimensions than 20mm x 20mm (maybe even rounded tubes) as long as they are approximately that size. The Z axis tubes are 15mm x 15mm (0.59") aluminium square tubes, approx. 215mm long (8.5"). You should measure this for yourself, check the video build. For the belts I'm using GT2 6mm and pulleys.
The effective working area is 50 x 70 cm (20" x 27").
To power the NEMA 17 stepper motors I've converted an old ATX PC power supply and used the 12V output. The type of stepper motors I use for the Y- and Z axis are: 17HS19-2004S1, the type for the X axis is: 42BYGHW811. Both type of motors can be used. For the wiring I've used CAT5 network cable.
I'm using a Makita M3700 router but you can use any router that has an approx. diameter of 65mm (2.5"). Or you might have to design another router mount or create an adapter.
- bCNC (https://github.com/vlachoudis/bCNC)
- Universal Gcode Sender (https://github.com/winder/Universal-G-Code-Sender)
- Easel by Inventables (http://easel.inventables.com)
- Fusion 360 with Design and Manufacturing mode (https://www.autodesk.com/products/fusion-360/students-teachers-educators)
I've made some changes to the GRBL config.h file before flashing it to the Arduino. The changes are not mandatory but helps if you are using (hard) limit switches. The changes I've made in the config.h file are as follows (check the GRBL page for more info):
// Line 88: I've disabled the initial lock because it's just annoying :)
// #define HOMING_INIT_LOCK

...

// Line 105: I wanted the homing cycle to first home Z than X and then Y (default it homes X and Y simultaneously)
#define HOMING_CYCLE_0 (1<<Z_AXIS)                // REQUIRED: First move Z to clear workspace.
#define HOMING_CYCLE_1 (1<<X_AXIS)                // Then home X
#define HOMING_CYCLE_2 (1<<Y_AXIS)                // Then home Y

...

// Line 342: I commented out this to enable homing for the Z axis again (swap pins D11 and D12 on Arduino).
// #define VARIABLE_SPINDLE // Default enabled. Comment to disable.
These are my GRBL machine settings. This might not work for you so check each setting carefully:
$0 = 10    (Step pulse time, microseconds)
$1 = 255    (Step idle delay, milliseconds)
$2 = 0    (Step pulse invert, mask)
$3 = 0    (Step direction invert, mask)
$4 = 0    (Invert step enable pin, boolean)
$5 = 0    (Invert limit pins, boolean)
$6 = 0    (Invert probe pin, boolean)
$10 = 3    (Status report options, mask)
$11 = 0.010    (Junction deviation, millimeters)
$12 = 0.002    (Arc tolerance, millimeters)
$13 = 0    (Report in inches, boolean)
$20 = 0    (Soft limits enable, boolean)
$21 = 0    (Hard limits enable, boolean)
$22 = 1    (Homing cycle enable, boolean)
$23 = 3    (Homing direction invert, mask)
$24 = 25.000    (Homing locate feed rate, mm/min)
$25 = 500.000    (Homing search seek rate, mm/min)
$26 = 100    (Homing switch debounce delay, milliseconds)
$27 = 1.000    (Homing switch pull-off distance, millimeters)
$30 = 1000    (Maximum spindle speed, RPM)
$31 = 0    (Minimum spindle speed, RPM)
$32 = 0    (Laser-mode enable, boolean)
$100 = 80.000    (X-axis travel resolution, step/mm)
$101 = 80.000    (Y-axis travel resolution, step/mm)
$102 = 500.000    (Z-axis travel resolution, step/mm)
$110 = 3000.000    (X-axis maximum rate, mm/min)
$111 = 3000.000    (Y-axis maximum rate, mm/min)
$112 = 3000.000    (Z-axis maximum rate, mm/min)
$120 = 10.000    (X-axis acceleration, mm/sec^2)
$121 = 10.000    (Y-axis acceleration, mm/sec^2)
$122 = 10.000    (Z-axis acceleration, mm/sec^2)
$130 = 400.000    (X-axis maximum travel, millimeters)
$131 = 200.000    (Y-axis maximum travel, millimeters)
$132 = 200.000    (Z-axis maximum travel, millimeters)