
A handful of Xcode file templates for projects that use RxSwift and my own variation of MVVM
These file templates are meant to be used for the following app architecture setup:
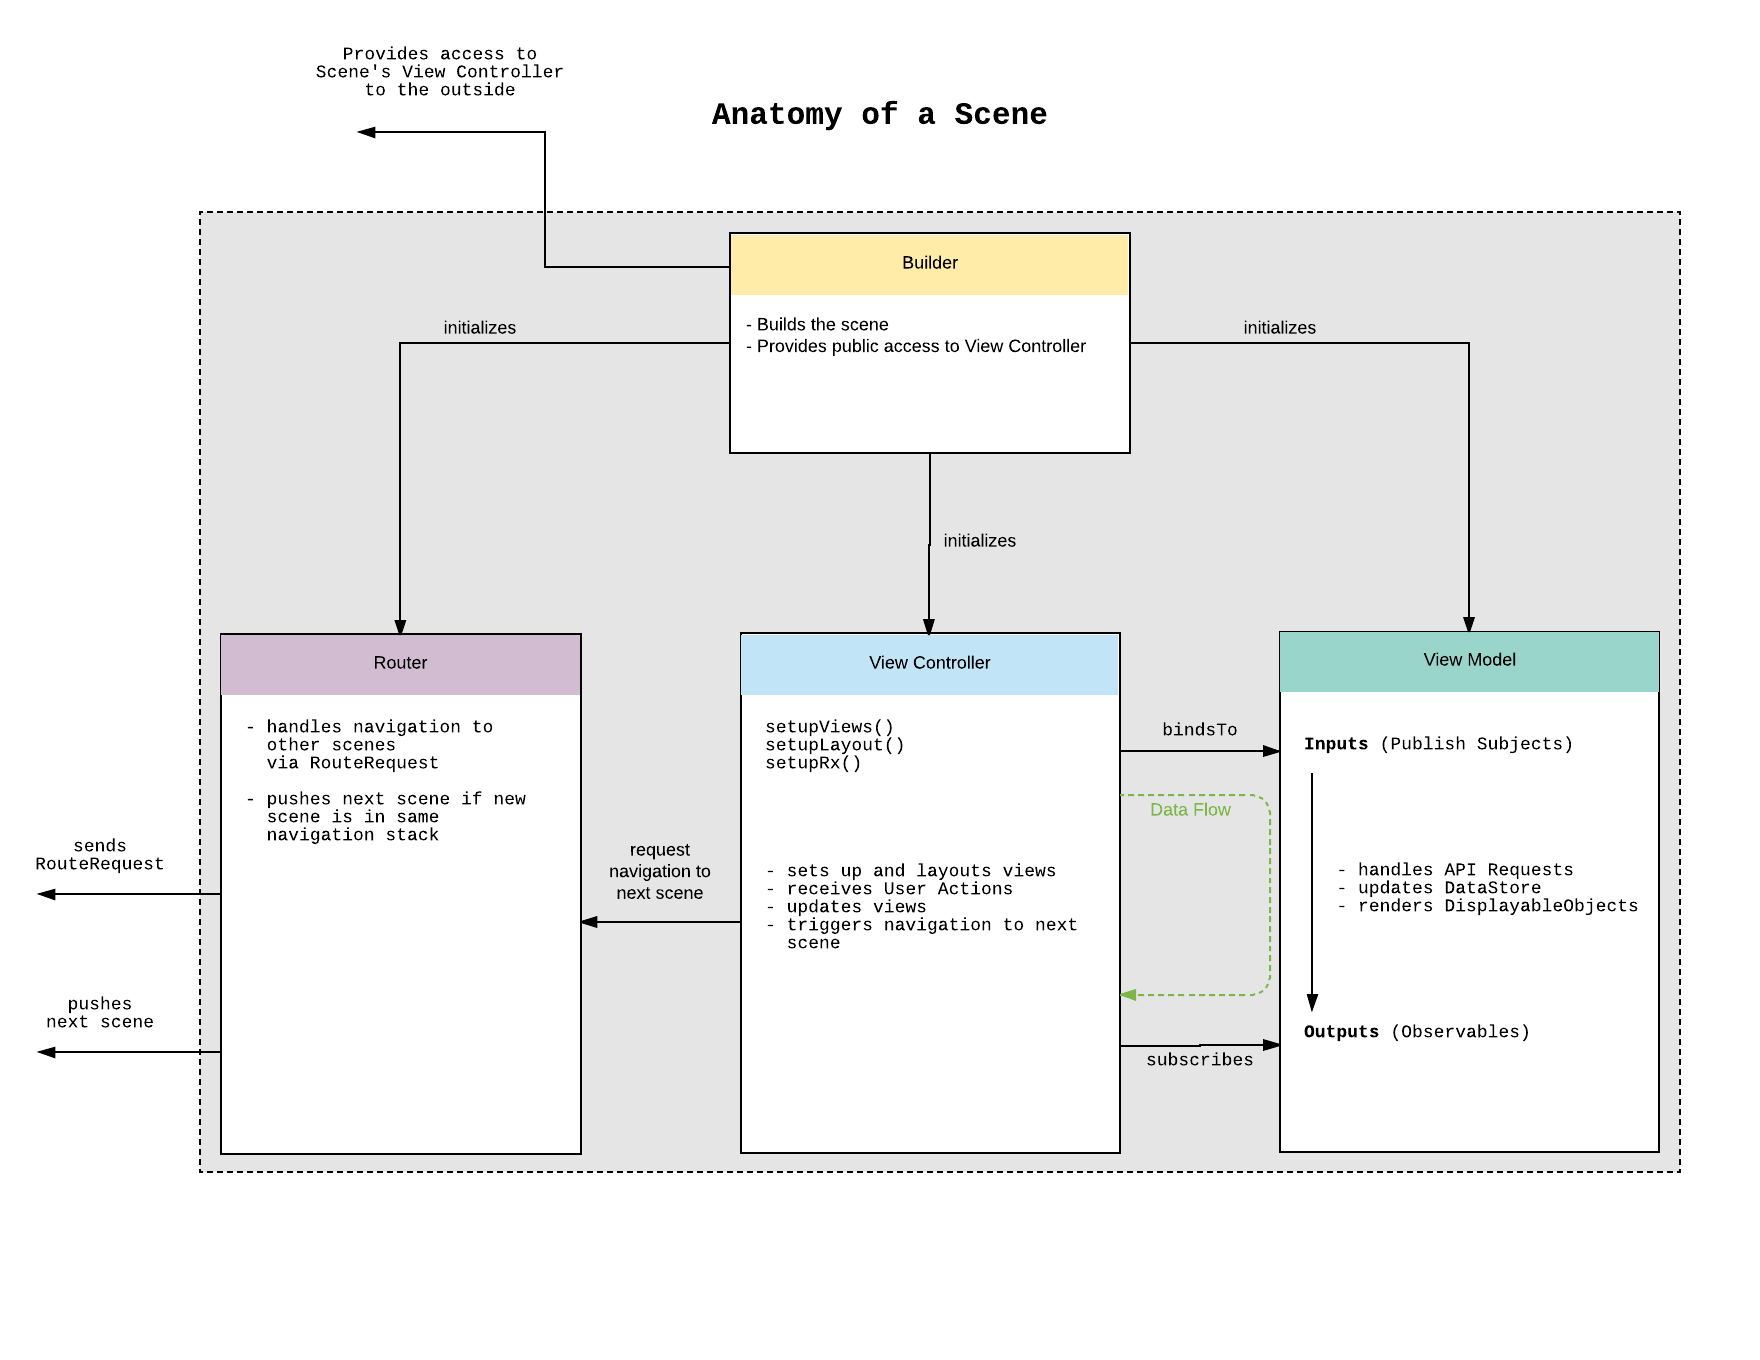
Let's call each "screen" or "view" in the app a Scene. So if you have an app that has a list view, a detail view and a login view you have 3 Scenes.
Each Scene consists of the following elements:
- initialize and layout its subviews
- handle user input (if data needs to be fetched or stored it relays that to the ViewModel)
- show Displayable Items that are provided by the ViewModel
- have any access to API, DataStore, UserDefaults
- push other ViewControllers or pop itself
- present other ViewControllers modally
- show Alerts
- format Data to be displayable in Views (e.g. AttributedStrings, DateFormatters)
- fetch data from API
- fetch / store / update Data from DataStore
- fetch / store / update Data from UserDefaults
- format Data to be displayable by the ViewController (e.g. Attributed Strings, DateFormatters)
- have any access to UIElements (does not even import UIKit!)
- push other Scenes (if they are should be on the same navigaton stack)
- generate a
RouteRequestfor Scenes that should be presented by the mainAppRouter
- have any access to UIElements (does not even import UIKit!)
- have any access to API, DataStore, UserDefaults
- initialize ViewController, ViewModel and Router
- provide the ViewController to the outside world (via the
viewController()method) - if the Scene needs some initial data it is injected into the Builder who then injects it into the ViewModel
- do anything else ;-)
When you want to show a new scene you never initialize any of its components yourself. Always ask the Scene's Builder to provide the Scene's ViewController via its static viewController() method:
let nextViewController = NextBuilder.viewController()
If the new Scene needs some initial data you inject it into the new Scene's Builder.
A simple example:
You have a CarListScene that shows a list of cars. When the user taps on a car in the list you want to navigate to a CarDetailsScene that shows the details of the selected car. To hand the carID to the Details Scene you inject it into the CarDetailsBuilder:
class CarListRouter {
    weak var viewController: CarListViewController?

    func navigateToDetails(withCarID carID: String) {
        let detailsViewController = CarDetailsBuilder.viewController(withCarID: carID)
        viewController?.navigationController?.pushViewController(detailsViewController, animated: true)
    }
}
The CarDetailsBuilder then injects the data into the CarDetailsViewModel:
struct CarDetailsBuilder {

    static func viewController(withCarID carID: String) -> UIViewController {
        let viewModel = CarDetailsViewModel(withCarID: carID)
        let router = CarDetailsRouter()
        let viewController = CarDetailsViewController(withViewModel: viewModel, router: router)
        router.viewController = viewController

        return viewController
    }
}
And then the CarDetailsViewModel prepares displayable data for the CarDetailsViewController as it always does.
-
Download the RxSwift folder and add it to the following folder on your machine:
~/Library/Developer/Xcode/Templates(You might need to create that folder if does not exist yet) -
When you want to add a new scene to your app, open the New File dialog and choose RxSwift in the left column
-
Select Scene and click Next
-
Enter a name for the Scene. As you can see that name will be used as a prefix for all the 4 classes that will be needed for the scene (see above)
-
Click Next and save the scene. Xcode now creates the 4 classes needed for the scene.
- Xcode 9 (for prior versions use 0.4.0)
- Swift 4