Configuring and using your PicoGUS
Choose a free IRQ and DMA on your system. A single jumper sets the IRQ, and two jumpers are used to set the DMA. In the following image, the jumpers are set for IRQ 5 and DMA 1, which are typical for GUS emulation. NOTE: on PicoGUS v1.1.x and the PicoGUS Femto Edition ISA adapter, a DMA must be set for the card to work, even when emulating cards that do not use DMA. PicoGUS 2.0 can be used with no DMA jumpers set. This is handy for emulating cards like MPU-401 or Adlib that do not use DMA.

When the PicoGUS is loaded with the pg-gus.uf2 firmware, it is in GUS emulation mode. This is the most-developed emulation on the PicoGUS.
Download the GUS v4.11 software installation .zip and extract to C:\ULTRASND on your DOS machine.
Set the ULTRASND environment variable by placing the following in your autoexec.bat or temporarily on the DOS prompt, where x is the GUS port, y the configured DMA, and z is the IRQ. Recommended settings are port 240, DMA 1, and IRQ 5. The PicoGUS will be configured to run on the port specified in ULTRASND, but the DMA and IRQ must reflect what the jumper settings are.
SET ULTRASND=x,y,y,z,z
Set the ULTRADIR environment variable to the installation directory, which should be C:\ULTRASND.
SET ULTRADIR=C:\ULTRASND
The software release archive available at https://github.com/polpo/picogus/releases/latest includes the PGUSINIT.EXE program which will detect and initialize the PicoGUS. If running it reports success, your PicoGUS is working! The archive includes the .uf2 firmware files which can be used to switch modes using pgusinit’s /f option.
PGUSINIT.EXE has an option, /a n to set the audio rendering buffer size. Tweaking this value may help with freezes or audio glitches in some programs.
On a real GUS, you'd run ULTRINIT.EXE to initialize the card. Some versions of ULTRINIT do run on the PicoGUS, but I strongly recommend using PGUSINIT instead.
Pick a program from the Compatibility list page to run to put your PicoGUS through its paces!
When the PicoGUS is loaded with the pg-adlib.uf2 firmware, it is in AdLib emulation mode. Most AdLib software will run. Accuracy is not perfect, but is much better than SBOS... 😉
When the PicoGUS is loaded with the pg-mpu.uf2 firmware, it is in MPU-401 emulation mode. Intelligent mode for most titles is supported, and UART mode should work everywhere.
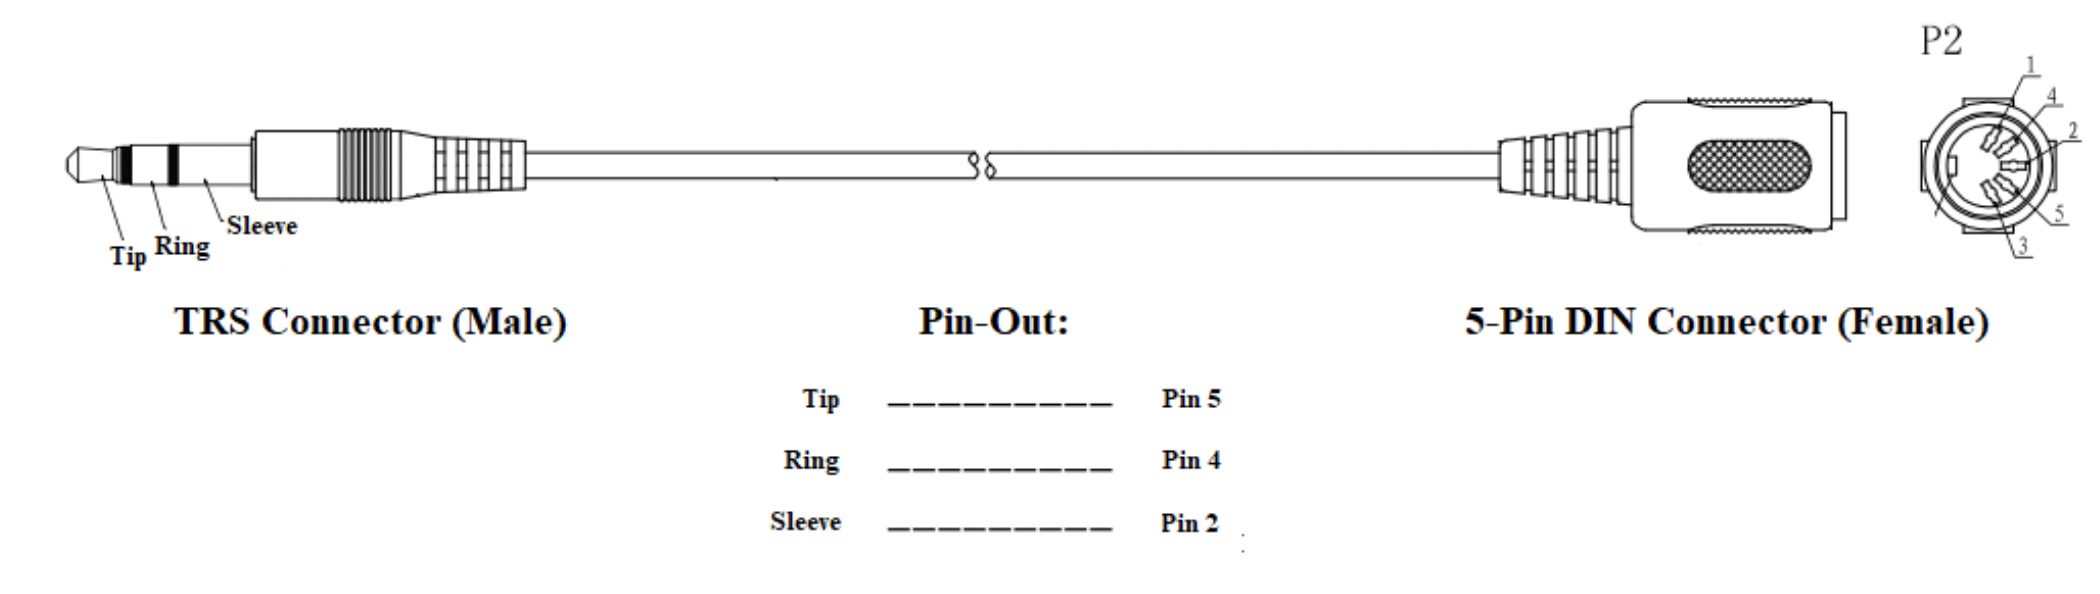
The MIDI output port uses the MIDI TRS "Type A" standard (note that the TRS cables that come with the Orpheus and PCMIDI cards from PCMIDI.eu are "Type B" and will not work on PicoGUS). Cables to the "Type A" standard have the following wiring:
PicoGUS 2.0 boards purchased from my Tindie store come with the adapter, but if you have another revision, the least expensive pre-made cable option in the US I've found is this cable on Sweetwater and is the cable I use. Sweetwater is a well-regarded musical instrument and equipment retailer, but be warned, their sales engineers are pretty enthusiastic...
When the PicoGUS is loaded with the pg-tandy.uf2 firmware, it is in Tandy 3-Voice emulation mode.
This emulation is on port 2C0h by default, to avoid conflicts or masked IO on the default Tandy port of 0C0h in non-Tandy systems. This is the same alternate port that Matze79's "TNDY" card can use. Use the TNDY driver program to redirect port 0C0h to 2C0h. Also many games need to be patched to allow for Tandy sound on non-Tandy systems with CGA, EGA, or VGA graphics. Note that this mode has not received much optimization, so accuracy and compatibility can be improved.
When the PicoGUS is loaded with the pg-cms.uf2 firmware, it is in CMS/Game Blaster emulation mode.
This emulation is on port 220h by default. If that conflicts with an existing Sound Blaster compatible card in your system, the base port can be changed with pgusinit.exe.
A USB joystick can be connected to the PicoGUS, which can emulate a gameport joystick. PicoGUS 2.0 has a USB-A port and joysticks can be directly connected. Earlier versions of PicoGUS need a powered USB OTG adapter or hub to connect the joystick to the Pico's micro USB-B port.
Currently Xbox 360-style Xinput and Sony DualShock 4 gamepads are supported. Support for more joysticks is planned. The left stick and d-pad and A/B or cross/circle buttons are mapped to the first gameport joystick, and the right stick and X/Y or square/triangle buttons are mapped to the second gameport joytick.