Installation
Watch the QuickStart Video here!
To install this plugin in OctoPrint, open the web interface, go to Settings -> Plugin Manager -> + Get More and enter "BedCheckAI" into the Search.
Then click the "Install" button on the right side of the "BedCheckAI" plugin.
Once installed, restart OctoPrint.
Getting started with the plugin.
- Navigate to the Plugins settings page at
Settings -> Plugins -> Bed Check AI - Enter the correct snapshot URL for your setup. Verify the snapshot URL is correct by entering it into the browser and ensuring it returns the still image of the current frame, not the live feed.
- Set the rest of your settings accordingly. Visit https://app.printpal.io and register an account to get your Free API key and provides unlimited usage. The Detection Threshold is set to a default of 0.05. Determine the right threshold in the next steps.
Camera Orientation
The print bed must be in the middle point of the camera frame. Below is an example of the print bed being in the correct position:
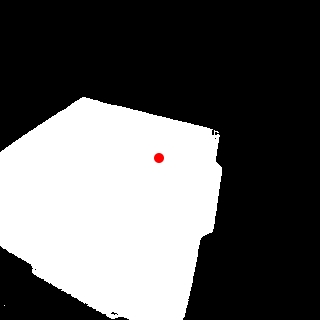
The red point in the image is the center point of the camera's frame. For best results, ensure the center point of the camera frame is close to the center of the print bed.
Failure to center the camera on the printer's bed will result in the wrong item being "snapped" onto and detected.
Threshold Setup
The Threshold is the value at which the bed will be classified as CLEAR vs NOT CLEAR.
The algorithm uses a baseline image of the bed and compares the detected bed area against it. The algorithm only compares the pixels that are in the area of the baseline bed, so new items that are in the frame but not on the bed will not be considered.
If the Current Loss is reported to be greater than the set Threshold, then the print bed is classified as NOT CLEAR
If the Current Loss is reported to be less than the set Threshold, then the print bed is classified as CLEAR
Macro
In most cases, it will be beneficial to execute this script in the beginning of a print job. To do this using the OctoPrint plugin, modify the beginning of the G-code file and add a set of motion instructions that places the print bed in a repeatable location and clears the toolhead from obstructing the camera's view of the print bed. After the bed is in the known location, add the @ command @SEGMENTBED to the G-code.
In some cases, you may need to add a wait G-code command for the kinematic instructions to finish before the @ command executes.
See the example below of a simple implementation of the macro into a G-Code file sliced by Cura Slicer:
1 ;FLAVOR:Marlin
2 ;TIME:10113
3 ;Filament used: 6.35549m
4 ;Layer height: 0.2
5 ;MINX:161.702
6 ;MINY:40.942
7 ;MINZ:0.2
8 ;MAXX:217.206
9 ;MAXY:173.101
10 ;MAXZ:19.4
11 ;Generated with Cura_SteamEngine 4.12.0
12 G28
13 G1 X0.0 Y235.0 Z50.0
14 G4 S1
15 @SEGMENTBED
16 M140 S60
17 M105
18 M190 S60
19 M104 S200
...
Where our Macro is added immediately after line 11 ;Generated with Cura_SteamEngine 4.12.0
Macro (Lines 12-15):
G28
G1 X0.0 Y235.0 Z50.0
G4 S1
@SEGMENTBED
- The camera must be in the same location and orientation with respect to the print bed
- Use a macro or a set of G-Code instructions that places the bed in a known location that is clear and free of obstructions prior to calling the Bed Checking function