We decided to develop a Bluetooth Stopwatch that would be used in sports related activities. We focused on the profile and portability aspect of the stopwatch. We wanted to make an interface with easy to use software and only three buttons. To keep processing power and our systems light, we decided to implement one BeagleBone Black (BBB) as our actual "Stopwatch" and another BBB as a host that would stay on indefinetly and act as a "Server" where it would await Bluetooth commands from our stopwatch.
In the code, we have developed profiles for our Linux mascots, Tux and Boris. Below we have included instructions on how to setup and run our application.


-
Hardware
- For this section, you will need to set up 3 GPIO push buttons, 2.4" TFT SPI LCD Display, and 2 HC-05 Bluetooth Modules
Lap Button = "P8_11"
Stop Button = "P8_12"
Start_Button = "P8_13"
- SPI Display Setup follow the instructions here and pinout is as follows
LCD BONE MISO P9_29 LED P9_16 SCK P9_31 MOSI P9_30 D/C P9_27 RESET P9_25 CS P9_28 GND P9_2 VCC P9_4 - Pinouts for the HC-05 modules are as follows (note: we are using UART5)
HC-05 BONE STATE RXD P8_37 TXD P8_38 GND GND VCC 3.3V EN - For this section, you will need to set up 3 GPIO push buttons, 2.4" TFT SPI LCD Display, and 2 HC-05 Bluetooth Modules
-
Software
- Install Pygame and all of it's libraries follow the instructions here
- Google Sheets API
In order to get the Google Sheets setup, follow the following video and put your sheets ID in the receiver code, and keys.json file in the Receiver folder:

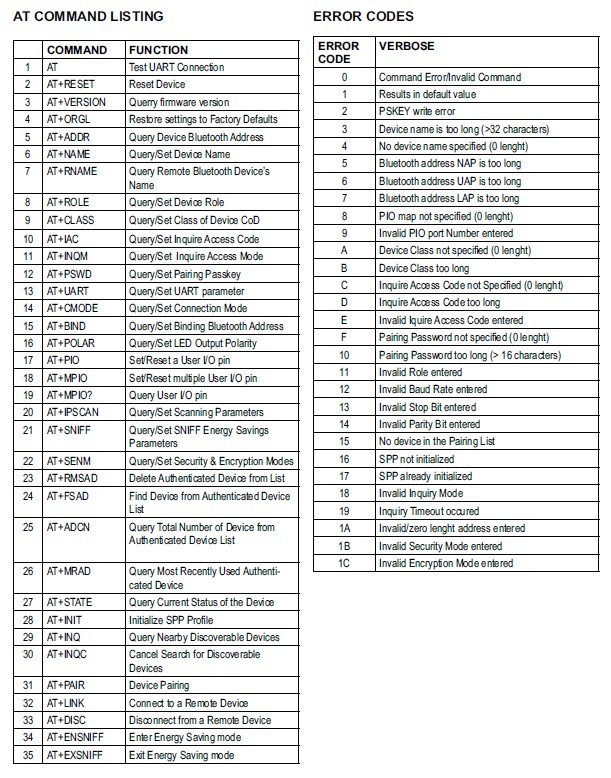
The HC-05 comes with a configuration mode called AT MODE, to set up bluetooth you must transmit a set of commands known as the AT Commands. A list of the all HC-05 commands can be found below.
Now the way we want to configure our 2 HC-05 Bluetooth modules is one module is the peripheral/slave and the other device will be configured as the controller/master and we will want to 'bind' the controller/master to the MAC address of the peripheral/slave device so it will only connect to the peripheral/slave device. For this we will only need a few of the commands from the table above and those can be found below.
| COMMAND | FUNCTION | Values | |
|---|---|---|---|
| 1 | AT | Test UART Connection | |
| 2 | AT+ADDR | Query MAC Address | |
| 3 | AT+ROLE | Query/Set Device Role | 0: Slave, 1:Master, 2: Slave Loop |
| 4 | AT+CMODE | Query/Set Device Connection Mode | 0: fixed address, 1: any address, 2: slave-loop |
| 5 | AT+BIND | Query/Set Binding Bluetooth Address |
To enter AT MODE on the HC-05 bluetooth module, you need to bring the EN or KEY pin up to 3.3V when plugging in the device it should then start to blink approx. every 2 seconds indicating that the device is in AT MODE

Once in AT MODE there is a syntax to follow when entering the commands from the table. We can either Query a value or Set a value. When we Query a value the command will look like AT+command? and the HC-05 will return the value. When we Set a value the command will look like AT+command=setvalue and the HC-05 will return OK if the value is successfully set.
For the Slave device the most important thing is that we configure the Role as 0 for slave, and then we also query the MAC address and write it down somewhere for when we configure the master HC-05.
$bone ./config_hc05.py
AT
OK

AT+ROLE=0
OK

AT+ADDR?
ABCD,EF,123456
For configuring the Master device, we want to set the role as 1 for master, the connection mode to 0 for fixed address binding, the binding address to the address of the slave device.
$bone ./config_hc05.py
AT
OK

AT+ROLE=1
OK

AT+CMODE=0
OK

AT+BIND=ABCD,EF,123456
OK
To start, run the following command on the transmitter:
bone$ sudo ./timer.py
and run the following command on the receiver:
bone$ ./receiver.py
You will enter the welcome screen where you will Press START to select a profile. Using the LAP Button you will be able to cycle through the profiles. In order to select a profile, you will hit the START Button To start the stopwatch, press the START Button
Press the LAP Button when you want to lap, and a split time will appear.
Once you are done, press the STOP Button to stop the program and register the final time. After the Stop button has been pressed, the data will transfer to connected Bluetooth reciever and uploaded onto Google Sheets.
To add a profile, you will need to edit the timer.py code and manually add the profile in the Profile class as shown below:
class Profile:
    def new_profile(self):
        ...
It is recommended to add a 200x200 .png image to make profile selection easier.