Setup in Eclipse PDE
This page describes how to setup Protege in Eclipse using the Plug-in Development Environment (PDE). This method is slightly more complicated than the setup without PDE, however, it has an advantage that one does not generally need to run maven once the project has been imported. In particular, incremental compilation and hot code replace in the debugger should work like for ordinary java projects in Eclipse. This setup is particularly useful for those who develop and debug the main Protege components, but can also be used for developing Protege plugins.
These following screenshots were taken with Eclipse Oxygen on MacOS High Sierra (10.13.1). These instructions were also tested on Linux Mint Cinnamon, Linux Ubuntu 16.10, and Windows 10.
Specifically these components are necessary: Java IDE, Git client, Maven integration for Eclipse
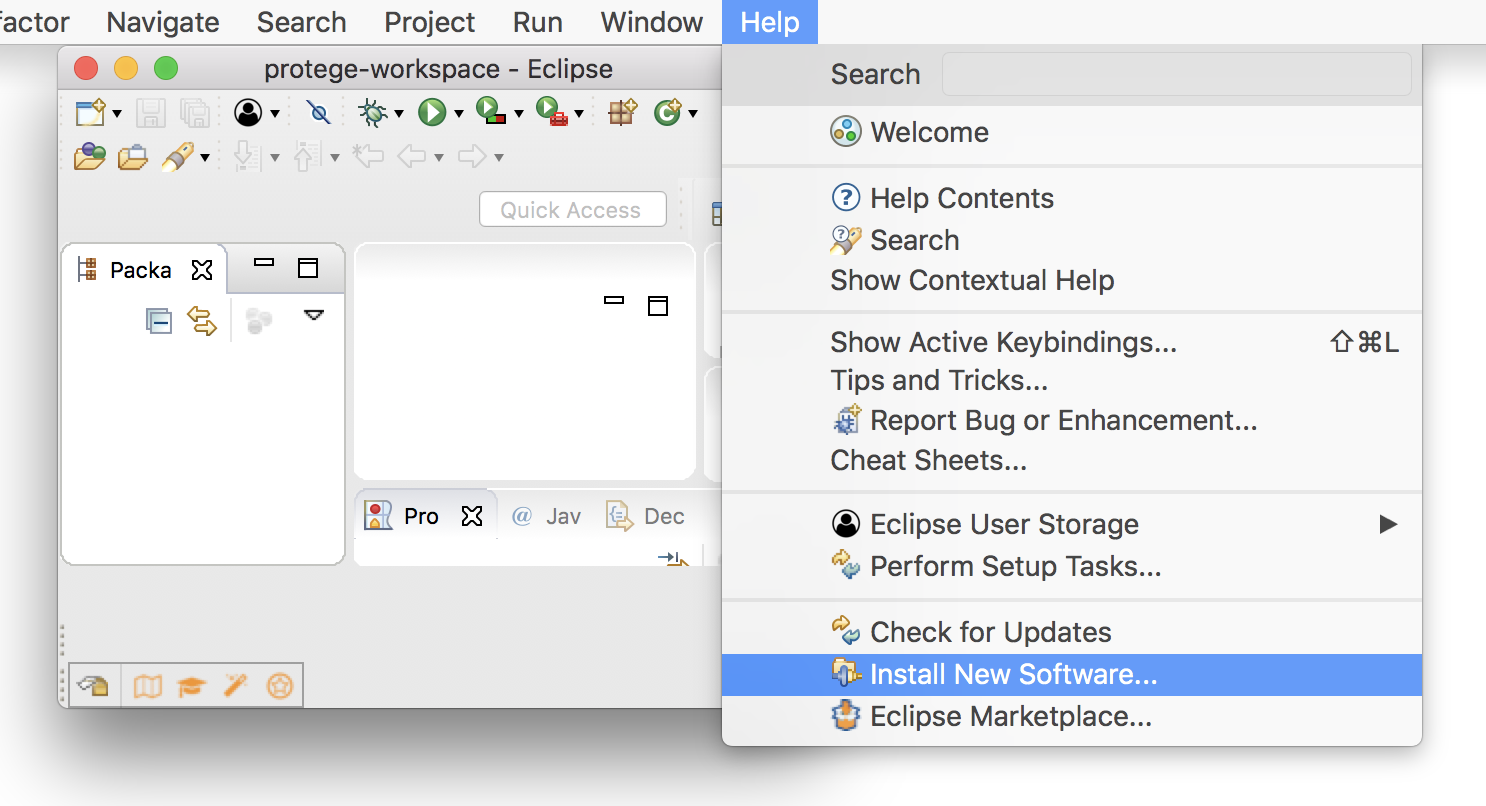
To obtain PDE, in the top menu, select "Help" > "Install New Software".
Select Work with: "--All Available Sites--", check everything under "Eclipse Plugin Development Tools".
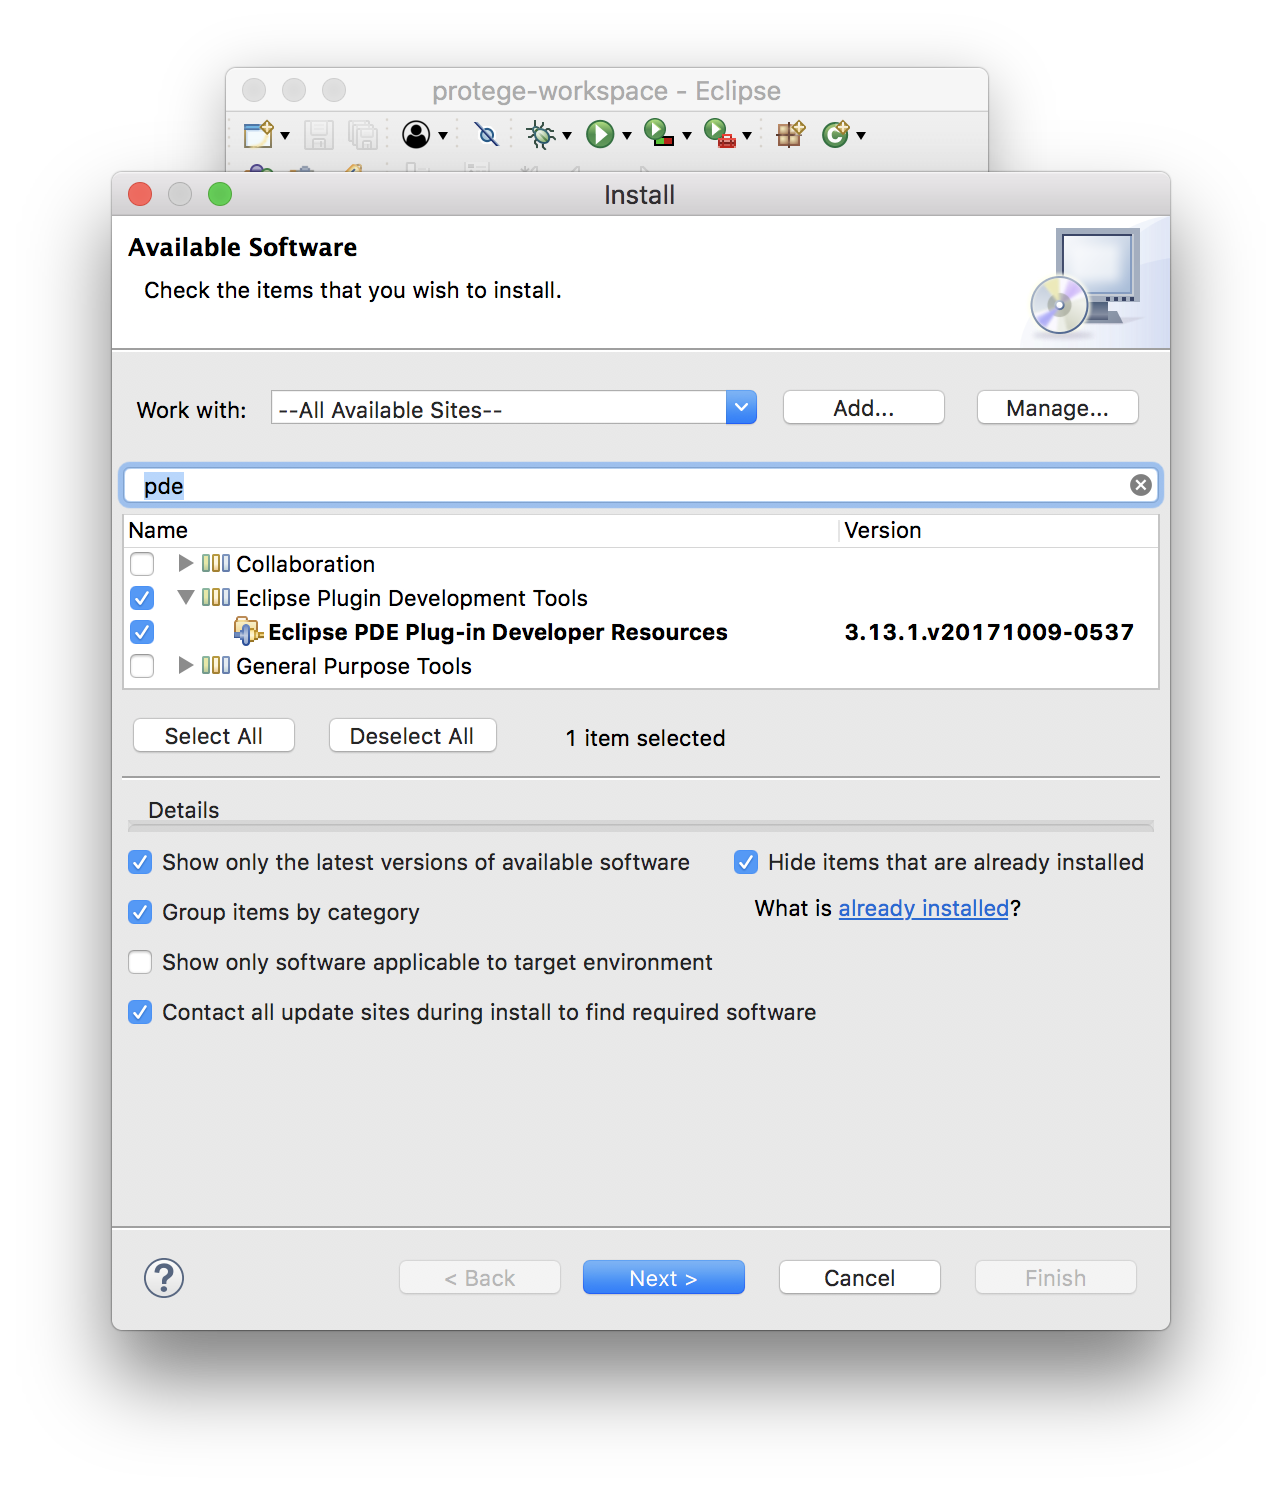
Click "Next". Accept the license agreement and select "Finish". We will need to restart Eclipse (but can do it after installing other plugins).
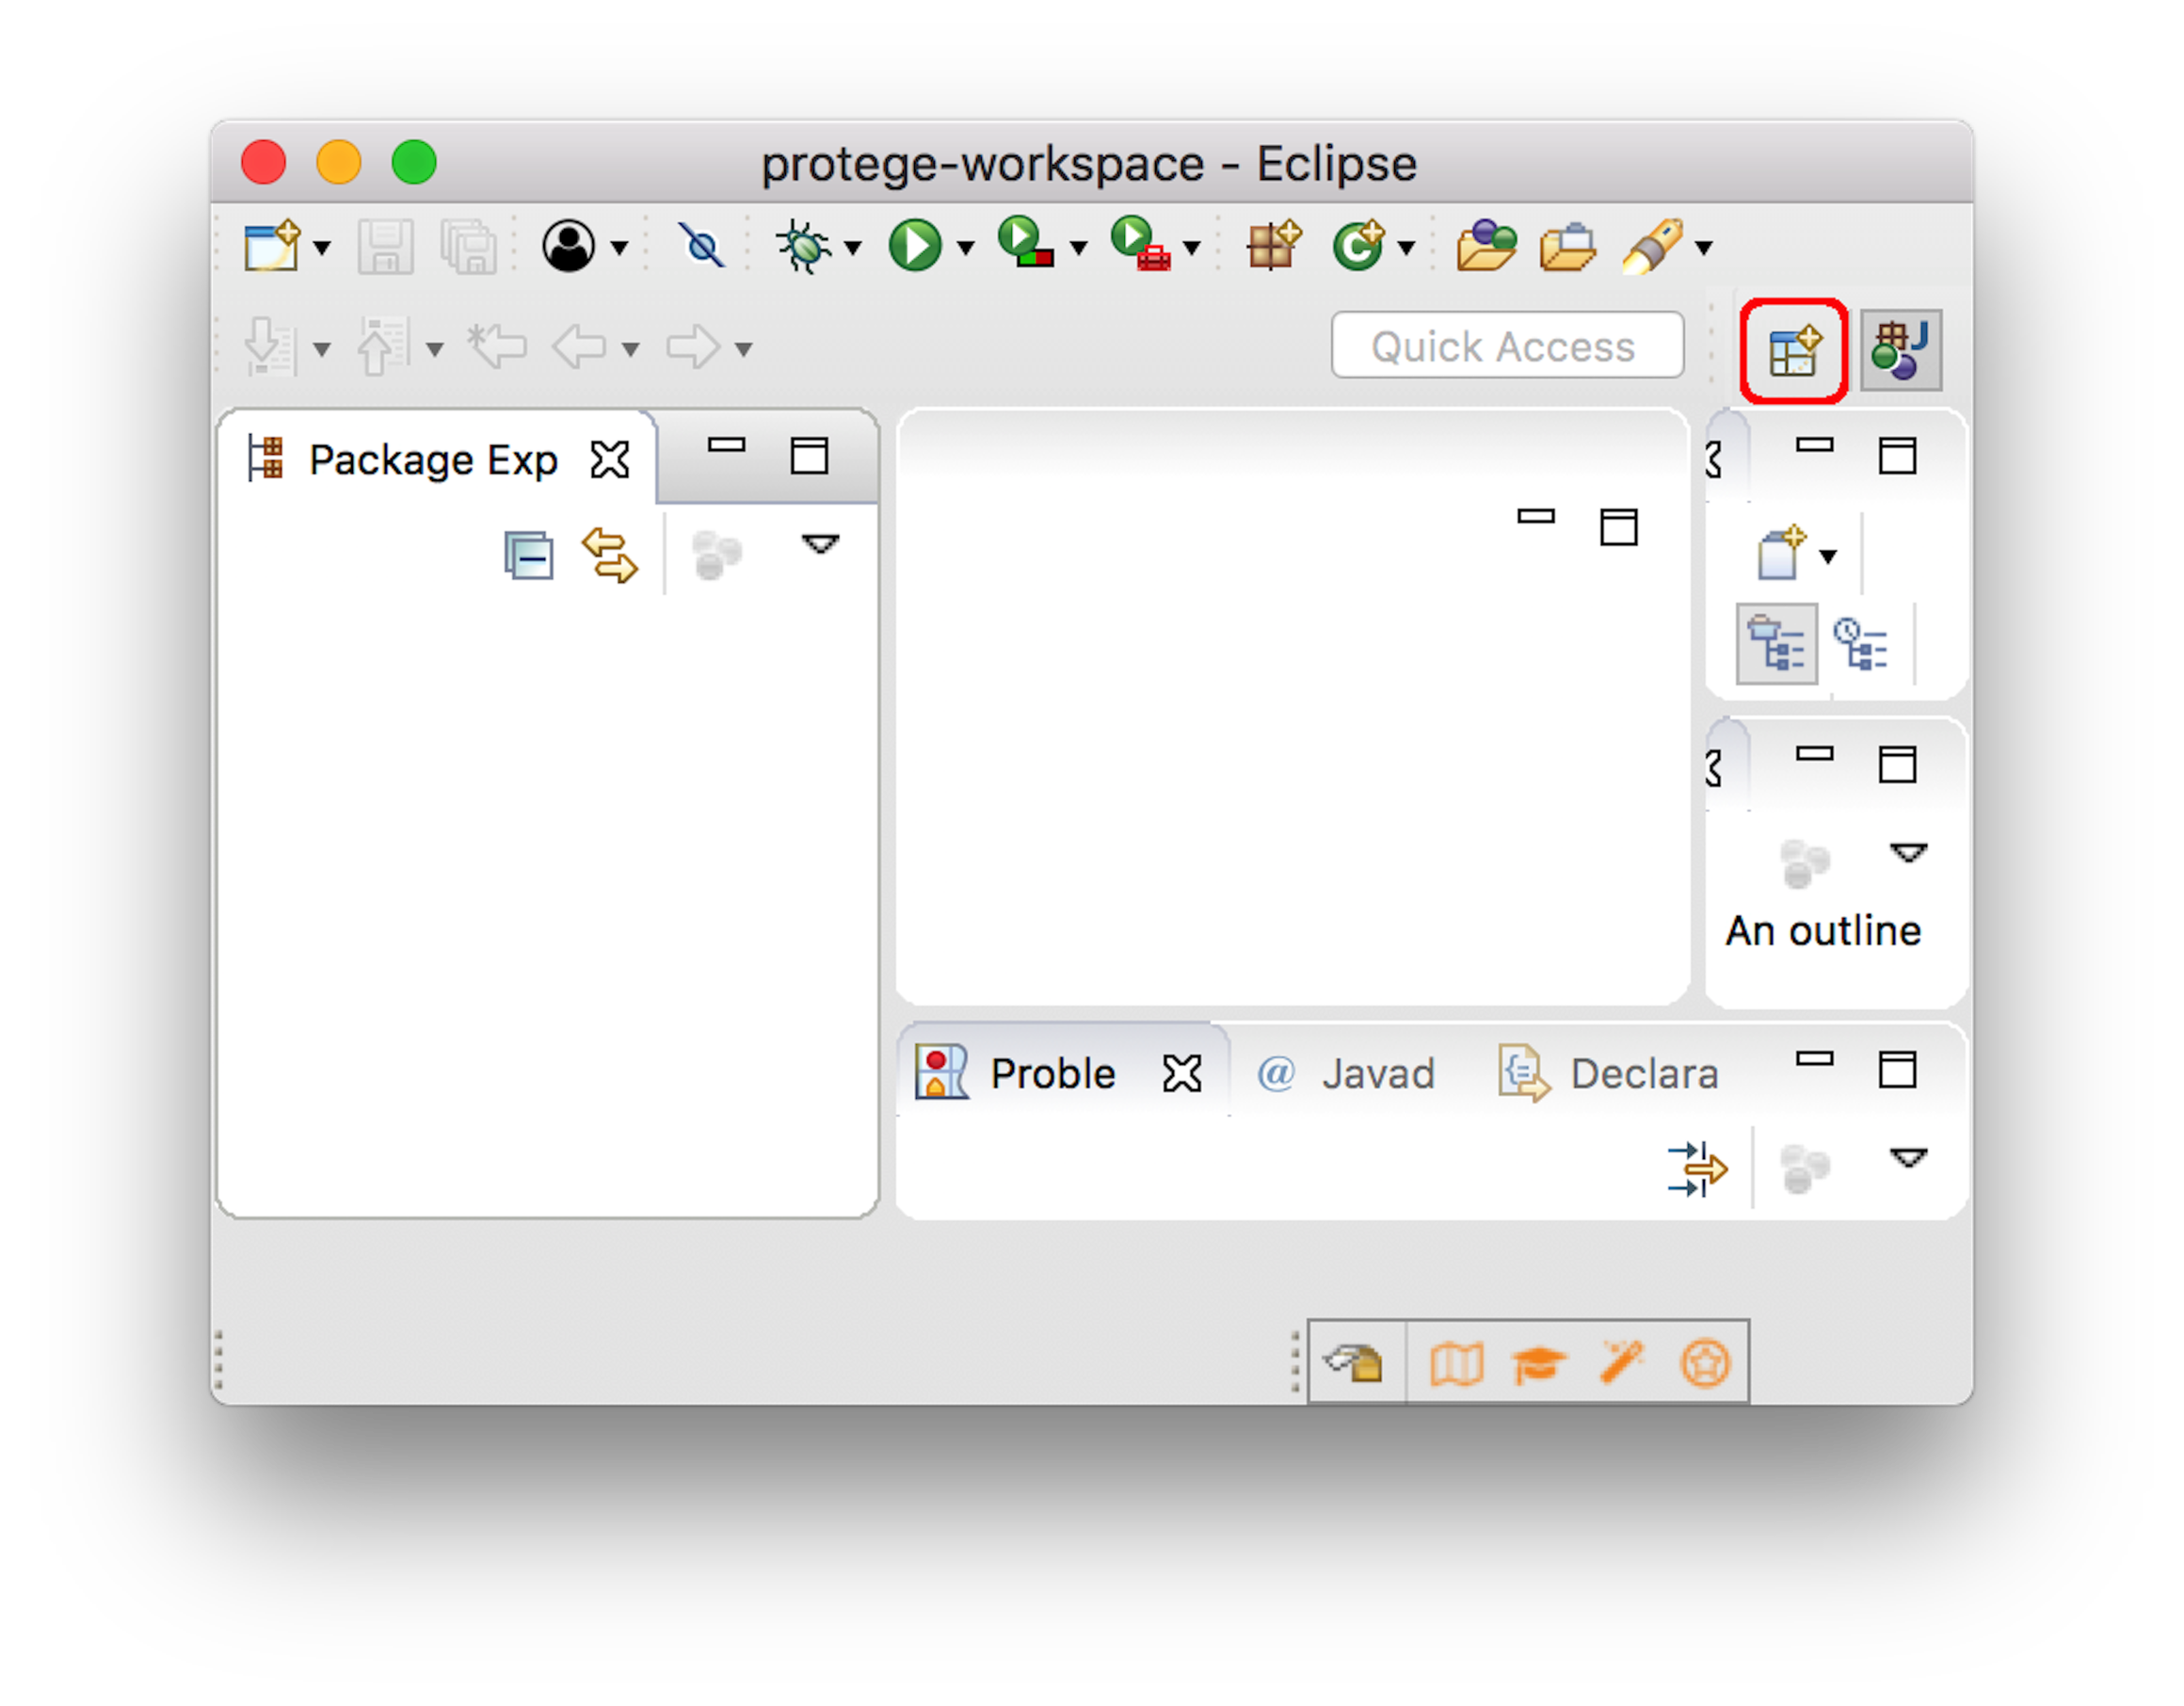
Click on the "open perspective" icon ![]() in the upper right or from the top menu go to:
in the upper right or from the top menu go to:
Window > Perspective > Open Perspective > Other...
Select the "Git" perspective ![]() . Choose "clone a git repository"
. Choose "clone a git repository" ![]() and enter as URI:
and enter as URI:
https://github.com/protegeproject/protege.git
Click "Next". In the "Branch Selection" dialog select only the master branch and click Next. In the "Local Destination" dialog, select a suitable destination directory and select "Finish". Finally, switch back to the "Java" perspective ![]() (in the top right corner).
(in the top right corner).
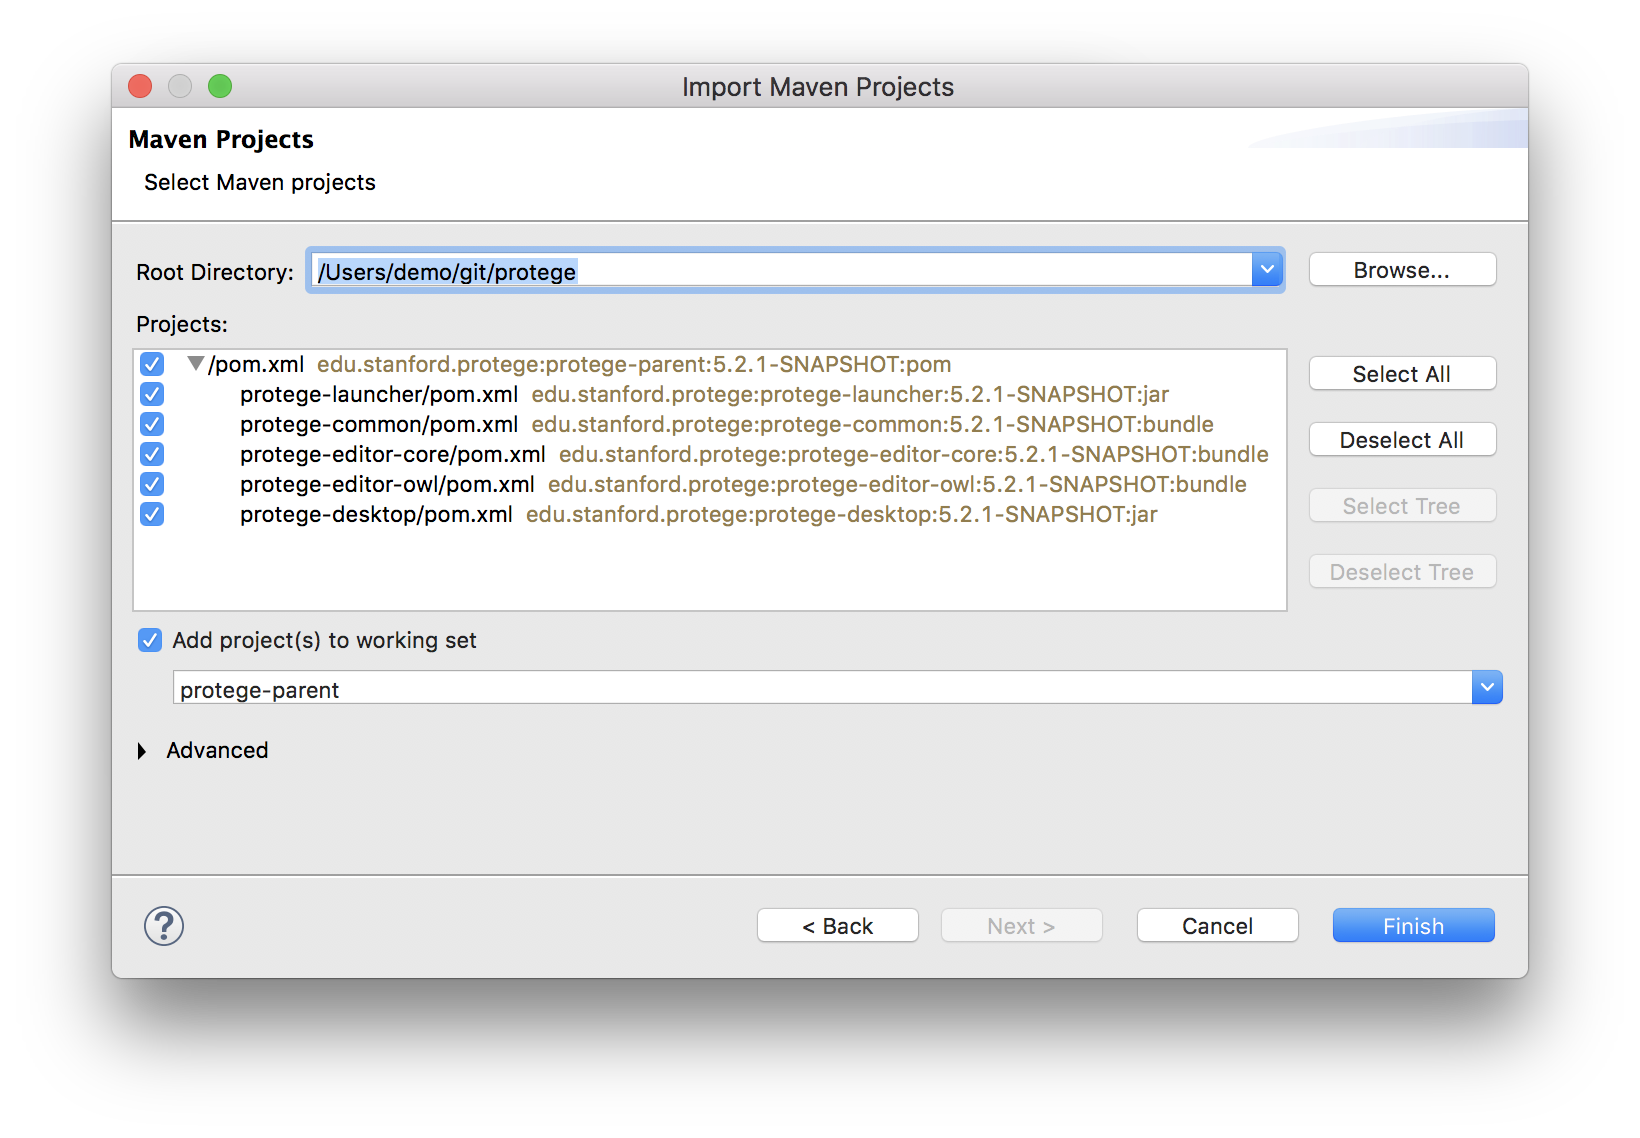
In the top menu of Eclipse, select File > Import > Maven > Existing Maven Projects, click "Next".
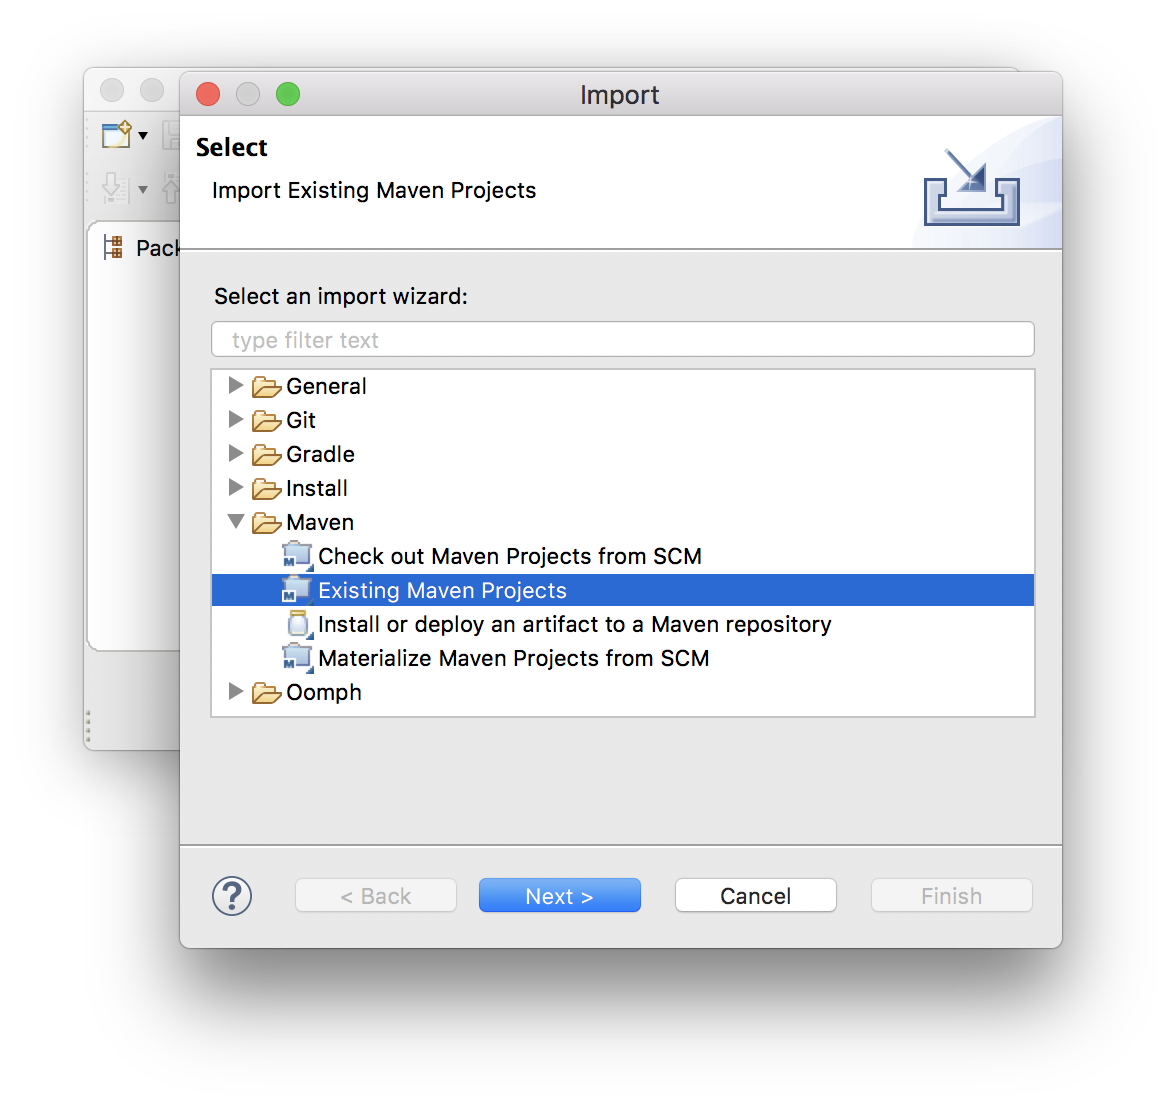
In the "Maven Projects" dialog, indicate as "Root Directory" the directory where Protégé was cloned in the previous step, ensure that all protege projects are selected, and click "Finish".
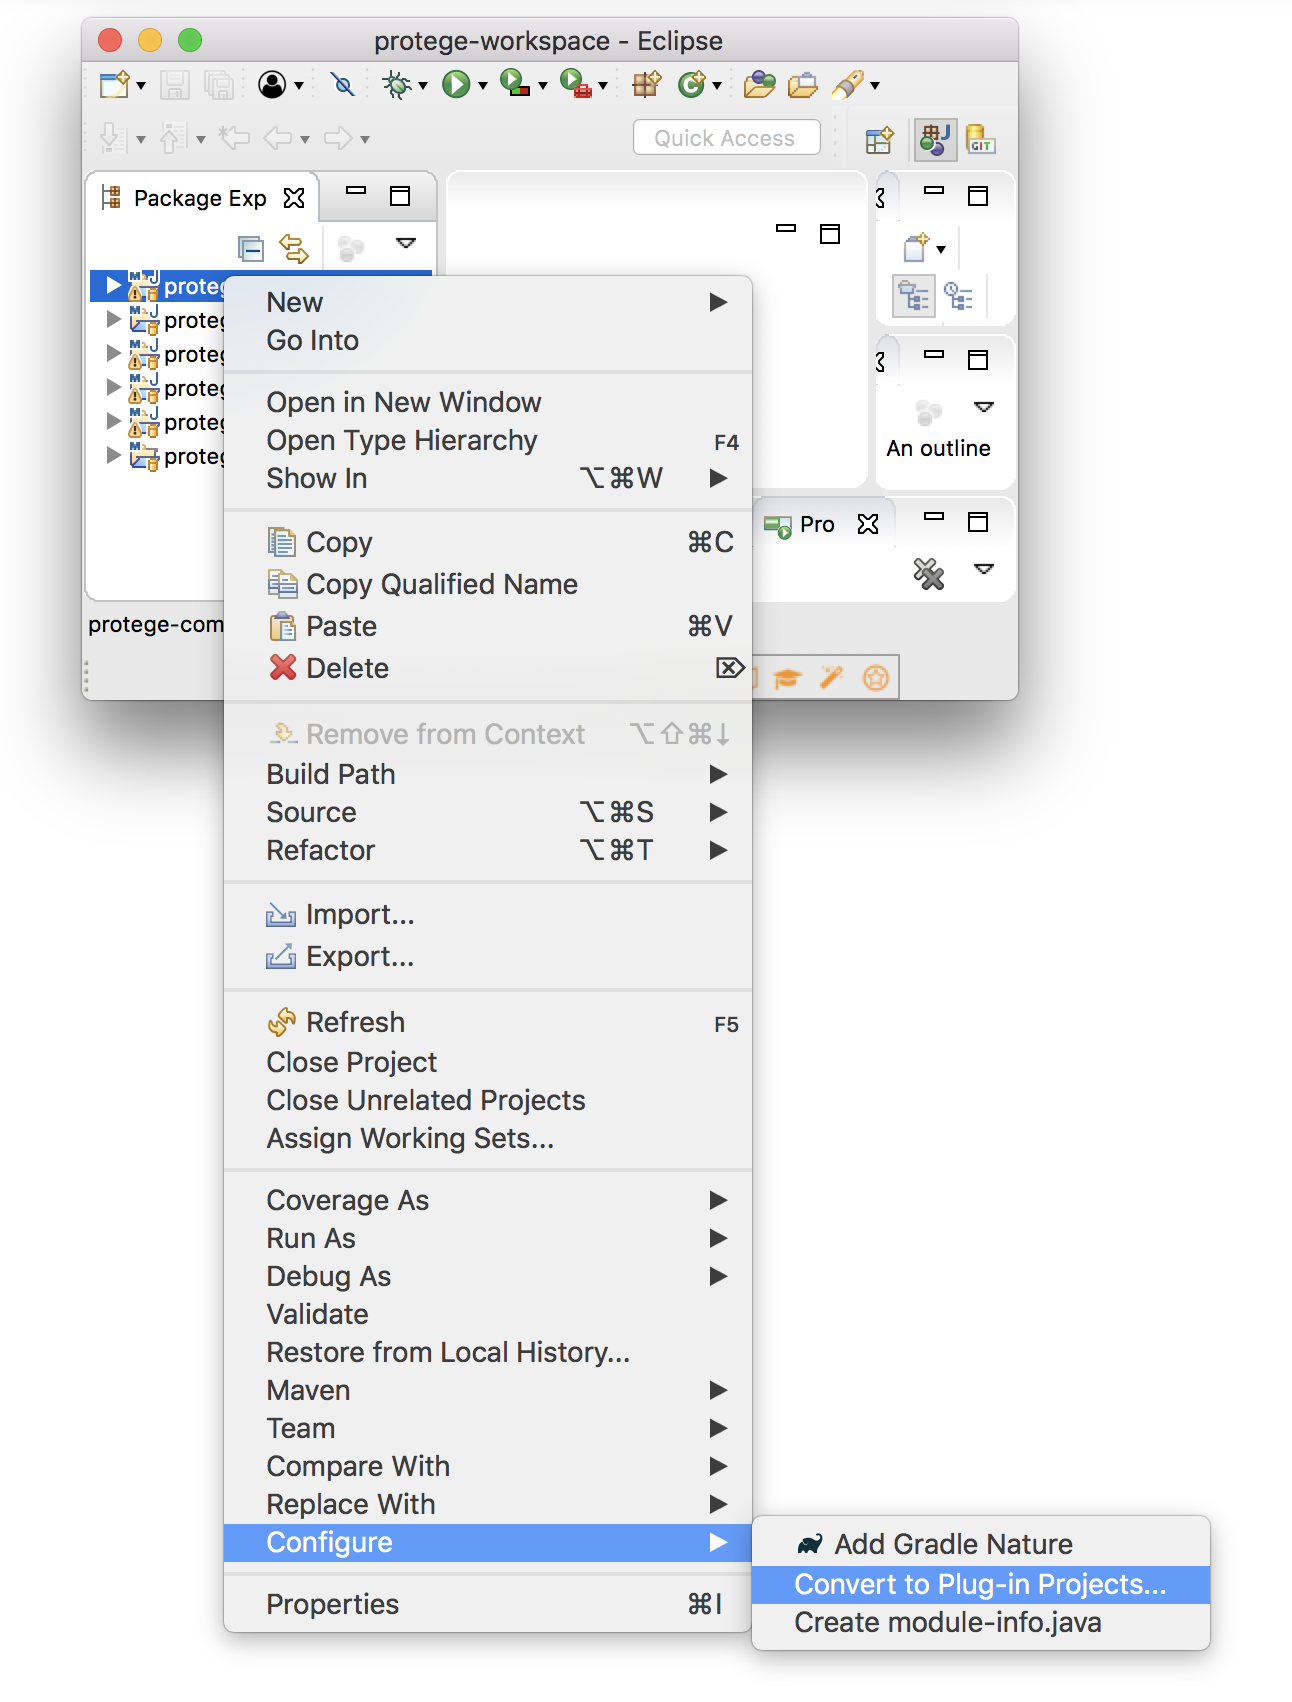
In the left panel, right click on the project protege-common: Configure > Convert to Plug-in Projects.
(if you do not see "Convert to Plug-in Projects" under Configure then most likely Eclipse PDE is not installed)
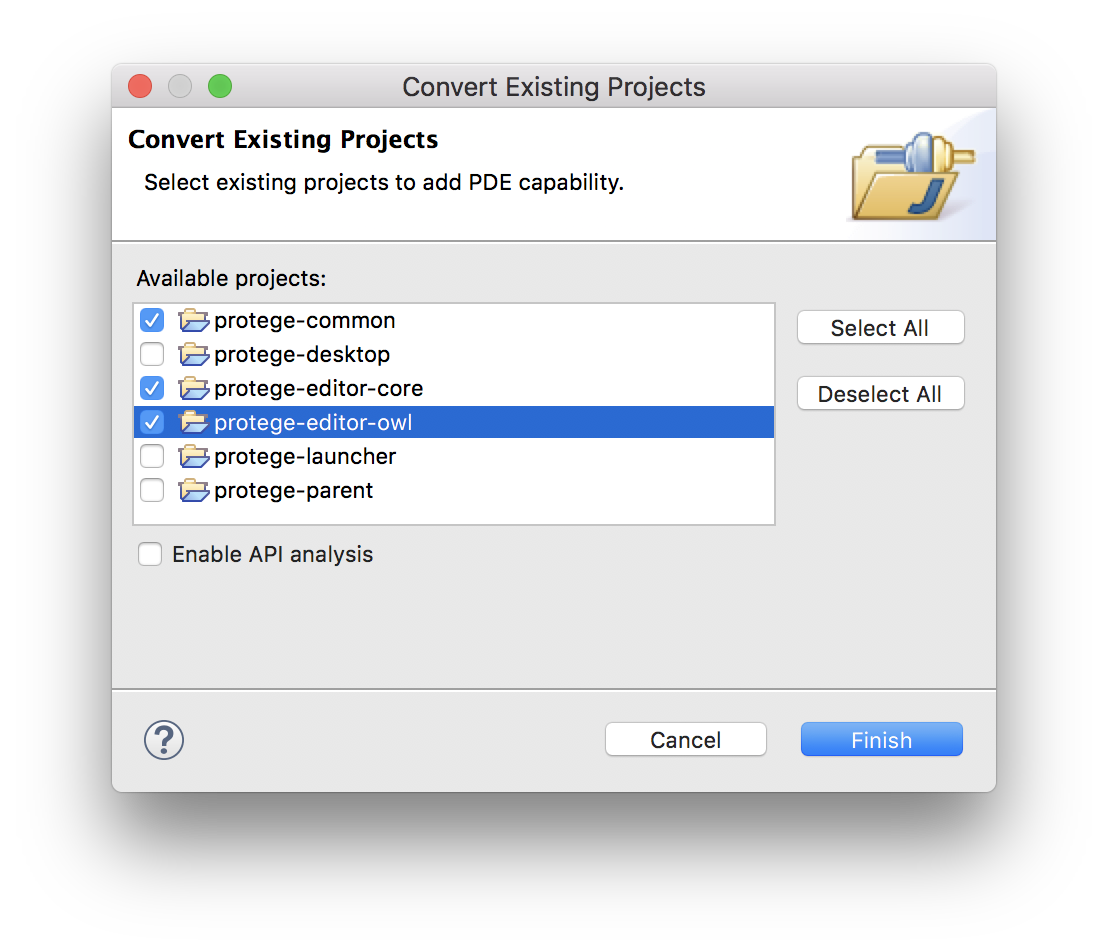
Select the projects protege-common, protege-editor-core, protege-editor-owl and click "Finish".
Rightclick on protege-parent in the package explorer, select "Maven" > "Select Maven Profiles".
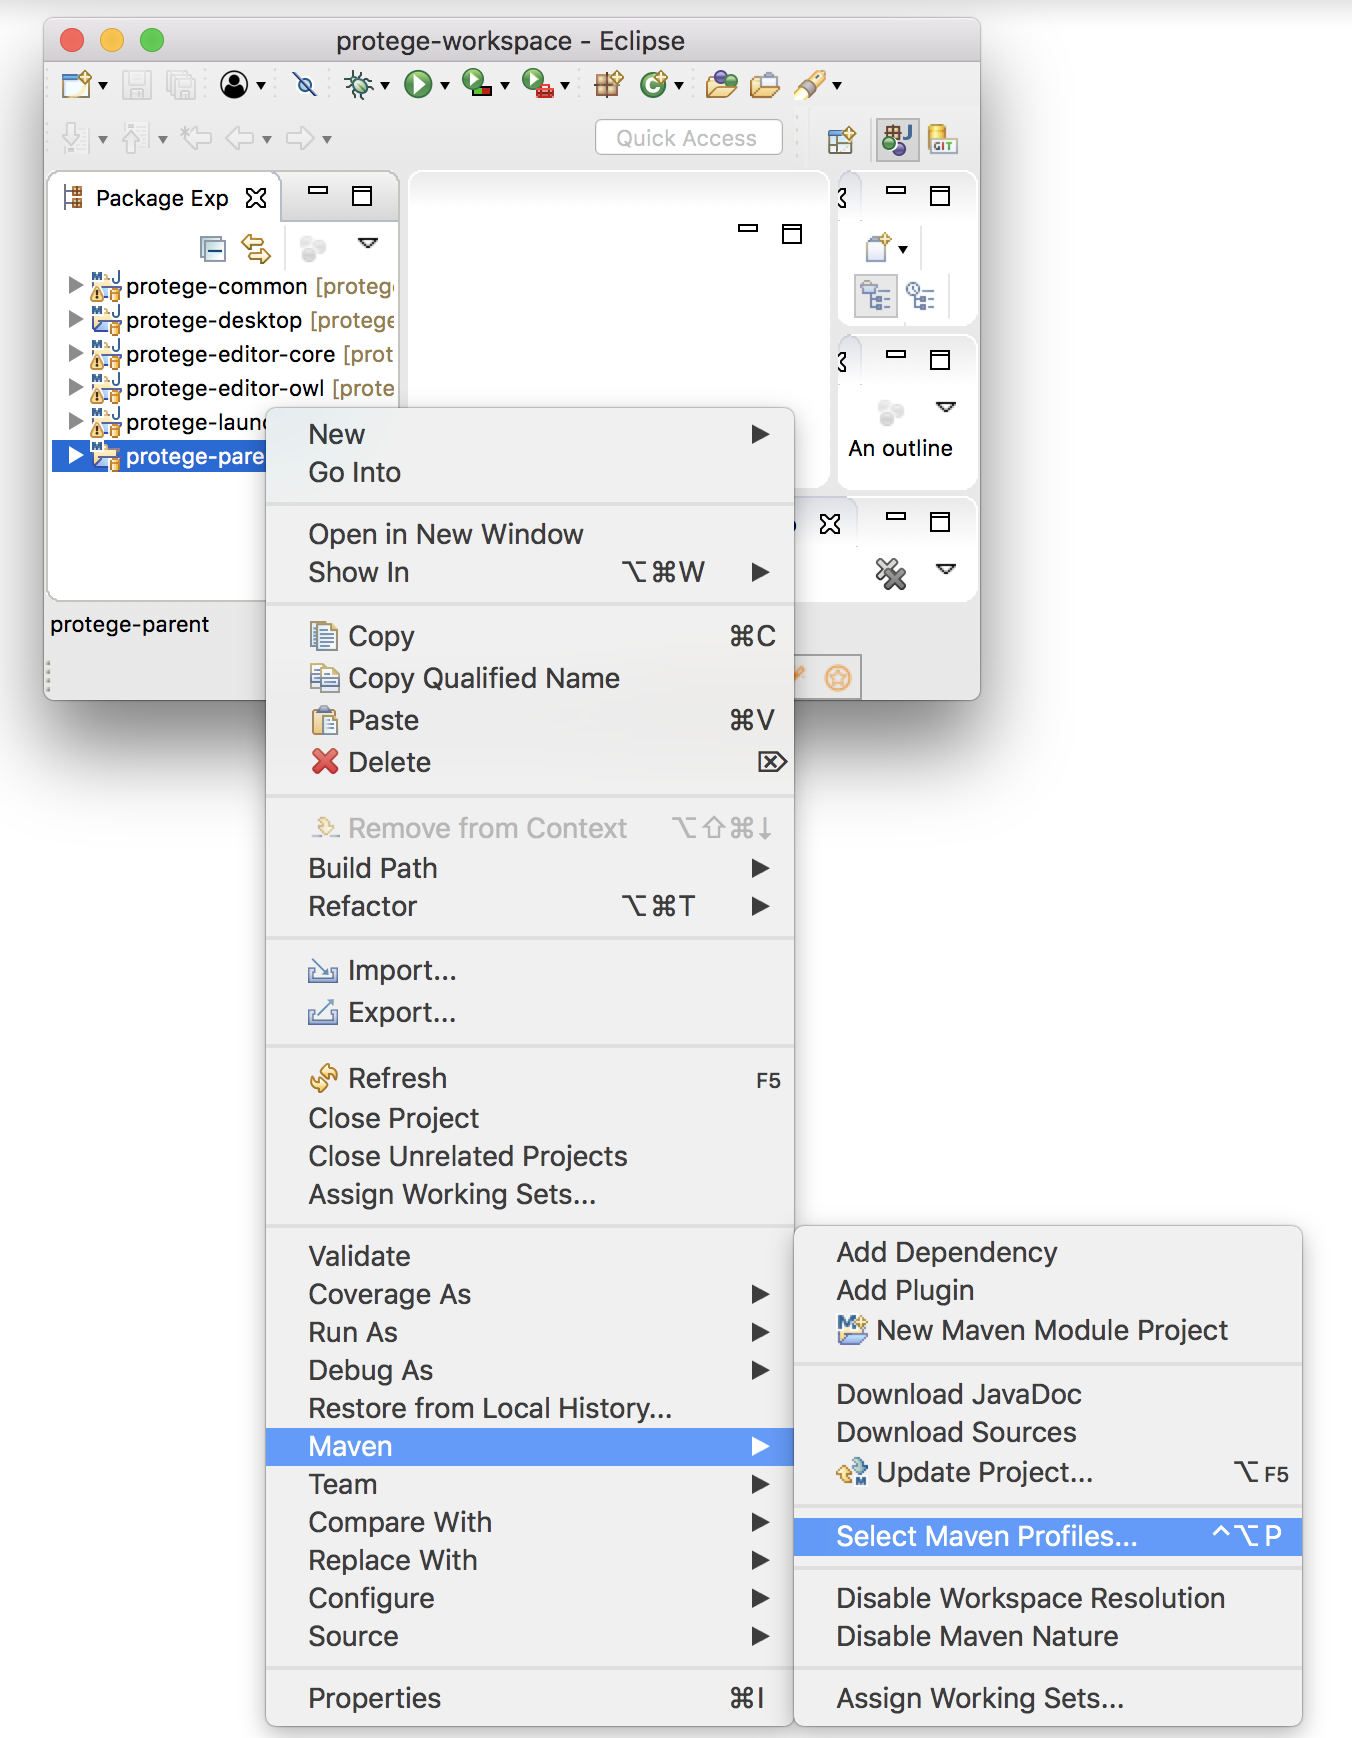
Tick "ide" and click "Ok".
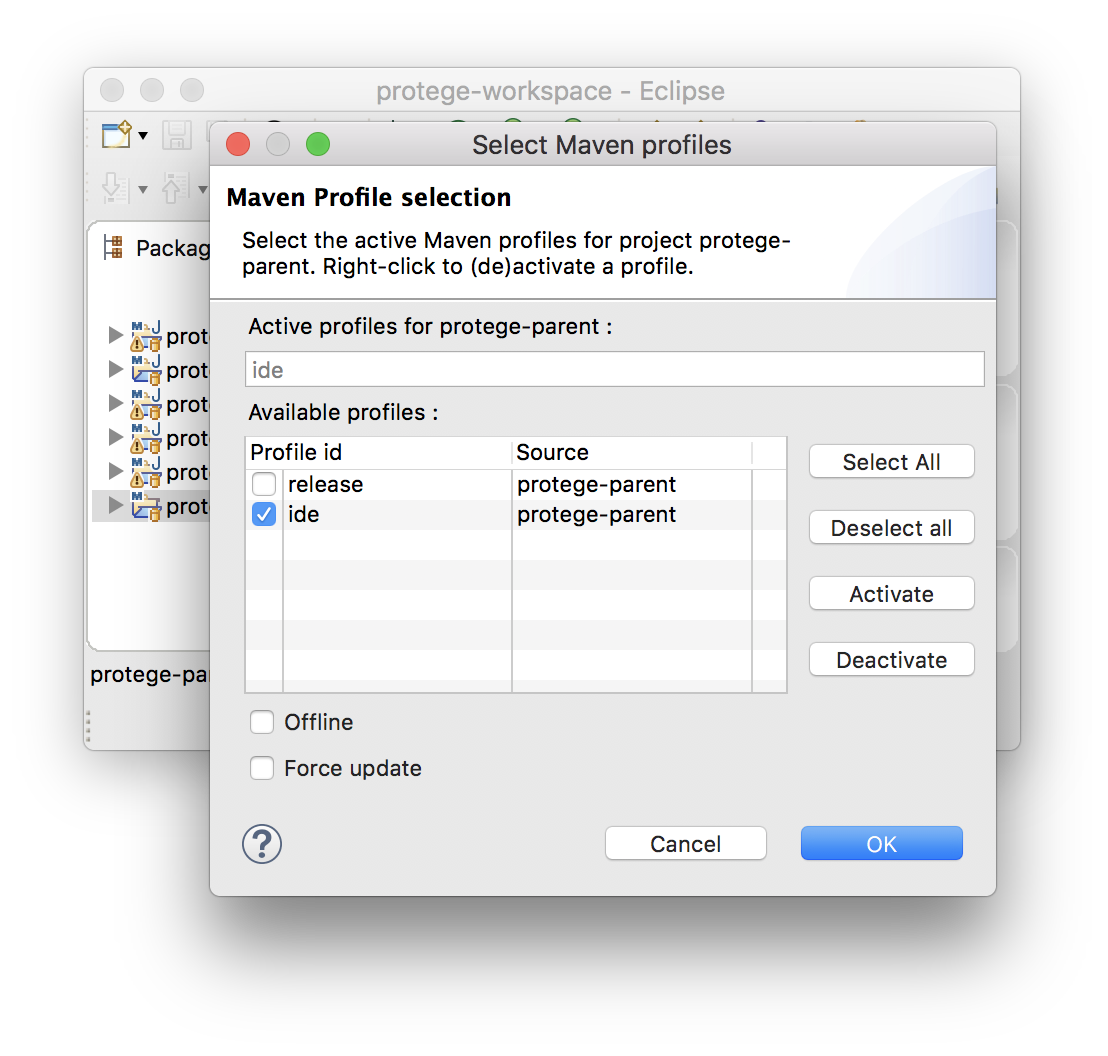
This flag tells maven to prepare files and configurations so that the projects can be used in eclipse.
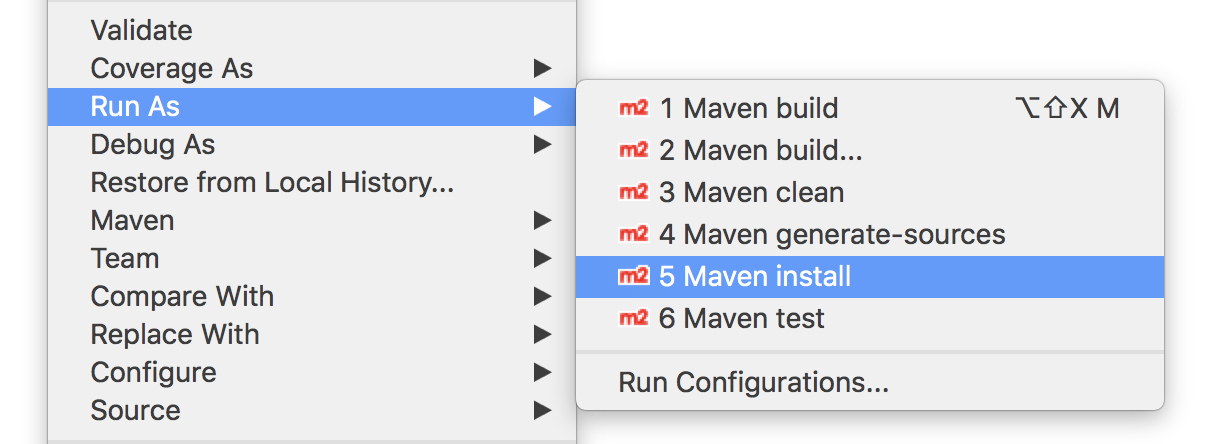
Now right-click on protege-parent again, select "Run as" and choose "Maven install" to compile Protégé.
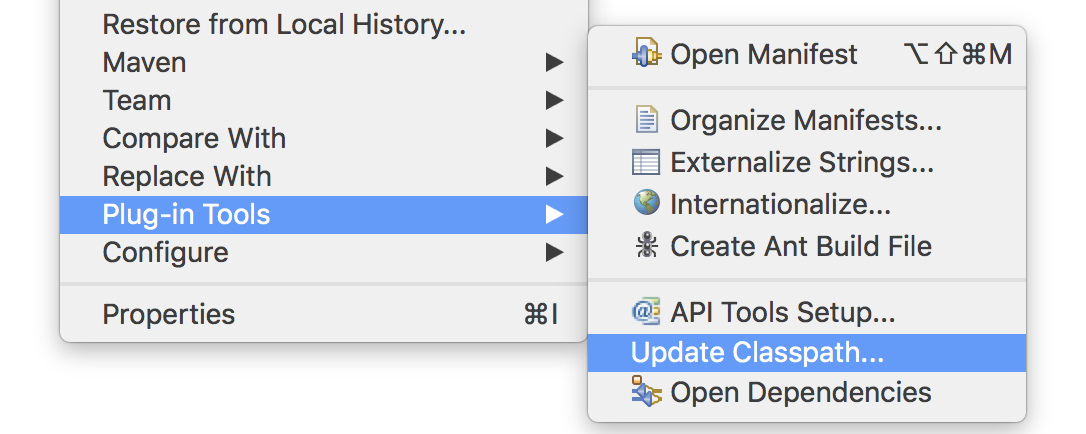
Maven generates new MANIFEST.MF files in the META-INF folders of the projects which contain some settings for the projects class path. To apply these settings, one needs to update the class path of the projects in eclipse.
Right click on protege-common: Plug-in Tools > Update Class path...
Select all projects (that were converted to plugins before) > Finish.

After updating the Plug-in class path, maven dependencies are removed from the classpath.
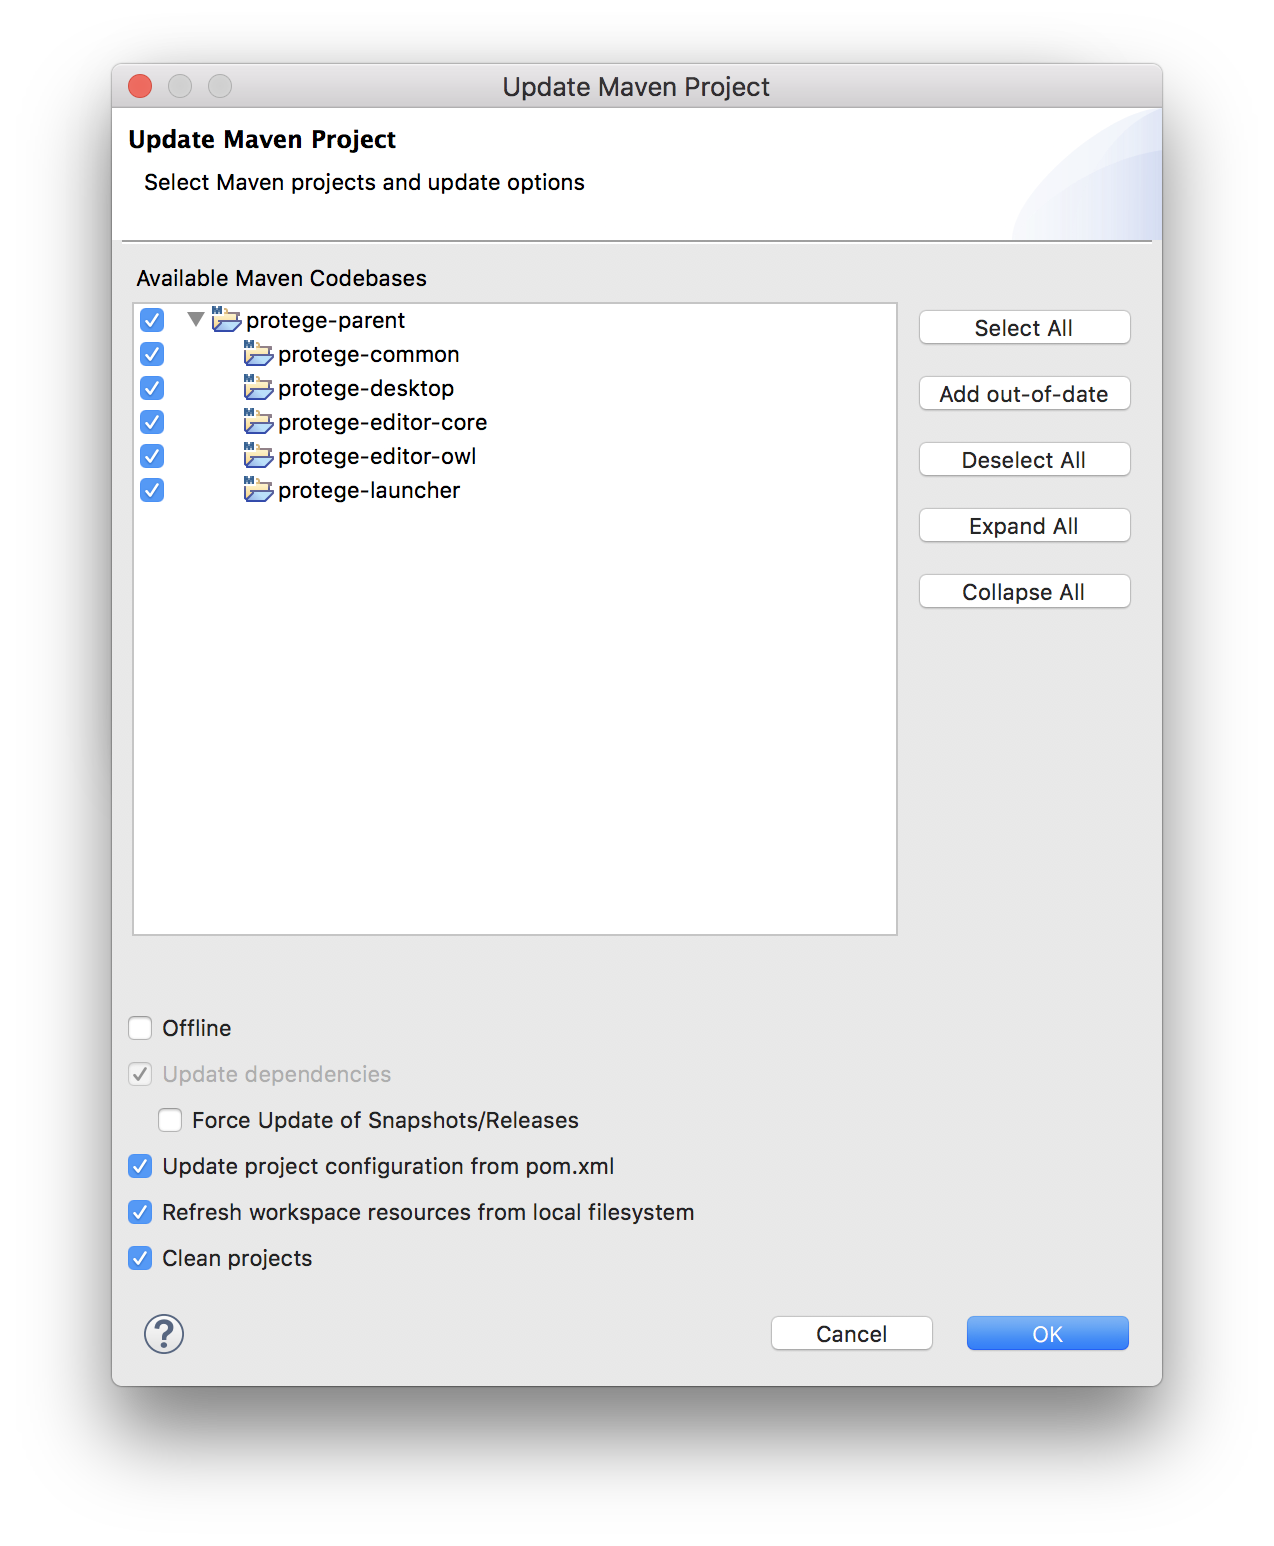
To restore them, right click on protege-parent: Maven > Update Project...
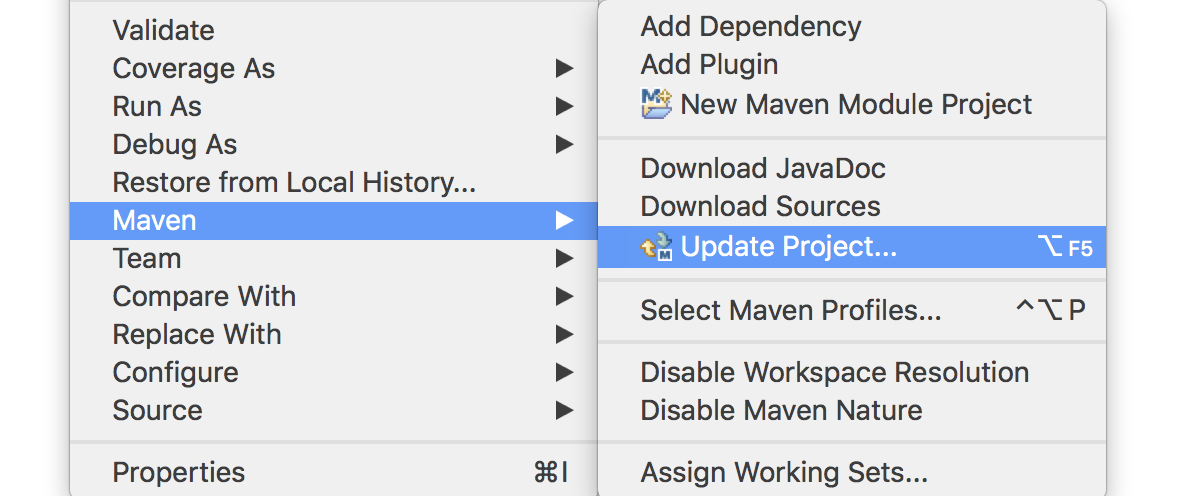
Ensure that all protege-* projects are selected and press OK.
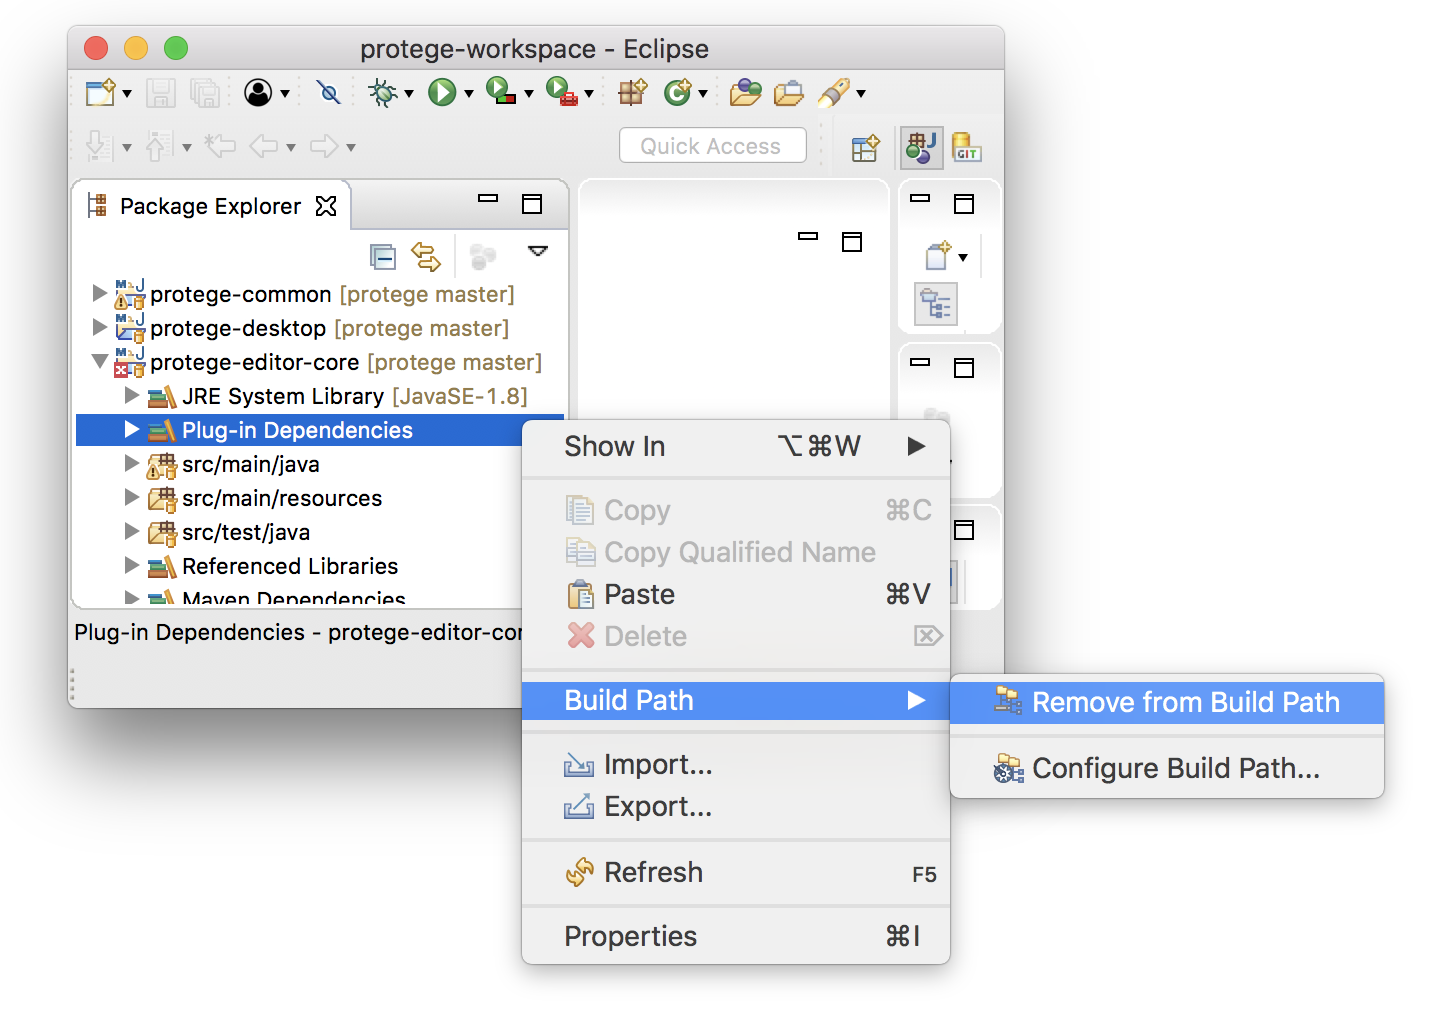
Now the classpath of each Protege project converted to Plug-in Projects will contain both Plug-in Dependencies and Maven Dependencies. However, all Plug-in Dependencies should be already provided in Maven Dependencies. To avoid unnecessary duplicates on the classpath, we can remove Plug-in Dependencies completely:
Open each protege project in the Package Explorer, right click on Plug-in Dependencies > Build Path > Remove from Build Path.
Alternatively, right click on each protege project > Properties > Java Build Path > select Plug-in Dependencies > click Remove
Protégé cannot run yet: you can see some compile errors about some missing import and export packages.
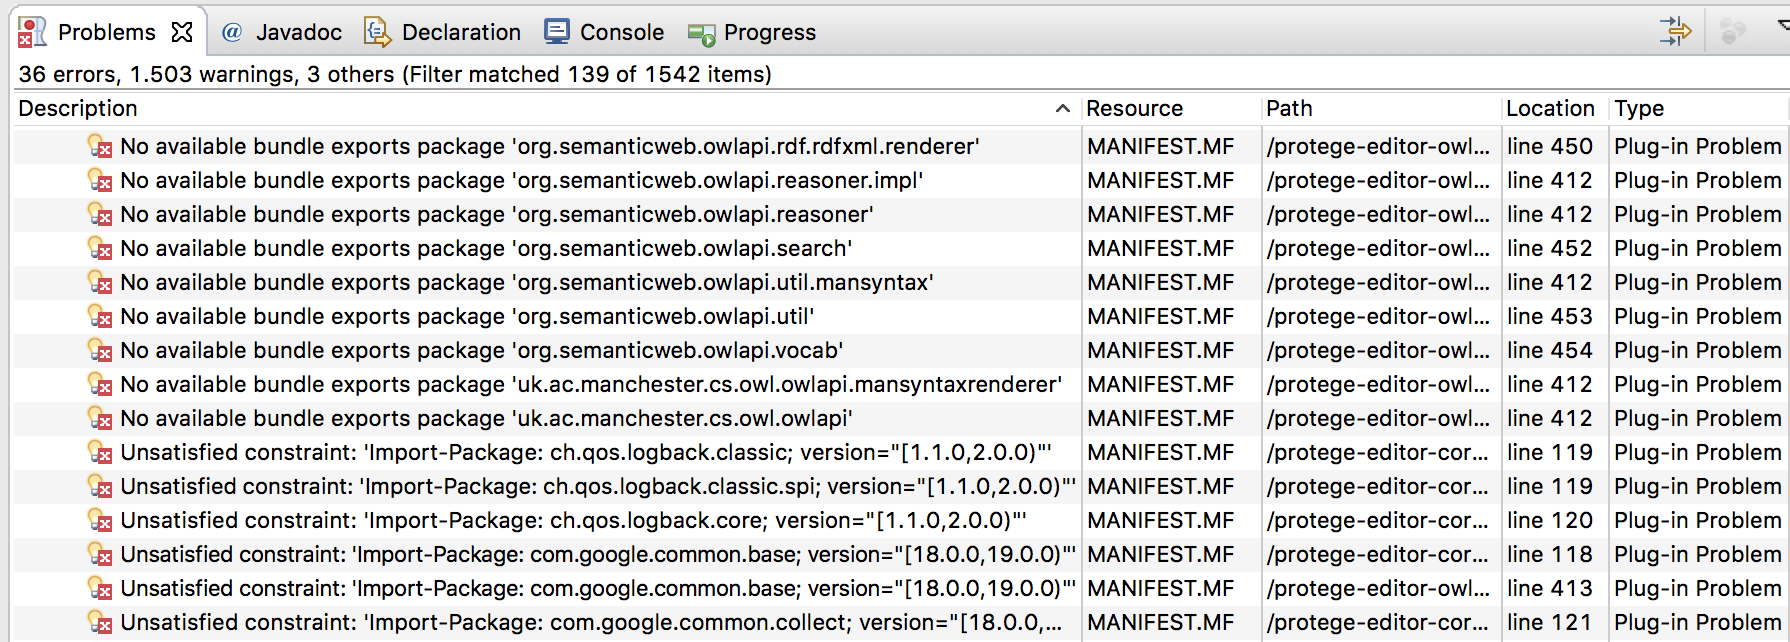
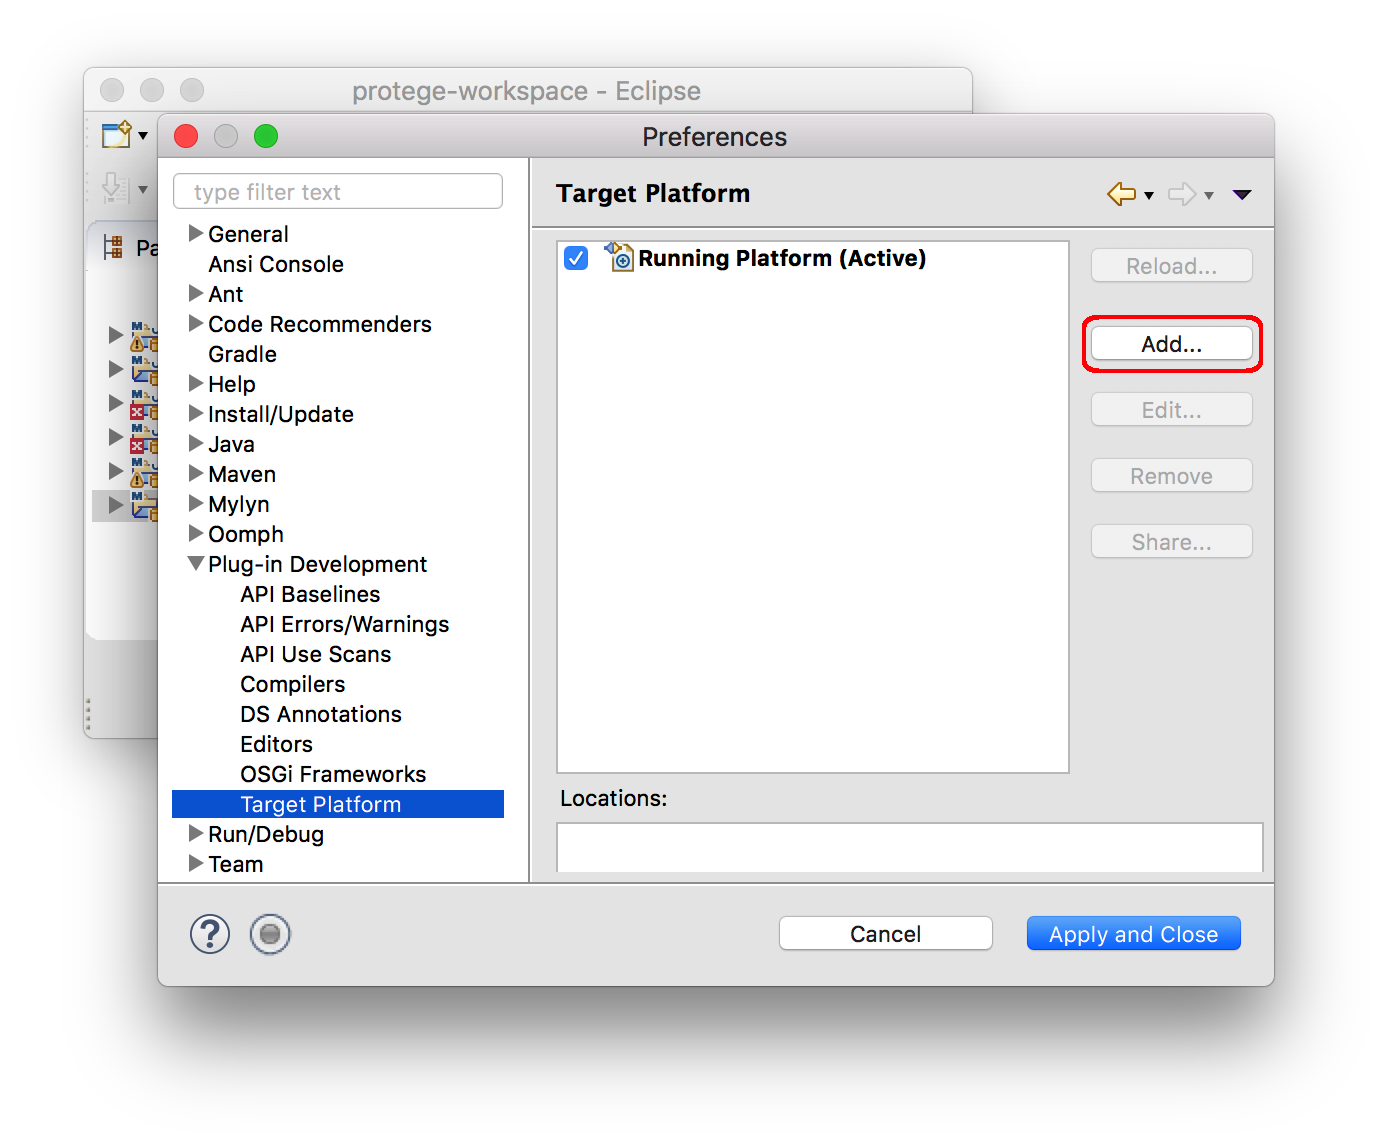
These packages are exported by bundles that are required for Protégé to run. We need to install these bundles in Eclipse. For this, we create a new PDE "Target Platform" definition, which is the environment in which Protégé should run. Go to:
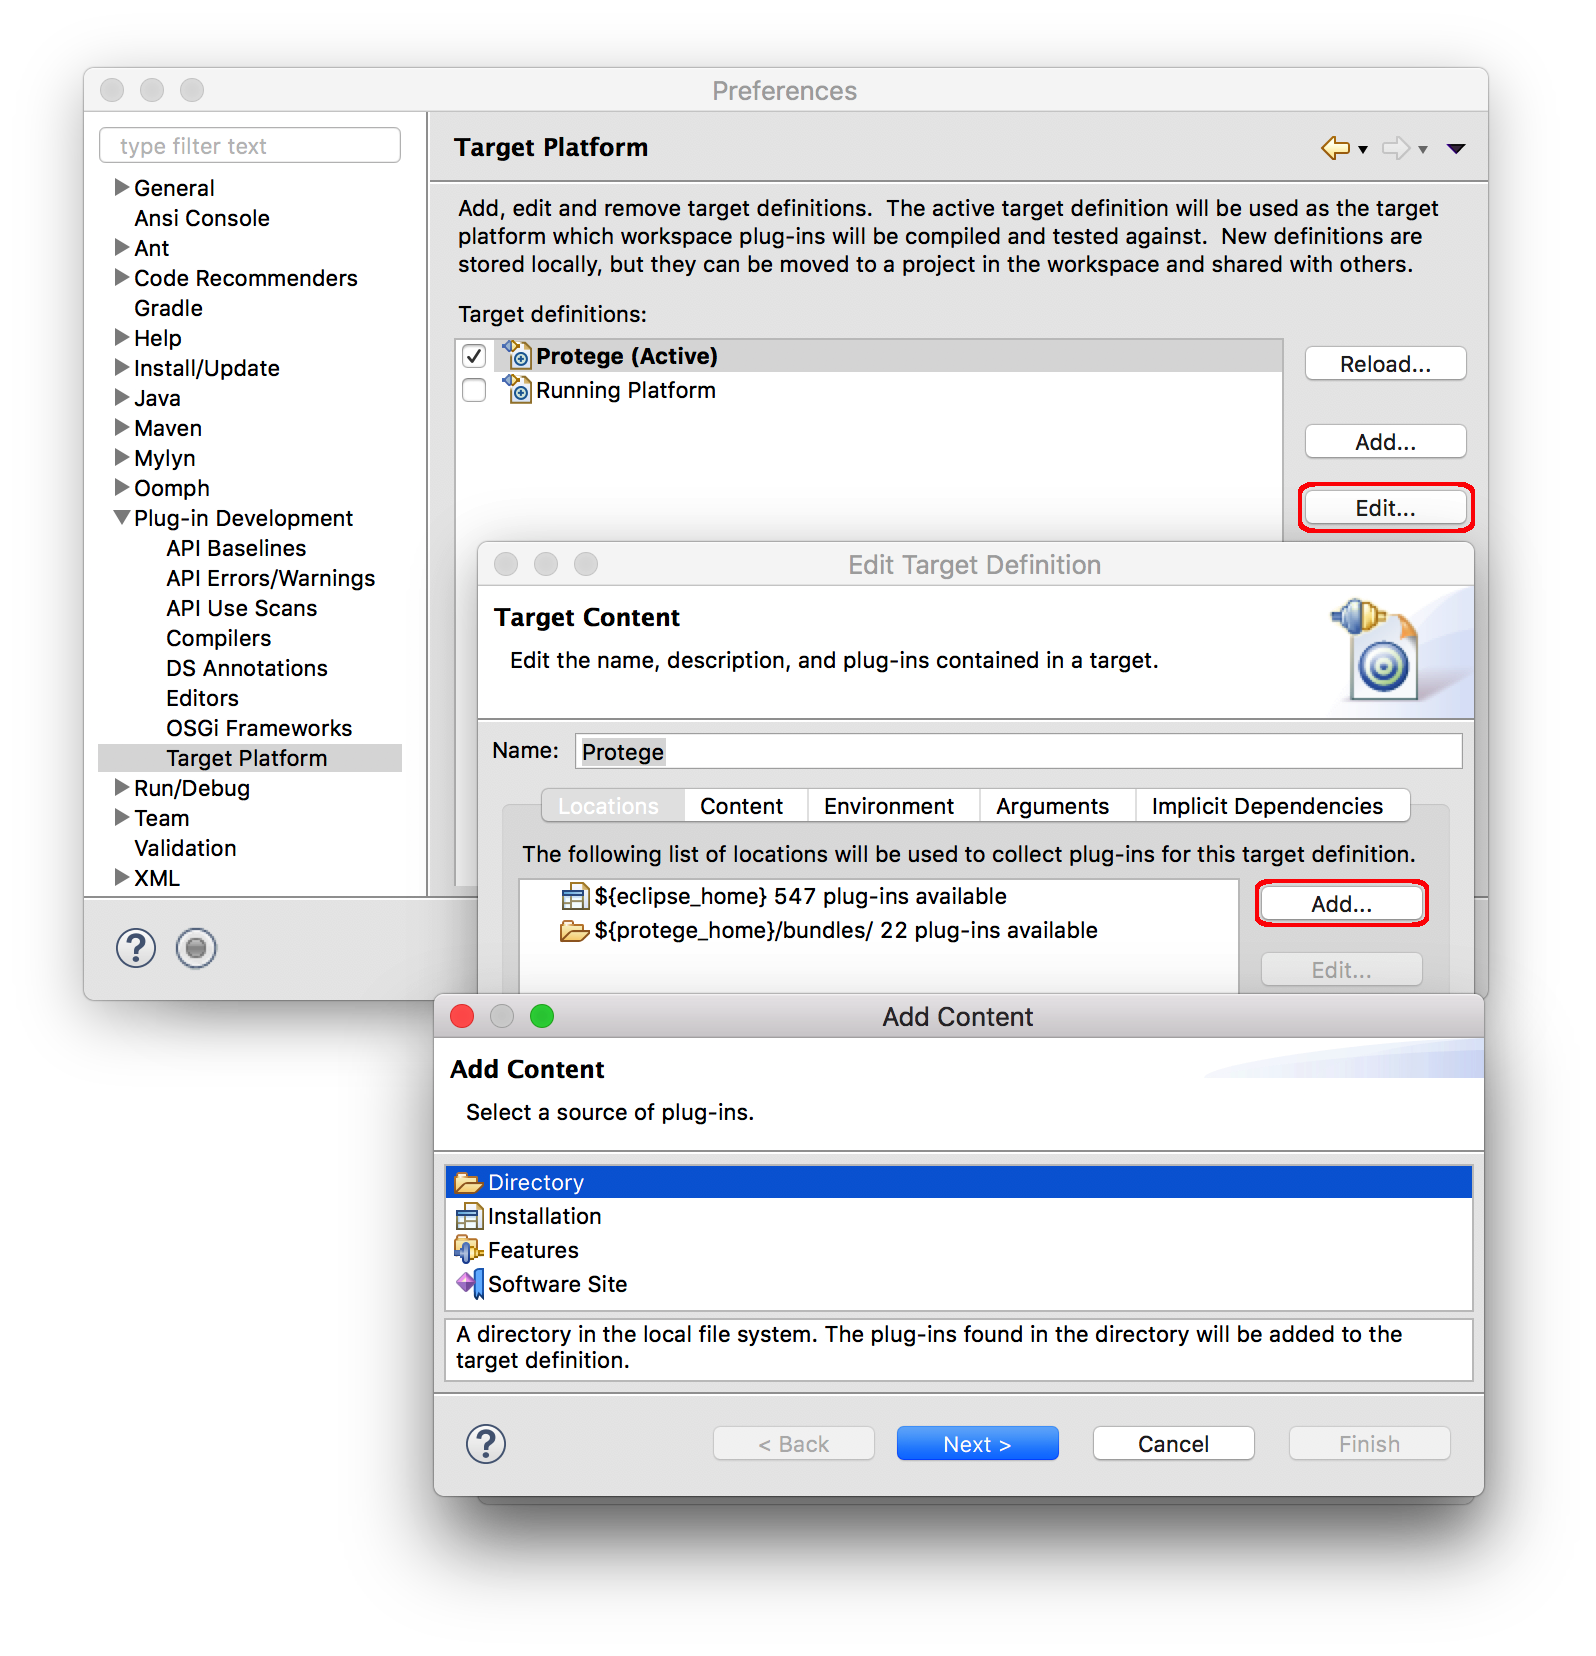
Preferences > Plug-in Development > Target Platform > Add...
Select the default target definition > Next
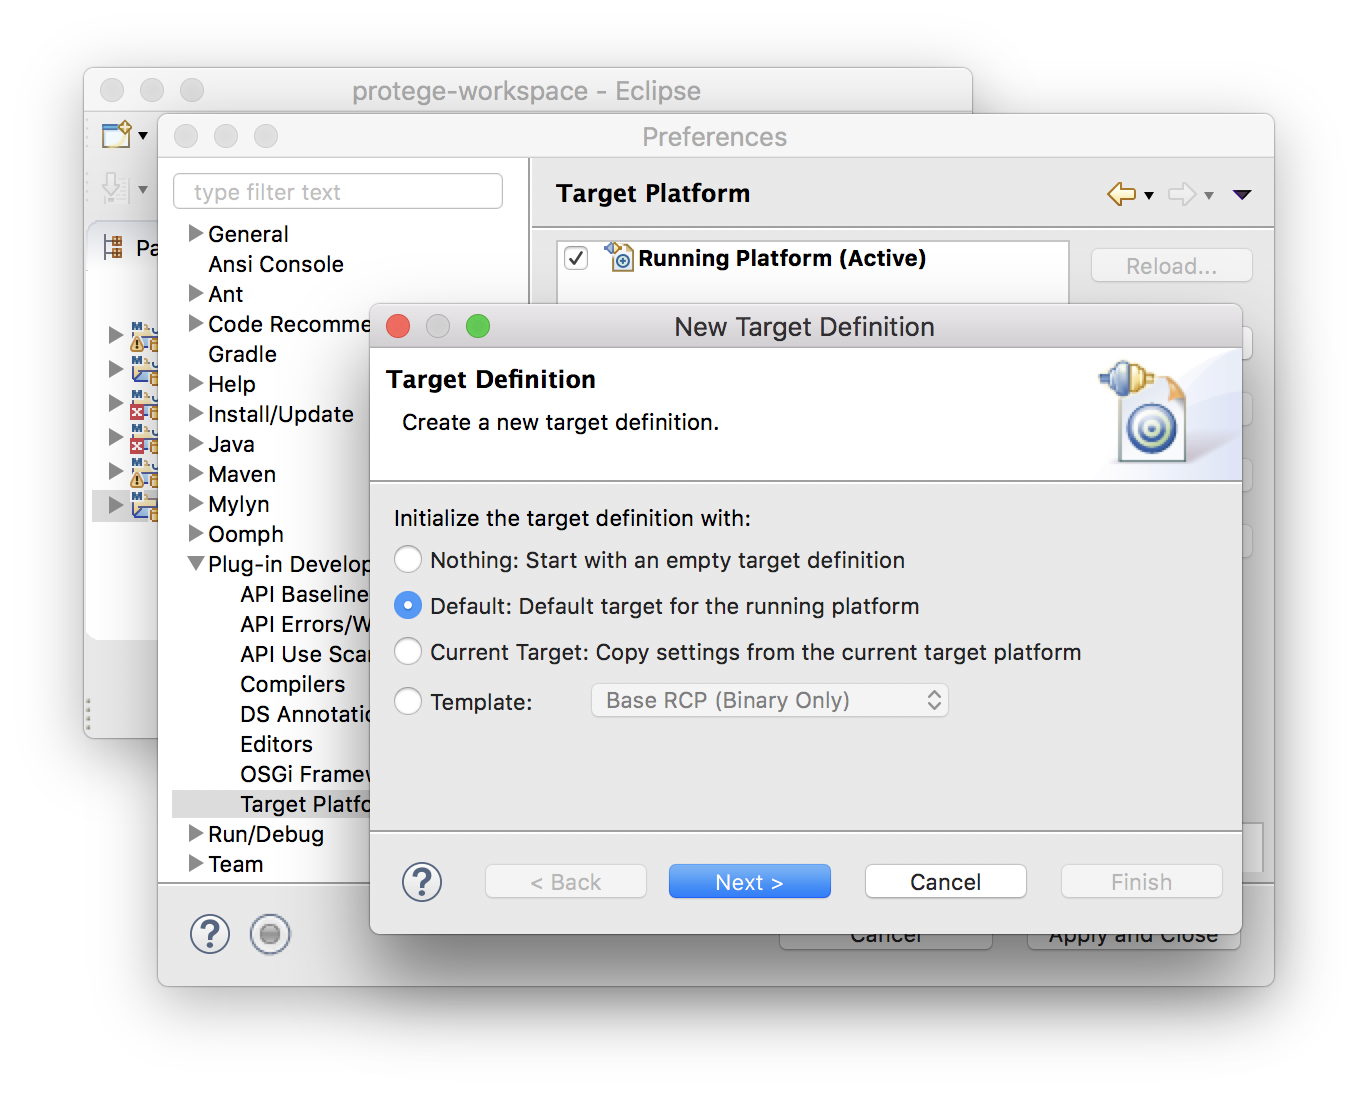
This will add all bundles from the eclipse installation, but we will not need all of them.
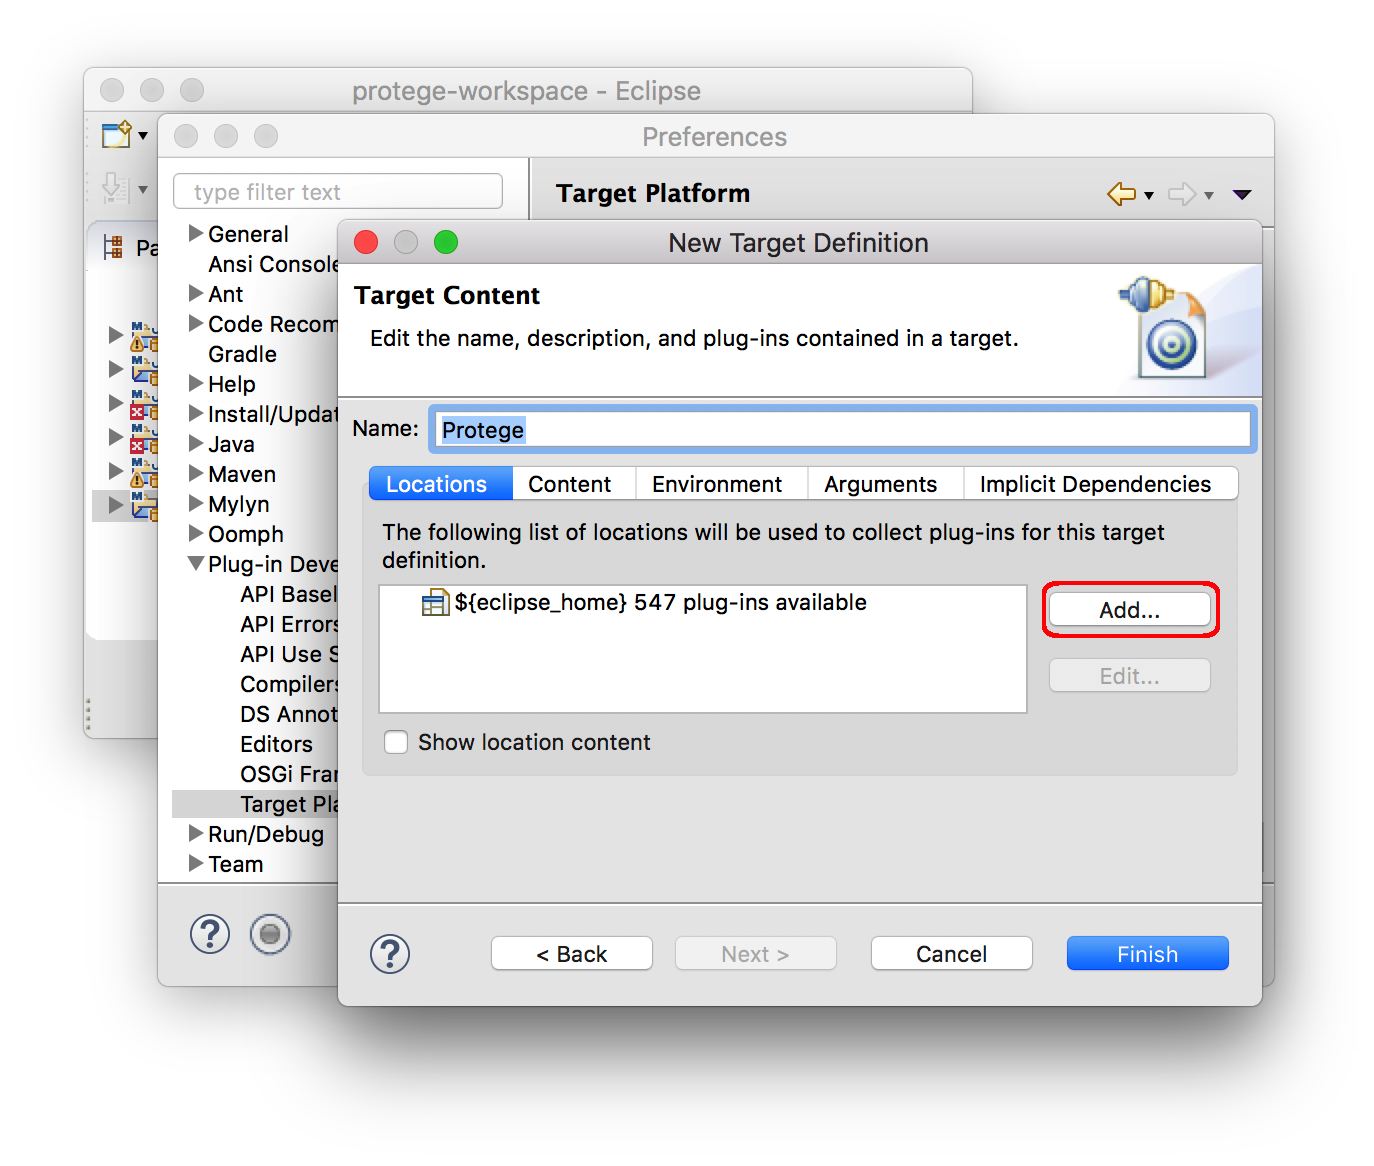
Provide a name, e.g., Protege and press Add... to add more bundles.
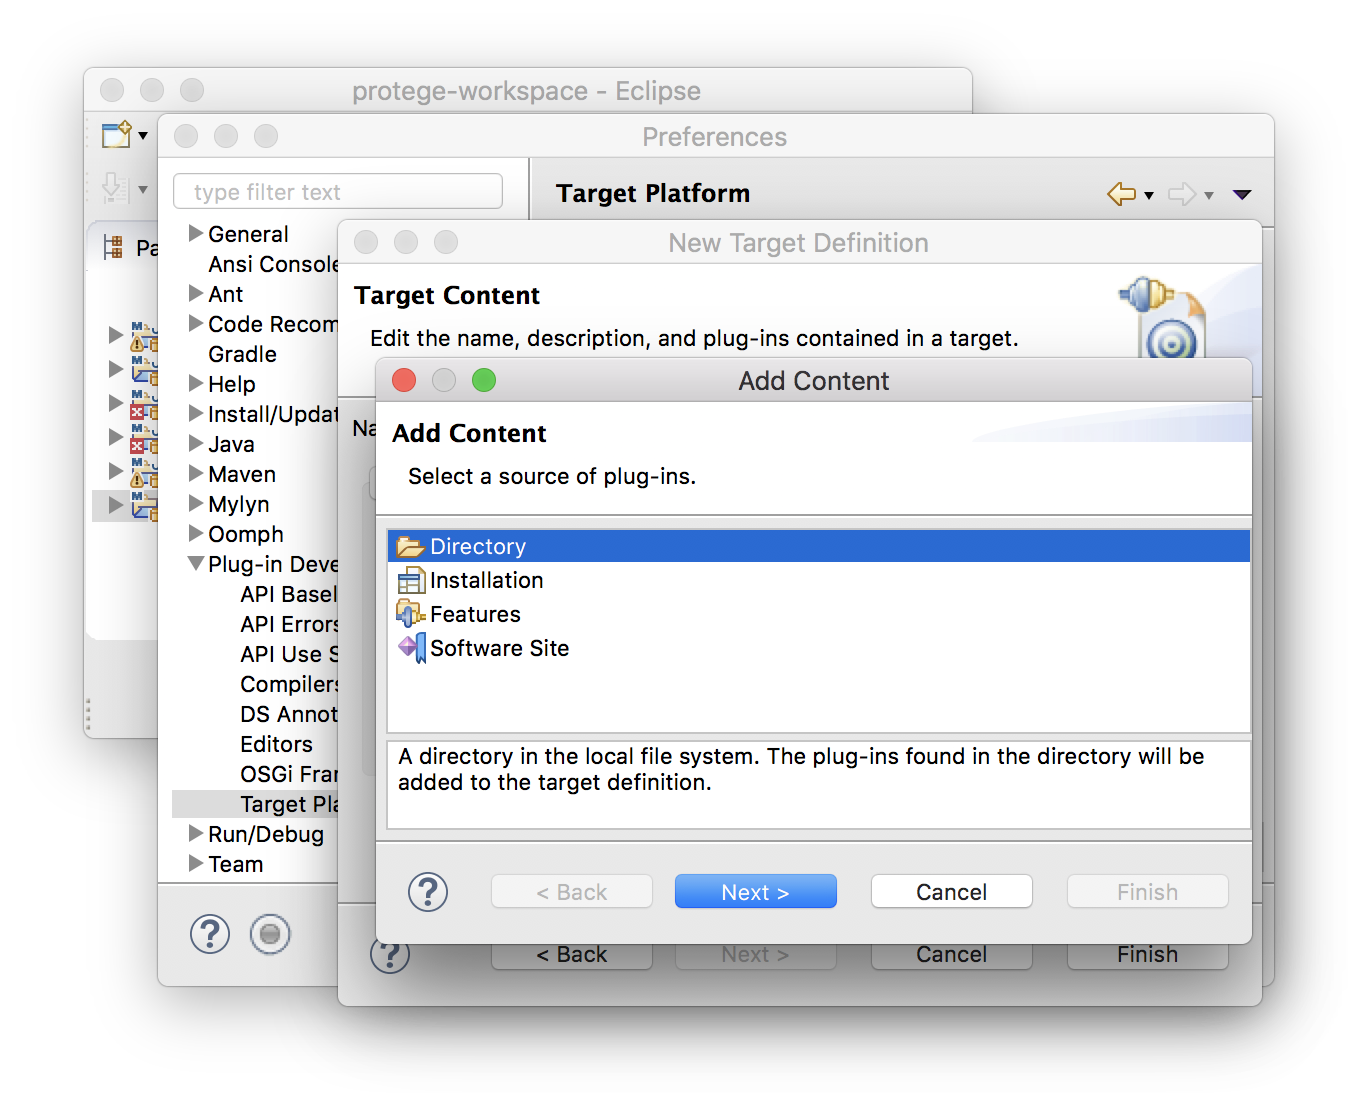
Choose Directory > Next
In the field "Location:" we are going to provide a location of Protégé bundles. For this, we define a string substitution variable pointing to the location of Protégé installation. Press "Variables...":
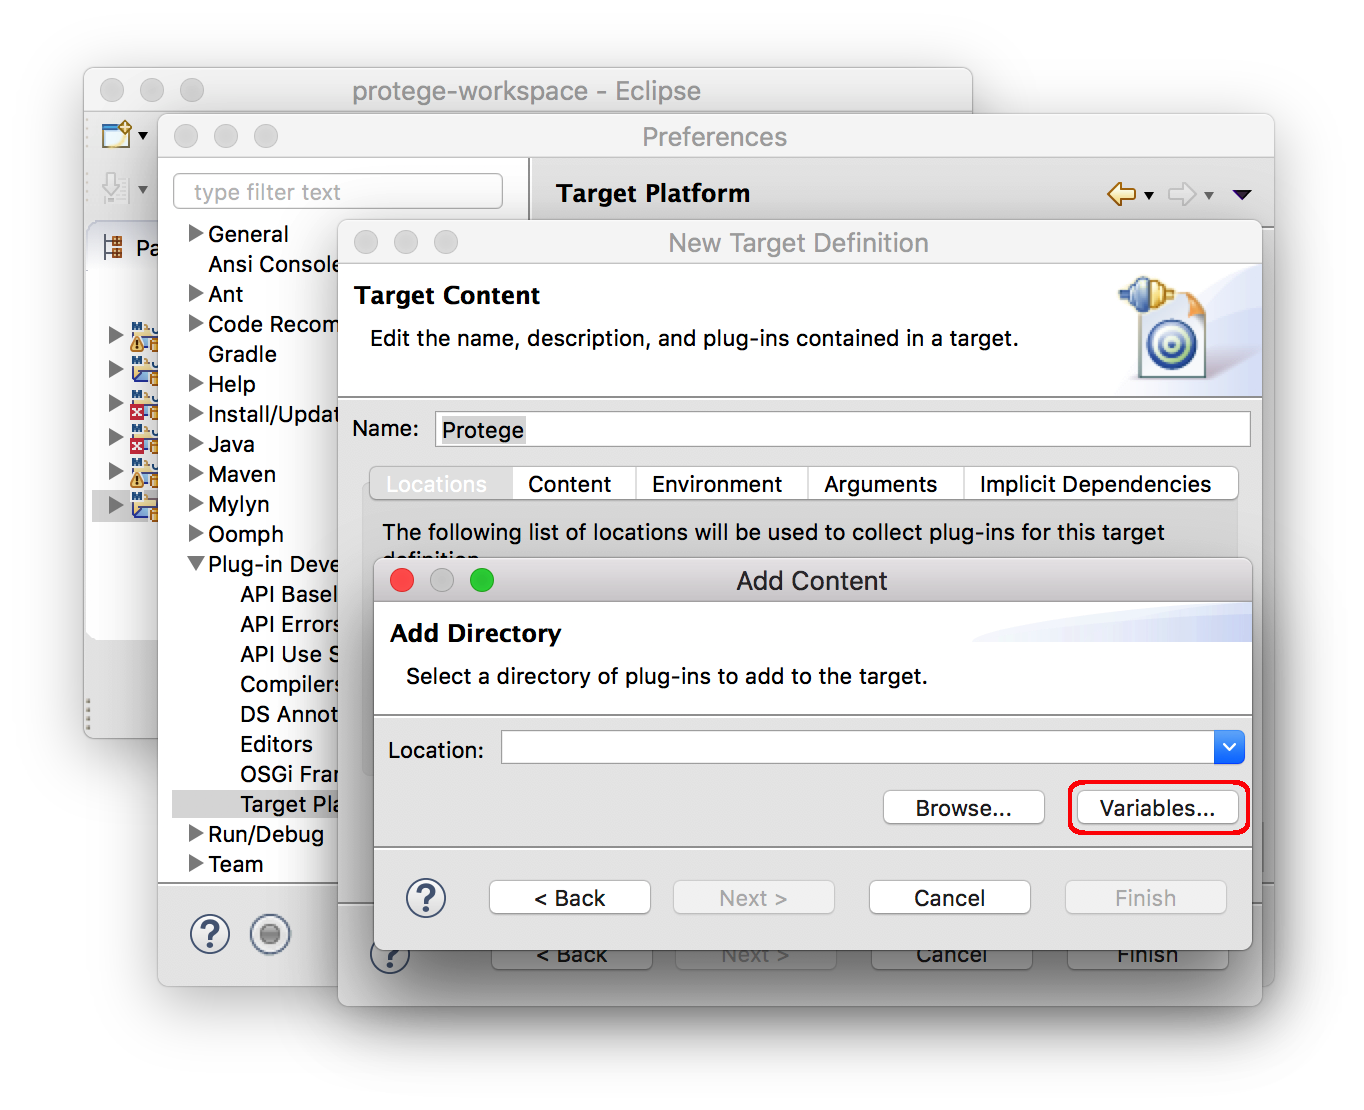
In the opened window press "Edit Variables..." > "New...", enter Name: protege_home and as the value the full path of of the following directory in the location where Protégé was cloned (or use the "Browse..." button to navigate to this location):
protege/protege-desktop/target/protege-${version}-platform-independent/Protege-${version}
You can provide an (optional) description such as:
The location of Protege installation

Press OK > "Apply and Close" > Cancel.
In the "Location:" filed of the "Add Content" window now enter
${protege_home}/bundles/
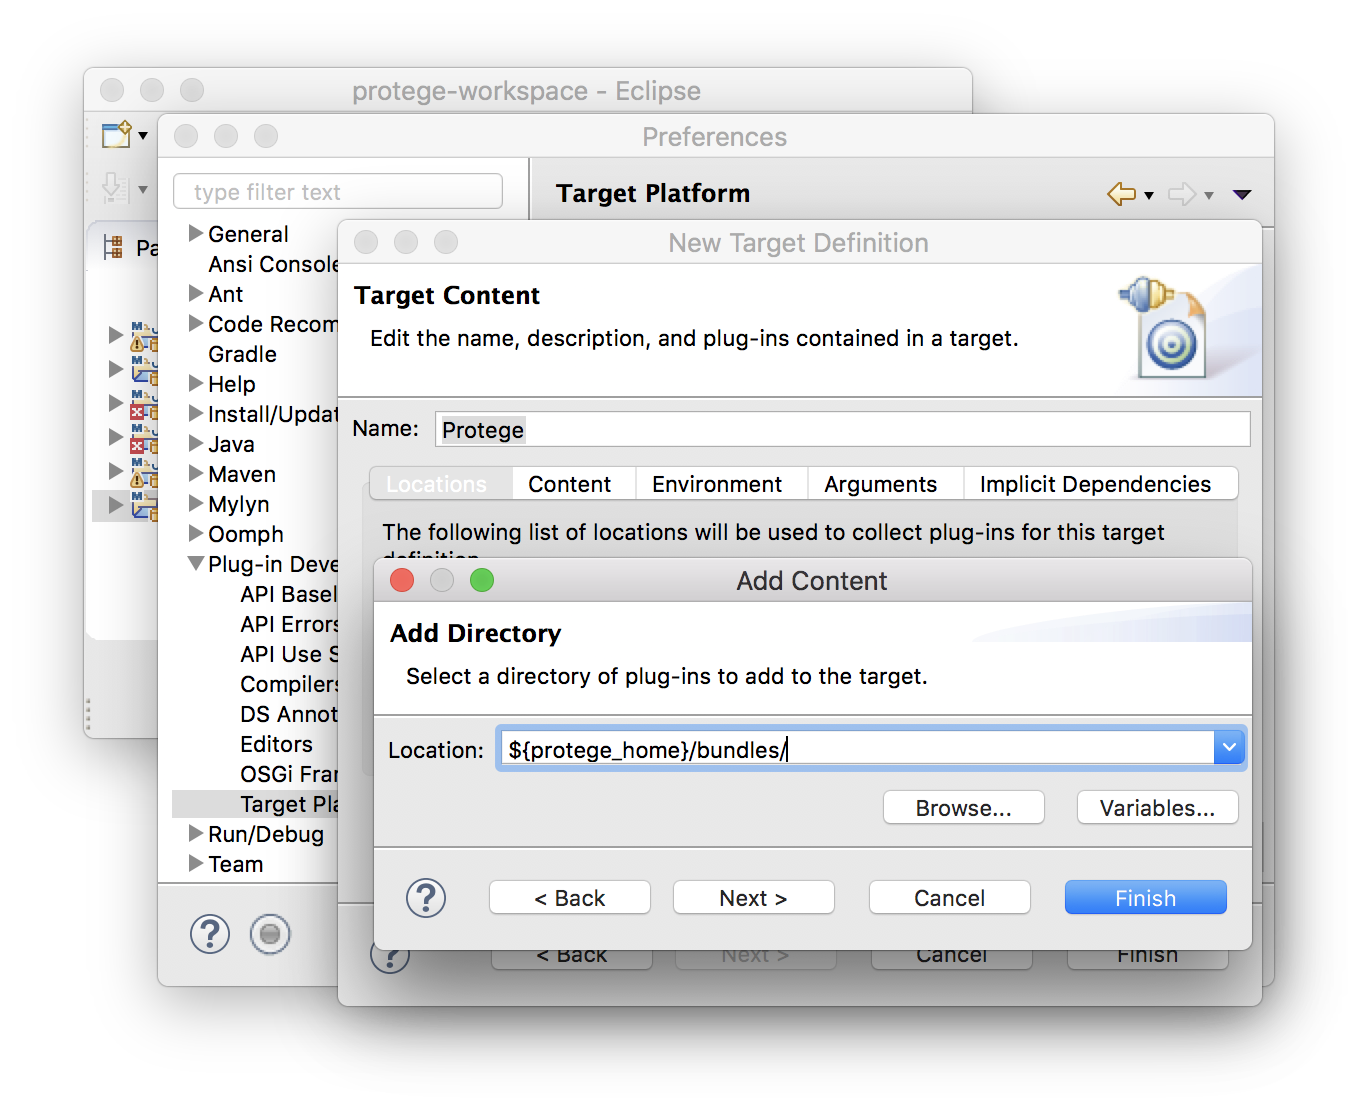
If there is a warning "Location directory does not exist" then the protege_home variable is probably defined incorrectly.
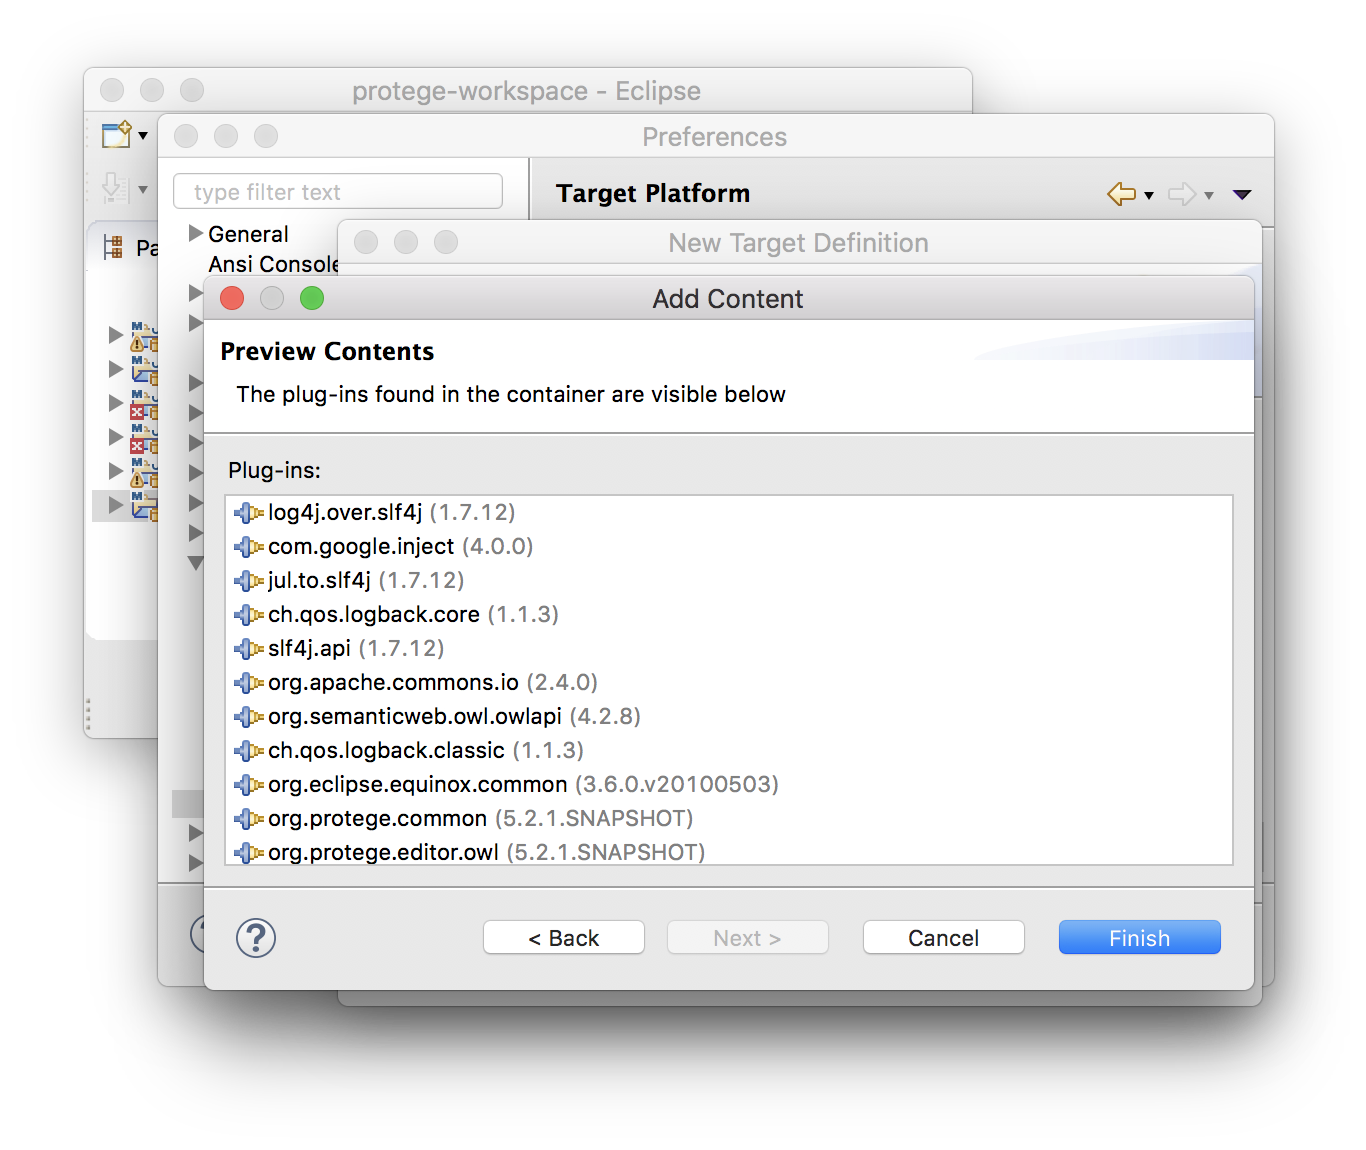
Press Next. You will see a list of plug-ins from this directory (if it is empty, double check the location directory). Press Finish.
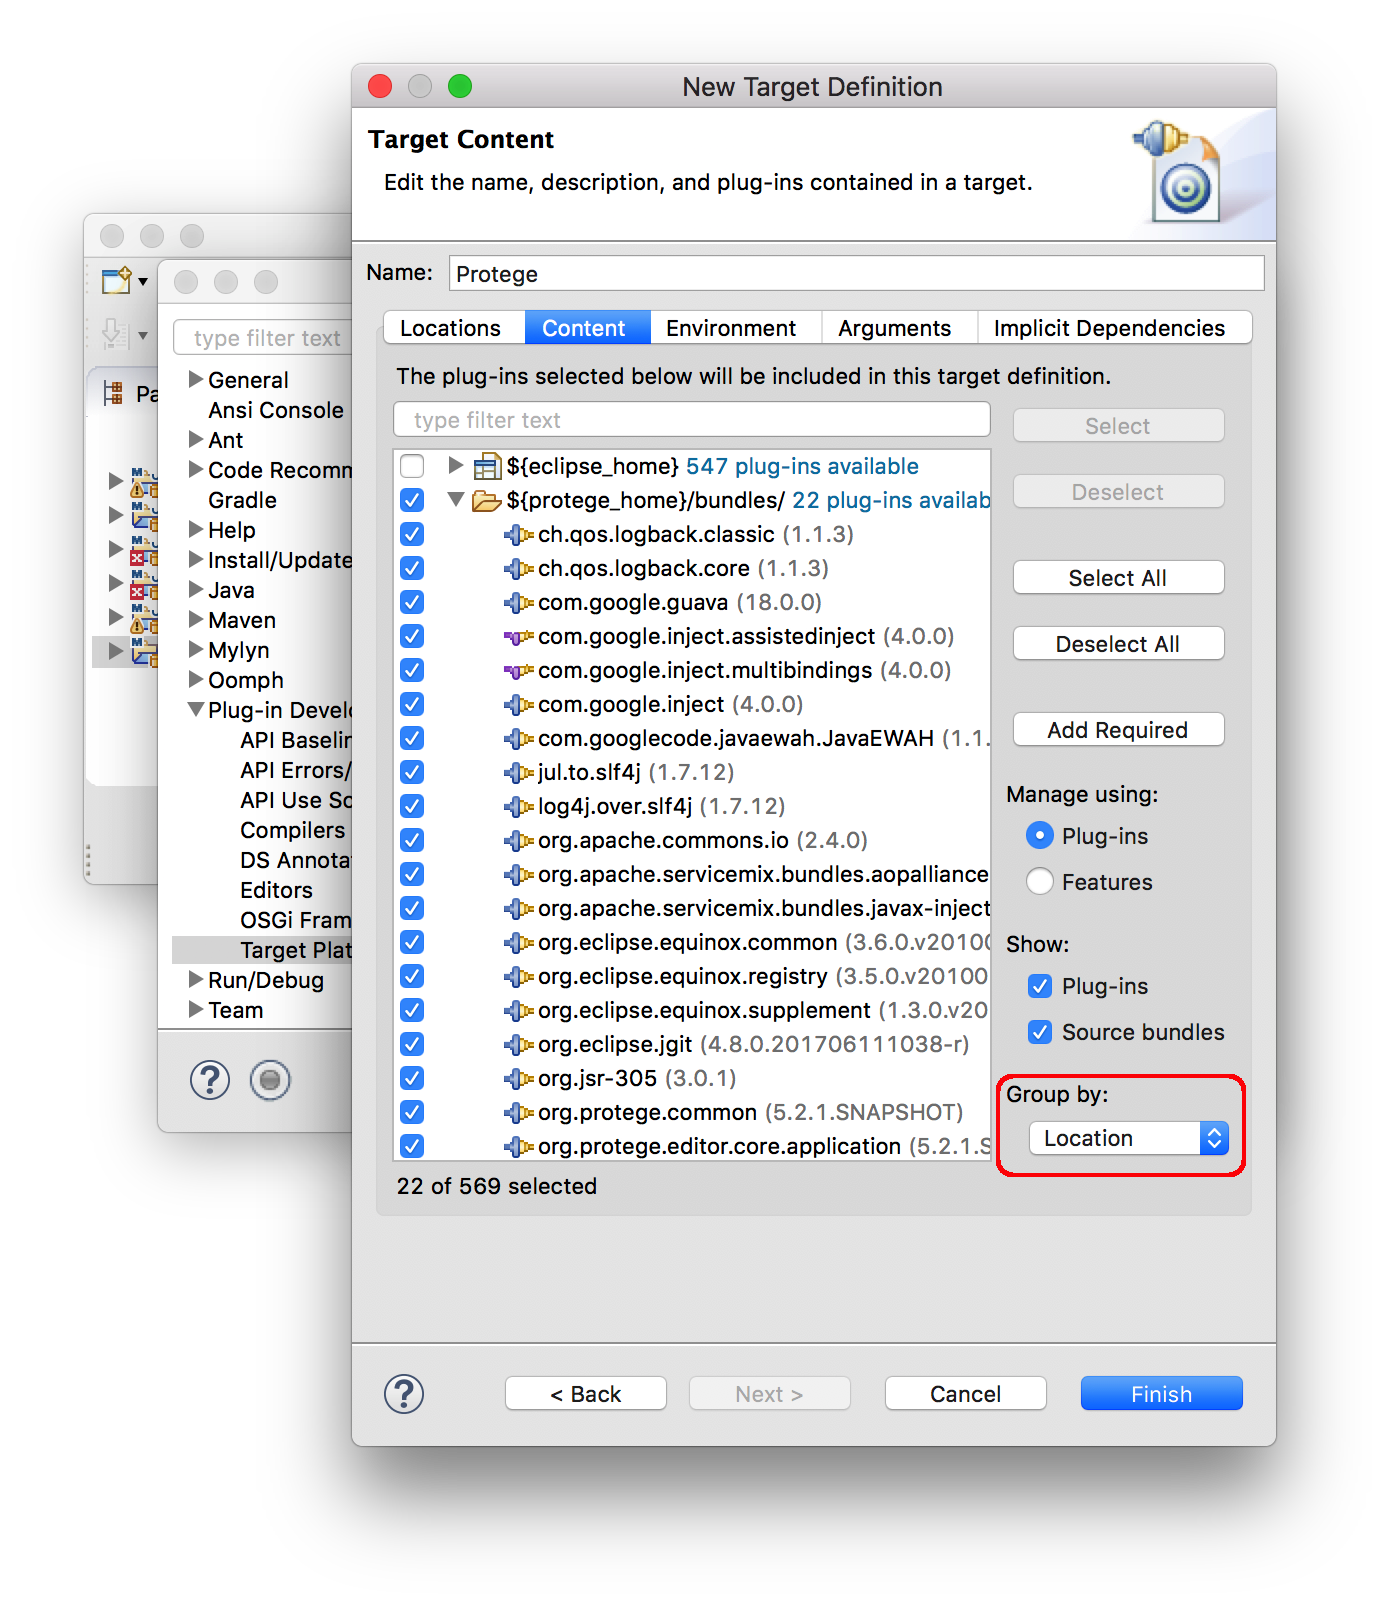
Next we select the bundles that we need for running Protégé. Switch to the "Content" tab of the "New Target Definition" window. In the bottom-right corner select "Group by: Location". Deselect all bundles from "${eclipse_home}". The bundles from the "${protege_home}/bundles" directory should remain selected.
Now type in the filter text field: org.eclipse.osgi and select the bundle that matches this name.
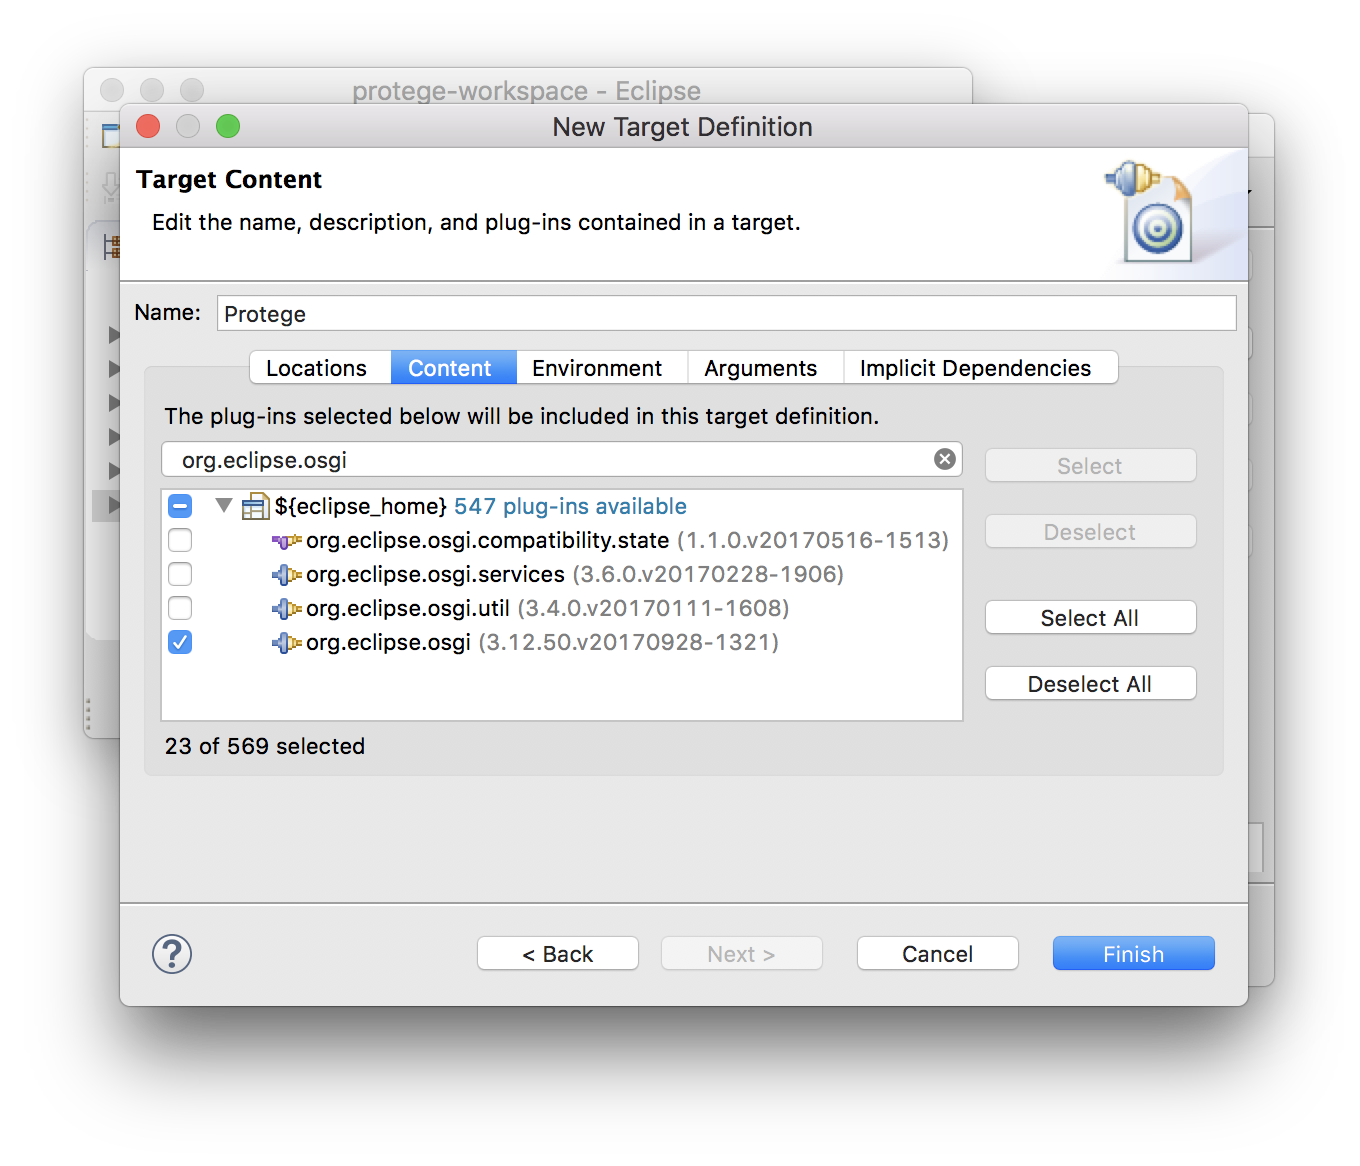
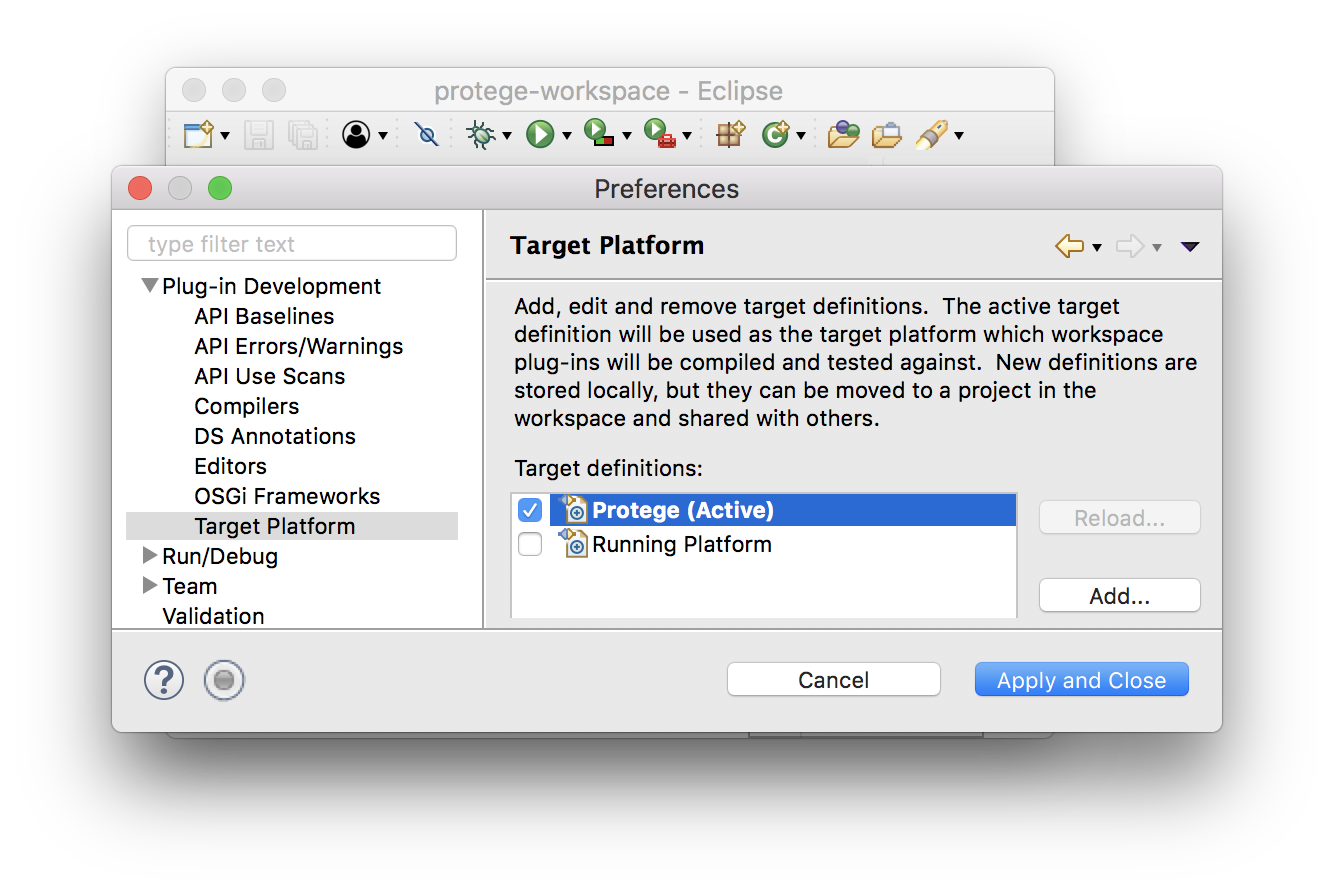
Press Finish. Ensure that the newly created Protege target platform is active and press "Apply and Close"
Next, in the top menu select Project > Clean... > Clean all projects > Clean
All compile errors should now disappear (there should be no red marks on the projects).
In the top menu, select
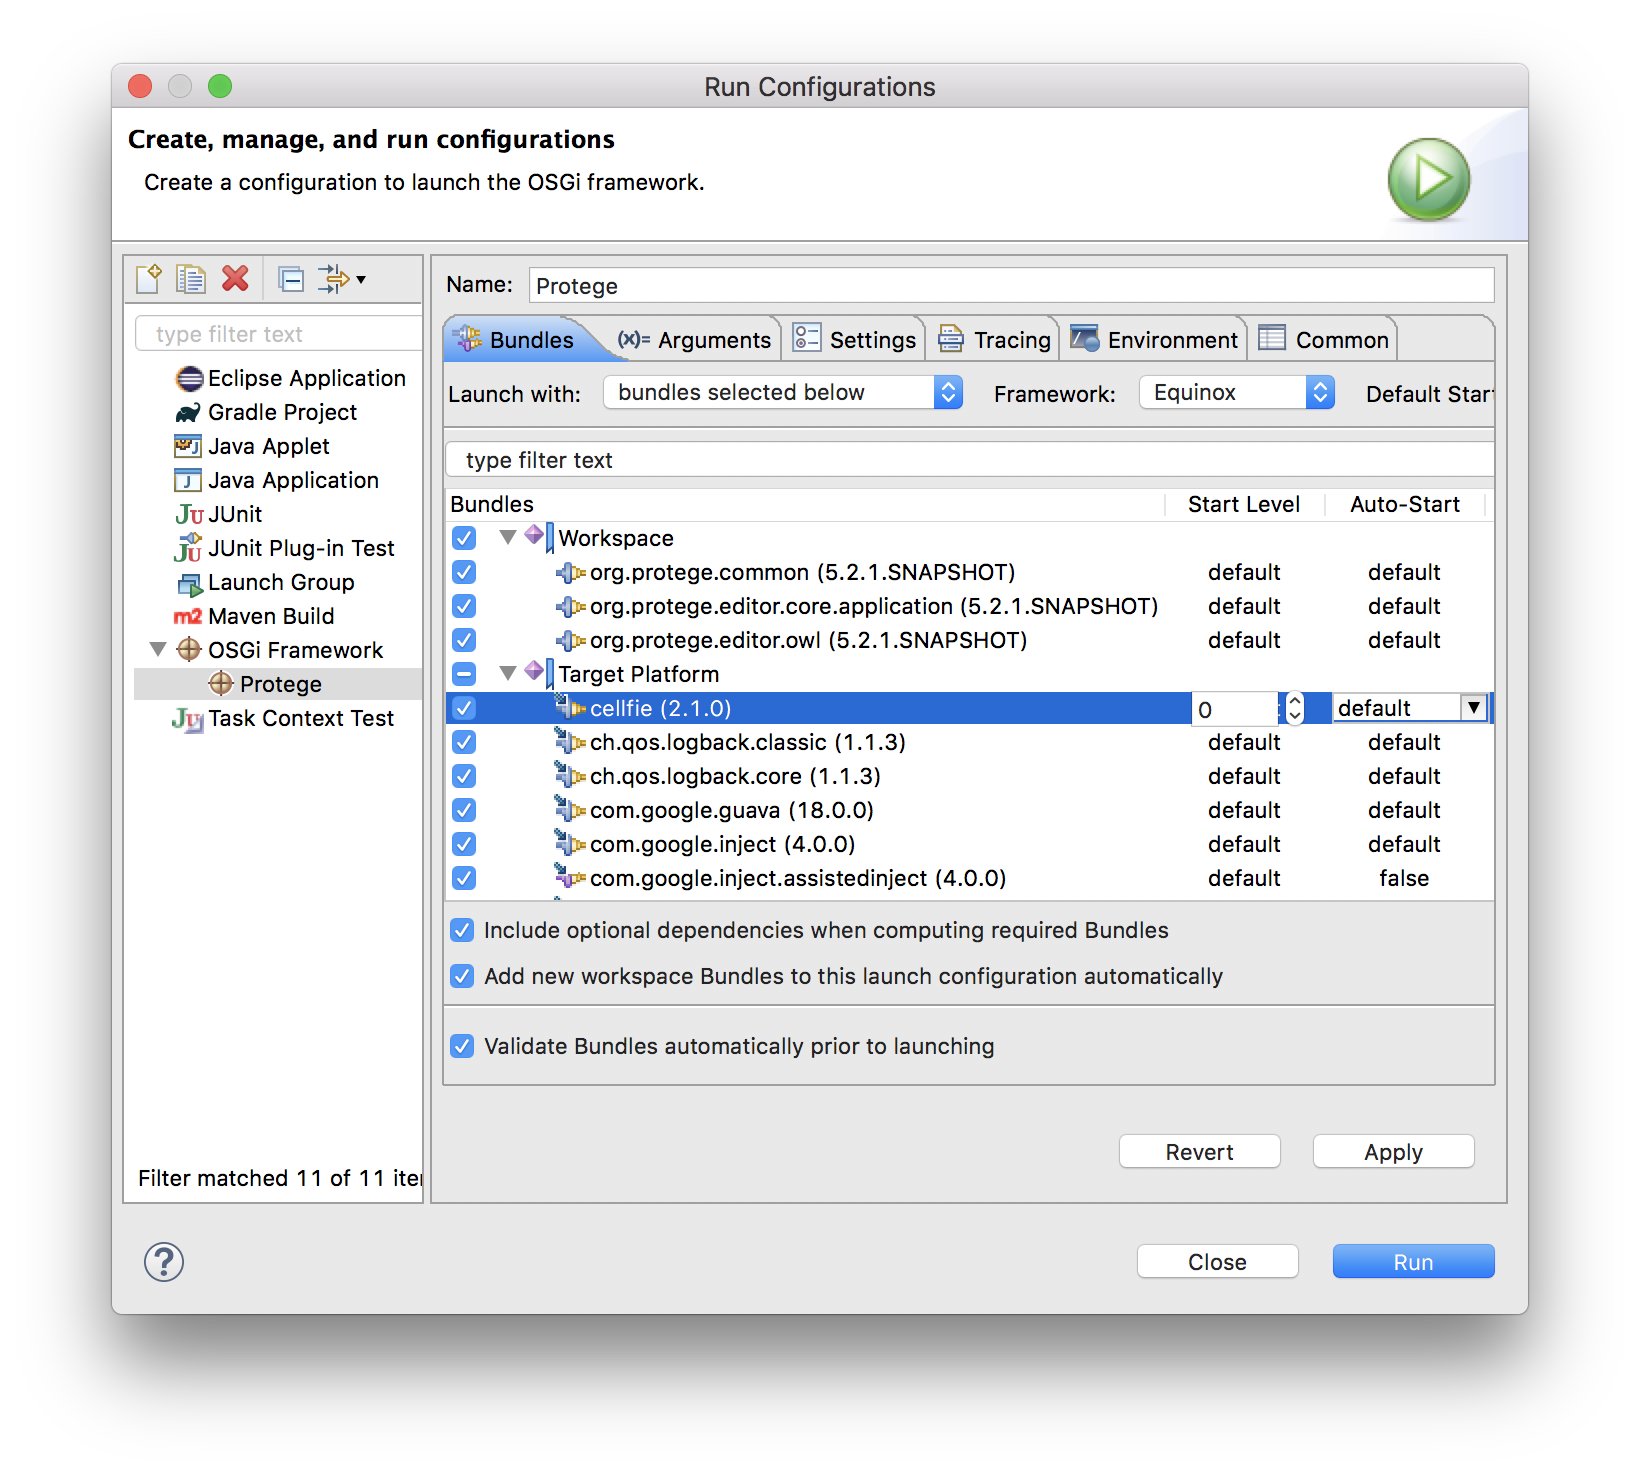
Run > Run Configurations... > OSGi Framework > (right click) > New
Provide a name for the configuration, such as Protege.
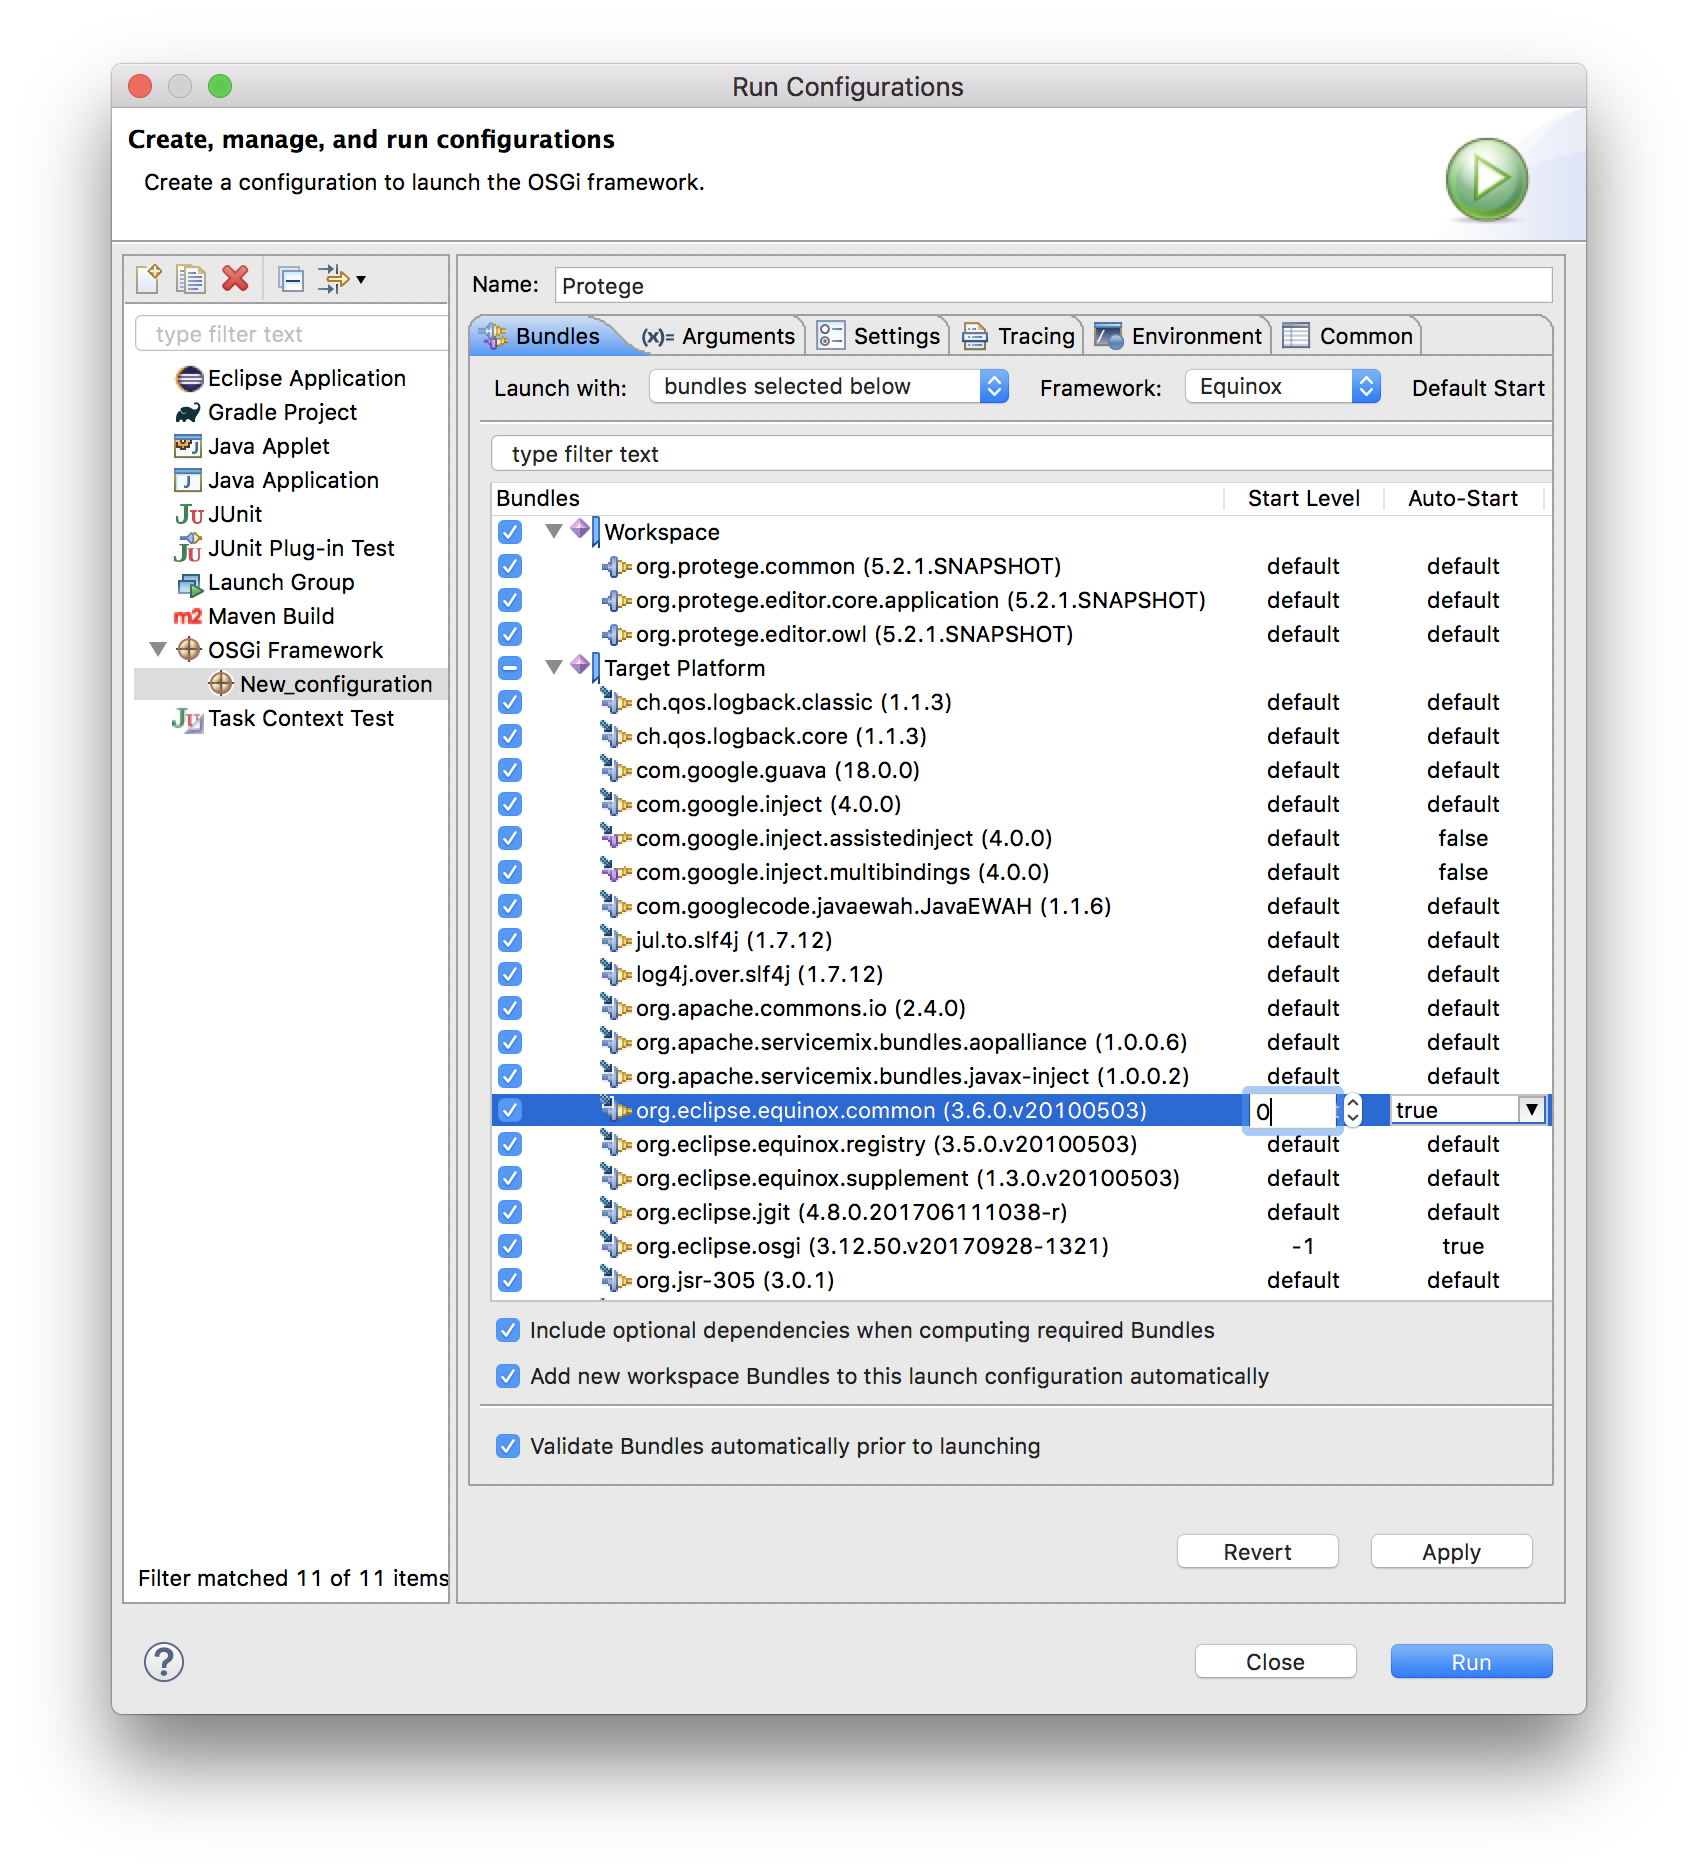
Set the default start level is 1 and ensure that the default auto-start is true (in the upper right corner).

In the bundles ensure that the start level of all bundles except for org.eclipse.osgi is set to default (0)
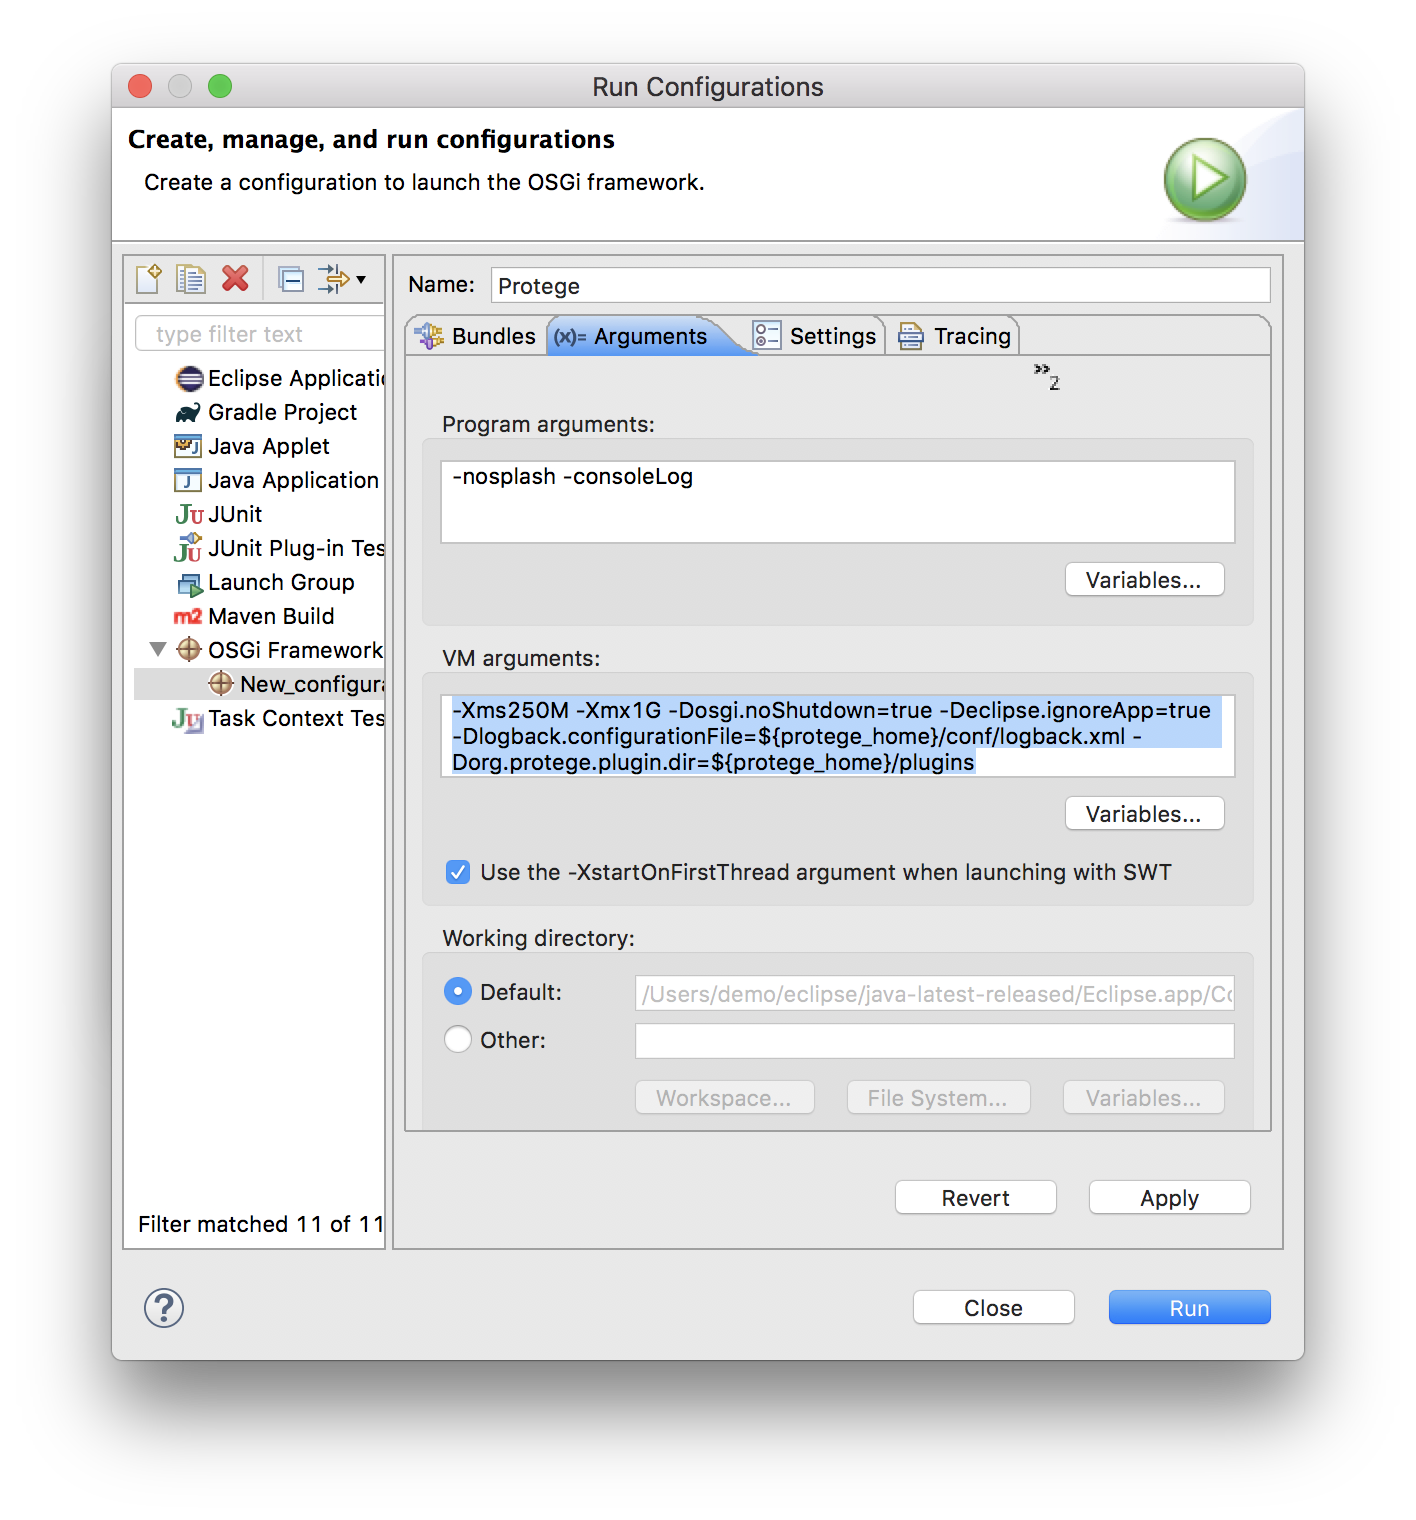
In the arguments tab, remove all existing entries and supply the Pogram arguments:
-nosplash -consoleLog
and as VM arguments (mind the long string!):
-Xms250M -Xmx1G -Dosgi.noShutdown=true -Declipse.ignoreApp=true -Dlogback.configurationFile=${protege_home}/conf/logback.xml -Dorg.protege.plugin.dir=${protege_home}/plugins
Be careful not to introduce new spaces or line breaks! It is recommended to just copy and paste the values from the above text fields.
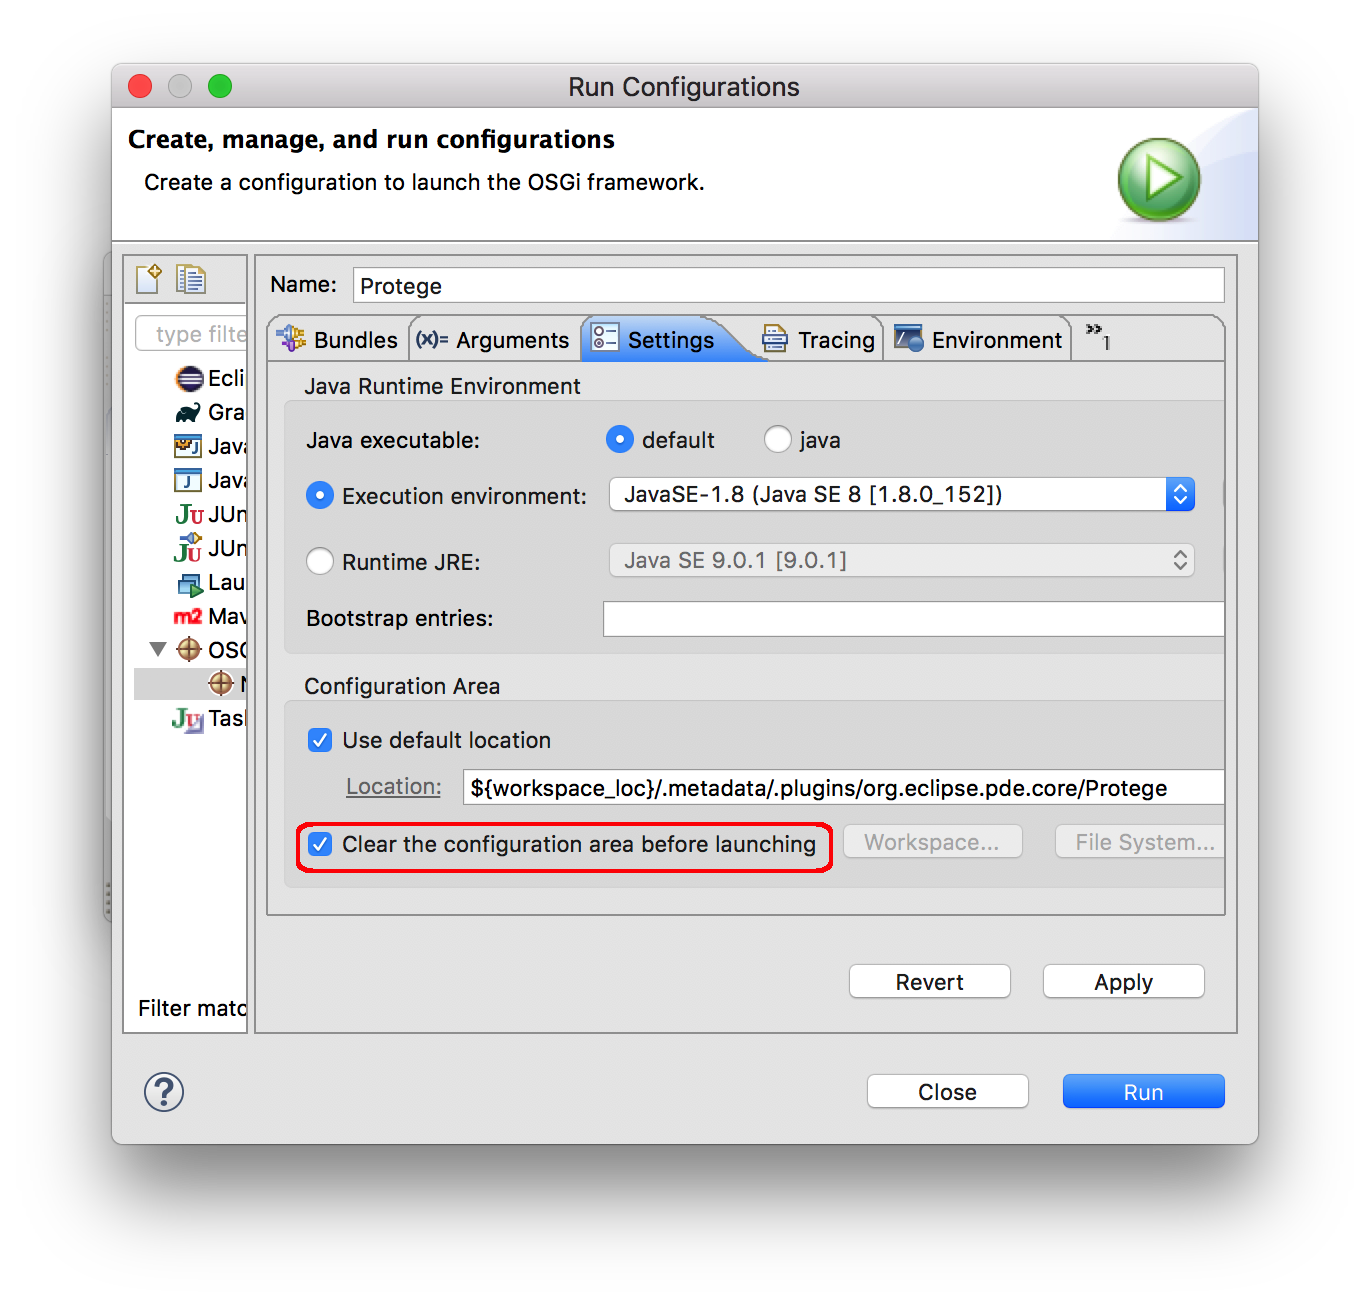
Next on the "Settings" tab make sure that "Clear the configuration area before launching" is checked.
Now start Protégé by pressing "Run".
If there are no errors but Protégé does not start, double check that the default start level is set to 1 and the default auto-start set to true (see above). If all settings are fine, try the fix described in Runtime problems.
Once the configuration has been created and used, it is accessible from the Run menu as well as the Run and Debug history.
A brief explanation for the launch configuration settings:
- the settings
default start level = 1anddefault auto-start=trueare needed to make sure that all Protégé bundles are started. When running Protégé from the command line, the project "protege-launcher" is responsible to start the bundles, but in eclipse we can only use the native eclipse OSGi launcher configuration for this. - without
-noSplashoption, the Protégé window does not show up for some reason. - the
-consoleLogoption is needed so that OSGi runtime errors, such as missing imports or packages, are displayed in the console - without the
-Dosgi.noShutdown=trueswitch, Protégé will close shortly after it starts - the switch
-Declipse.ignoreApp=trueis to tell that there is no application service. Without it, an exception will be thrown like:java.lang.IllegalStateException: Unable to acquire application service. Ensure that the org.eclipse.core.runtime bundle is resolved and started (see config.ini). - the switch
-Dlogback.configurationFile=${protege_home}/conf/logback.xmlpoints to the location of logback configuration file needed for logging - the switch
-Dorg.protege.plugin.dir=${protege_home}/pluginspoints to the location where Protégé plugins should be installed (see Protege Plugins). - finally, the Setting
Clear the configuration area before launchingensures that no information persists between the runs. This is especially important when changing configurations or external files, such as adding or removing bundles.
If Protégé runs from the PDE configuration created above, it is possible to install plugins from the Protégé interface. In this case, the installed plugins will be placed in the location defined by the java preference key org.protege.plugin.dir. In our debug/run configuration, we set this location to the plugins directory of the Protégé installation, but one can, in principle, use any other directory:
-Dorg.protege.plugin.dir=${protege_home}/plugins
To work from Protégé, however, the plugins saved in this directory have to be included in the list of bundles of the run/debug configuration. In the following, we demonstrate how to do that.
Start Protégé using the run/debug configuration created as described in the previous section.
From the Protégé menu open File > Check for plugins... Select the "Cellfie" plugin and press "Install".
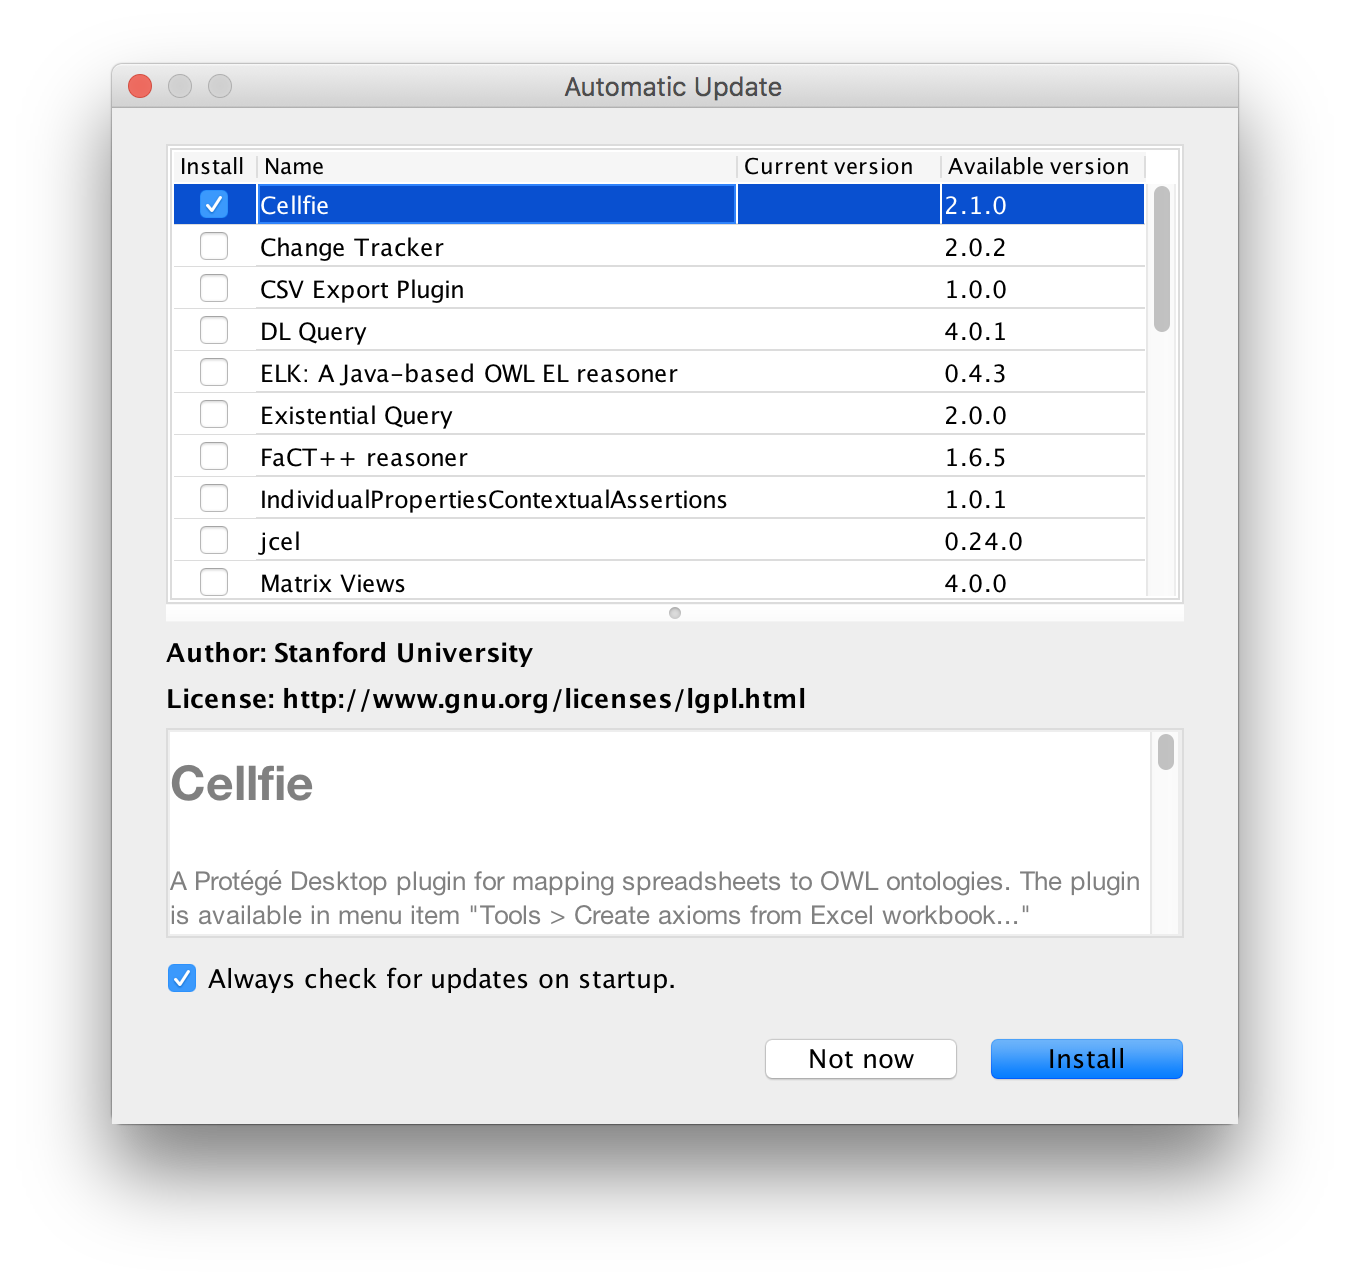
After the installation, Protégé warns that "Updates will take effect when you next start Protege". However, if we quit and start Protégé again, there will be still no new menu "Tools > Create axioms from Excell workbook..." that the plugin should add. This is because the Cellfie plugin is not yet present in the list of plug-ins of the Protégé run/debug configuration. To add the plugin, we need to modify the target platform definition created before.
Open Preferences > Plug-in Development > Target Platform > Protege (double click or press "Edit...")
In the Locations tab press "Add..." > select "Directory"
Press "Next" and enter the Location:
${protege_home}/plugins
Press "Finish". In the "Content" tab of the "Edit Target Definition" window select "Group by: Location" in the bottom right corner and select all plugins in the "${protege_home}/plugins" location.
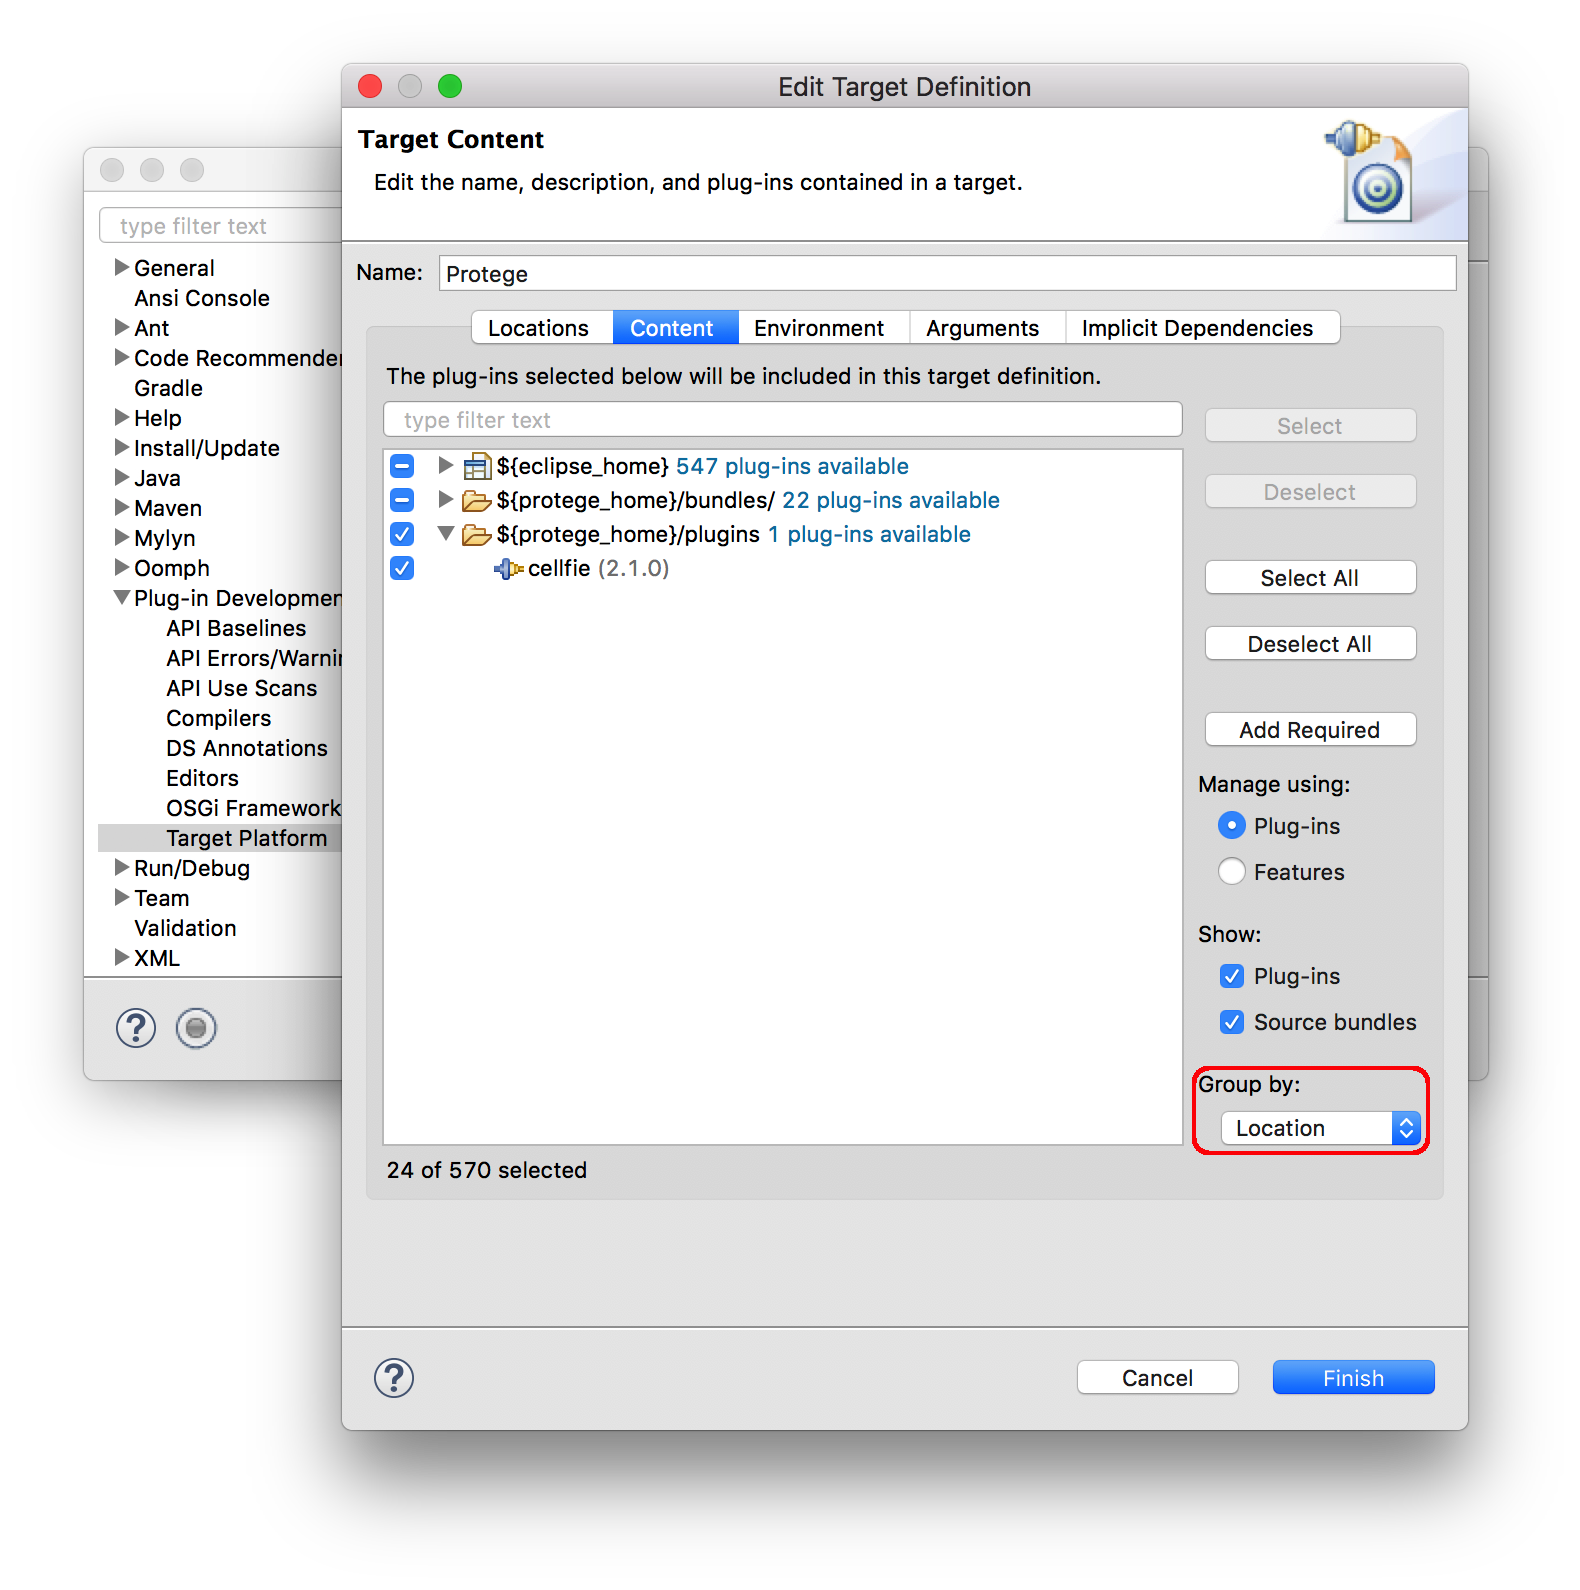
Press "Finish" > "Apply and Close".
Finally, open the Protege run/debug configuration and select the new bundles in the Target Platform, ensuring that they have the default Start Level and Auto-Start.
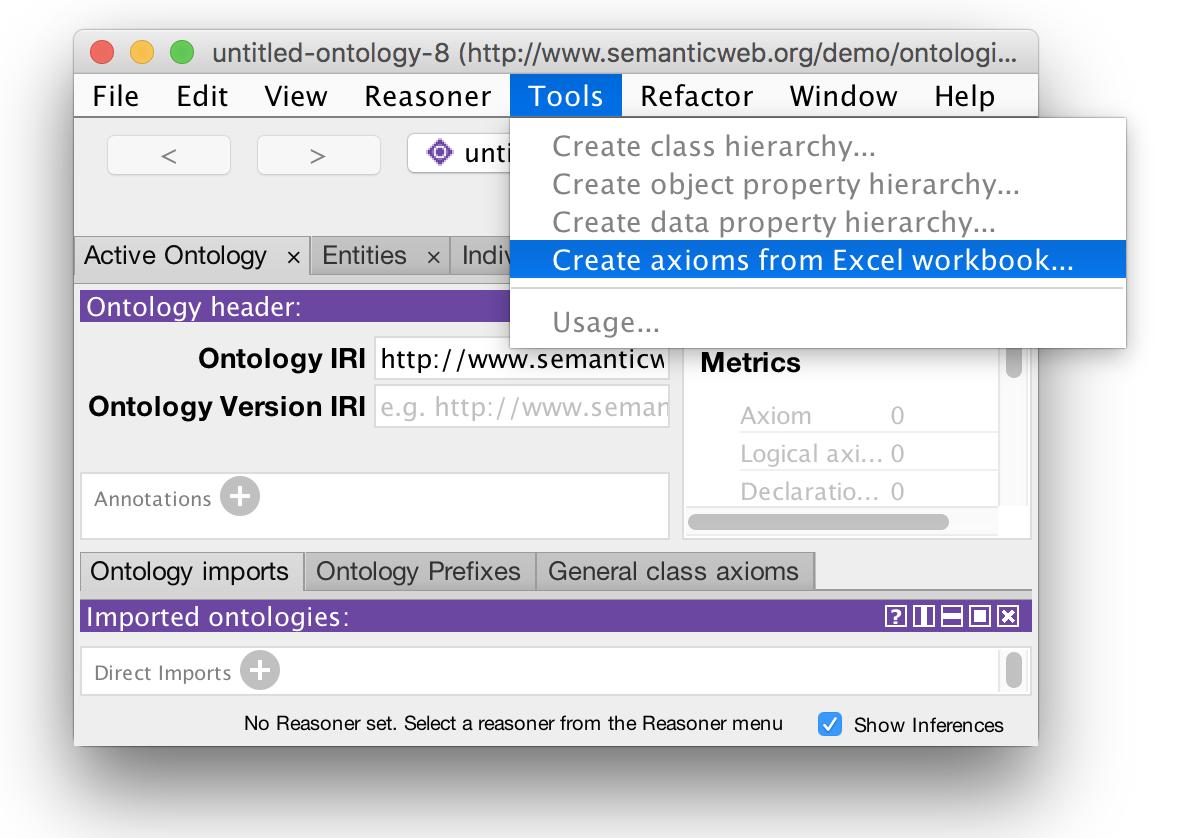
After pressing "Run" the "Create axioms from Excell workbook..." menu should appear in the Protégé Tools menu.
We can also verify that the Cellfie plugin is loaded by opening the Protégé log:
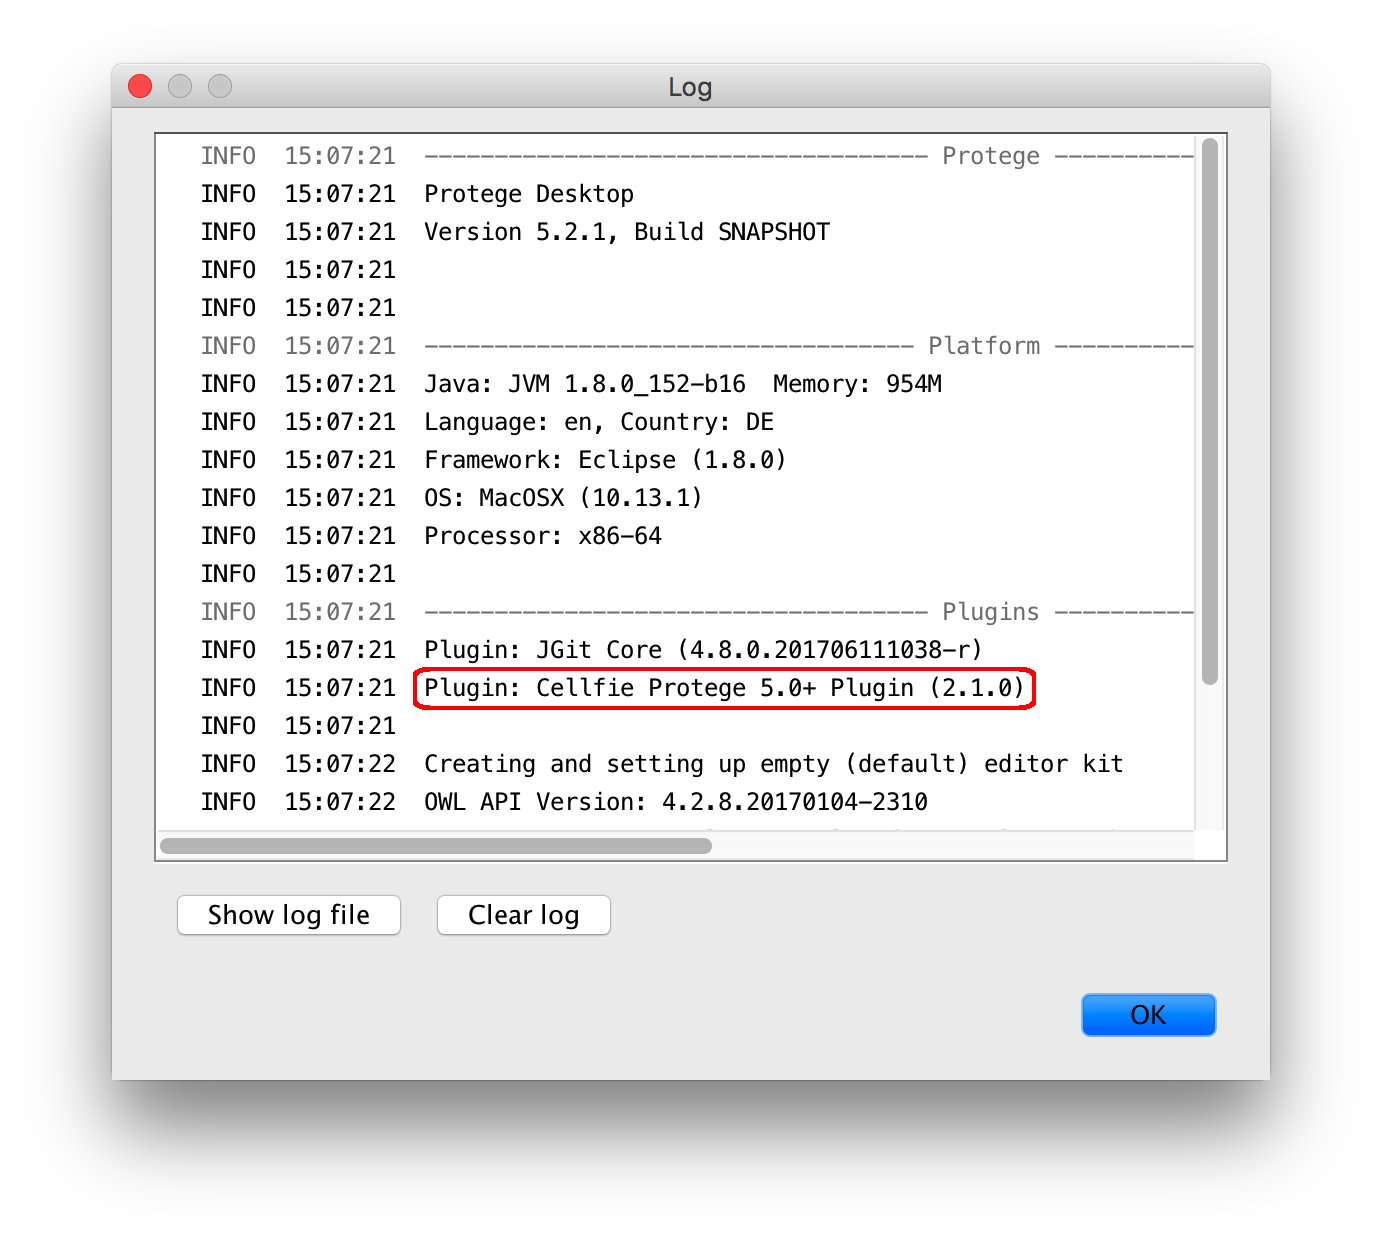
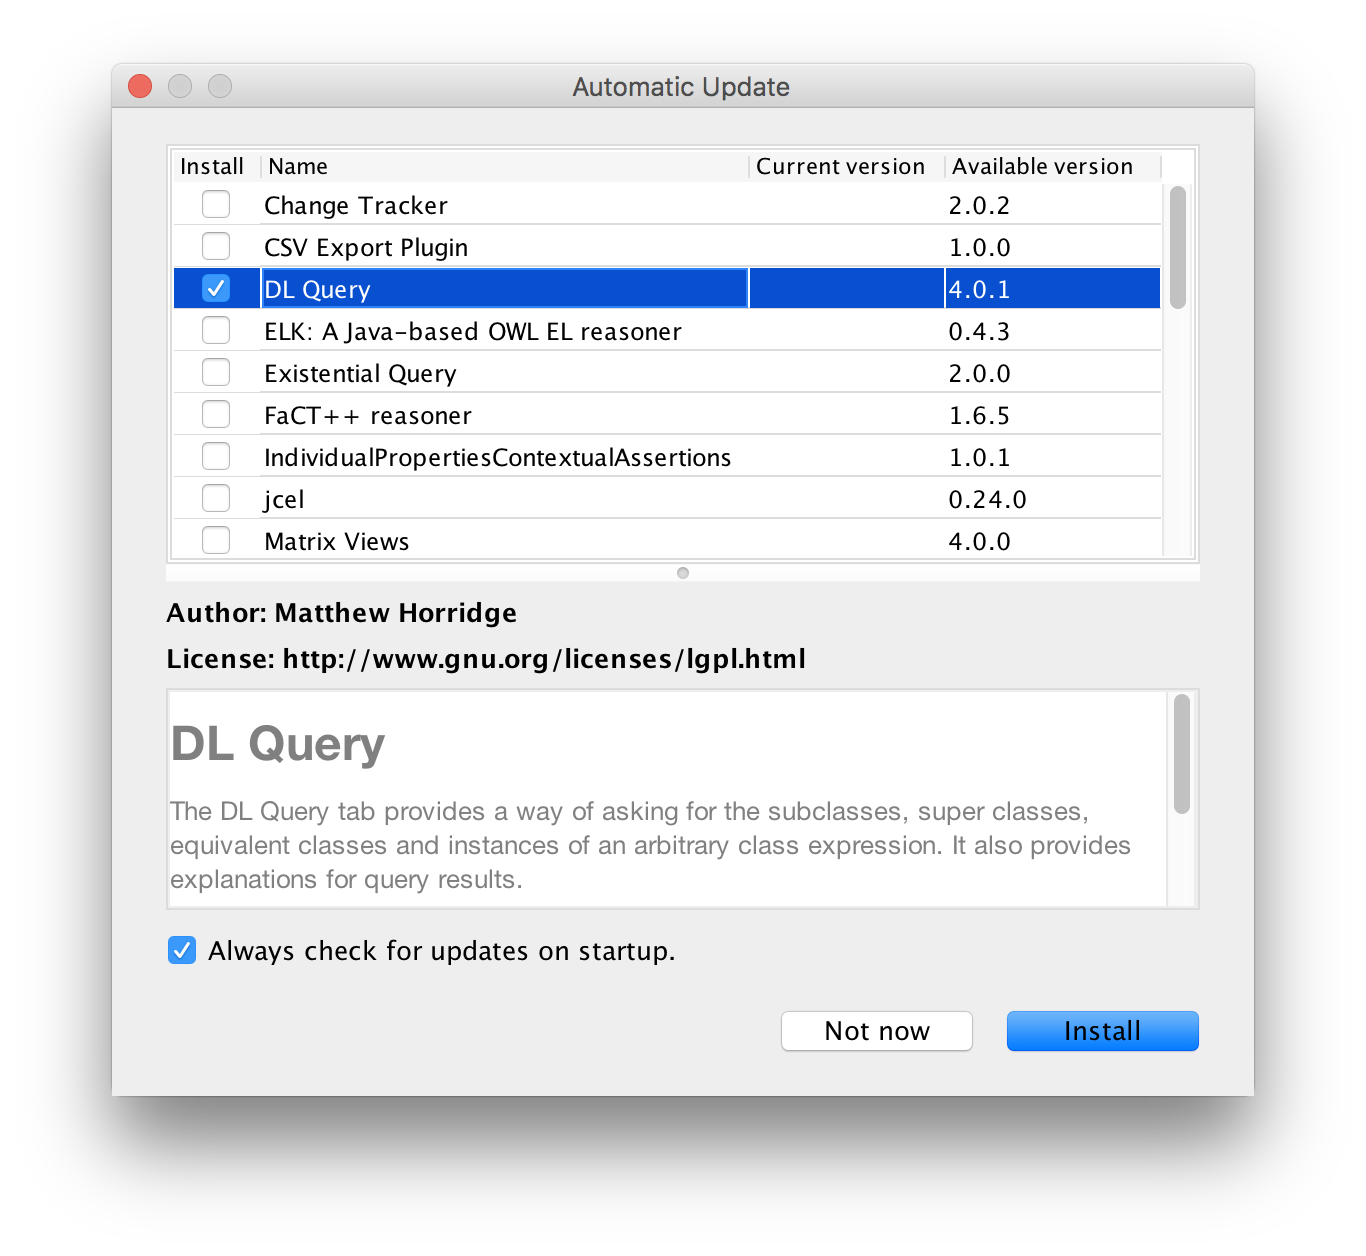
To see how the list of plugins can be extended, let us now install another plugin "DL Query" from the Protégé File > Check for plugins... menu.
After installing, close Protégé. Open Eclipse Preferences > Plug-in Development > Target Platform > Protege > Edit
In the Protégé target definition switch to the Content tab, select "Group by: Location" in the bottom right corner, and check "org.coode.dlquery" under the ${protege_home}/plugins location:
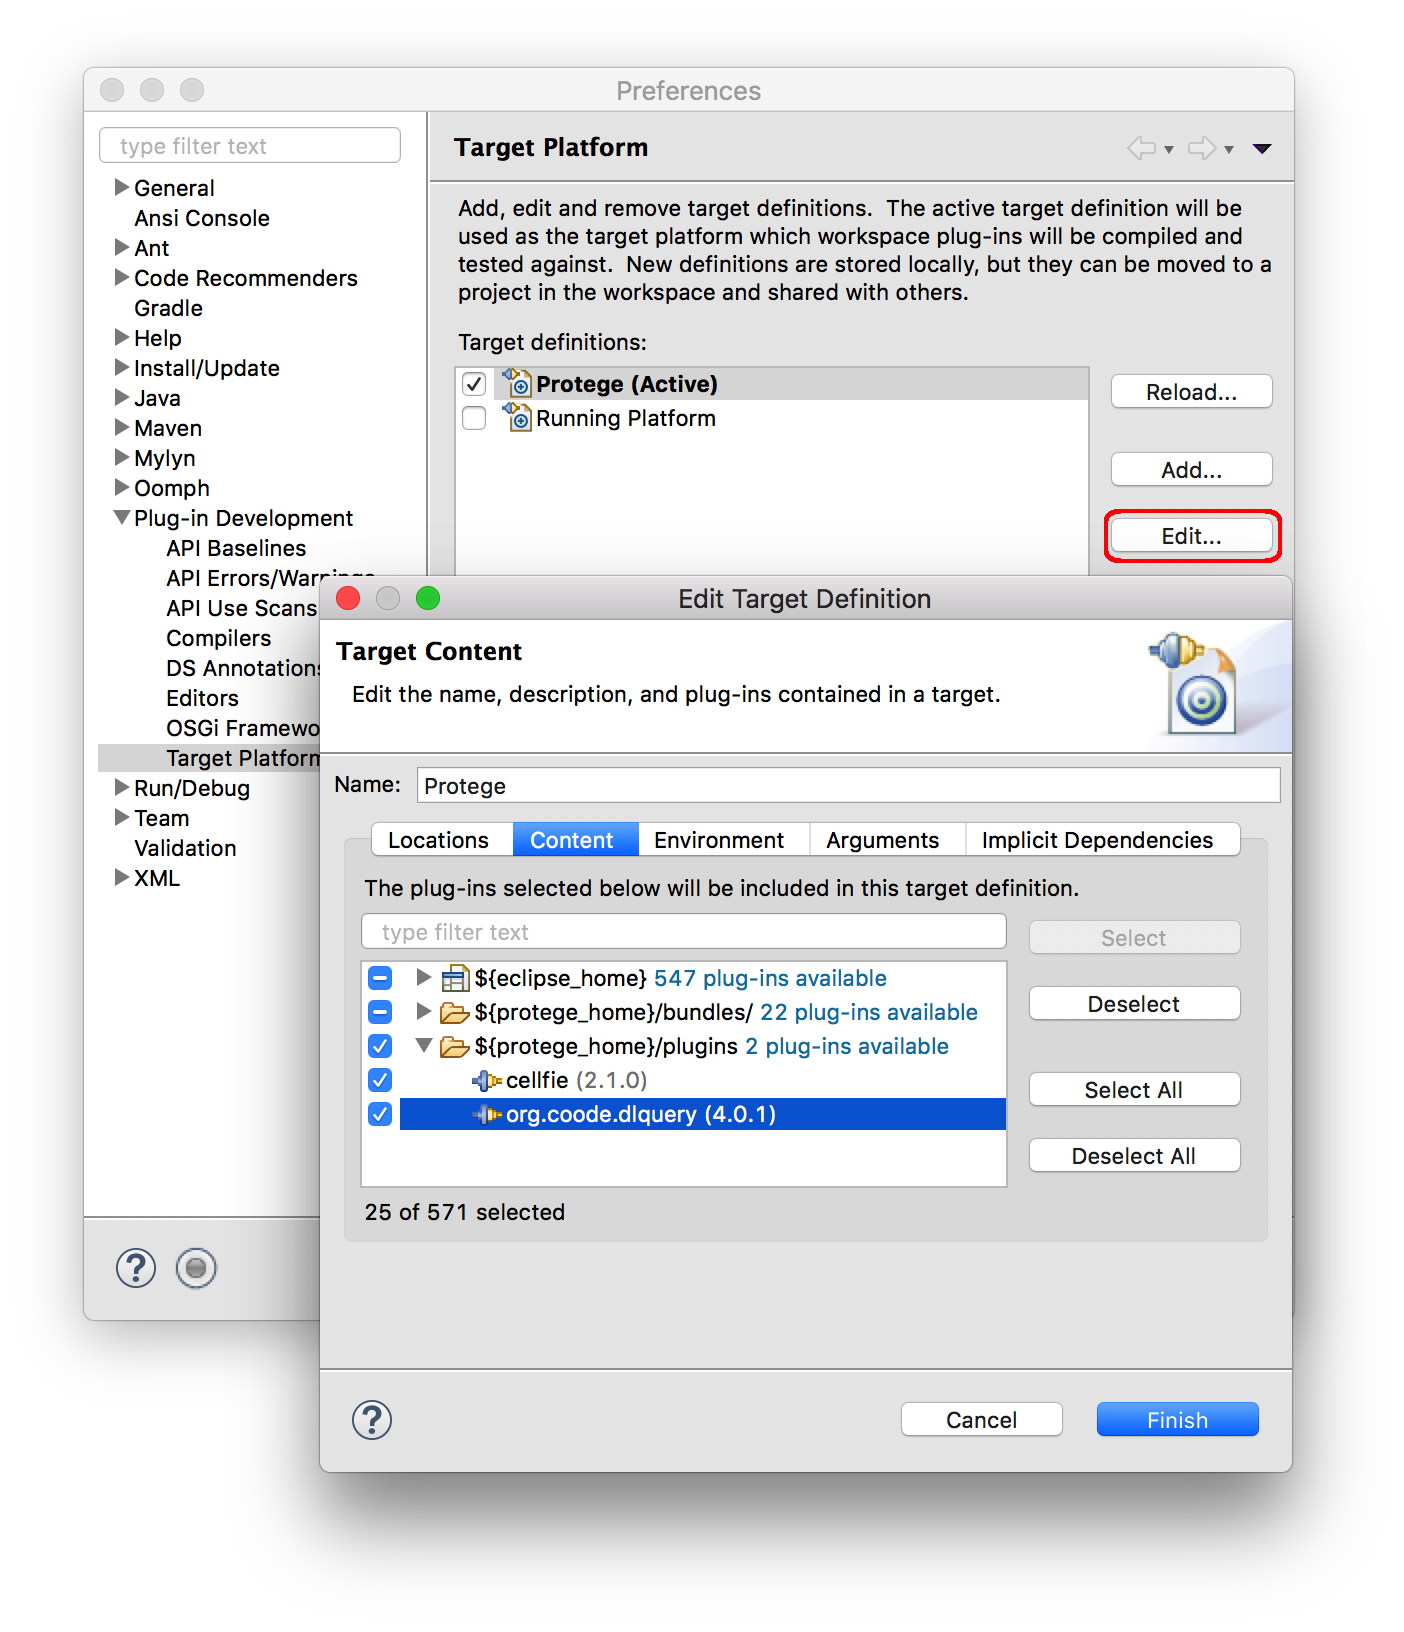
Press "Finish" > "Apply and Close"
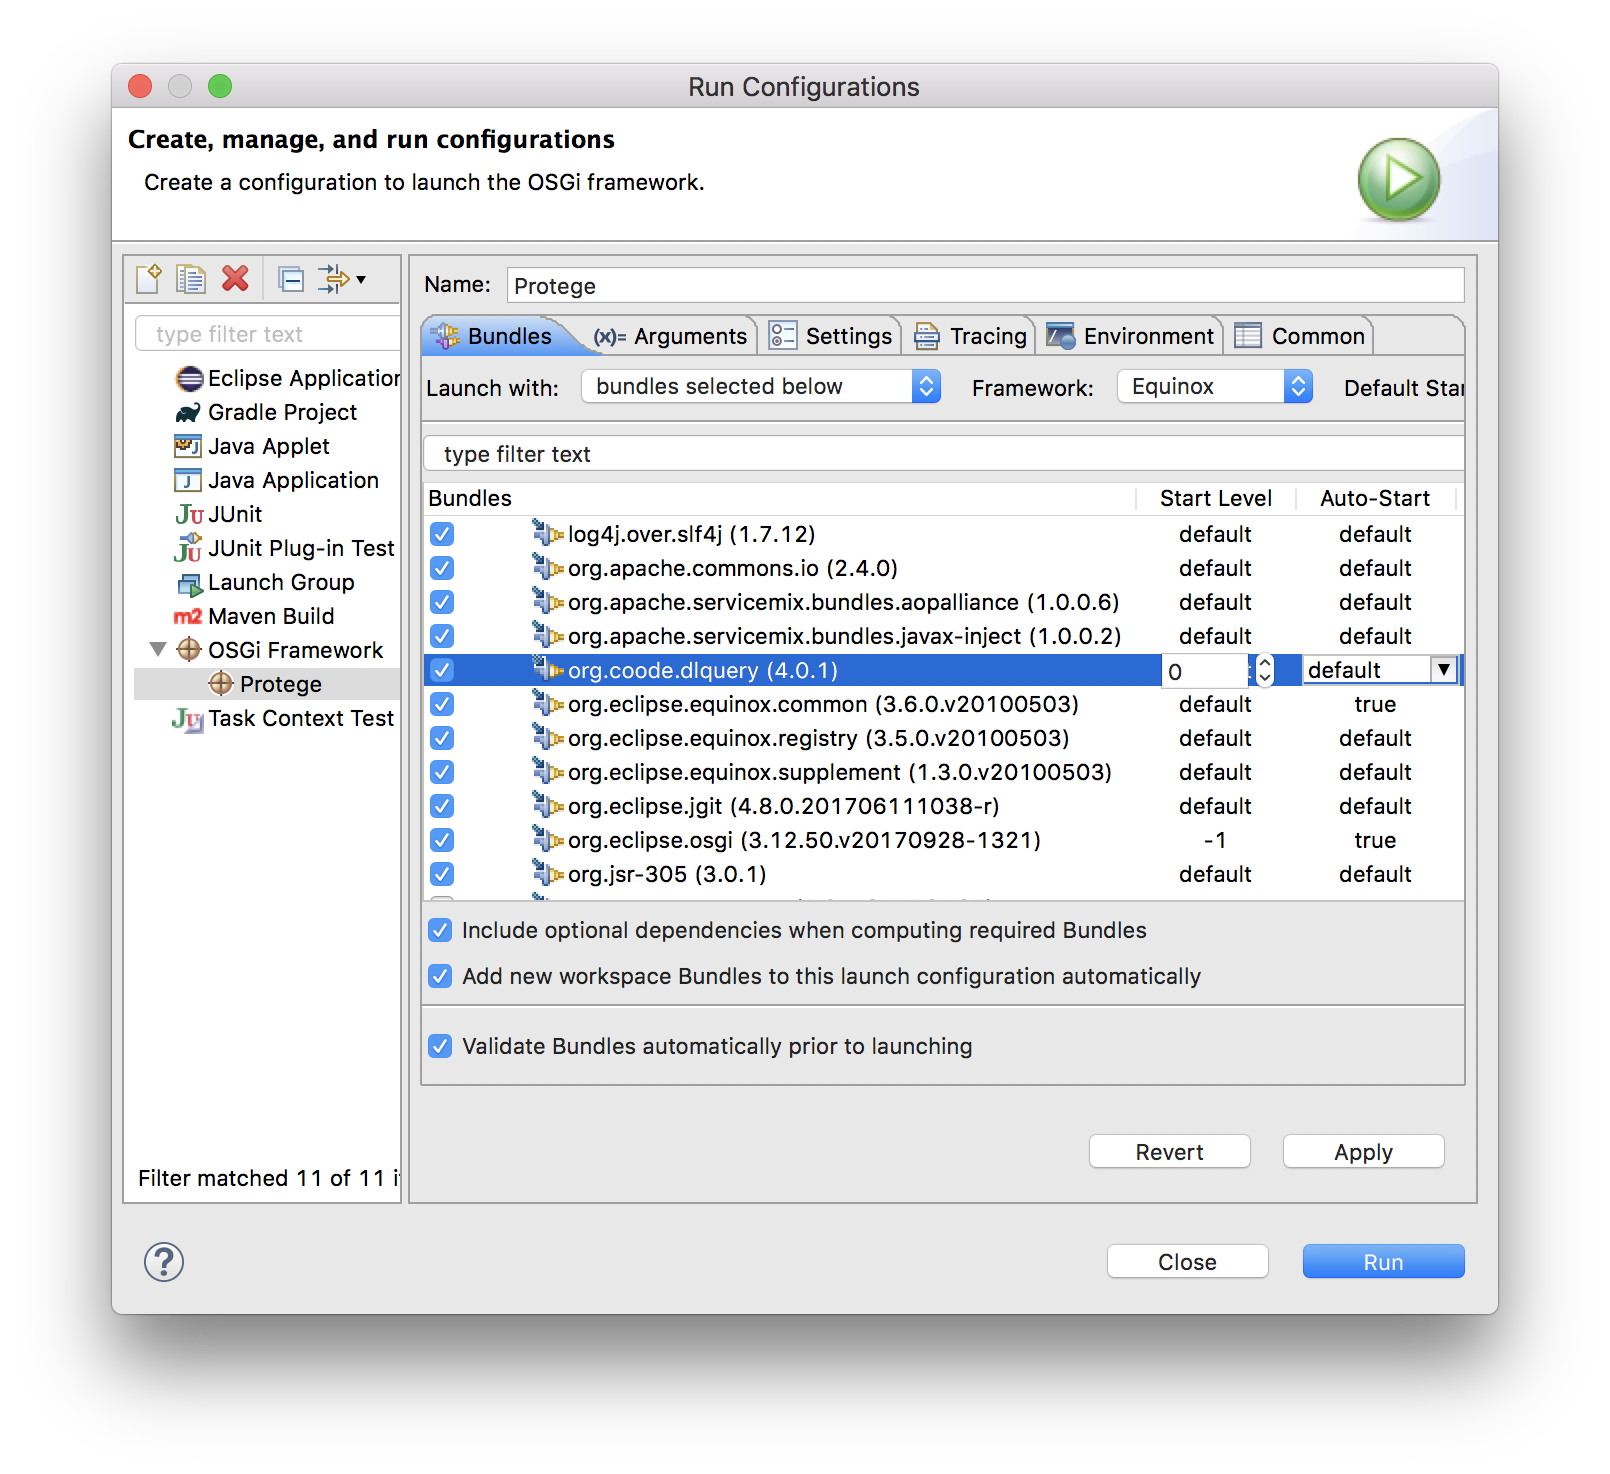
Now open the Protégé run configuration, check "org.coode.dlquery" in the list of Bundles, and press "Run":
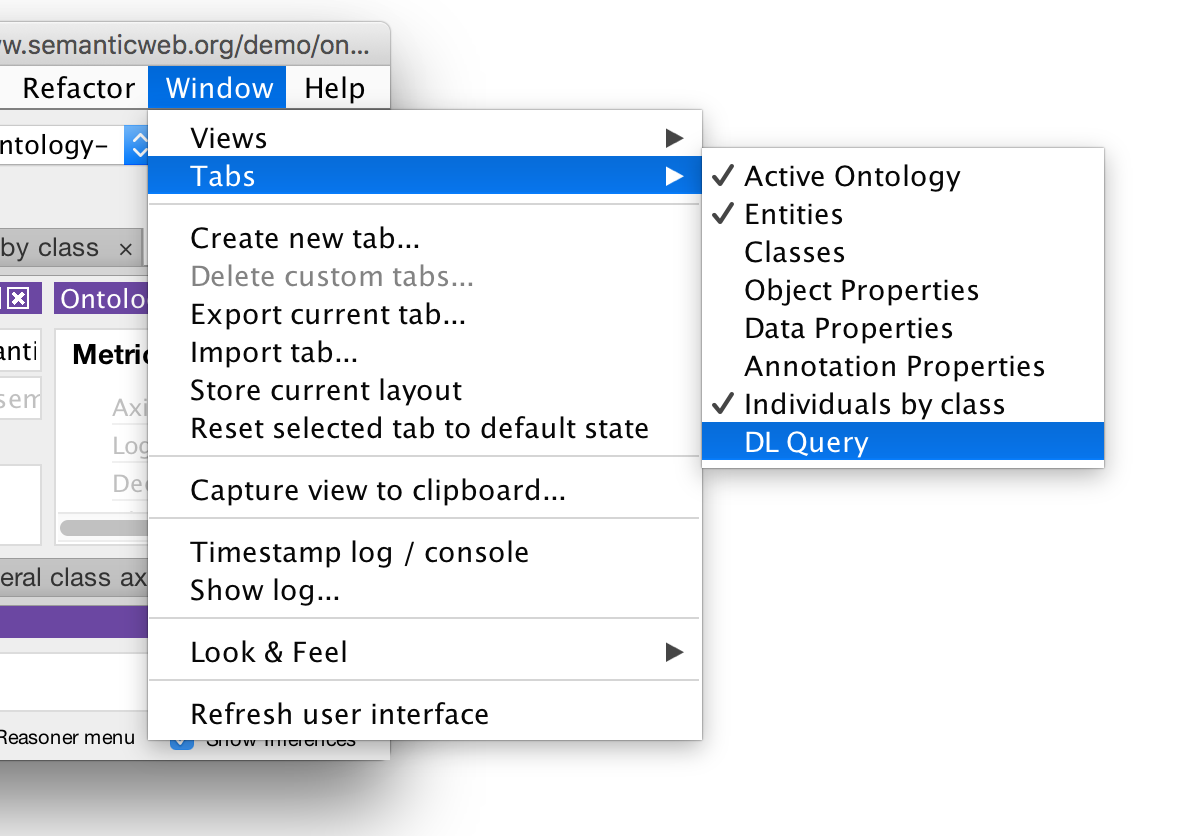
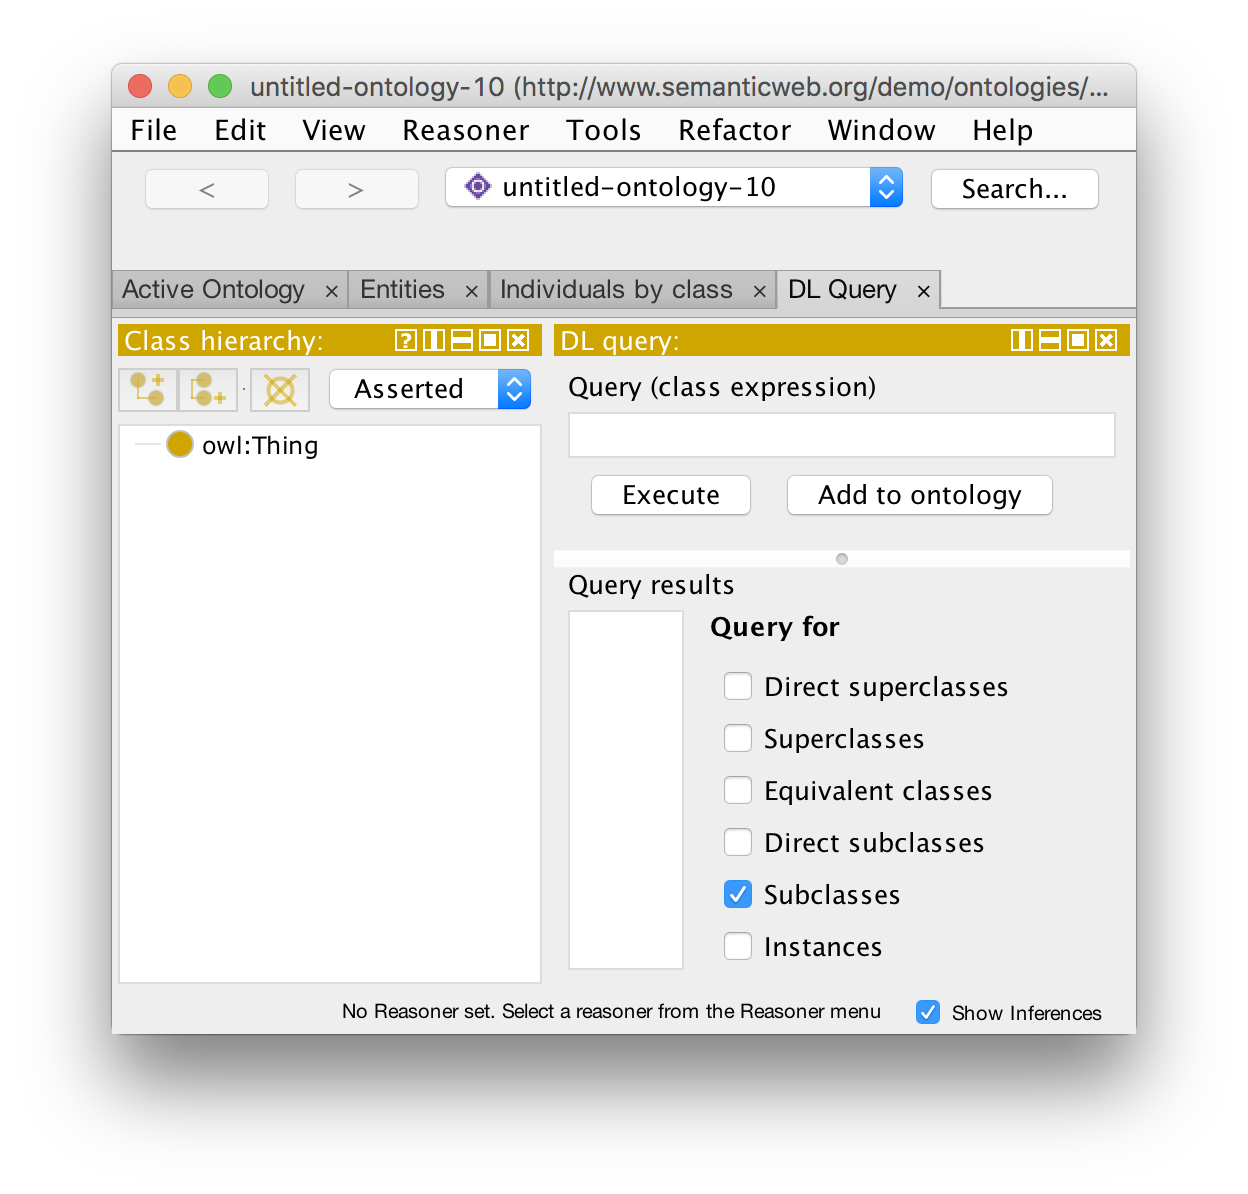
The DL Query plugin should be loaded, which can be verified by the presence of the "Window > Tabs > DL Query" menu of Protégé:
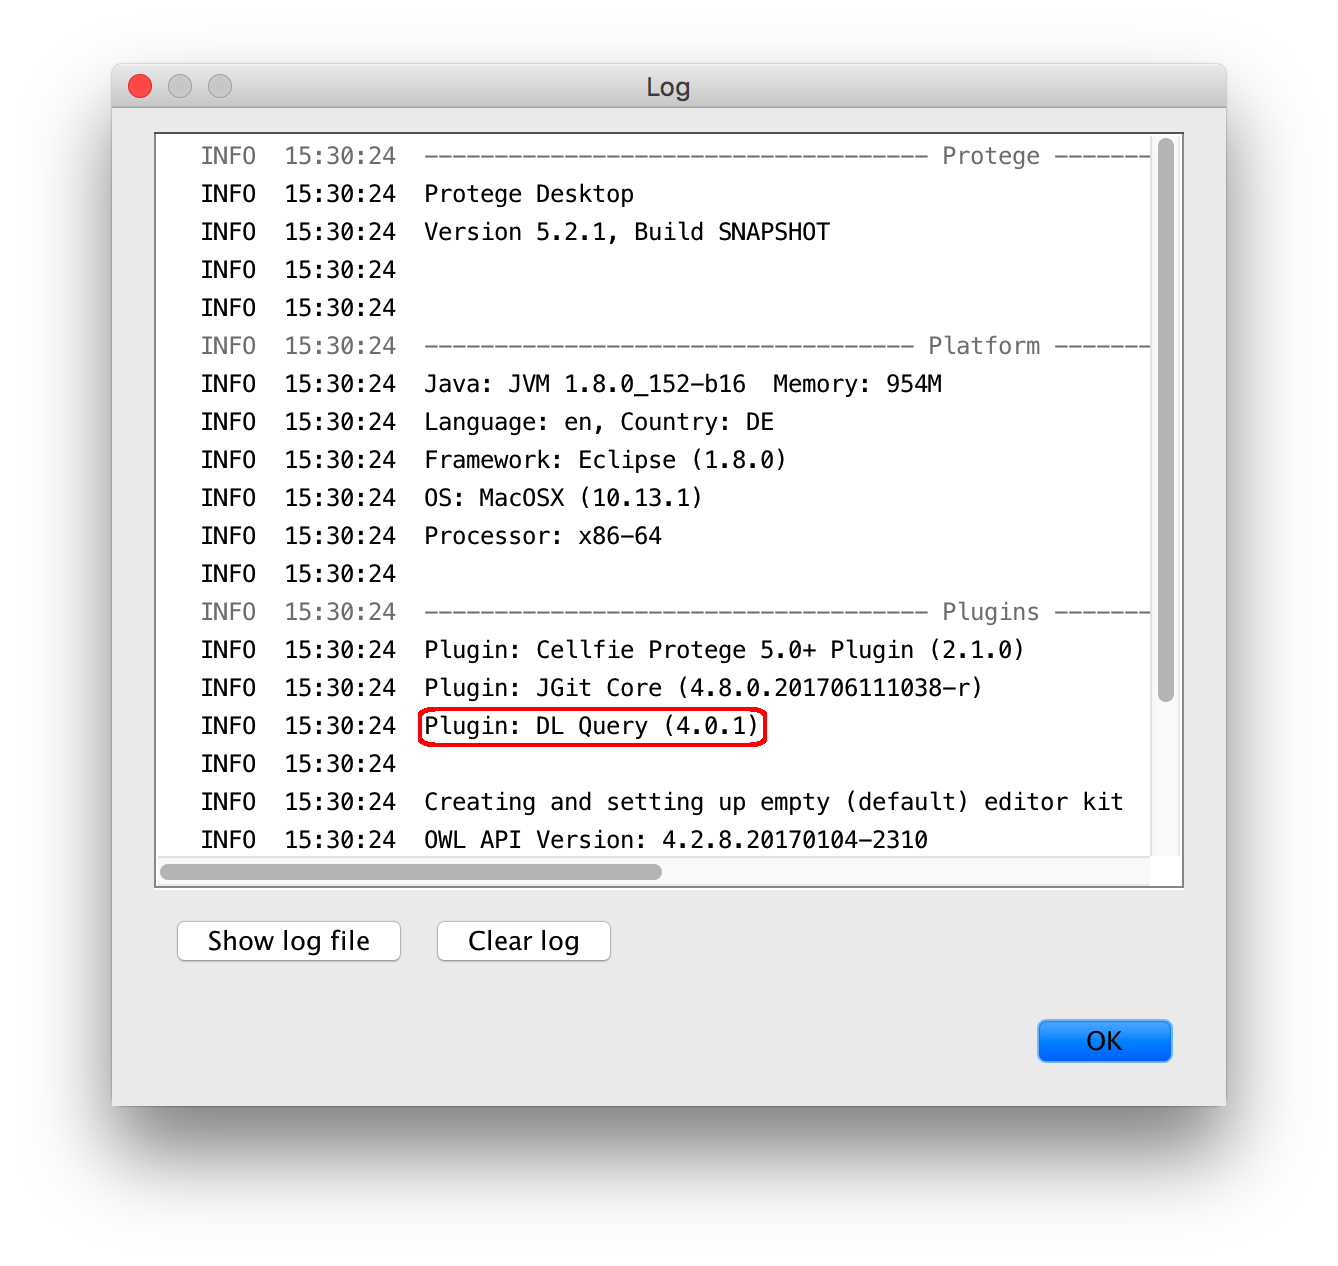
We can also verify that the DL Query plugin is loaded by opening the Protégé log:
With the setup described above it is possible to make modifications in Protégé sources and run Protégé with these modifications without manually re-complining the project (by maven). Furthermore, debugging and even hot code replace should work in Eclipse as for ordinary Java projects.
To illustrate these capabilities, start Protégé in debug mode. Press the icon ![]() in the Eclipse toolbar or select from the top menu:
in the Eclipse toolbar or select from the top menu:
Run > Debug
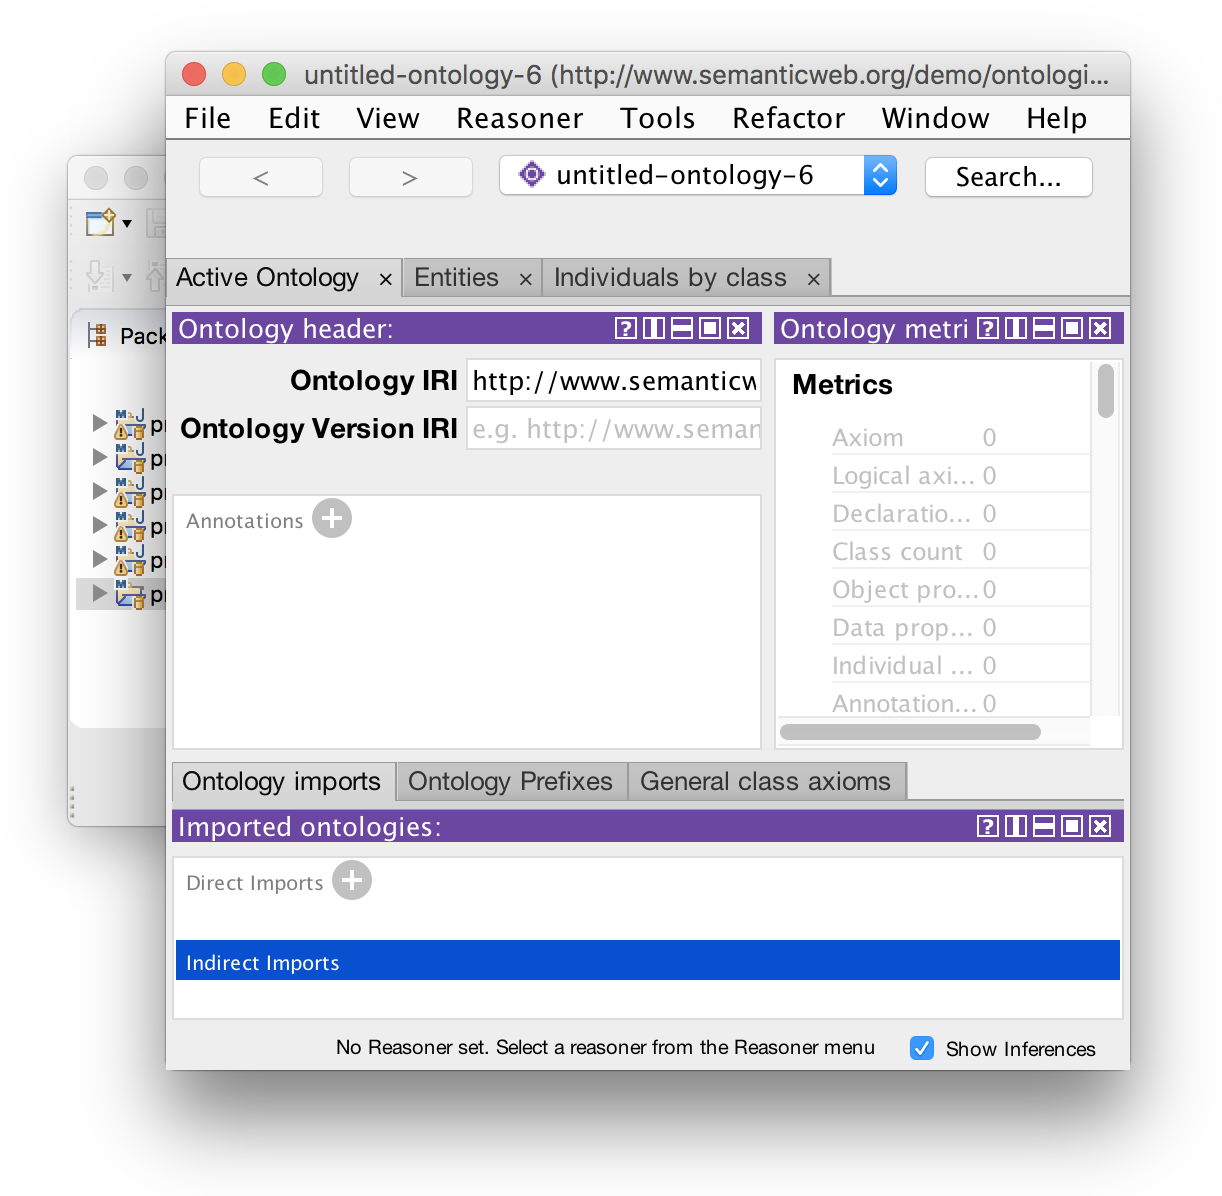
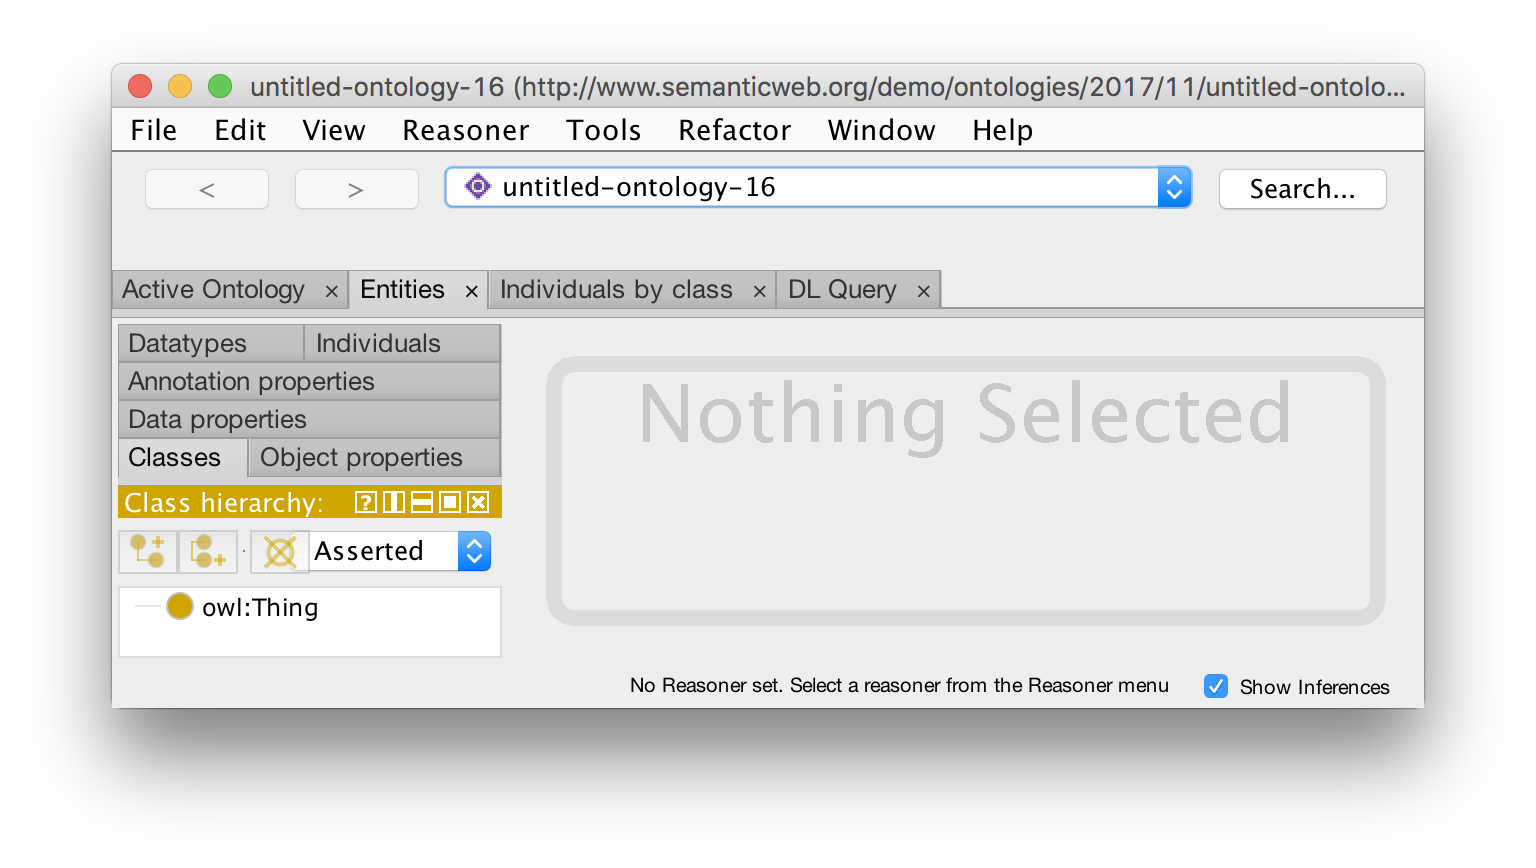
In the opened Protégé window, switch to the tab "Entities":
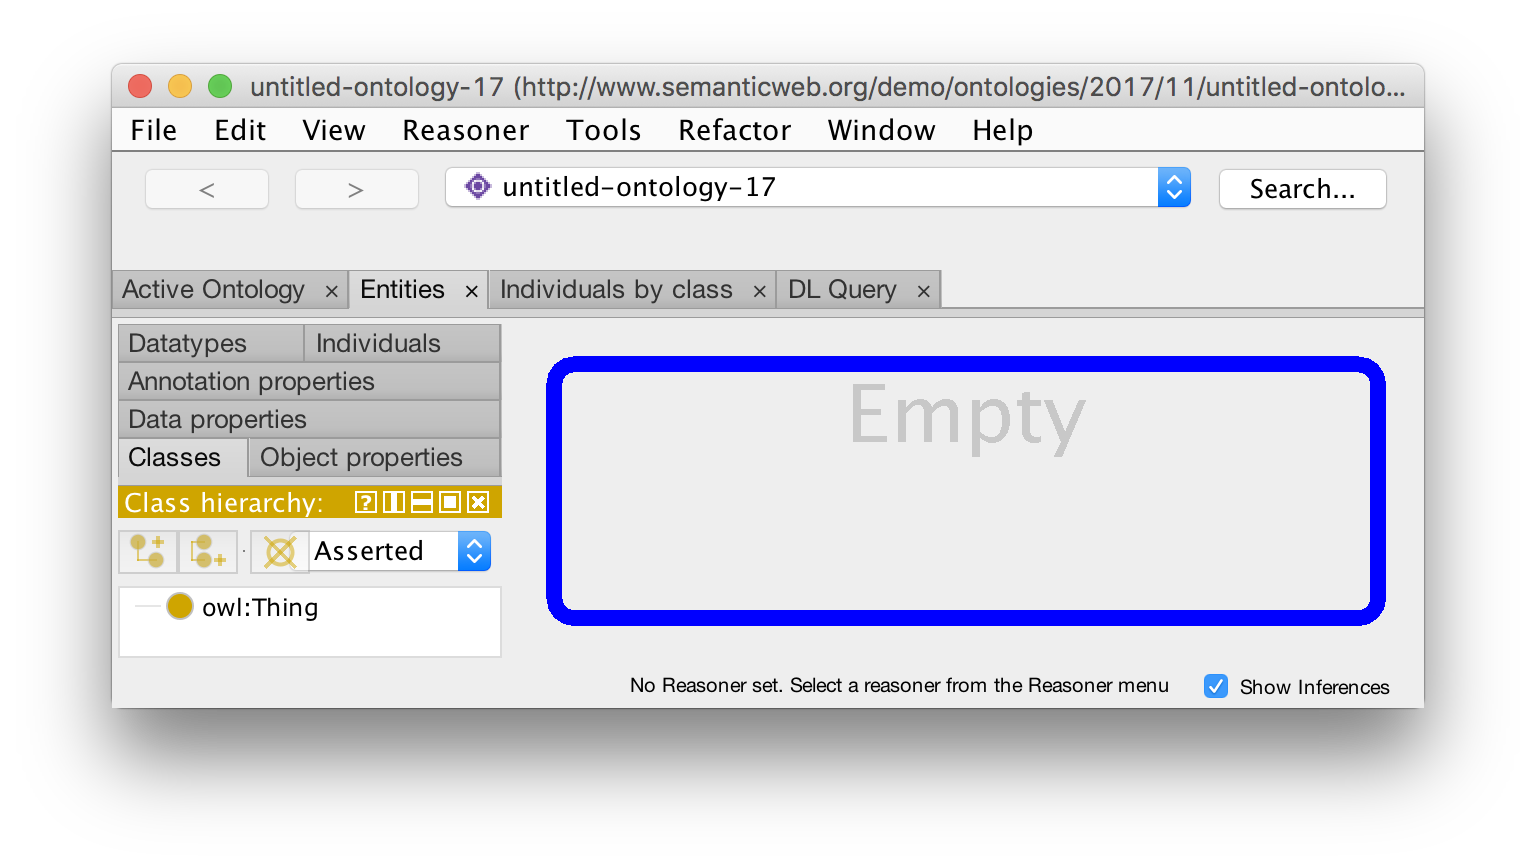
Suppose we want to change the text "Nothing Selected" on the right to "Empty". This text is configured in the class org.protege.editor.owl.ui.util.NothingSelectedPanel (which could be found by searching for occurrences of "Nothing Selected").
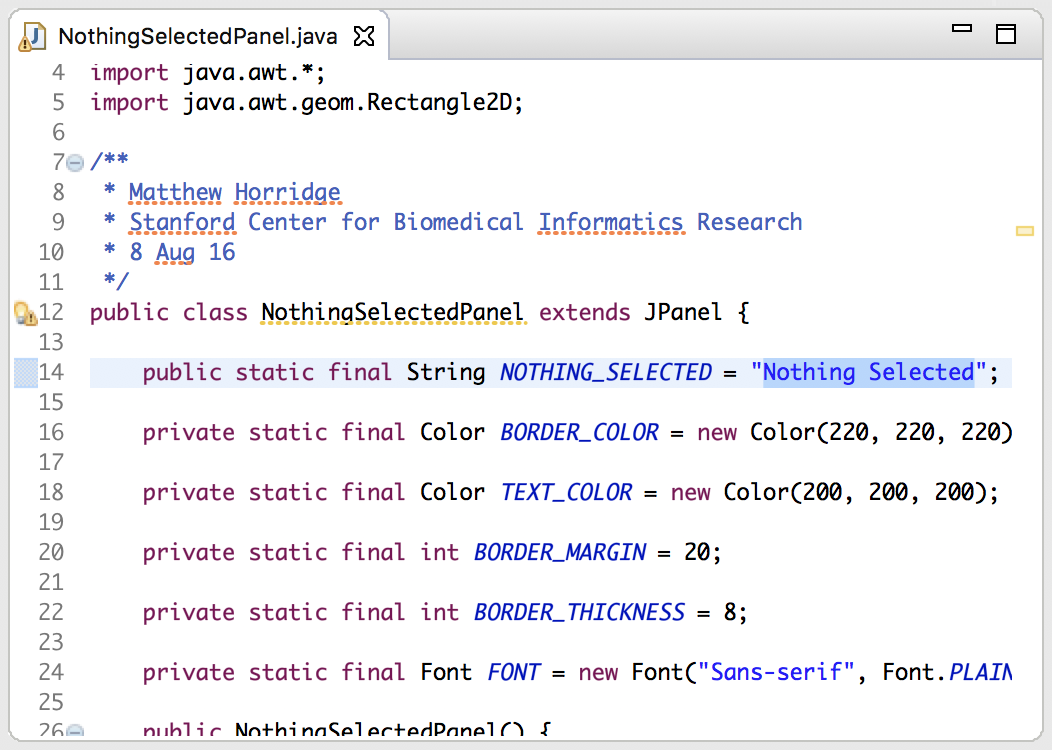
Change the value of this string as follows:
public static final String NOTHING_SELECTED = "Empty";
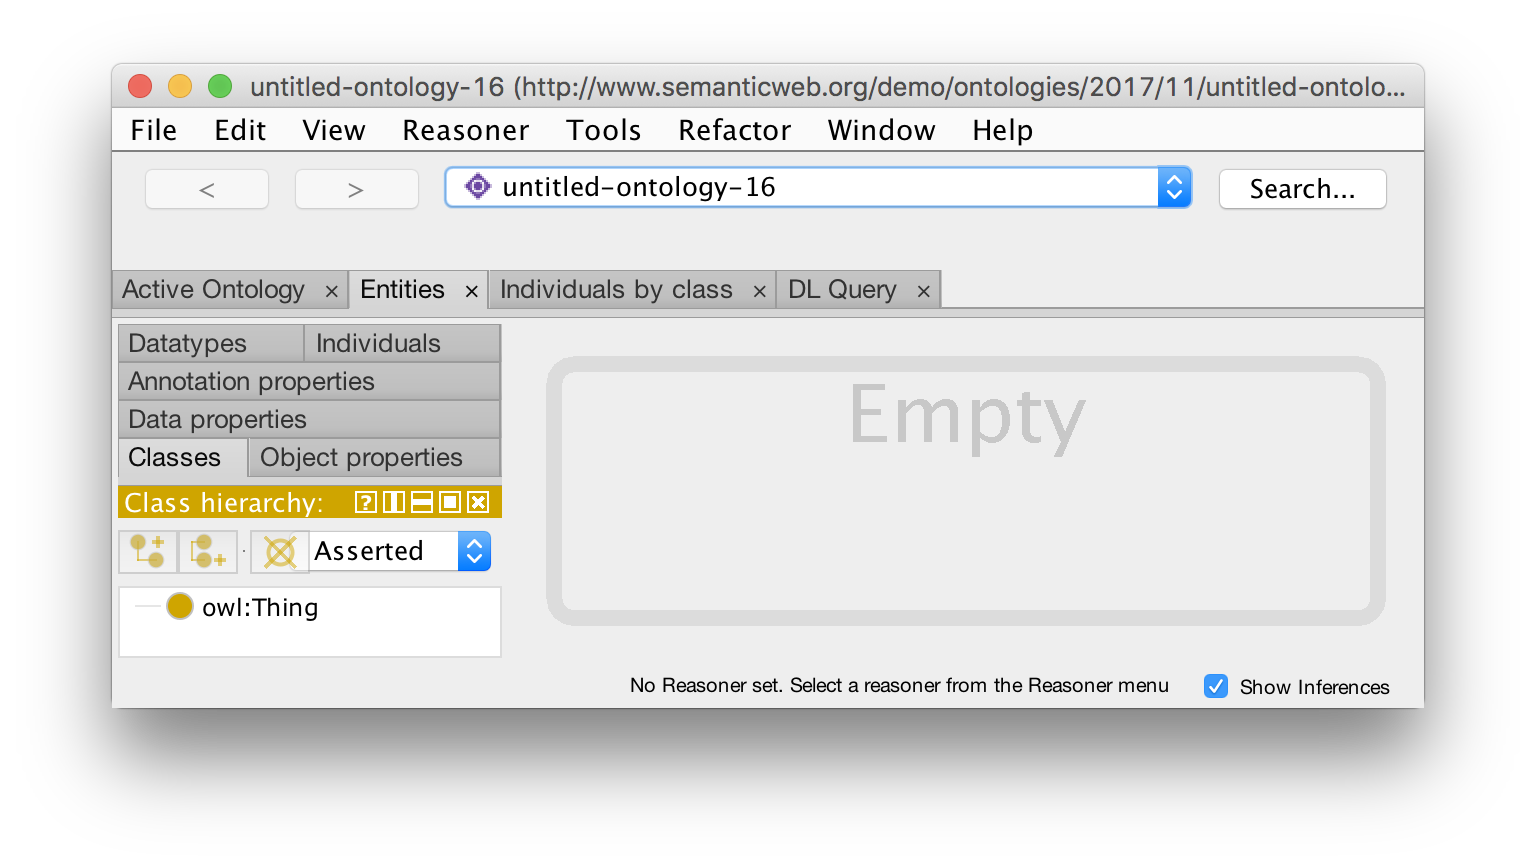
and save the file. Return to the Protégé window, switch to the tab "Active Ontology" and back to "Entities". The text should now change:
The code has been replaced in the running application. Not every source modification, though, can be handled by hot code replace. If we, for example, change the border colour to blue, the Protégé window will not be updated.
private static final Color BORDER_COLOR = Color.BLUE;
However, the changes will be applied next time we start Protégé:
Note that the hot code replace works only if Protégé starts in the debug mode!
If after running the Protégé configuration you see in the console errors like this:
!MESSAGE FrameworkEvent ERROR
!STACK 0
org.osgi.framework.BundleException: Exception in org.eclipse.core.internal.registry.osgi.Activator.start() of bundle org.eclipse.equinox.registry.
	at org.eclipse.osgi.internal.framework.BundleContextImpl.startActivator(BundleContextImpl.java:800)
	at org.eclipse.osgi.internal.framework.BundleContextImpl.start(BundleContextImpl.java:729)
	at org.eclipse.osgi.internal.framework.EquinoxBundle.startWorker0(EquinoxBundle.java:933)
	at org.eclipse.osgi.internal.framework.EquinoxBundle$EquinoxModule.startWorker(EquinoxBundle.java:309)
	...
Caused by: java.lang.NullPointerException
	at org.eclipse.core.internal.runtime.ResourceTranslator.getResourceBundle(ResourceTranslator.java:69)
	at org.eclipse.core.internal.runtime.ResourceTranslator.getResourceBundle(ResourceTranslator.java:61)
	at org.eclipse.core.internal.registry.osgi.EclipseBundleListener.addBundle(EclipseBundleListener.java:177)
	...
Root exception:
java.lang.NullPointerException
	at org.eclipse.core.internal.runtime.ResourceTranslator.getResourceBundle(ResourceTranslator.java:69)
	at org.eclipse.core.internal.runtime.ResourceTranslator.getResourceBundle(ResourceTranslator.java:61)
	at org.eclipse.core.internal.registry.osgi.EclipseBundleListener.addBundle(EclipseBundleListener.java:177)
	...
	at org.eclipse.equinox.launcher.Main.run(Main.java:1499)
	at org.eclipse.equinox.launcher.Main.main(Main.java:1472)
It probably means that some bundles did not start. Check that in the run configuration all bundles have the default (0) start level.
If (especially after changes) when running the configuration you see some ClassNotFoundException on the console, but there are no error messages in the workspace, try the following:
- Duplicate the run configuration: Run > Run Configurations > right click on the Protege configuration created on the last step > Duplicate.
- Delete the previous configuration: right click on the previous configuration > Delete.
- [optional] Select the new configuration and at the top of the window change the field "Name" to the previous value, e.g.,
Protege. - With the new configuration selected, press Run at the bottom right corner.
It seems like the PDE configuration occasionally gets corrupted and copying the configuration can fix the problems.
If (especially after changes) you have compilation errors or missing required dependencies, try the following steps:
- Refresh projects in the workspace: File > Refresh or F5
- Update maven configuration: Right click on a project > Maven > Update Project... > Add out-of-date > OK