Fast, simple layout & rendering of a lightweight object model on canvas. Inspired by Netflix's (closed-source) Gibbon.
Lightning Layout is designed to enable app development on top of a thin, extensible runtime, like nanocanvas or Cocoon's Canvas+ engine. These runtimes don't provide a DOM or a CSS layout engine, so Lightning Layout fills the gap with a minimal (but capable) solution.
Lightning Layout also provides event bubbling for mouse and touch events, see "Event Support" below.
Lightning Layout's design goals are (in order): simplicity and speed. It is inspired by Netflix's (closed-source) Gibbon and shares many similarities with Gibbon:
- JSON is used for declarative layout (instead of HTML)
- All positioning is "absolute" (based on the parent element, not siblings or "flow")
- All styles are set on elements themselves, there is no cascading (but you can supply a default
fontstyle for all elements)
Include lightning-layout.js in your page and it will define a global LightningLayout() constructor:
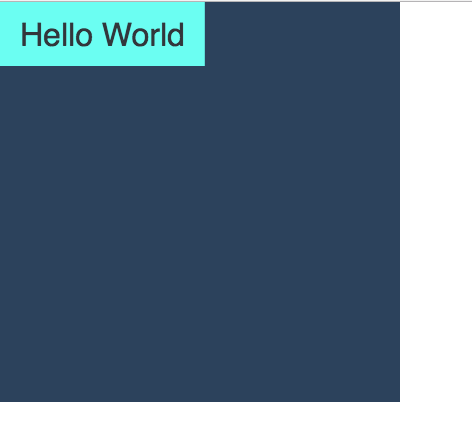
<script src="lightning-layout.js"></script>var element_obj = {
backgroundColor: "#2C425C", width: 200, height: 200, color: "#FFFFFF", children: [
{ text: "Hello World", width: "textWidth", height: "textHeight", backgroundColor: "#6BFEF2", color: "#32363B", padding: 10 }
]
};
var canvas = document.getElementById('canvas'),
var ctx = canvas.getContext('2d');
var ll = new LightningLayout();
ll.layout(ctx, element_obj, 0, 0, canvas.width, canvas.height);
ll.render(ctx, element_obj);This is basically the Gibbon example from Jafar Husain's presentation. Here's how lightningLayout renders it:
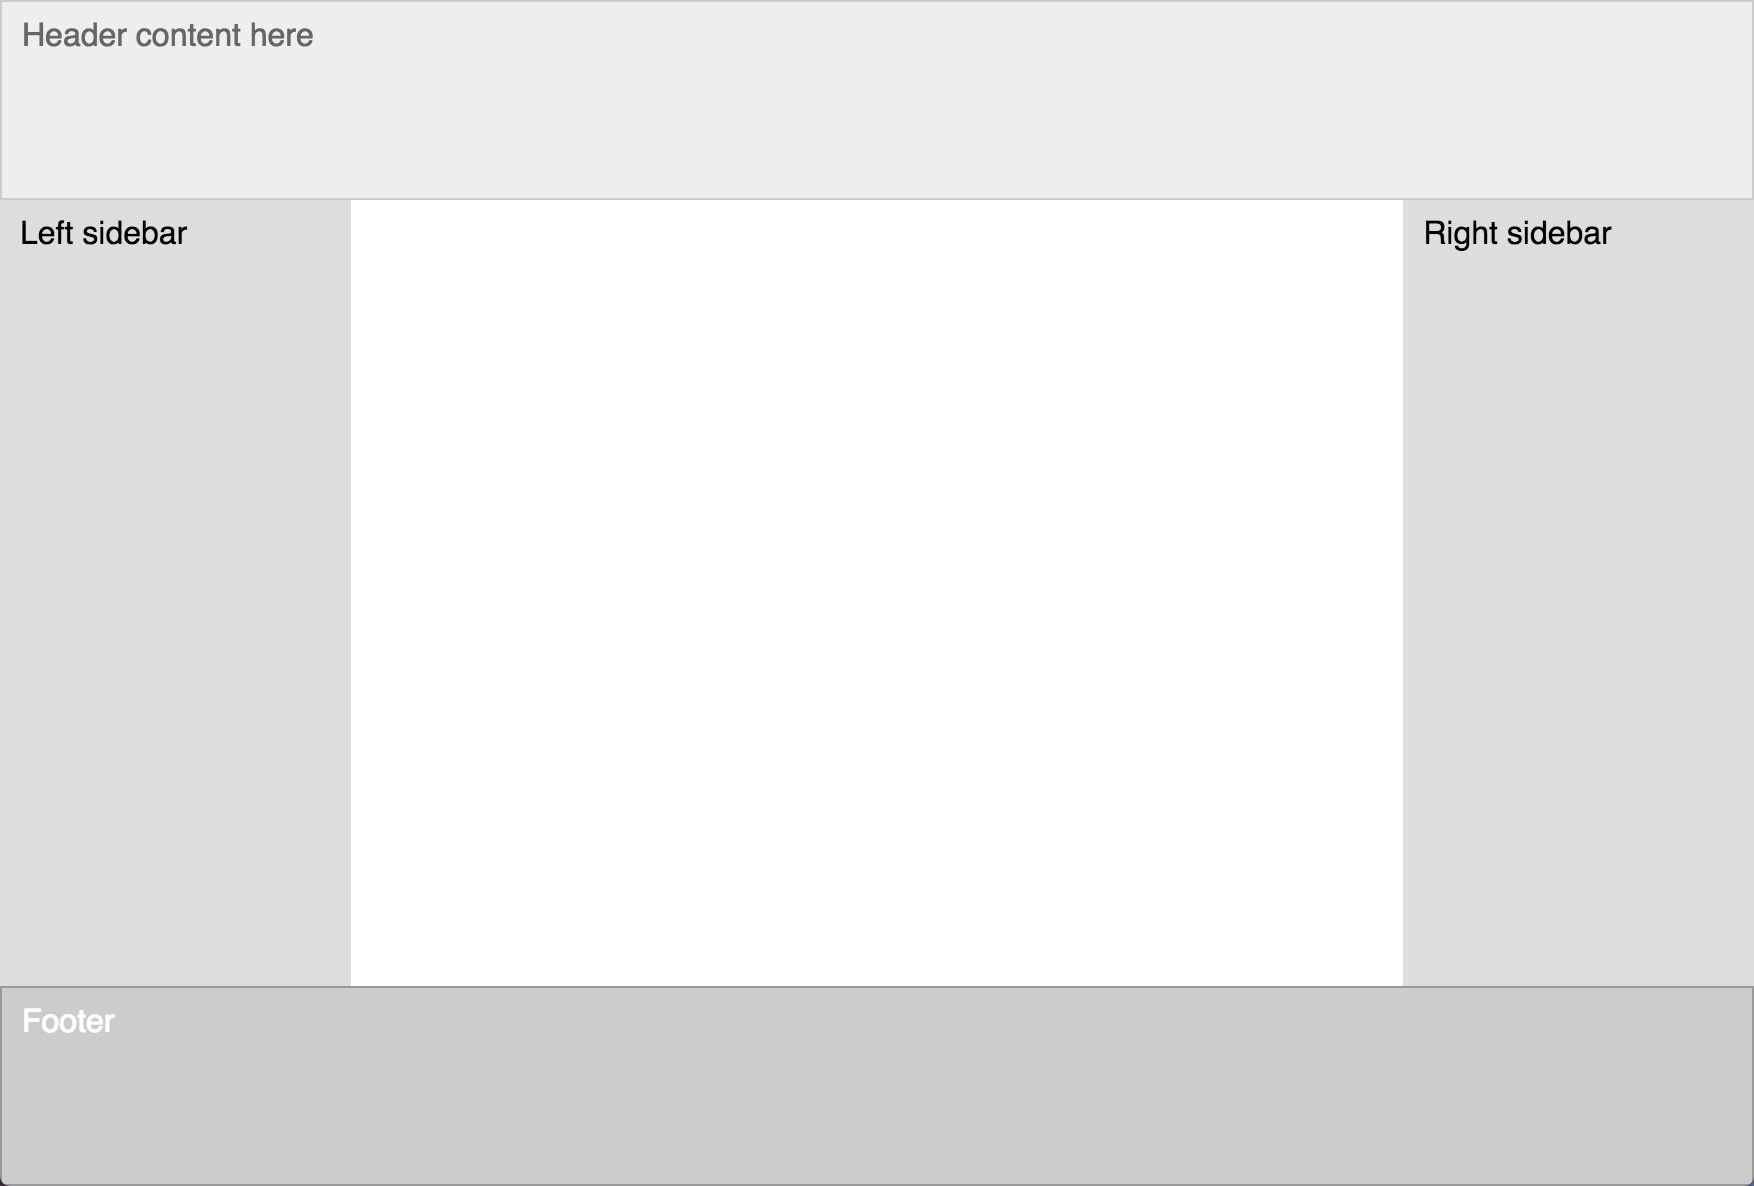
var element_obj = { children: [
  { text: "Header content here", borderColor: "#cccccc", borderWidth: 1, backgroundColor: "#eeeeee", height: 100, padding: 10, color: "#666666" },
  { top: 100, bottom: 100, children: [
      { text: 'Left sidebar', padding: 10, color: 'black', width: '20%', backgroundColor: '#dddddd' },
      { text: 'Right sidebar', color: 'black', padding: 10, right: 0, width: '20%', backgroundColor: '#dddddd' }
  ]},
  { text: 'Footer', color: 'white', padding: 10, bottom: 0, height: 100, backgroundColor: '#cccccc', borderColor: '#999999'}
]};

var canvas = document.getElementById('canvas'),
var ctx = canvas.getContext('2d');
var ll = new LightningLayout();
ll.layout(ctx, element_obj, 0, 0, canvas.width, canvas.height);
ll.render(ctx, element_obj);
This renders as:
You can view and play with this example live at http://prust.github.io/lightning-layout.
canvas- optional: the canvas element, used for callingaddEventHandler()and listening for mouse and touch events. If not supplied, event support will be disabled. SeeaddEventSupport()below.defaults- an object supplying default styles (currently the only supported default style isfont, for example:{font: '12pt Helvetica'})
The layout() method walks the element object graph and calculates the layout, setting 4 properties on each element (_layout_x1, _layout_x2, _layout_y1, _layout_y2).
canvas_ctx- the 2D context object from the canvas. This is only necessary if your layout requires text measurements (if you're using the 'textHeight' or 'textWidth' values), otherwise you can passnull.element_obj- the top of your hierarchy of lightweight elements: plain javascript objects with optional style properties (see below) & an optionalchildrenarrayparent_x1,parent_y1- the top-left coordinates of the canvas, typically0, 0parent_x2,parent_y2- the bottom-right coordinates of the canvas, typically the width and height of the canvas
The render() method walks the element object graph and uses the 4 calculated layout properties to draw the elements to the canvas.
addEventSupport() adds basic event support to a javascript object by implementing two functions: addEventListener(evt_name, fn) and dispatchEvent(evt). These functions dynamically add an object property, ._evt_handlers = {}, the first time addEventListener() is called. If your objects share a common prototype, you can pass that for better performance: ll.addEventSupport(MyObject.prototype). Or, if you want to decorate every object in the tree, supply true for should_cascade.
Lightning Layout provides event propagation (bubbling) of mouse events (mousemove, mousedown, mouseup, click) and touch events (touchstart, touchend, touchmove, touchcancel). Events propagate up the object tree, starting with the children and propagating up to the parents. If siblings overlap each-other (both are under the mouse cursor), the event will be dispatched in reverse order, starting with the last sibling.
To take advantage of the event support, you need to pass the canvas element (or whatever object your runtime provides to listen for events via addEventListener()) to the LightningLayout() constructor. If your element objects already support events (already have dispatchEvent() and addEventListener() methods) then this is all you need to do. However, if you are using plain javascript objects or a custom class that does not provide event support, you will need to call ll.addEventSupport() (see above). If you are using an event system that uses non-standard event methods (like Backbone.Events), you will need to write adapter methods that proxy the standard methods to the non-standard methods (for backbone, you would need to supply a addEventListener(evt_name, fn) method that calls Backbone's on(evt_name, fn) and a dispatchEvent(evt) method that calls Backbone's trigger(evt_name, evt)).
Lightning Layout's dispatchEvent() respects evt.stopImmediatePropagation(), but only if evt.isImmediatePropagationStopped() is supported by the browser/runtime. Likewise Lightning Layout's event propagation respects evt.stopPropagation(), but only if evt.isPropagationStopped() is supported by the browser/runtime.
See the footer click handling in index.html (http://prust.github.io/lightning-layout/index.html) for an example of event support.
left,right,top,bottom- these can be numbers or percentages and will position the edge of the element relative to its parentwidth,height- these will be used to calculate unsupplied edges (for instance if arightandwidthproperties are given, theleftwill be calculated), can be a number or a percent or the strings "textWidth" / "textHeight" for shrink-wrapped width/height.font- css font string defining the font style, size and facetext- text to display inside the elementpadding- single number used for padding on all four sides (see To-Do section below for note onpaddingLeft)backgroundColor- css color string for the border (transparent if not supplied)borderColor- css color string for the border (no border is rendered if this is not supplied).borderWidth- number for the width of the border (the border is drawn inside the element, then padding is inside of that, see Box Model). See To-Do section below for note onborderLeftWidth.
There is no support for margins, since elements are positioned based on their parent, not sibling or "flow", and margins would overlap in meaning with the top/right/bottom/left properties. Borders and padding are both drawn inside the element (the border first, then padding is inside of that. For example: if there is a border of 1px and a padding of 2px, the inner width (the space reserved for text and child elements) would be 6px less than the outer width ((1px + 2px) * 2).
You can do custom layout or rendering of objects (or to let them handle their own layout/rendering) by wrapping _render() or _layout() with a function that does the custom rendering. This is useful for custom elements, like a canvas-based text-input control (here, here or here).
LightningLayout is not quite production-ready. The 4 most glaring omissions are listed at the top of the To-Do section below. Also, it could use more testing (the 2 examples are somewhat complex and they render correctly, but it needs to be tested in a wider variety of use cases).
These need to be implemented in the layout engine itself:
- add support for separately specifying padding, borderColor and borderWidth (
paddingLeft,borderLeftColor,borderLeftWidth), as well as for shorthand formats that specify 2, 3 or 4 values (ex:"2px 3px 0 0") - implement text wrapping
- add support for rounded rectangles (all corners or individual corners)
- implement
overflow: auto/scroll/hidden&textOverflow: ellipsis - implement
position: "flow-x"andposition: "flow-y". This would enable clients to easily display all the options in an option menu, for instance, without pulling into our laps all the complexities ofposition: "static"(the CSS default positioning), which has to place items in a row and then wrap them down to the next row, while dealing with variable height items, etc. - add support for passing in a top-level array instead of a top-level object
- allow a space-delimited className property that can apply a set of styles
- add support for background images
- make a more friendly method of custom rendering/layout (emitting an event or providing a hook)
These should be done outside of the layout engine:
- investigate handing off to Pixi.js for maximum rendering performance
- implement the most popular Bootstrap CSS classes (for buttons, modals, drop-downs, etc)
- implement the most popular Bootstrap components (dropdowns, modals, etc)
- write a mustache/handlebars-like templating engine
- test the 3rd-party canvas-based text-input controls (see above), writeup their pros/cons & make sure it's super-easy to use the best one(s) with Lightning Layout
- test & document using glyphicons & fontawesome icons with Lightning Layout (perhaps provide CSS classes, if helpful)
- Facebook's css-layout performs layout (but not rendering) of the CSS flexbox model. It is primarily used by React Native, so it's currently just in C, Java, Objective-C and C#. But there used to be a Javascript version; if you go back in the history of the repo you should be able to find it.
- twinkle: GPU-accelerated UI framework powered by JavaScript for desktop/mobile apps. "Repo on hold: Current development is continuing in a private branch due to modifications not being license compatible with open-source. Hoping to be able to resurface these changes at a later time."
- Other: If you know of other similar projects, please submit an issue or pull request. I saw some before starting this project, but none seemed like it was going in quite the direction I wanted, so I didn't write them down :-(