- Introduction of MiMut
- The primary workflow of MiMut
- The secondary workflow of MiMut (e.g. using SL9 and LF10 inbred lines)
- User guide step by step
- Frequently asked questions
MiMut was designed for easy identification of Mimulus mutants. It requires minimal bioinformatics skills for researchers to easily run a complicated pipeline for analyzing next-generation sequencing data. More than twenty Mimulus mutants have been successfully identified using MiMut. It can be applied to any other organisms as well.
If MiMut is helpful for your research, please cite:
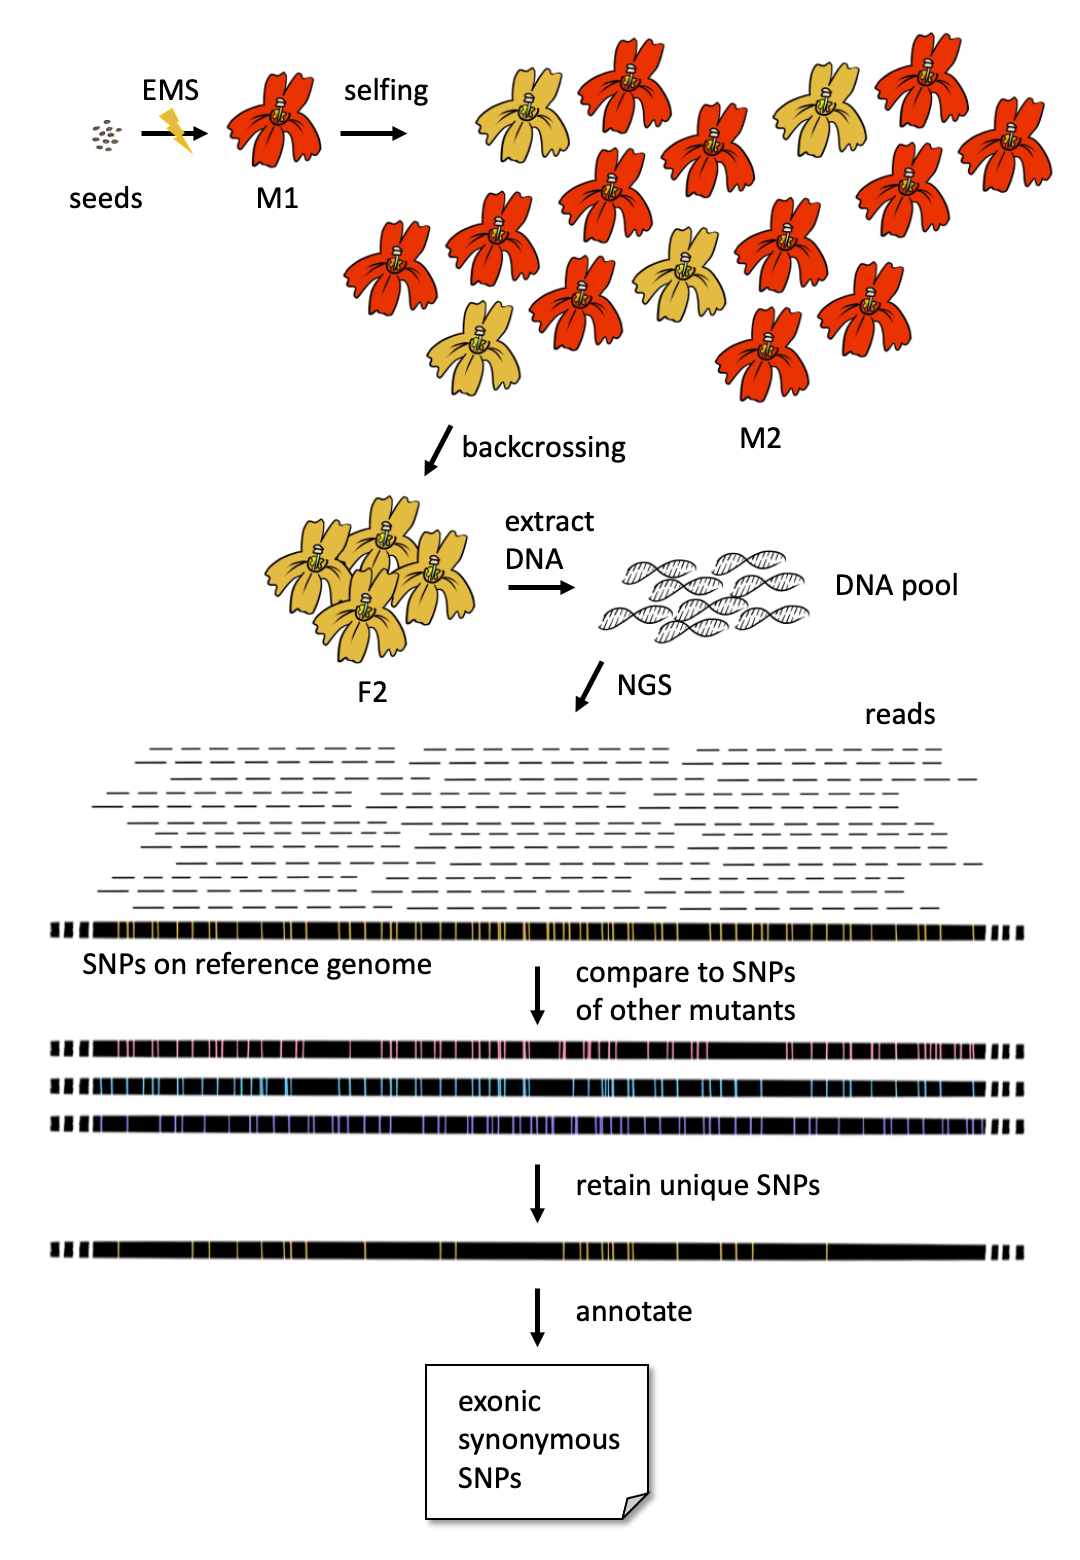
First, we mutated the wildtype monkeyflower seeds with EMS treatment. These seeds were sown to generate M1 plants, the main proportion of which was supposed to be heterozygous in regard of mutations. Most of the mutations were recessive so that no phenotype was observed in most M1 plants. Secondly, an M2 population was generated for each mutant by selfing the M1 plant. The segregation rate of an M2 population was expected to be 3:1.
The M2 plants with the mutant phenotypes were backcrossed to the wildtype to produce an F2 population. The F2 plants with the mutant phenotypes were selected for DNA extraction and pooling. At least 30 individuals were needed for a bulk of DNA, which was further sequenced by NGS, e.g., Illumina sequencing, to produce DNA raw reads.
Raw reads were trimmed to get rid of adapters and sequences with bad quality and then aligned to user-designated genomes. Single nucleotide polymorphisms (SNPs) were called based on the read alignments followed by filtration based on the on-site sequencing coverage, read mapping quality, and homozygosity.
Since the true causal mutation should not be shared in the other mutants of different phenotypes, SNPs were further filtered by comparing to all homozygous SNPs found to date in the other mutants of the same species. So only SNPs that uniquely appeared in the mutant were retained as candidates of the causal mutation. Among these candidates, SNPs of high or moderate impact on genes were first to check. Other SNPs were reserved for checking in case none of these SNPs was verified as the true causal ones by functional experiments.
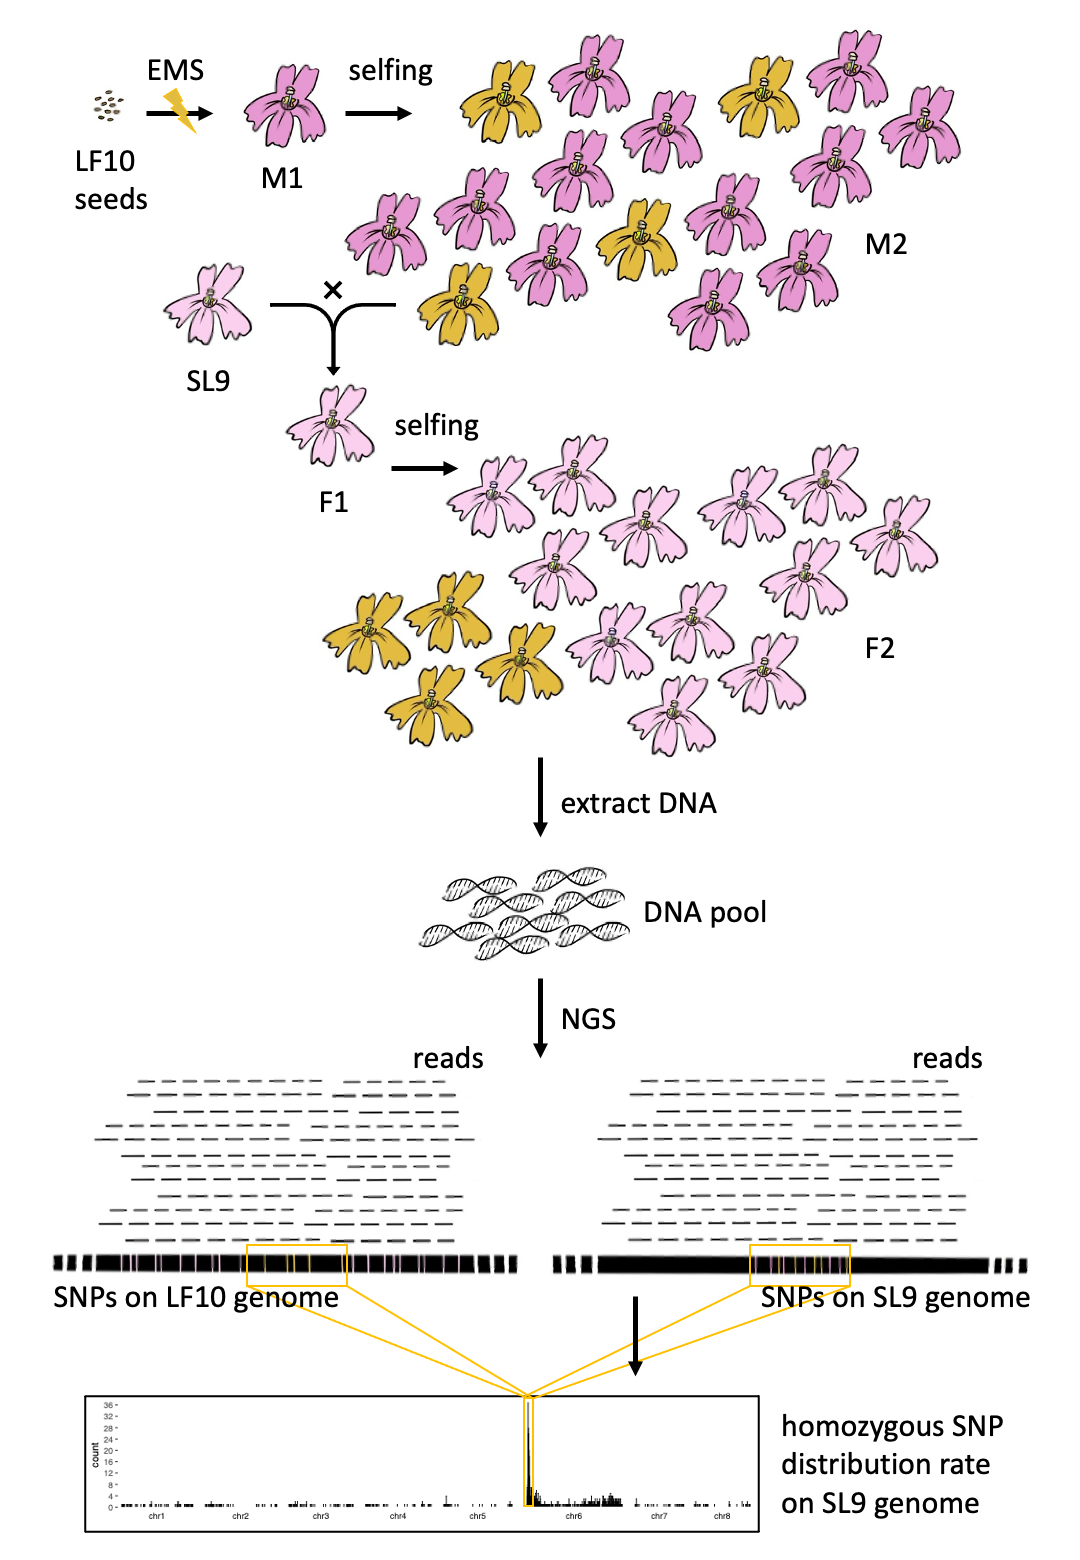
First, we mutated the wildtype monkeyflower (e.g. LF10) seeds with EMS treatment. These seeds were sown to generate M1 plants, the main proportion of which was supposed to be heterozygous in regard of mutations. Most of the mutations were recessive so that no phenotype was observed in most M1 plants. Secondly, an M2 population was generated for each mutant by selfing the M1 plant. The segregation rate of an M2 population was expected to be 3:1.
The M2 plants with mutant phenotypes were crossed to another inbred line of the same species (e.g. SL9) to produce F2 segregants with the mutant phenotypes for the collection of DNA pools. At least 30 individuals were needed for a bulk of DNA, which was further sequenced by NGS, e.g., Illumina sequencing, to produce DNA raw reads.
Raw reads were trimmed to get rid of adapters and sequences with bad quality and then aligned to user-designated genomes of the two inbred lines (e.g. LF10 and SL9). Single nucleotide polymorphisms (SNPs) were called based on the read alignments followed by filtration based on the on-site sequencing coverage, read mapping quality, and homozygosity.
A figure of homozygous SNP distribution rate across the genome would be produced to visualize the tightly linked flanking region of the causal mutation. Given a high recombination rate, there could be a peak region with significantly high counts of homozygous SNPs. Once the peak region was defined, SNPs out of the region would not be considered as candidates.
Since the true causal mutation should not be shared in the other mutants of different phenotypes, SNPs were further filtered by comparing to all homozygous SNPs found to date in the other mutants of the same species. So only SNPs that uniquely appeared in the mutant were retained as candidates of the causal mutation. Among these candidates, SNPs of high or moderate impact on genes were first to check. Other SNPs were reserved for checking in case none of these SNPs was verified as the true causal ones by functional experiments.
- Install Miniconda3.
First, download the installer: wget https://repo.anaconda.com/miniconda/Miniconda3-latest-Linux-x86_64.sh
Second, install by execute: sh Miniconda3-latest-Linux-x86_64.sh. (use its default path settings and let it auto initiate)
Third, execute source ~/.bashrc
Finally, execute conda env list to print existing environments. If this command work properly, Miniconda3 is successfully installed.
- Download MiMut to your server:
git clone https://github.com/qslin/MiMut.git - Create MiMut environment:
conda env create -f MiMut/MiMut.yaml - Activate the environment:
conda activate MiMut
Please make sure to activate MiMut environment everytime you use it.
- Prepare genome(s) and annotation files (including CDS sequences, protein sequences, and a GTF file). If you don't have them locally, please download from Mimubase. Creating a new folder for each species is recommended. For example:
mkdir MvBL
cd MvBL
wget http://mimubase.org/FTP/Genomes/MvBLg_v2.0/MvBLg_v2.0.fa
wget http://mimubase.org/FTP/Genomes/MvBLg_v2.0/MvBLg_v2.0.codingseq.fa
wget http://mimubase.org/FTP/Genomes/MvBLg_v2.0/MvBLg_v2.0.gtf
wget http://mimubase.org/FTP/Genomes/MvBLg_v2.0/MvBLg_v2.0.protein.fa
cd ..
- Set up the mutant library. Currently there are two mutant libraries curated in MiMut:
LF10_lib.txtandMvBL_lib.txt. These are the latest collection of homozygous SNPs detected from mutants of Mimulus lewisii inbred line LF10 and Mimulus verbenaceus inbred line MvBL respectively. To use the libraries, please provide their paths such as~/MiMut/LF10_lib.txt
If you are re-analyzing an old sample, please make sure to remove the sample from the library before running MiMut. For example: you are going to re-analyze an old sample called bagua. First, check if bagua is in the library: cat MiMut/LF10_lib.txt. All mutants in the library will be printed:
mutant_snps/Trumpet1/snp3.vcf
mutant_snps/boo3/snp3.vcf
mutant_snps/bagua/snp3.vcf
mutant_snps/flayed1/snp3.vcf
mutant_snps/flayed2/snp3.vcf
mutant_snps/flayed5/snp3.vcf
mutant_snps/flayed6/snp3.vcf
mutant_snps/flayed7/snp3.vcf
mutant_snps/Ml14181/snp3.vcf
mutant_snps/MlYL/snp3.vcf
mutant_snps/NT2/snp3.vcf
mutant_snps/PIN1/snp3.vcf
mutant_snps/ROI2/snp3.vcf
mutant_snps/Wastonia/snp3.vcf
We need to remove bagua on the third line and create a new library for running MiMut:
grep -v 'bagua' MiMut/LF10_lib.txt > MiMut/LF10_lib_no_bagua.txt
Then use the new library MiMut/LF10_lib_no_bagua.txt in the MiMut command.
If you want to add a new sample to the library of existing species, create a folder for the sample in MiMut/mutant_snps, put SNP files inside, and add the paths to the library file. For example, you have analyzed a new mutant named Mv233 by MiMut, saved the results in ~/Mv233/, and would like to add it to the MvBL mutant library:
mkdir ~/MiMut/mutant_snps/Mv233
cp ~/Mv233/snp3.vcf ~/MiMut/mutant_snps/Mv233/
echo mutant_snps/Mv233/snp3.vcf >> ~/MiMut/MvBL_lib.txt
If you want to create a library for a new species, create a folder for each sample of the new species in MiMut/mutant_snps, put SNP files inside respectively, and create a new file in MiMut folder as a new library, which contains paths of SNP files. For example, you have analyzed two M. guttatus mutants called Mg001 and Mg002 by MiMut, saved the results to ~/Mg001/ and ~/Mg002/, and would like to add it to a guttatus mutant library:
mkdir ~/MiMut/mutant_snps/Mg001
mkdir ~/MiMut/mutant_snps/Mg002

cp ~/Mg001/snp3.vcf ~/MiMut/mutant_snps/Mg001
cp ~/Mg002/snp3.vcf ~/MiMut/mutant_snps/Mg002

echo mutant_snps/Mg001/snp3.vcf >> ~/MiMut/guttatus_lib.txt
echo mutant_snps/Mg002/snp3.vcf >> ~/MiMut/guttatus_lib.txt
Note: for the first run of new species, please follow the instructions here.
- Create a folder for your project:
mkdir project_nameEnter the folder:cd project_name - Create a file (e.g. reads.txt) to store the absolute paths of raw reads. One pair per line. Forward and reverse seperated by a space. For example:
/home/CAM/user/rawdata/Example_H2N3KDMXX_L1_1.clean.fq.gz /home/CAM/user/rawdata/Example_H2N3KDMXX_L1_2.clean.fq.gz
- Execute MiMut (please replace the paths to where your files were stored):
sh path/to/MiMut/MiMut.sh -r path/to/reference/genome -g path/to/reference/annotation -c path/to/reference/cds -p path/to/reference/proteins -l path/to/mutant/library -f file/of/raw/read/paths
For example, you have cloned MiMut to your home directory ~ and also created MvBL folder in home directory. The command would be:
sh ~/MiMut/MiMut.sh -r ~/MvBL/MvBLg_v2.0.fa -g ~/MvBL/MvBLg_v2.0.gtf -c ~/MvBL/MvBLg_v2.0.codingseq.fa -p ~/MvBL/MvBLg_v2.0.protein.fa -l ~/MiMut/MvBL_lib.txt -f reads.txt
By default, MiMut requires 8 threads. Change the number of threads using -t. For example:
sh ~/MiMut/MiMut.sh -r ~/MvBL/MvBLg_v2.0.fa -g ~/MvBL/MvBLg_v2.0.gtf -c ~/MvBL/MvBLg_v2.0.codingseq.fa -p ~/MvBL/MvBLg_v2.0.protein.fa -l ~/MiMut/MvBL_lib.txt -f reads.txt -t 16
For the MvBL genome of about 440Mb, MiMut usually finish a job within one day when using 8 threads. But the run time could be longer given a bigger raw data size. So try to increase threads when you have a sequencing depth of more than 50X. For memory usage, 8GB is enough for a Mimulus species. Increase memory usage if you have a bigger genome.
For more options, execute sh ~/MiMut/MiMut.sh to read the full manual.
Step 1-8 are the same as the primary workflow. If you need the SL9 genome, it can be downloaded by git clone https://github.com/qslin/SL9.git Make sure to decompress it before using MiMut: gzip -d SL9/SL9g_v2.0.fa.gz
- Execute MiMut (please replace the paths to where your files were stored):
sh path/to/MiMut/MiMut.sh -r path/to/reference/genome -g path/to/reference/annotation -c path/to/reference/cds -p path/to/reference/proteins -l path/to/mutant/library -f file/of/raw/read/paths -b path/to/the/second/genome
Here we use LF10 and SL9 as examples. Supposing you have cloned MiMut and SL9 to your home directory ~ and also created LF10 folder in home directory, The command will be:
sh ~/MiMut/MiMut.sh -r ~/LF10/LF10g_v2.0.fa -g ~/LF10/LF10g_v2.0.gtf -c ~/LF10/LF10g_v2.0.codingseq.fa -p ~/LF10/LF10g_v2.0.protein.fa -l ~/MiMut/LF10_lib.txt -f reads.txt -b ~/SL9/SL9g_v2.0.fa
In this workflow, reads will be mapped to both LF10 and SL9 genomes, which doubles the time of running programs. So increasing threads is recommended when possible. By default, MiMut requires 8 threads. Change the number of threads using -t. For example:
sh ~/MiMut/MiMut.sh -r ~/LF10/LF10g_v2.0.fa -g ~/LF10/LF10g_v2.0.gtf -c ~/LF10/LF10g_v2.0.codingseq.fa -p ~/LF10/LF10g_v2.0.protein.fa -l ~/MiMut/LF10_lib.txt -f reads.txt -b ~/SL9/SL9g_v2.0.fa -t 16
For more options, execute sh ~/MiMut/MiMut.sh to read the full manual.
sbatch can be used to submit MiMut jobs. A reference shell script for job submission can be found here.
Although there is no existing mutant libray for the new species, MiMut has a mandatory requirement of the library file as an input parameter. Therefore, create an empty libray for MiMut to run at the first time: touch ~/MiMut/new_lib.txt. Then add the SNP files to the new library following the instructions in step 6 above. You don't need to rerun the whole MiMut pipeline with the new library. Just add -s filter to the command so that MiMut will rerun from the filtering step. For example:
cd ~/Mg001/
sh ~/MiMut/MiMut.sh -r ~/guttatus/guttatus.fa -g ~/guttatus/guttatus.gtf -c ~/guttatus/guttatus.cds.fa -p ~/guttatus/guttatus.prot.fa -l ~/MiMut/guttatus_lib.txt -f reads.txt -s filter
Please note that you should execute the MiMut command in the same folder where you execute the first run. Otherwise MiMut cannot find the intermediate files from last steps to continue the filtering.
All the output files will be stored in the directory where you run or submit MiMut jobs. There will be five basic outputs as described below:
| Files | Descriptions |
|---|---|
| snp2.vcf | contains all heterozygous and homozygous SNPs; can be added to the mutant SNPs library |
| snp3.vcf | derives from snp2.vcf; contains all homozygous SNPs; can be added to the mutant SNPs library |
| SNP.ann.vcf | derives from snp3.vcf; contains all homozygous SNPs after filtering by a mutant library |
| SNP.ann.1.vcf | derives from SNP.ann.vcf in the primary workflow or from SNP.ann.high_count_regions.vcf in the secondary workflow; contains SNPs of high impact on the genes |
| SNP.ann.2.vcf | derives from SNP.ann.vcf in the primary workflow or from SNP.ann.high_count_regions.vcf in the secondary workflow; contains SNPs of mediate impact on the genes |
If you use the secondary workflow, two more output files will be generated:
| Files | Descriptions |
|---|---|
| SNP.ann.high_count_regions.vcf | derives from SNP.ann.vcf; contains SNPs within regions of high SNP distribution rates |
| SNP.eps | is the figure of homozygous SNP distribution rate on chromosomes; a high peak indicates a candidate region for the causal mutation |
There will be a tmp folder storing all the intermediate data such as the trimmed reads and the alignment files. Since in most cases, these files will not be used anymore, you can delete the folder by rm -r tmp after the MiMut job is finished.
-
How to cite this work?
Please cite this work with
.