Getting Started
First you have to download Quasar. The recommended way to download Quasar is from the GitHub release page, which can be found here. Bleeding edge versions with latest features, improvements and bug-fixes can are located at the CI server. These builds should be used with caution as they may contain critical bugs.
Extract the downloaded files and make sure that at least .NET Framework 4.5.2 is installed. It comes preinstalled with Windows 10 and you will be notified anyways by Windows if you try to run Quasar without having the required .NET Framework version installed. The main application which is used to remotely administrate computers is called Quasar.exe. You can create an shortcut to it by right-clicking the file and selecting Send to -> Desktop (create shortcut) or pin the application to your taskbar while its running by performing a right click on the icon and selecting Pin to taskbar.
After having successfully started Quasar.exe a certificate creation window will up and help you to create a server certificate which is required to secure the communication between the server and clients. A certificate can either be created or imported. Importing is only necessary when restoring a previous Quasar installation. The creation process might take a while. Once completed and saved you will be asked to backup the created quasar.p12 certificate file. It is important to create a backup of this file in a secure location, it is unique and required to restore a previous Quasar installation. Without a valid certificate backup the existing client will not be able to connect to the server.
Now it is time to actually start the Quasar server. To do that click on Settings at the top of the Quasar window, enter an unused port number or use the default port (4782 TCP), and check to listen for new connections on startup. During the first start of the Quasar server it might be possible for a firewall alert to pop up. If you had no such popup the firewall rule needs to be added manually (see step 4). Simplified it says that Quasar is trying to listen for connection requests from other computers. Also it is important to understand that the mentioned connections are only possible when the Quasar server is running. When stopped, packets received for the Quasar servers are dropped.
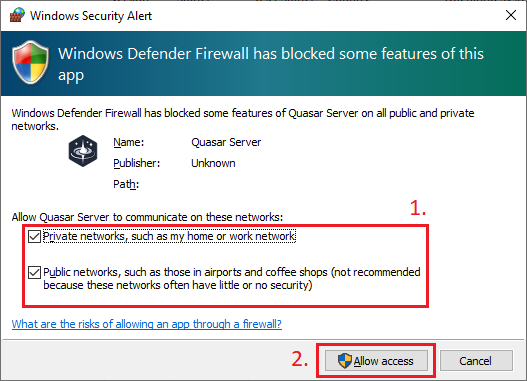
If you had a firewall popup as described in step 3 and allowed the access, it is not necessary to add another firewall rule and you can skip this step.

The easiest method to open Windows Defender Firewall with Advanced Security in most Windows versions is to search for its executable file. Type wf.msc in the Windows search box and click on the result. Next select Inbound Rules in the left pane. Right click Inbound Rules and select New Rule.... Select Port and click Next. Select TCP and enter previously chosen port number into the next window and click Next. Select Allow the connection in the next window and hit Next. Select all network types and click Next. Name the rule something meaningful, such as Quasar Server and click Finish.
After starting Quasar.exe for the first time, you will need to build a client for deployment on your computers. Use the button Builder at the top of the Quasar application to start the client configuration. In the Connection Settings tab it is important to choose the same port as previously chosen in step 3. To successfully establish a connection with the Quasar server it is necessary to enter a correct hostname which can be resolved from your configured DNS servers. Alternatively you can enter the IP (v4 or v6) of the server. Click Add Host to add a host to the list of available hosts which the client will try to connect to in a round-robin fashion. It is also possible to add more than one host. A complete list of all client settings can be found here. After configuring the client for your needs, click the Build button and choose a location to save the built client.
The standalone client from the previous step has to be deployed on the computers of the users. Simply executing the client on the computers is enough. The client will take care of the installation routine. Once installed the client will try to connect to your server on the specified hostname and port. It might be necessary to set up port forwarding to your local server if it is behind a firewall in your network. You can use automatic forwarding with UPnP in the settings if it's being supported by your firewall/router. To get started with port forwarding, check this out.