An automatic set of scripts to build a RMA (factory) shim for a given ChromeOS board and inject the sh1mmer payload (BeautifulWorld).
This repository aims to provide a means to build your own shim from source. However, I also provide prebuilt, signed shims in a convenient mega.nz folder which you can find below. I plan to upload more shims as I build them, as for now only a few are available.
Folder link: https://mega.nz/folder/DIwBBTxK
Decryption key: OO3Ma9bBsnp2x81l2jNSUw
Using this project requires a significant bit of knowledge about *nix shells, the boot process and drive partitioning. Before you even run this on your system, be sure to read through it to understand what it does! I'm not responsible if you mess up following the instructions!
This project does not produce a signed RMA shim. If you want to sign a built RMA shim, you need to extract the proprietary components from an official ChromeOS shim, which I will not provide for legal reasons.
The creator of this project does not endorse un-enrolling your Chromebook where it would violate the terms of any legally binding agreement or be illegal in any other fashion. The creator does not, under any circumstances, take any liability for what is done with this project.
If you know what you're doing and don't need to be held by the hand through the entire process, see ./tldr.md.
There are two scripts in this repo: autoshim.sh and injectsh1mmer.sh. The first one is used to build a RMA shim for a given ChromeOS board, and the second one is used to inject the sh1mmer payload into the shim. If you already have a prebuilt shim, you can skip the first step and go straight to the second one.
To build a shim, you need to know what board you want to build for. You can see this by visiting chrome://version on a Chrome/ChromiumOS device, and looking for the word after stable-channel. For example, if you see stable-channel kindred, then you want to build for kindred.
A couple of common boards are:
jacuzzikindredlarsgrunt
Before you start, there are a couple of choices for your environment. You can either use a VM running Ubuntu 20.04 (LTS), or you can use a physical machine running Ubuntu off of a USB stick, which will no doubt provide superior performance. The Gitpod free tier is unable to run this script, as it requires around 35gb of disk space and only 10gb are available. It also does not function on the free tier of Github Codespaces, although they provide a formidable 30gb of storage.
No matter how you choose to run your environment, you should be using Ubuntu 20.04 or one of its distributions at a matching version (Xubuntu, Lubuntu, Ubuntu Unity, etc). Kali Linux will not work (I'm looking at you, 3kh0)!
Only run these commands as root if the instructions say so. Stuff will break if your home directory is set to /root!
No matter what you chose, the steps are the same:
git clone https://github.com/rainestorme/auto-sh1mmer.git
cd auto-sh1mmer./autoshim.sh <board>For example, if you want to build for kindred, you would run:
./autoshim.sh kindredWait for the script to finish. It might prompt you for your password a couple of times, in which case just enter it and press enter.
About halfway through the script, you will be dropped into a terminal. Before you do anything, make sure that it says (cr) before the shell prompt. An example prompt would look like this:
(cr) ((...)) you@hostname ~/chromiumos/src/scripts $When you see this, type exit and press enter to continue the build process. From here, everything else is automatically done.
It will take a while, but it will eventually finish. You will know it's finished when you see the following message:
Done creating RMA shim! Your image should be located in ~/chromiumos/chroot/mnt/imgs/build_shim.bin3. If you don't want to install the sh1mmer payload into the shim, you can skip this step. To inject BeautifulWorld into the shim, run the injectsh1mmer.sh script, passing in the path to the shim you just built
./injectsh1mmer.sh /path/to/shimIf you just built the shim with autoshim.sh, then you can just run:
./injectsh1mmer.sh ~/chromiumos/chroot/mnt/imgs/build_shim.binThis shouldn't take too long, and once it's done, you'll see the following message:
Done! Your image should be located in ./sh1mmer-payload.binIf you're using a VM, then you should make sure that you passed through the USB drive to the VM. If you're using a physical machine, then you should make sure that the USB drive is plugged in (obviously). Let's find the path to the USB drive. Run the following command:
sudo fdisk -lYou should see a list of drives. Look for the one that is the size of your USB drive, as well as the brand. It should be something like /dev/sdX, where X is a letter. If you're not sure, you can unplug the USB drive and run the command again. The drive that disappears is the one you want. Once you've found the drive, run the following command, replacing /dev/sdX with the path to your USB drive:
If you've injected the sh1mmer payload into the shim, then run:
dd if=sh1mmer-payload.bin of=/dev/sdXMake sure to replace /dev/sdX with your USB drive path! If you get it wrong, you could easily wipe your primary drive, which, Pro tip: is not good.
If you built the shim and didn't inject the sh1mmer payload, then run:
dd if=~/chromiumos/chroot/mnt/imgs/build_shim.bin of=/dev/sdXAgain, make sure to replace /dev/sdX with your USB drive path!
Hopefully, you should see a bunch of output, and then it should finish. If you get an error, make sure you're using the correct path to your USB drive, and that the USB drive has enough storage space to hold the shim (16gb minimum).
If you don't want to do this through linux, you can use Rufus on Windows to flash the shim to a USB drive (ensure that you select dd mode when prompted).
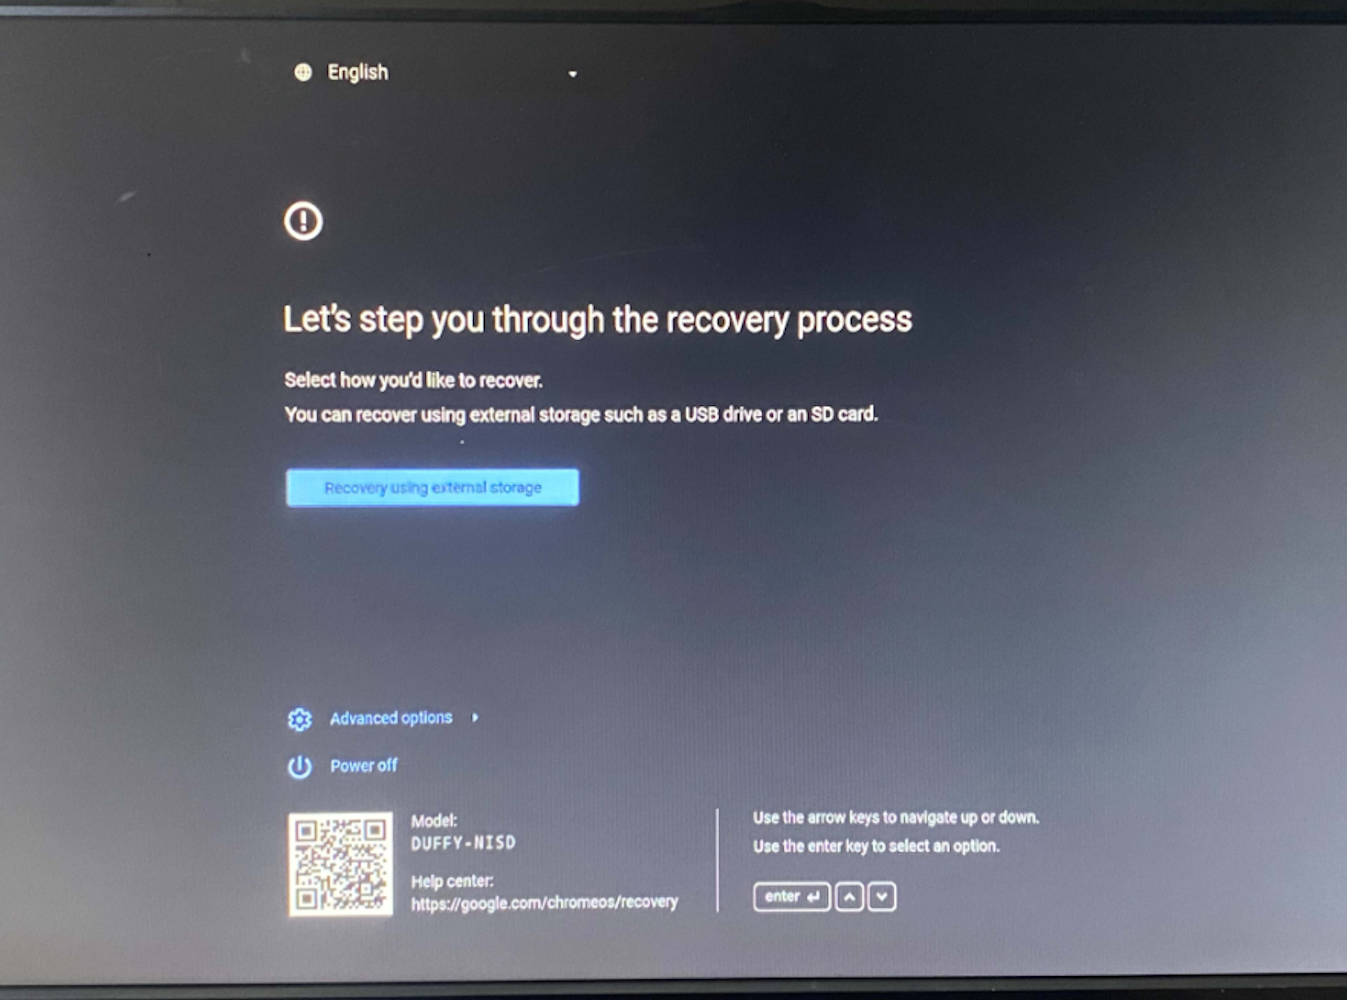
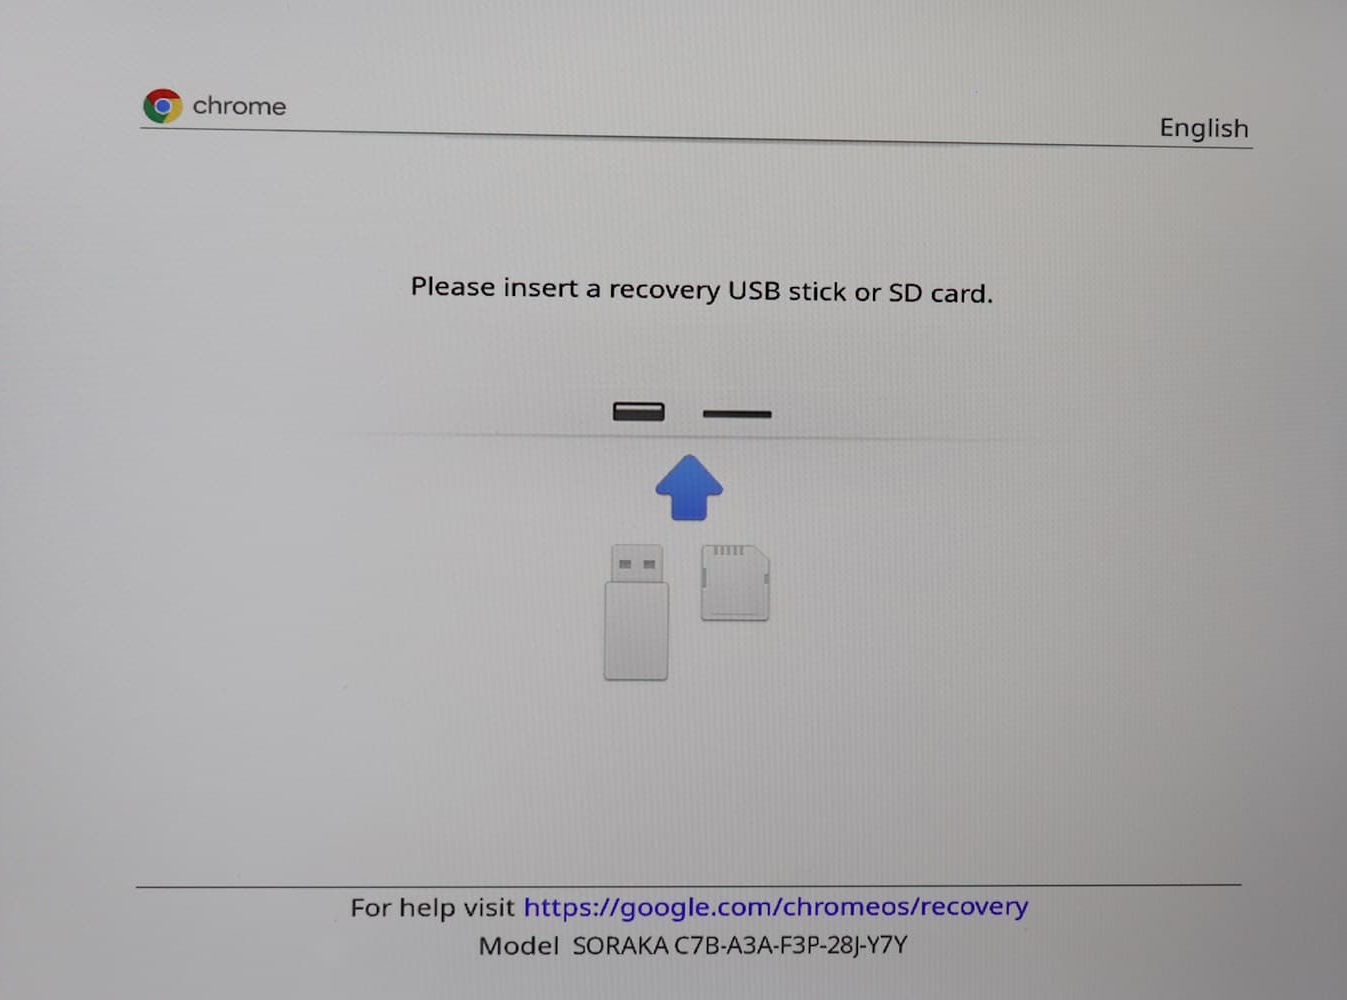
Grab your ChromeOS device (developer mode enabled with dev_boot_usb for booting an unsigned image like the one you just made) and boot it into recovery mode. This is done by holding ESC and Refresh (F3) and then pressing and holding the power button. Release it after a second or so. You should see a screen that looks like either of the following images:
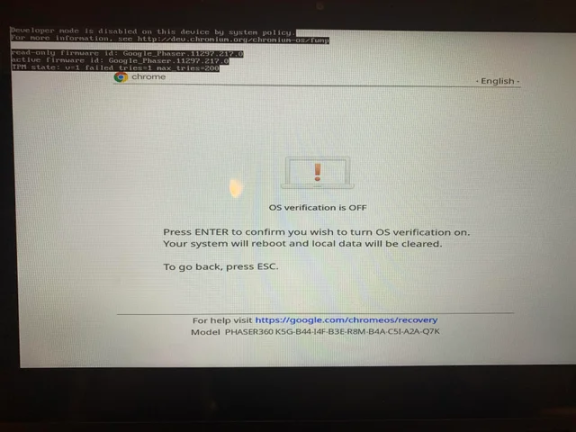
Press Ctrl+D then Enter to enter developer mode. Once the device reboots, you should see a screen that looks like either of these:
This is where the steps differ from traditional ChromeOS developer mode. Press ESC and Refresh (F3) and then press and hold the power button. Release it after a bit. You should see a very similar screen to the one you saw when you booted into recovery mode.
This is where your USB drive comes in. Plug it into the device, then press ESC, Refresh (F3), and Power again. I promise this is the last time. After a brief black-and-white loading screen, you should be greeted with either the screen of options for your device (if you didn't use the sh1mmer payload), or the sh1mmer BeautifulWorld menu (if you did). Although we don't have a screenshot for the options screen due to its dynamic nature, here's a screenshot of the sh1mmer menu:
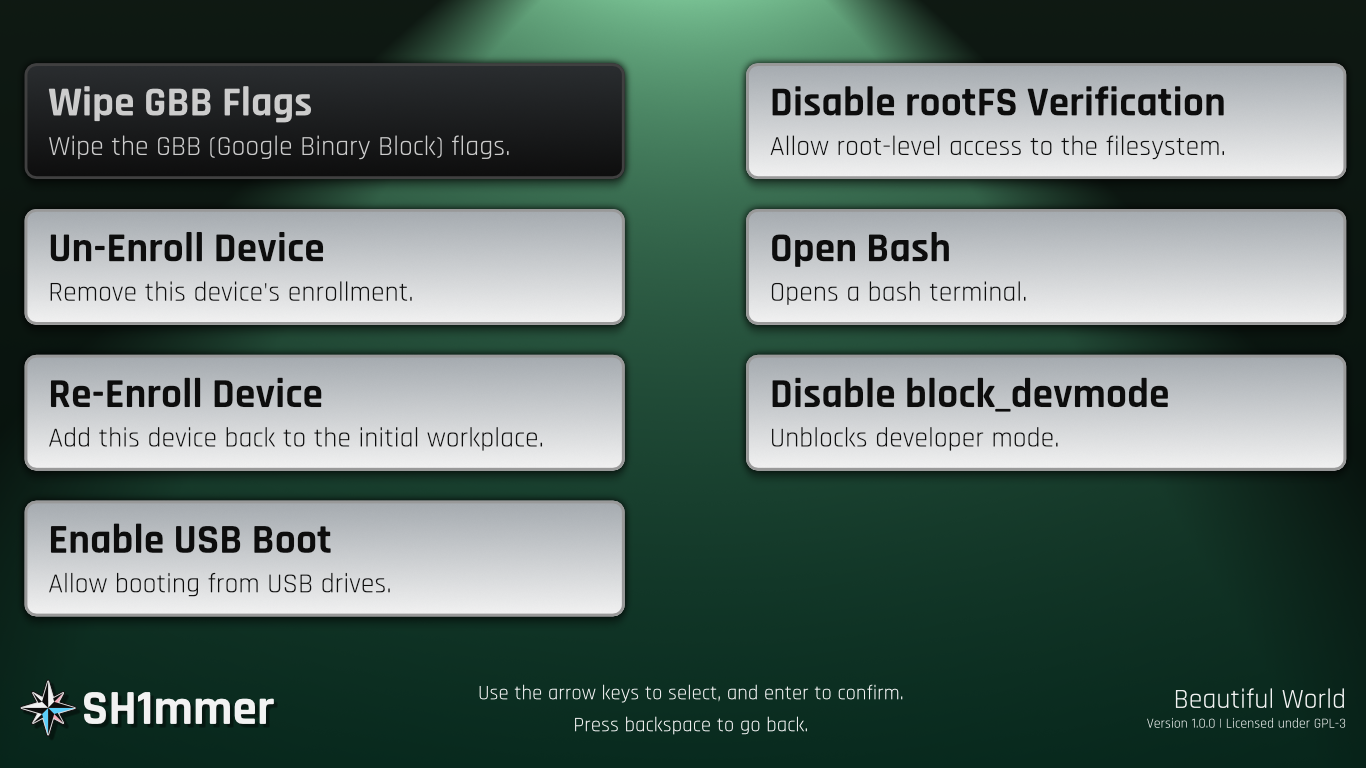
From here the rest is up to you. You can, among other things, un-enroll and re-enroll your device, enable USB booting, flash custom firmware, open a shell, disable rootFS verification (write-protect), and disable the lock against developer mode.
If you want to boot from a USB drive, you can do so by following the steps below. This is not required, but it's a nice feature to have.
Boot into the sh1mmer menu, and select Enable USB booting. This will run the built-in developer mode command that enables USB booting. Once it's done, reboot the device.
2. Activate the hidden USB boot feature
At the developer mode confirmation screen, press Ctrl+U. This will cause ChromeOS to continue booting from the first USB drive it finds. If you have multiple USB drives, the results of this command are unpredictable. In that case, unplug all USB drives except the one you want to boot from before pressing Ctrl+U.
You should be greeted with the USB drive's boot menu, usually GRUB2 or some other bootloader (I'm looking at you, Windows). Proceed with booting it as you normally would.
You can disable rootFS verification, which is also known as write-protect, using the sh1mmer menu. This is useful if you want to modify the root filesystem, or if you want to install a custom firmware. To disable rootFS verification, boot into the sh1mmer menu, and select Disable rootFS verification. From here, reboot the device. You should now be able to modify the root filesystem, install custom firmware, use the rw flag, and more.
You can also enable developer mode so that you can access the developer shell and the chronos and root accounts through crosh. You can do this by booting into the sh1mmer menu, and selecting Enable developer mode. However, you should be aware that this will not stop enterprise enrollment from blocking various aspects of your device's functionality. For optimal results, you should also un-enroll your device.