
This project is not fully polished, as it was originally a sandbox just for myself. I created this about a year ago, but there doesn't really seem to be any Linux software that provides background blurring in an easy-to-use fashion, so hopefully this project can fulfill that niche. Pull Requests are welcome.
Shout out to https://github.com/Volcomix/virtual-background! That project is excellent and it taught me how background segregation works. It links to the following live demo: https://volcomix.github.io/virtual-background/. It is a typescript project, but I took a lot of inspiration from his code when implementing this project. This project also uses Tensorflow Lite with the same ML models, and ffmpeg for dealing with the camera devices.
This is the hackernews post for it: https://news.ycombinator.com/item?id=34006745
This below collab video with SBF demonstrates how it works and how it looks.
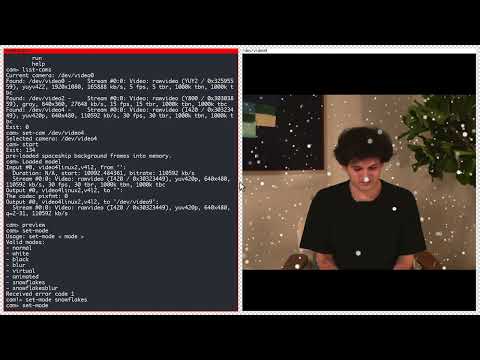
The snowflakes effect uses the background segregation to place snowflakes in the background, only larger flakes are close enough to the camera to be visible in front of the subject.
- Deploy using "Deploy using Docker", or "Deploy from binaries".
- Run the program, follow usage instructions below. Typically:
rayb@ideapad ~> cam cam> set-device /dev/video4 # (if /dev/video4 is your external camera to use) cam> set-mode snowflakes # (animated is the default, the spaceship background) cam> start - Use the virtual webcam labeled
Virtual 640x480 420P TFlite Camerain your video conferencing software.
For detailed usage, see: Usage.md.
In case docker is present on your system, then you can create a simple cam
wrapper script that starts the program using a container.
However, there is an additional pre-requisite:
apt install -y v4l2loopback-dkms # other distros might have a different package name
We can create a script named cam that will create two virtual devices and
launch the program using a container from docker.io.
cat << EOF > cam
#!/bin/bash

# recreate virtual devices
sudo modprobe -r v4l2loopback;
sudo modprobe v4l2loopback video_nr=8,9 exclusive_caps=0,1 card_label="Virtual Temp Camera Input","Virtual 640x480 420P TFlite Camera";

# allow X from within container
xhost +

# the rest runs inside docker
docker run --privileged -it -e DISPLAY=\$DISPLAY -v /tmp/.X11-unix:/tmp/.X11-unix docker.io/rayburgemeestre/virtual-bg:1.1.1
EOF
chmod +x cam
sudo cp -prv cam /usr/local/bin/  # optionally
If you want to use an external image as a background, you can mount the desired path into the Docker image. For example:
docker run --privileged -it -e DISPLAY=\$DISPLAY -v /home/user/pictures:/release/pictures -v /tmp/.X11-unix:/tmp/.X11-unix docker.io/rayburgemeestre/virtual-bg:1.1.1Afterward, select the corresponding image by using the command: set-mode external pictures/<your-image>.png
- If you don't like the
--privilegedflag, you can also discard it and use--device /dev/video0 --device /dev/video8 --device /dev/video9(or whatever devices are appropriate in your case). - The
-e DISPLAY=$DISPLAY -v /tmp/.X11-unix:/tmp/.X11-unixflags are also optional, and only needed if you wish to use thepreviewcommand, to show a window of the virtual camera output. - The
xhost +is also needed only for thepreviewcommand, to allow the container to access the X11 server. - The
exclusive_caps=0,1parameter for the virtual devices is important: the1makes it available for chrome to use. We don't set the "Virtual Temp Camera Input" device to1as it's just an intermediate device to be used by this project only. -v /home/user/pictures:/release/picturesThis will make your path/home/user/picturesavailable as/release/picturesin the docker image. In case you wish to set an external picture as your background, you can useset-mode external /releases/etc.... Note that tab completion should work inside the program.
This should work at least on Ubuntu 20.04 and 22.04:
apt-get update
apt-get install -y v4l2loopback-dkms make sudo libreadline8 libavfilter7 libxcb-shape0 ffmpeg

wget https://github.com/rayburgemeestre/webcam-virtual-background/releases/download/1.1.1/virtual-bg-1.1.1.tar.gz
tar -xvf virtual-bg-1.1.1.tar.gz
cd virtual-bg-1.1.1
./cam
Check make:
rayb@ideapad:~/projects/webcam-virtual-background[master]> make
clean                clean project
compile              compile project
configure            configure ffmpeg, tensorflow and mediapipe dependencies
device               setup two devices /dev/video8 and /dev/video9
export               create files in the lib dir
...
Not all targets are documented as of now, but building on Ubuntu 20.04 (might also work on other distros) should be done as follows.
make configure # optional, see below
This is by far the most time consuming step, and likely the most error prone.
It downloads and compiles a lot of dependencies. If you don't want to do this,
you can skip this step and try the libraries committed to git in lib. These
were compiled on Ubuntu 20.04 by me, and were only 24 MiB anyway.
Then, download https://cppse.nl/spaceship.tar.gz and extract it in the
backgrounds folder. If you don't care about the animated spaceship
background, you can skip this step. (Please note that if you try to use that
particular animated background, the program might crash in that case). Next:
make compile      # produces `main` binary
make release      # optionally copy all related binaries and files to `release` directory
make docker       # optionally create an ubuntu docker image with the `release` directory binaries
The Dockerfile can be viewed to see the dependencies. The installed
dependencies happen to be exactly the same on Ubuntu 22.04.
Version 1.0: Initial version
Version 1.1: External images support (added by: Sebastian https://github.com/ChillAndImprove)
Version 1.1.1: Small "no buffer" fix (see: #3)
These originate from this excellent project: https://github.com/Volcomix/virtual-background
Background segregation stuff code that helped me with TFlite
Shout out to:
- https://github.com/spacejake/tflite-cpp - for showing how to use TFlite
- https://gist.github.com/bfraboni/946d9456b15cac3170514307cf032a27 - for the blur code
- https://www.youtube.com/watch?v=1kDQggH30Lg - free virtual background
- Reason for the resizing is larger resolutions were a bit heavy on the CPU, at least on the laptop I was using at the time. Code optimizations code improve this.
- Reason for the YUV420p conversion is that I could make the code simpler, I
did spend many days at the time to use a higher level ffmpeg API to achieve
support for all ffmpeg supported pixel formats. The point would be that
different webcams could be hooked up directly, and potentially we don't need
/dev/video8at all, but didn't manage to do it quickly enough.