This document explains Read2Me Widget, which is a plug and play implementation of Read2Me API. It lets you convert any of your web pages into audio. Emphasis is put on quality, ease of use and usefulness.
Looking for Read2Me API?
The widget creates audio for every page where the following JavaScript and HTML are put.
Add this to your page, ideally immediately after <body>:
<script>(function(d, t, id) {
    var s, r, div, c, js, h, sT, sI;
    if (d.getElementById(id)) return;
    div = d.createElement(t); div.id = id;
    d.body.insertBefore(div, d.body.firstChild);
    s = 'https://d22fip447qchhd.cloudfront.net/api/widget/1.1.0-beta5r5/widget.min.html';
    r = new XMLHttpRequest(); r.responseType = 'document'; r.open('GET', s, true);
    r.onload = function(e) {
        c = e.target.response.querySelector('style');
        js = e.target.response.querySelector('script');
        h = e.target.response.querySelector('div');
        div.outerHTML = "";
        div = d.createElement(t); div.id = id;
        sT = d.createElement('script');
        sI = d.createTextNode(js.text);
        sT.appendChild(sI); div.appendChild(sT); div.appendChild(c); div.appendChild(h);
        d.body.insertBefore(div, d.body.firstChild);
    };
    r.send();
}(document, 'div', 'read2me-root'));</script>
Add this where you want the player to appear:
<div class="read2me-widget"
     data-app-id="YOUR APP ID"
     data-url="https://canonical.url/to/your/page"
>
</div>- four pre-made custom color presets (green, blue, white and white/black), all of which are customizable
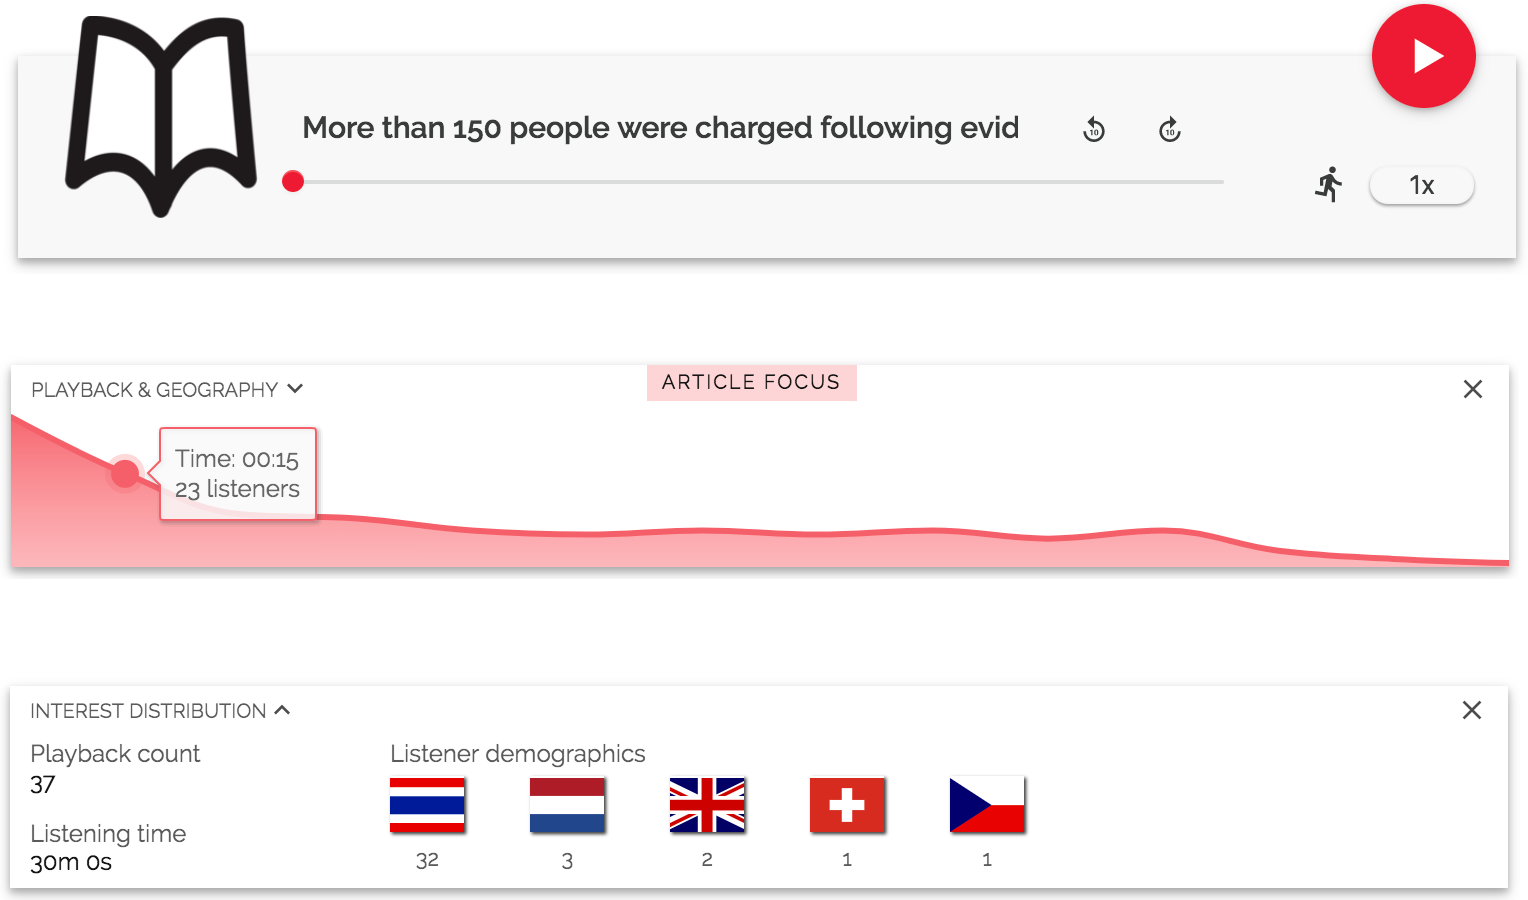
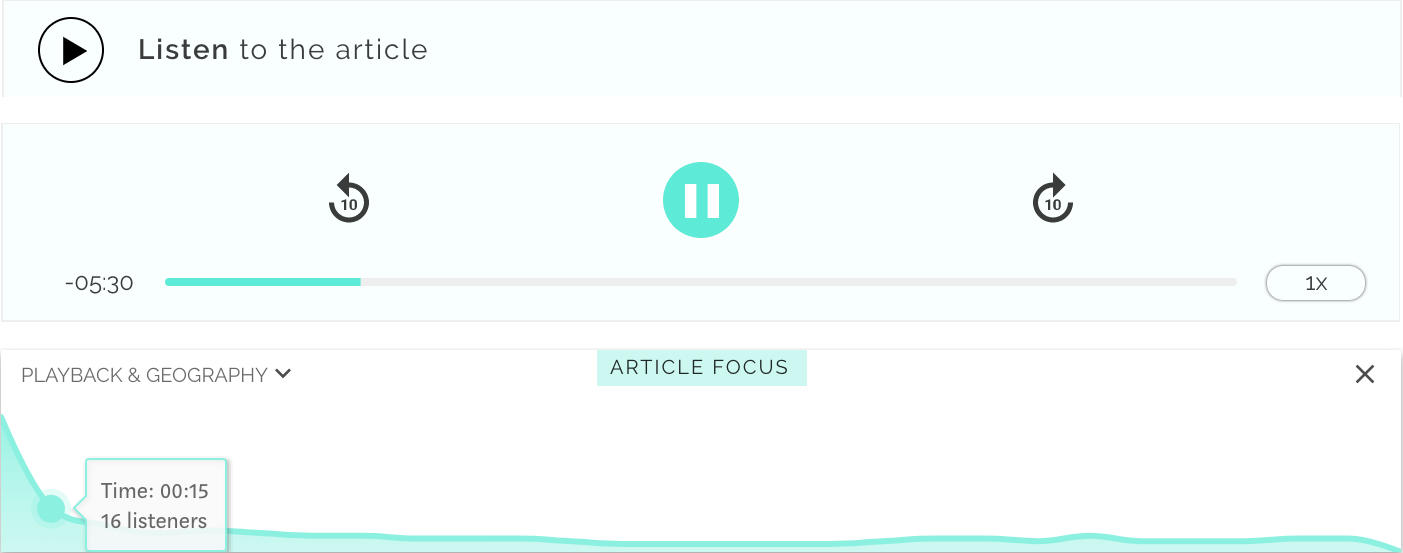
- analytics: easily figure out where are you dropping your readers by looking at
Focus Chart, get playback stats and listener demographics - responsive design - tablet, desktop and mobile UIs
- adjustable width in any unit (e.g.
pxor%) - supports autoplay (but can only autoplay on desktops due to mobile browsers' policies)
- explicit or implicit title: if not set, it will use what it finds in <title> tag
- explicit or implicit thumbnail: if not set, it will use what it finds in OG:Image property. An image with 1:1 aspect ratio is recommended.
- quota warnings at 70%, 80% and 90% via email
- ability to be specific about content using CSS selectors
- numerous voices and supported languages
- ability to choose whether or not the audio should update on content change (i.e. should the podcast keep up to date with your article text or just serve the first version)
- graceful behaviour on package quota exhaustion: will continue serving existing podcasts and the widget will simply self-destruct in case it's placed on a new article
- serve ads that are immune to adblockers by inlining text into the content and hiding it from viewers using CSS
- create iTunes-compatible RSS feeds using the RSS API endpoint. you can create multiple feeds, each with its their own settings.
Widget API.
data-app-id- your App ID, requireddata-url- URL you are converting, requireddata-css-selectors- manually select content you want to convert to a podcast using CSS selectors. optional, but when manually set it yields a higher quality page-to-podcast conversion. defaults to an intelligent guess. example:['h1', 'p.content']data-autoplay- should the audio autoplay on page load? optional, default is false (only works for desktop)data-voice- voice you want to use for podcast. optional, defaults toen-US-Wavenet-D, an American male voice.data-ignore-content-change- optional. by default, the created podcast will keep in sync with any revisions you might do on an article. if you want to ignore those changes, set this attribute to truedata-title- the title you want to use, only applies to Standard design. optional, defaults to page titledata-thumbnail- URL to an image you want to display, only applies to Standard design. recommended is 1:1 ratio. optional, defaults to OG:Image, and if that is not set either, it'll use an Read2Me image.data-design- design type. optional, defaults to standard. available choices are: standard, minimaldata-theme- color preset. optional, defaults to white. available presets are: white, gray, blue and green.data-colors- set primary and secondary colors on top of the theme as an array (e.g.data-colors="['#EE1932', '#ffffff']"). optional, but if passed, must be in hex format.data-width- sets a custom width for the widget. for standard design the minimum is 570 px, and for minimal 250 px. if you use a standard design but the container is less than 570px wide, it'll automatically apply the minimal design. optional, defaults to 570px for tablets and desktops and 100% for phonesdata-preload- set if audio should be preloaded (auto|metadata|none)data-only-instantiate- only use the widget code for validation, don't instantiate the player. this should be used when you don't want to use any of the available players, but instead you want to code your own solution against the API. optional, defaults to false
Advanced integration means that you won't be using any pre-existing designs, and you just want to be able to use Read2Me's API.
You're advised to use ReadMe's SDK:
- Import the
widget.min.htmlas mentioned above (or however you prefer) - Declare a widget inside the HTML document (
data-only-instantiate="true"might come in handy) - Write some code:
let appId = 123;
let url = 'https://canonical.url/to/your/page';
let css = ['h1', 'p.content'];
let read2meBackend = new Read2Me.BackendWrapper(appId, url, css);
BackendWrapper has a few methods: get(), create(), deleteCache() and refreshCreate(). Take a look at class API.
To send analytics, you'll be using Read2Me.AnalyticsBackendWrapper which is a class with static methods. Again, take a look at class API.
Widgets created using the simple setup are exposed through Read2Me.PlayerInstances.
- Tested in Chrome, Firefox, Edge, Opera, Safari and Samsung Browser
- No IE support, but will fail gracefully by simply not showing

| data-theme | data-colors |
|---|---|
| gray | ['#EE1932', '#ffffff'] |
Onboarding is manual. If you're interested please send an email to hello@read2me.online
- standard design based on this design by easiblu
- @rafamel for creating a Preact version and advice
- Set
AWS_ACCESS_KEY_IDandAWS_SECRET_ACCESS_KEYenv variables (with S3 permissions) - For development:
gulp default(by default, Gulp will use Read2Me's S3 buckets - you can change that in gulpfile.js) - Production versioning: change VERSION file and execute
gulp publish(which uploads to production S3) - Change the sample JS snippet at the top of this document so it reflects the new version