Camera volumes usage
This video tutorials may be outdated for specific cases, because there was few major updates after it was recorded.
Camera location and rotation calculated according to camera volume location and rotation, and there are no world coordinates limitations. But camera blocking performed according to volume sides, so in side-scroller game, camera blocking will work properly only if movable camera will be oriented to volume Front side.

This system supports from 2 to 3 dimensions, and calculations can be performed for 4 or 6 sides of volume accordingly.
By default system uses 2.5D settings - camera volumes are volumetric, but only Right, Left, Top and Bottom sides are processed. On closed sides, camera will be blocked on +Y volume extent depth. See extended explanation in Camera blocking section.
There are 2 parameters that used to switch 2D, 2.5D and 3D behavior:
- bUseZeroDepthExtent makes camera volume min and max coordinates on Y axis equal to 0, so volume still have Y extent but behaves like 2D plane. This should be used for "flat" 2D games.
- bUse6DOFVolume enables processing of all 6 volume sides. By default it is set to false for optimization purposes, so, Right, Left, Top and Bottom sides will be processed, Front and Back sides will be ignored. Set it to true if you want Front and Back sides be processed too.
Note: Of course you can't have both this parameters enabled at the same time.
You can set both this parameters per camera volume instance, or you can set it in config file for all camera volumes in your game. In CameraVolumes/Config directory you can find or add DefaultCameraVolumes.ini config:
[/Script/CameraVolumes.CameraVolumeActor]
;bUseZeroDepthExtent=true
;bUse6DOFVolume=true
Remove comments (;) to set this options globally. It is required to update camera volumes in map after that.
For "flat" 2D game with camera blocked on XZ plane:
- bUseZeroDepthExtent = true;
- bUse6DOFVolume = false;
For 3D game with camera blocked on volume "+depth" coordinate:
- bUseZeroDepthExtent = false;
- bUse6DOFVolume = false;
For 3D game with camera blocked on volume "+depth" coordinate and character that can move into depth:
- bUseZeroDepthExtent = false;
- bUse6DOFVolume = true;
Read more detailed description in Example projects setup

This is regular third person camera that follows player and rotates around it. There is no SpringArmComponent used, but CameraVolumesCameraComponent contains all functionality to create similar camera behavior. This mode can be enabled/disabled in camera component by bUsePawnControlRotationCV parameter. Using it you can create hybrid camera game.

This type of camera will follow player character. It can be blocked on Right, Left, Top and Bottom volume's sides.
Settings:
- Camera Mobility = Movable

This type of camera will be fixed in space, and can look at specified point in space or look at player character. It will not be blocked at any side during looking at player.
Settings:
- Camera Mobility = Static
- (optionally) bFocalPointIsPlayer = true

This type of movable camera will follow player character, but also will rotate around volume's central axis. It can be blocked on the Top and Bottom volume's sides. You can disable volume's main box collision, and add your own collision primitive, to make custom volume activation (or simply adjust volume priority). This can be useful in case you want to offset volume’s central axis. Additionally, bUseCameraRotationAxis flag unblocks bFocalPointIsPlayer flag, so it can be used to change camera behavior.
Settings:
- Camera Mobility = Movable
- Use Camera Rotation Axis = true
- (optional) bDisableMainBoxCollision
- (optional) bFocalPointIsPlayer
When main box collision is disabled, additional primitives added to camera volume should use Custom collision preset, with CollisionEnabled set to QueryOnly, Pawn channel set to Overlap, and all other channels set to Ignore:

Camera blocking designed for movable camera that oriented to camera volume Front side.
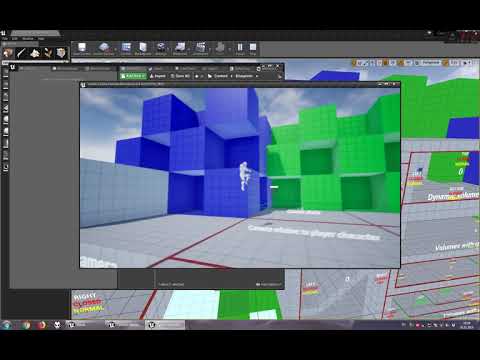
Volume sides can be Open or Closed. Camera can pass through Open sides and will be blocked on screen edges on Closed sides. By default, all sides set to Open, and every volume have bPerformCameraBlocking property enabled.
For example, you want to block camera inside some room. So, you set it's Right, Left, Top and Bottom sides Closed. And if you start the game, you will notice that camera is blocked on volume +Y extent. As mentioned above - this can be changed by bUseZeroDepthExtent option.

In case you use bUse6DOFVolume option, you will enable all 6 volume sides for processing. And there is one thing you need to know - Front and Back sides are also opened by default, and now, to block camera properly in this room, you must set Closed for Front, Right, Left, Top and Bottom sides.
Camera blocking done by clamping camera position according to calculated volume extent and screen extent, with only local forward direction (-Y) processed. If you rotate camera, you will notice that it is passes through blocked sides on distance proportional to rotation angle.
Camera blocking will be automatically disabled in volumes with static cameras.
Additionally, you should know that camera blocking processed in next way:
- If camera manager have bPerformBlockingCalculations = true, then camera blocking calculations is processed according to every camera volume bPerformCameraBlocking parameter.
- If camera manager have bPerformBlockingCalculations = false, then camera blocking calculations is not processed at all.
There are Normal, Smooth and Cut transitions possible when character passed through volume side.
- Normal transition uses camera lag settings from character's camera component. Usually should be used with Open sides, but sometimes can be applied to Closed.
- Smooth transition uses easing functions to calculate interpolation. It's speed controlled by CameraSmoothTransitionSpeed parameter. Should be used with Closed and Open side if your character camera not uses lag settings.
- Cut transition simply replaces previous volume parameters with parameters from current volume. Usually should be used with Closed sides.
There are 3 sides pairs that processed during transition:
-
Front/Back
-
Right/Left
-
Top/Bottom
-
In case character passes from void into volume, or between nearby volumes that stand to each other by sides that are in pair - transition from side he passed in will be used.
-
In case character passes from volume that is inside another volume, or between nearby volumes that stand to each other not by sides that are in pair, or from volume into void - transition from side he passed from will be used.
For better player experience, it is desired to use the same side types and transitions types for adjoining sides of nearby volumes.

Try always have unambiguous situations with transitions between volumes. Character must pass one volume side at the moment, so sometimes it is necessary to block volume corners with level geometry, to prevent character pass, for example, Top and Right side at the same time.
Usually, in third-person games, character control rotation is used to rotate a camera around a character by mouse or gamepad. In side-scroller games it is not used and not updated.
But, for an instance, in ExampleProject for this plugin, you can find characters blueprints that are uses "hybrid" settings, and can change type of camera in runtime - from side-scroller to third-person (orbit) camera and back.
Their control rotation updated all the time even when camera is side-scroller:

And of course when camera is third-person:

During transition from side-scroller to third-person camera tries to match control rotation:

To avoid this and to use last camera rotation during transition, there is a special flag in camera component called bUpdateControlRotationFromCameraRotation. When this flag is set to true, control rotation is set from camera rotation when it's not ised to control third-person camera. And transition works better:

Flag bUpdateControlRotationFromCameraRotation is true by default, and if you have any issues with character control rotation in your specific game setup, you can disable it when necessary (in example project it is disabled for 2D side-scroller and top-down characters).
Priority used to let camera manager know which one of few overlapped volumes is more important.
For example, you can place one big volume with big camera offset, to cover some big room, and few smaller volumes inside of it that covers specific parts of that room with small camera offsets to zoom in.

Because we are talking about volumes in volumes, it is true that inner volumes always should have higher priority.
Volumes with equal priorities must stand side to side. Volumes with different priorities can overlap.
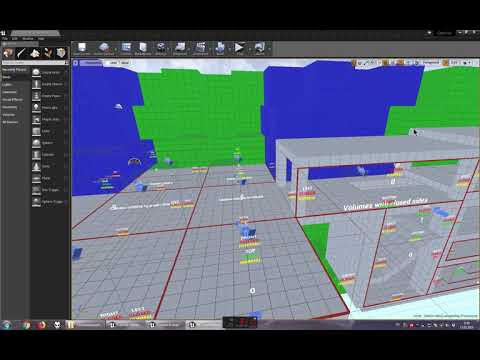
Volumes have reasonable limitations in size. They must be equal or greater than character collision capsule. Also, it is not desired to make volumes very thin, because it may cause issues with camera transitions.
In case you spawn character outside of any camera volume, and then you stream some level with camera volume so it appears around character, or you teleport him into some another camera volume, it is necessary to manually call SetProcessCameraVolumes with parameter true in CameraVolumesCameraManager using level blueprint, to force update camera volumes processing.

You can place camera volume in map like any other actor - simply search "Camera Volume Actor" in "Search Classes" field.

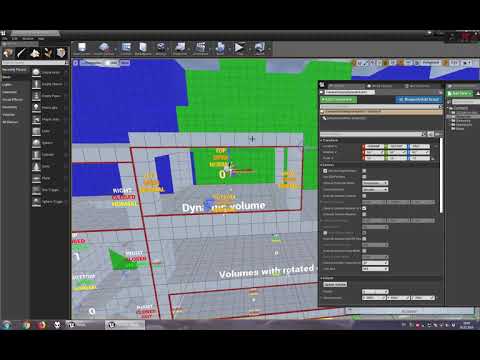
You can move/rotate volumes, and camera location and rotation will be processed accordingly. You can use scale tool in editor to change volume extent. Better use with regular scale, not percentage-based.

In simple side-scroller volumes should stand side to side, so I recommend to move volume and modify it's extent with some grid snapping, for example 50 units.
Do not make volumes very thin, because it may cause errors with collision detection and camera transitions. Try to keep volume extent on every axis at least 50 units. If you need to block camera at some specific depth, that requires to make volume very thin, you can try to move volume itself deeper into this depth and adjust camera location in this volume to match required offset.
Volume parameters will be updated in editor every time you move/rotate/scale volume or change it's properties. But there is one case for volume attached to other actor - volume parameters will not be updated if you move parent actor. So use UpdateVolume button to update volume extents before save your map.
It is possible to modify camera behavior using additional parameters stored in CameraVolumesCameraComponent:
- bUseAdditionalCameraParams
- AdditionalCameraLocation
- AdditionalCameraRotation
- AdditionalCameraFOV
For example, you can move camera with arrows keys to look up/down/left/right with additional rotation and FOV, when character is in volume with movable camera, or outside of any volume.

Camera calculations takes some processor time, so it is necessary to disable it during menu/loading/cut-scenes/etc. To do this - use SetUpdateCamera function in CameraVolumesCameraManager:
