This repository contains the initial version of the MMFeedbacks. You'll find a more advanced version, now called FEEL, on the Asset Store, with more features, more feedbacks (100+ in v2.0), more tools, a pause system, loops, better inspectors, real time progress bars, duration previews, quality of life improvements, copy features, and a lot of bonuses. This repository won't evolve much past this point, the only version I'll maintain and improve on from now on is the one on the Asset Store.
Check out FEEL on the Asset Store.
I strongly believe game feel (or juice, or microinteractions, or feedbacks, or whatever you prefer to call it) is one of the most important parts of game design. Making sure the player understands the consequences of their actions is the best way to make sure interactions are rewarding and engaging. Providing proper feedback when the player makes an action, or when something significant happens in the game is mandatory. Whether it's a screenshake, a flash, an object's scale bumping, or all of these at once, it will only make the experience more satisfying.
You can learn more about feedbacks in Martin Jonasson and Petri Purho's talk "Juice it or lose it", the wonderful "Art of screenshake" talk by Jan Willem Nijman, or my own talk about game feel and fast prototyping at Unite Los Angeles in 2018.
Implementing these kinds of feedbacks isn't necessarily rocket science, shaking a camera is quite an easy task. But after working on tons of games and prototypes, I've found myself often going back to the same game feel recipes, and I wanted to remove as much friction as possible between an idea for a feedback and its in-game implementation. Initially created for (and built into) the TopDown Engine and Corgi Engine, I've decided to make this system public, hoping it'll help people improve the feel of their game.
- What is MMFeedbacks?
- How to install?
- Using MMFeedbacks
- List of feedbacks
- Demos
- Creating a new feedback
- License
MMFeedbacks is a solution to provide on-demand game feel to your Unity game, with as little friction or setup as possible. It's modular, user friendly, and very easy to extend and build upon.
Clone or download this repository, and put it in your Unity project. You'll likely get errors after that, that's because if you want to use the MMFeedbacksForThirdParties, you'll have to install either Cinemachine or the PostProcessing effects (or both) via Unity's Package Manager (Window > Package Manager). Otherwise you can just remove the MMFeedbacksForThirdParties folder, that will get rid of the errors.
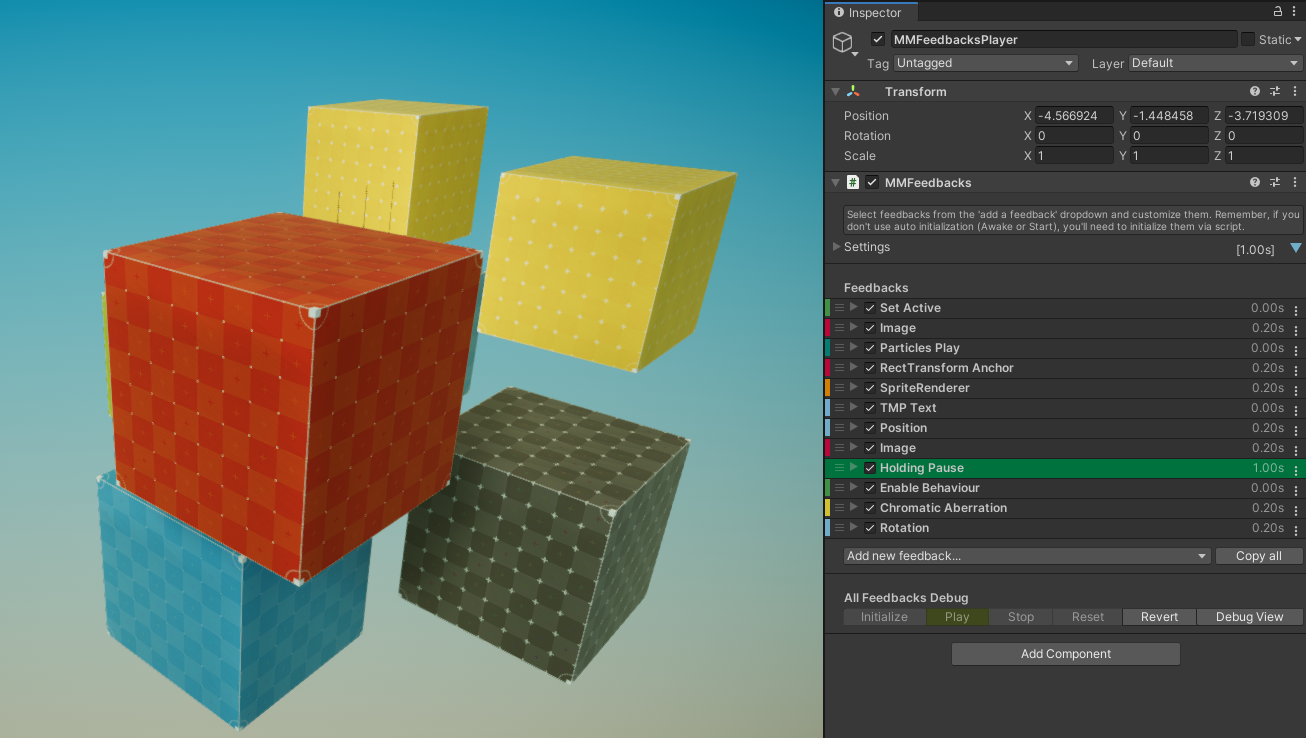
The main component you'll interact with is called MMFeedbacks. To use it, create an empty game object, and add a MMFeedbacks component to it. From its inspector, you'll be able to set an Initialization Mode (the default, Start, should be good for most), and then you can start adding and tweaking feedbacks using the "Add new feedback" dropdown. You can reorder feedbacks by dragging them with the left most icon, fold/unfold them, disable them individually using the checkbox, rename them by editing their label field, and remove and copy them using the rightmost dropdown.
Once you've added some feedbacks, you'll probably want to play these feedbacks. There are two simple ways to do so (but feel free to do things differently) :
- via Unity events : on your buttons or any other components that use events, simply drag and drop your MMFeedbacks object into an event's slot, and bind its PlayFeedbacks method. Every time that event will get fired, your feedback will play.
- via code : in one of your classes that you want to add some feedback to, declare a public MMFeedbacks variable, bind it to your newly created MMFeedbacks object from its inspector, and at the place in your code where you'd like the feedback to happen, call its PlayFeedbacks method. You may also want to call the Initialization, StopFeedbacks and ResetFeedbacks methods as well.
The following example shows how a class responsible for having a player jump uses MMFeedbacks to make that better :
using UnityEngine;
using MoreMountains.Feedbacks;

public class CharacterJump : MonoBehaviour
{
    // we declare a public MMFeedbacks reference, that we'll set from our CharacterJump inspector
    public MMFeedbacks JumpFeedback;

    public void Jump()
    {
      // here we'd put our Jump code
      JumpFeedback.PlayFeedbacks();
    }
}
Note that you can also try them at runtime in debug mode, directly from the inspector, via the bottom button bar, that will allow you to test the Initialize, Play, Stop and Reset methods. You can also test them individually via the dropdown on the right of each Feedback's title bar.
In each feedback's inspector you'll find a Timing dropdown. This allows you to fine tune things such as initial delay, cooldown duration (the minimum time between two plays of that feedback), and repeat options.
MMFeedbacks comes loaded with two types of feedbacks. The first are regular feedbacks, that don't require any third party dependency. Note that some of them are autonomous, and some will require the presence of another object, usually called Shaker (because it's responsible for shaking stuff), put in your scene. This list explains it all, and if you want to know more, you can always look at the classes themselves, they're all commented.
- Animation : this feedback will allow you to send to an animator (bound in its inspector) a bool or trigger parameter, allowing you to trigger an animation.
- CameraShake : define camera shake properties (duration in seconds, amplitude and frequency), and this will broadcast a MMCameraShakeEvent with these same settings. You'll need to add a MMCinemachineCameraShaker on your camera for this to work (or a MMCinemachineZoom component if you're using Cinemachine). Note that although this event and system was built for cameras in mind, you could technically use it to shake other objects as well.
- CameraZoom : define zoom properties : For will set the zoom to the specified parameters for a certain duration, Set will leave them like that forever. Zoom properties include the field of view, the duration of the zoom transition (in seconds) and the zoom duration (the time the camera should remain zoomed in, in seconds). For this to work, you'll need to add a MMCameraZoom component to your Camera.
- Events : this one is quite simple, and allows you to bind any type of Unity events to this feebdack's Play, Stop, Initialization and Reset methods.
- Flash : on play, this feedback will broadcast a MMFlashEvent. If you create a UI image with a MMFlash component on it (see example in the Demo scene), it will intercept that event, and flash (usually you'll want it to take the full size of your screen, but that's not mandatory). In the feedback's inspector, you can define the color of the flash, its duration, alpha, and a FlashID. That FlashID needs to be the same on your feedback and MMFlash for them to work together. This allows you to have multiple MMFlashs in your scene, and flash them separately.
- Flicker : this feedback lets you flicker the specified renderer (sprite, mesh, etc) for a certain duration, at the specified octave, and with the specified color. Useful when a character gets hit, for example (but so much more!).
- FreezeFrame : pretty simple to setup, will freeze the timescale for the specified duration (in seconds). I usually go with 0.01s or 0.02s, but feel free to tweak it to your liking.
- InstantiateObject : allows you to instantiate the object specified in its inspector, at the feedback's position (plus an optional offset). You can also optionally (and automatically) create an object pool at initialization to save on performance. In that case you'll need to specify a pool size (usually the maximum amount of these instantiated objects you plan on having in your scene at each given time).
- Light : lets you control the color and intensity of a Light in your scene for a certain duration (or instantly).
- ParticlesPlay : this feedback will simply play the specified ParticleSystem (from your scene) when played.
- ParticlesInstantiation : similar to the previous one, but this one will instantiate the specified ParticleSystem at the specified position on Start, optionally nesting them.
- Position : will animate the target object's position over time, for the specified duration, from the chosen initial position to the chosen destination. These can either be relative Vector3 offsets from the Feedback's position, or Transforms. If you specify transforms, the Vector3 values will be ignored.
- Rotation : will animate the target's rotation on the 3 specified animation curves (one per axis), for the specified duration (in seconds).
- Scale : will animate the target's scale on the 3 specified animation curves, for the specified duration (in seconds). You can apply a multiplier, that will multiply each animation curve value.
- SetActive : allows you to change the state of the target gameobject from active to inactive (or the opposite), on init, play, stop or reset. For each of these you can specify if you want to force a state (active or inactive), or toggle it (active becomes inactive, inactive becomes active).
- Sound : lets you play the specified AudioClip, either via event (you'll need something to catch a MMSfxEvent, that's not included in this package, but that's how it's done in the Corgi Engine and TopDown Engine), or cached (AudioSource gets created on init, and is then ready to be played), or on demand (instantiated on Play). For all these methods you can define a random volume between min/max boundaries (just set the same value in both fields if you don't want randomness), random pitch, and an optional AudioMixerGroup.
- TimescaleModifier : this feedback triggers a MMTimeScaleEvent, which, if you have a MMTimeManager object in your scene, will be caught and used to modify the timescale according to the specified settings. These settings are the new timescale (0.5 will be twice slower than normal, 2 twice faster, etc), the duration of the timescale modification, and the optional speed at which to transition between normal and altered time scale.
- Wiggle : lets you trigger position, rotation and/or scale wiggles on an object equipped with a MMWiggle component, for the specified durations.
The following feedbacks will require you to install third party libraries. They will throw errors if you don't. Either add the required dependency, or remove these classes. For all the post processing related ones, you'll need a shaker of the same name (MMBloomShaker for the Bloom, for example) on the same object you've got your Post Process Volume on.
- CinemachineImpulse : triggers a Cinemachine Impulse event at the position of the feedback. To get at least a basic result, you'll want to make sure you select a Raw Signal preset using the tiny cog icon on the right (I like 6D Shake), and then you'll want to set the Velocity value to something like 2,2,2 (or whatever you prefer). Cinemachine Impulse can be customized to no end, have fun! Note that this will require a MMCinemachineCameraShaker component on your virtual camera for this to work.
- Bloom : allows you to animate Bloom over time. You'll be able to control the bloom's intensity and threshold. You'll need a MMBloomShaker component on the same object as your PostProcessVolume for this feedback to work.
- ChromaticAberration : lets you control the ChromaticAberration effect's intensity over time. You'll need a MMChromaticAberrationShaker component on the same object as your PostProcessVolume for this feedback to work.
- ColorGrading : this feedback allows you to control, separately, the Post Exposure, Hue Shift, Saturation and Contrast values of your ColorGrading post processing effect. You'll need a MMColorGradingShaker component on the same object as your PostProcessVolume for this feedback to work.
- DepthOfField : allows you to control focus distance, aperture, and focal length over time. You'll need a MMDepthOfFieldShaker component on the same object as your PostProcessVolume for this feedback to work.
- LensDistortion : lets you tweak the Lens Distortion's intensity over time. You'll need a MMLensDistortionShaker component on the same object as your PostProcessVolume for this feedback to work.
- Vignette : this feedback lets you tweak the Vignette effect's intensity over time. You'll need a MMVignetteShaker component on the same object as your PostProcessVolume for this feedback to work.
- Haptics : this feedback lets you play the NiceVibration haptic feedback of your choice. This requires you bought the NiceVibrations asset from the Unity Asset Store.

The repository includes a demo of all feedbacks. Simply open the MMFeedbacksDemo scene (located in MMFeedbacks/Demos/), and press play. Then, in the Hierarchy, select any of the feedbacks and press their debug Play button in their inspector to see them in action. You can also tweak each feedback's parameters, disable some, or play them individually.
Creating a new feedback is very easy. Create a new class, have it inherit from MMFeedback, and override the methods you're interested in (usually CustomInitialization, CustomPlayFeedback, CustomStopFeedback and CustomReset). You can look at each feedback for a reference of how it's done, they're all heavily commented. Here's a template you can use as a starting point :
using UnityEngine;
using MoreMountains.Feedbacks;

[AddComponentMenu("")]
[FeedbackPath("ChosenPath/MyFeedbackNameGoesHere")]
public class MMFeedbackMyFeedbackNameGoesHere : MMFeedback
{
    // declare your variables here

    protected override void CustomInitialization(GameObject owner)
    {
        base.CustomInitialization(owner);
        if (Active)
        {
            // Put custom initialization code here
        }
    }

    protected override void CustomPlayFeedback(Vector3 position, float attenuation = 1.0f)
    {
        if (Active)
        {
            // Put custom play code here
        }
    }

    protected override void CustomStopFeedback(Vector3 position, float attenuation = 1)
    {
        base.CustomStopFeedback(position, attenuation);
        if (Active)
        {
            // Put custom stop code here
        }
    }

    protected override void CustomReset()
    {
        base.CustomReset();
        if (Active)
        {
            // Put custom reset code here
        }
    }
}
- MMFeedbacks are licensed under a Creative Commons Attribution-NonCommercial 4.0 International License.
- You are free to use MMFeedbacks in any and all games that you make
- You cannot sell MMFeedbacks or its parts, redistribute this code, commercially or not, modified or not