Developed Software
This project has developed an end-to-end demonstration of a sensor network including code for sensor nodes, code for a master node, a HTTP server for processing and uploading sensor data to a cloud service and plugins to visualize the sensor data on the cloud service.
The developed software includes code for :
## Sensor Nodes The software developed for the sensor nodes is an arduino sketch that utilises the RF24 libraries. The sketch runs a timer that will take a reading from an analogue temperature sensor. The temperature reading will then be sent in a HTTP POST request to a configured server address and path. ### Installation- Download the Arduino node sketch from GitHub: https://github.com/rickii/SensorRF24/blob/master/arduino_node/arduino_node.ino
- Save it into a folder named the same as the folder.
- Open the sketch with your Arduino IDE.
- Set the connected CE and CSN pins for the nRF24
- Set an IP Address for this node in the same subnet as the master node
- Set the IP Address of the lightweight HTTP server that accepts the POST requests.
- Set the update interval
A edit should be made to a header file of one of the RF24 libraries. This edit will disable a feature within the library that can be used to send non TCP packets over the RF24 radio module. In this project this feature is not needed and disabling it will reduce the memory needed by the sketch on the Arduino.
Follow these steps to disable the unneeded feature.
- Open the RF24Network library folder
- Edit the RF24Network_config.h file
- Un-comment #define DISABLE_USER_PAYLOADS
Upload the sketch to the arduino.
Use the Arduino serial port monitor to view the output from the arduino.
## Master NodeThe master node is a C++ application that utilises the RF24 libraries. It provides the gateway and addressing functionality to the RF24 wireless modules. At defined intervals the master node will create a list of all the nodes it knows about, including inactive nodes, it will send a HTTP POST request with the list of nodes to a configured HTTP server. The master node creates a virtual network interface on the Raspberry Pi that then enables IP communication with the sensor nodes.
The master node program is based on an example program provided by the developer of the RF24 libraries.
### InstallationDownload the master node from GitHub: https://github.com/rickii/SensorRF24/tree/master/master_node
Place in a folder on the Raspberry Pi.
### ConfigurationThe default IP address for the master node is 10.10.2.2. This can be changed by editing the master_bode.cpp file. Note: this IP address must be in a different subnet to the physical network interface on the Raspberry Pi.
The program needs compiling by running this command:
sudo ./makeTo run the program use the command:
sudo ./master_nodeTo leave the program running in the background run the command:
nohup sudo ./master_node&The nohup will allow the program to continue to run after disconnecting from the shell session, and & tells the program to run in the background.
Take note of the process ID reported after running the command so you can use it to kill the process later.
The lightweight HTTP server is a node.js application. It uses the express plugin to provide the HTTP server.
The application is designed to accept POST requests from the Arduino node and from the Raspberry Pi master node. It takes the POST requests from the master and nodes and uploads the data to a cloud service called ThingSpeak. See the section on ThingSpeak for details necessary to configure this service.
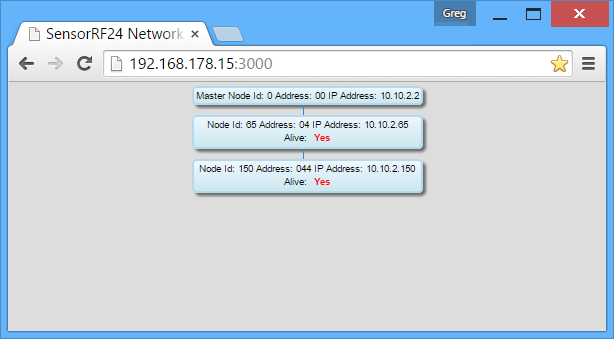
The application also accepts GET requests from a user and returns a map of all the nodes in the network showing their relationship to each other along with their currently configured address.
Output from the HTTP Server showing the master and two child nodes
Download the node/express application from GitHub: https://github.com/rickii/SensorRF24/tree/master/rf24_httpserver
Place the the files and folder in a folder on the Raspberry Pi.
The application uses a set of plugins that need to be installed using the NPM plugin manager. To install the plugins, from within the folder created with the index.js and package.json files run the command:
npm installThis will read the list of packages from the package.json file and install them into the current folder.
### ConfigurationThe HTTP server is configured to listen on port 3000. This can be changed within the index.js file if necessary.
The other configuration for the HTTP server is to set the API Keys for the channels within the ThingSpeak cloud service.
If you do not plan on using the ThingSpeak cloud service then no other configuration is necessary. Refer to the ThingSpeak configuration section for details.
### RunningTo run the HTTP server use the command:
sudo node ./index.jsTo leave the program running in the background run the command:
nohup sudo ./index.js&The nohup will allow the program to continue to run after disconnecting from the shell session, and & tells the program to run in the background.
Take note of the process ID reported after running the command so you can use it to kill the process later.
The cloud service is called ThingSpeak. It is designed to allow Internet of Things devices to upload data in a HTTP POST request. The data can then be visualization in a set of built in graphs.
The service also allows for custom plugins to be developed to provide custom visualizations. ###Configuration
-
Create an account on ThingSpeak. Create a channel for each sensor node with 4 enabled fields.
- Field 1: NodeId
- Field 2: IP Address
- Field 3: Temperature
- Field 5: Mesh Address
-
Take the api key from the newly created ThingSpeak channel and add it to the 'thingSpeakChannels' array in the index.js for the HTTP server as an object of the form:
{_id: xx, apiKey: 'API_Key_from_ThingSpeak'}
````
The _id is the node id of the sensor node which is always the last octet of the node's IP Address.

3. Create a channel on ThingSpeak for the sensor network map with a minimum of 2 fields.
   * Field 1: Master Node
   * Field 2: ChildNode 1-6

Add more fields dependent on the number of sensor nodes. The max being 44 nodes due to a restriction on the length of the data in each field of 400 characters set by ThingSpeak.

4. Take the api key from the newly created network map ThingSpeak channel and set it in the index.js for the HTTP server as:

````javascript
thingSpeakNetworkApiKey = 'Network_Channel_API_Key_from_ThingSpeak';
````

<a name='plugins'/>
## Visualization Plugins

The ThingSpeak cloud service allows a user to visualize a single field of data in some basic pre built visualizations.

**Prebuilt Graph Visualization**
<a href="images/TempGraph.png">[[images/TempGraph.png]]</a>

In order for this demonstration project to show some more complex visualizations a set of custom plugins were developed for use within ThingSpeak.

Link to live view of these plugins in action:

- https://thingspeak.com/channels/57797
- https://thingspeak.com/channels/58102

The plugins developed are:

**Temperature Gauge**

<a href="images/TempGauge.png">[[images/TempGauge.png]]</a>

**Data Table to show last 10 sensor updates**
<a href="images/SensorDataTable.png">[[images/SensorDataTable.png]]</a>

**Location Map to show the last position of sensor latitude and longitude**
<a href="images/LocationMap.png">[[images/LocationMap.png]]</a>

**A map of all the nodes in the network**
<a href="images/NetworkMapSmall.png">[[images/NetworkMapSmall.png]]</a>

**Data Table to of the last 10 network map updates**
<a href="images/NetworkTable.png">[[images/NetworkTable.png]]</a>

###Installation

Refer to the [instructions](https://thingspeak.com/docs/plugins) provided by ThingSpeak to add custom plugins.

All of the code for the plugins are available on GitHub: https://github.com/rickii/SensorRF24/tree/master/thingspeak_plugins

Each plugin consists of a HTML CSS and JavaScript file that needs to be loaded into the ThingSpeak account following the ThingSpeak provided instructions.

The plugins use the [Google Charts](https://developers.google.com/chart/) library.

###Configuration
There is no configuration necessary. The plugins are hard coded to work with the data in the format as uploaded to ThingSpeak by the node.js application.