
Sample application for JavaEE Pipeline as code using Jenkins, Sonar and Docker presentation. Slides available here.
The pipeline code can be found here.
|
💡
|
For pipeline DSL syntax highlight I recomment sublime text and this package: https://github.com/bjarneo/jenkinsfile-syntax. To use it just clone the above git repository into OR use IntelliJ with GDSL. |
|
❗
|
You need Docker, Maven and Java installed on your machine.
|
All commands below must be executed in project root folder.
-
Create a (filesystem) database using Flyway:
mvn flyway:migrate -P migrations -D db.path=~/db
After that, a file named
cars.h2.dbwill be created on your userhome/dbfolder.ℹ️your user must have write permissions in ~/dbdirectory.💡If you are on a non unix OS like Windows you must change db.pathto an existing directory e.g: db.path=C:/db -
Create application binary with:
mvn clean package
❗If you have changed db.path in migrations command you must build the application with the same param:
mvn clean package -D db.path=C:/db
-
Now create a docker image using:
docker build -t tdc-pipeline .
-
And finally run the application:
docker run -it --name tdc-pipeline -p 8080:8080 -v ~/db:/opt/jboss/db tdc-pipeline
ℹ️-v ~/db:/opt/jboss/dbmaps our host filesystem database (the one we created with Flyway) to docker container home dir so we can exit the container without losing data.ℹ️/opt/jboss/is the home dir (~/) in wildfly docker container. -
Access the application at http://localhost:8080/tdc-pipeline
Tests in this application use Arquillian, see this guide if you never heard about it.
-
Initialize database
mvn flyway:clean flyway:migrate -Pmigrations -Ddb.name=cars-test
-
Run the tests
mvn clean test -Pit-tests
💡If you want to run the test using an already running server activate
wildfly-remoteprofile:mvn clean test -Pit-tests -Pwildfly-remote
|
💡
|
For it tests the database migration can be run only once to create tables. DataSets are prepared by Arquillian Persistence.
|
-
Initialize database
mvn flyway:clean flyway:migrate -Pmigrations -Ddb.name=cars-ft-test
-
Run the tests
mvn clean test -Pft-tests
|
💡
|
For ft tests the database migration is required to be run every time the tests are run because Arquillian Persistence is not enabled in functional tests.
|
Perf tests use Gatling tool.
-
Initialize database
mvn flyway:clean flyway:migrate -Pmigrations -Ddb.name=cars
-
Run the tests
mvn clean gatling:execute -Pperf
💡By default perf tests run against
http://localhost:8080/tdc-pipeline/but you can change it by passingAPP_CONTEXTsystem property:mvn clean gatling:execute -Pperf -DAPP_CONTEXT=http://localhost:8181/tdc-pipeline/
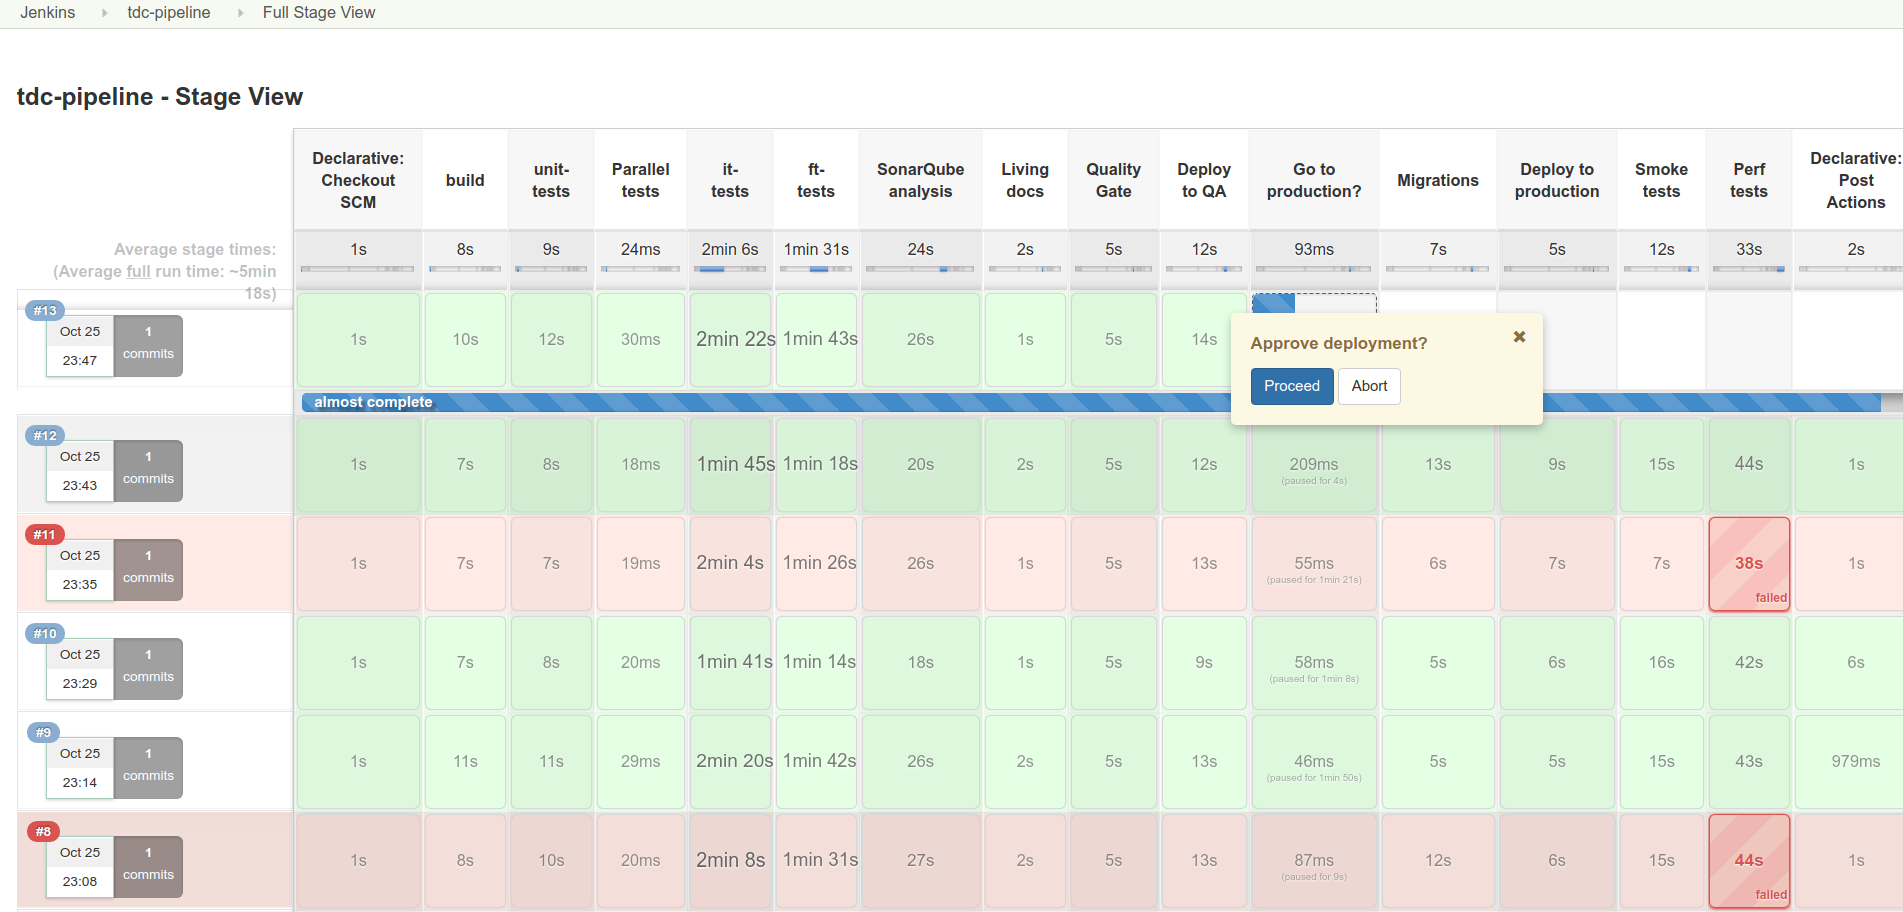
This application comes with a Jenkins declarative pipeline. Below are the steps to run the pipeline locally.
|
|
At least 8GB of RAM is needed on the host machine, 16GB is recommended. |
First thing that is needed is a Jenkins instance, download Jenkins here and start it on port 8080 using:
java -jar jenkins.war|
ℹ️
|
It was tested with
|
This pipeline have an example of shared library. Configure https://github.com/rmpestano/tdc-pipeline as a shared lib on Jenkins > Configure system > Global Pipeline Libraries like in image below:
|
ℹ️
|
The name must be notify, it’s the name of the function we invoke in pipeline here.
|

More details on pipeline shared libs, look here.
This pipeline depends on Docker, install it according to your operating system as described here.
|
💡
|
look for Docker CE (community edition). |
|
💡
|
To run docker without sudo look here.
|
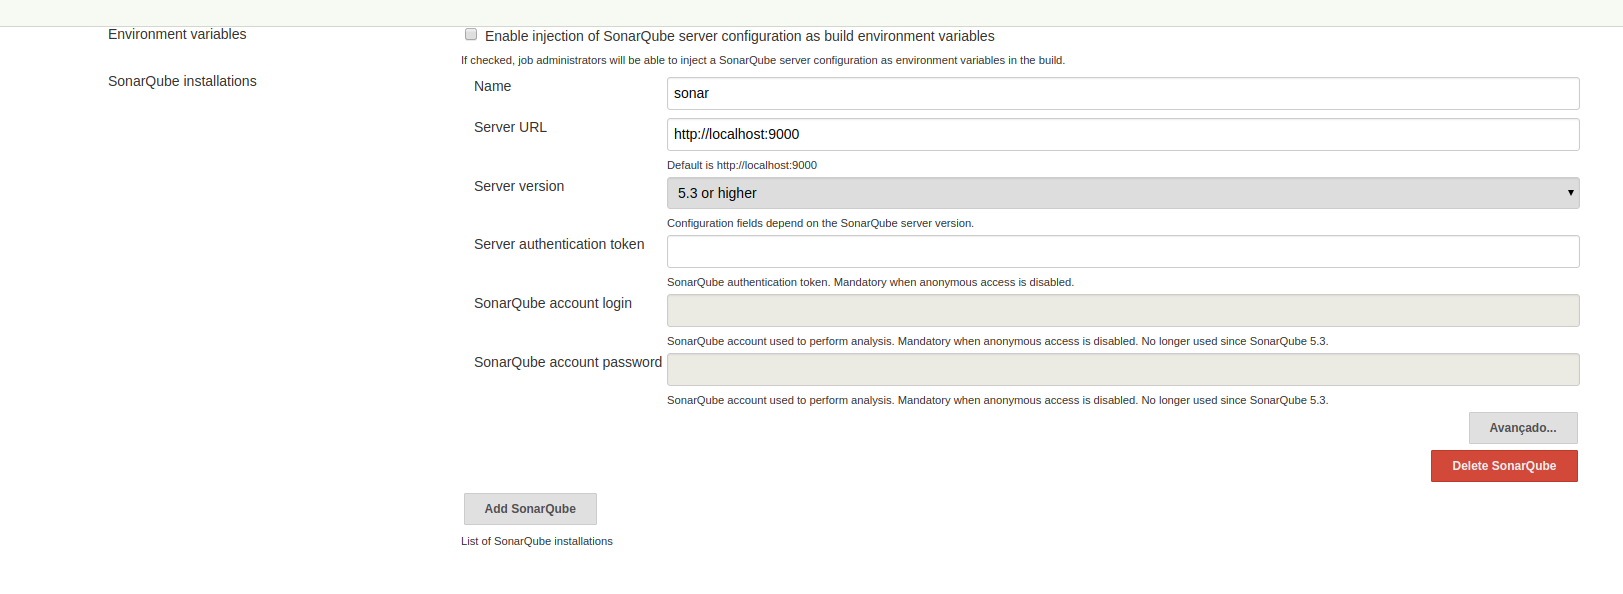
The pipeline depends on Sonar, you need to have a Sonar instance running on http://localhost:9000.
An easy way to start Sonar locally is just running it’s docker container:
docker run -d --name sonarqube -p 9000:9000 -p 9092:9092 sonarqube:6.6Configure Sonar on Jenkins (http://localhost:8080/configure):
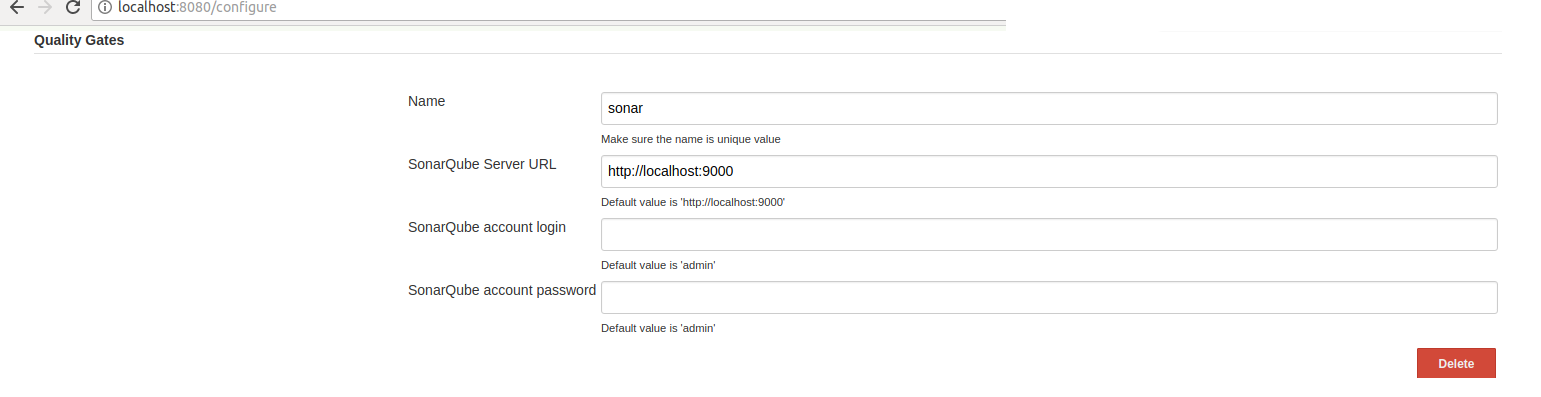
Quality gates can fail a pipeline if it doesn’t reach the Sonar quality gates conditions, for more details see this post.
Following is Jenkins configuration for quality gates:
This pipeline is integrated with slack. You’ll need to configure your Jenkins instance to work with the Slack plugin.
In Jenkins configuration search for Global Slack Notifier Settings and set Integration Token with SyQ9NWKGoEorB1g9h2h5xUuy and Base URL with value https://tdc-java.slack.com/services/hooks/jenkins-ci/.
The configuration above will configure jenkins to send messages to the following slack channel: https://tdc-java.slack.com/messages/C7L0N9V0B
|
ℹ️
|
Use this invitation link to join the channel above. |
For more details on how to integrate your own slack channel and Jenkins see this simple (5 steps) tutorial.
-
Create a new job;
-
Chose
pipelineand give tdc-pipeline as name; -
On job config check
Do not allow concurrent buildsoption on General section; -
On Build Triggers section Check
pool scmand use* * * * *as value; -
Finally on Pipeline section select option
Pipeline script from scm, choseGITand use this url: http://github.com/rmpestano/tdc-pipeline;
After saving job configuration the pipeline should run on next minutes.
|
ℹ️
|
There is an (manual) approval step before "going to production". |
There is also a jenkins docker container with above plugins installed, here is how to run it:
docker run -it --name jenkins -p 8080:8080 -v "$HOME/.m2":/root/.m2 -v /var/run/docker.sock:/var/run/docker.sock -v $(which docker):/usr/bin/docker --net="host" -v ~/.jenkins:/var/jenkins_home rmpestano/jenkins|
❗
|
Docker, Sonar, Quality Gates and Slack setup described above is still needed. |
|
|
When running the pipeline on docker mvn test -Pft-tests -Darquillian.port-offset=120 -Darquillian.port=10110 -Darquillian.browser=phantomjs |
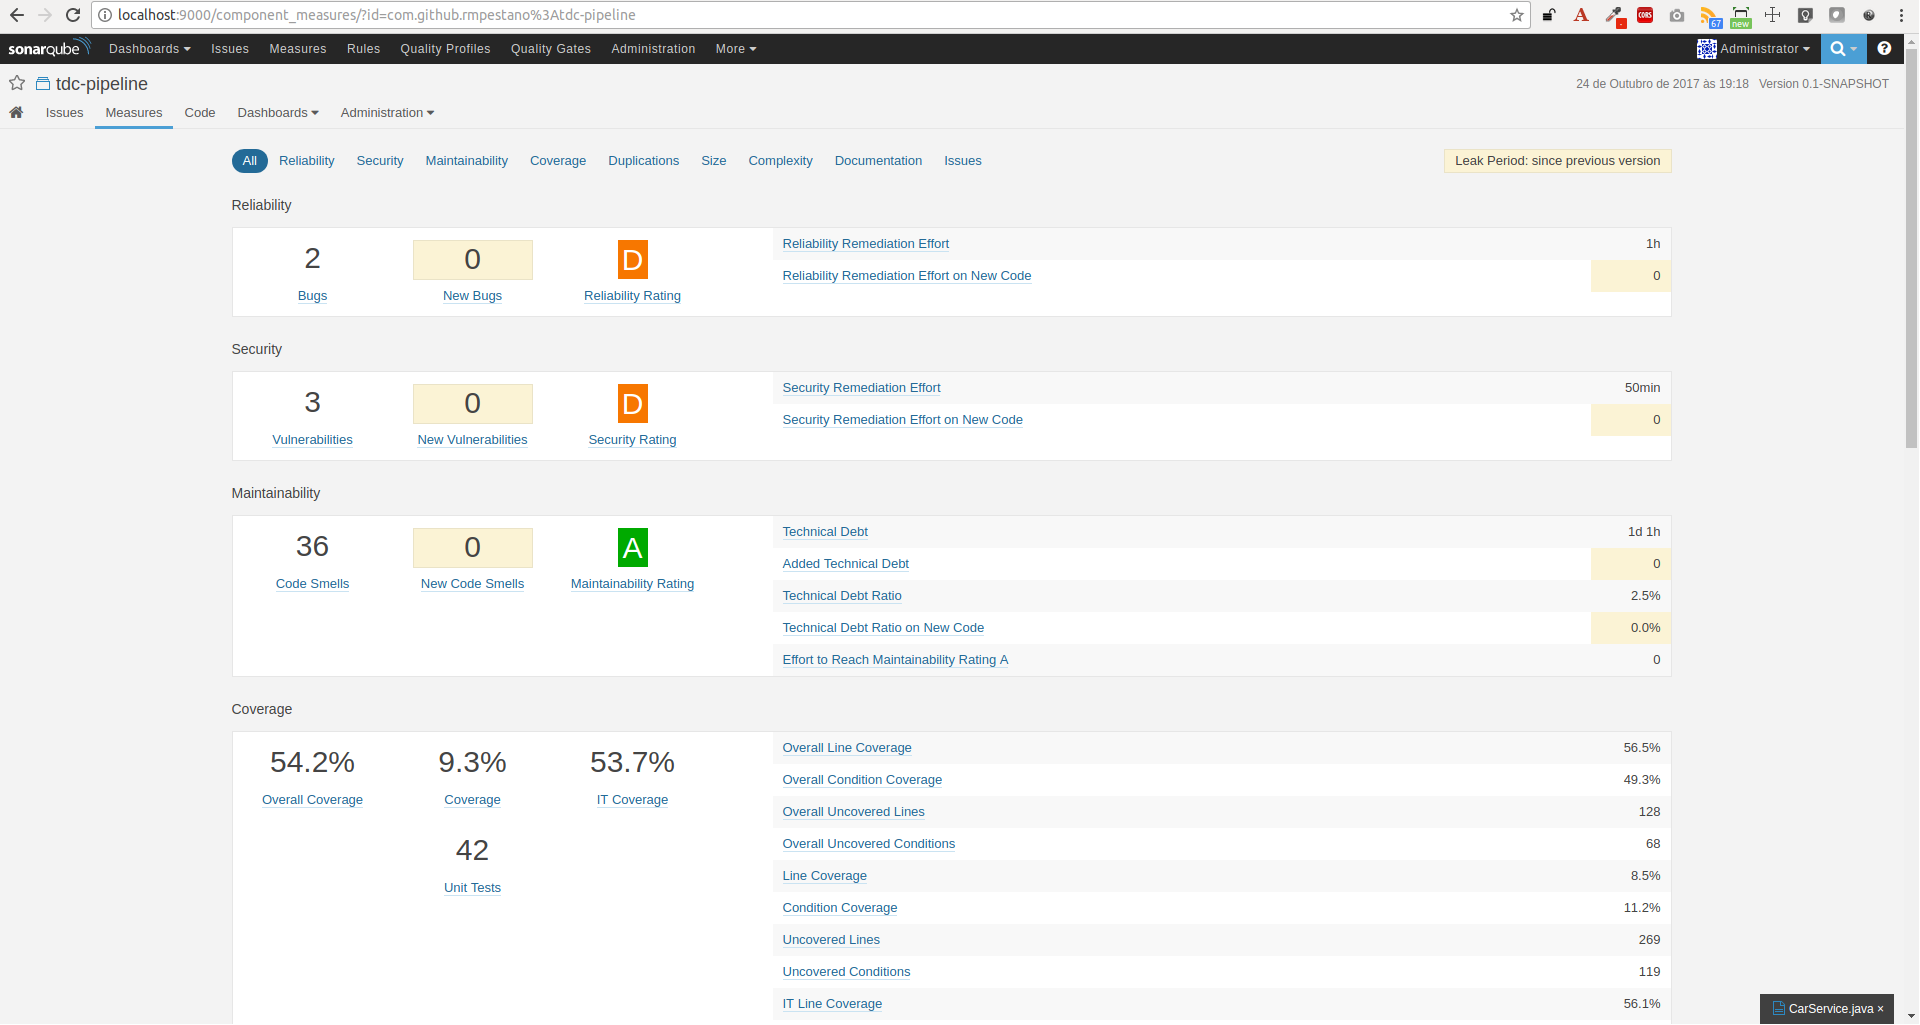
The pipeline will generate a lot of evidences about the quality of the build:
-
Sonar analysis along with code coverage can be viewed on http://localhost:9000/dashboard/index/com.github.rmpestano:tdc-pipeline

-
Each build VCS diff can be browsed on http://localhost:8080/job/tdc-pipeline/last-changes

-
Cucumber living documentation at http://localhost:8080/job/tdc-pipeline/cucumber-living-documentation

-
Performance tests report http://localhost:8080/job/tdc-pipeline/gatling


|
ℹ️
|
|

Two docker containers will be started during the pipeline, one representing the application deployment on QA environment and another which is production:

For QA the app should be available at http://localhost:8282/tdc-pipeline. In Prod env the application is available on port http://localhost:8181/tdc-pipeline.
Following is a demo video showing this pipeline: https://www.youtube.com/watch?v=xUlTyzsMPes