Let's make a bot!! These instructions were written for participants in the 2020 Jumpstart Program, but they're publicly viewable for anyone to follow.
Required libraries: tweepy 3.5, requests, time, os, random. Written in Python 3.
For this workshop, you will need to:
- Install Visual Studio Code (VS Code)
- Install Anaconda (which will install Python for you and some of the required libraries listed above)
- Install the Tweepy library
- Create a new Twitter account, and use that account to apply for developer status. (Don't use an existing Twitter account that has followers, as you're about to send a zillion tweets that your followers might not want to clutter their feed.) It may take a few hours (occasionally longer) for a developer account to be approved.
Get this code onto your local machine.
-
Fork this repository by clicking the button labeled 'fork' in the top right corner of this window. This will add this repository to your own GitHub account.
-
Clone the repository to your local machine.
- Go to the repository in your account: github.com/(your account name)/bot-tutorial-jumpstart
- Select the green "Code" button and copy the URL there, which should end in .git
- In your terminal [mac] or command line [windows], navigate to the folder where you want this repository to live (your Desktop, for example), and then run the following command to clone the repository to that location:
git clone [repository url ending in .git]
- Navigate into that repository with the command
cd bot-tutorial-jumpstart
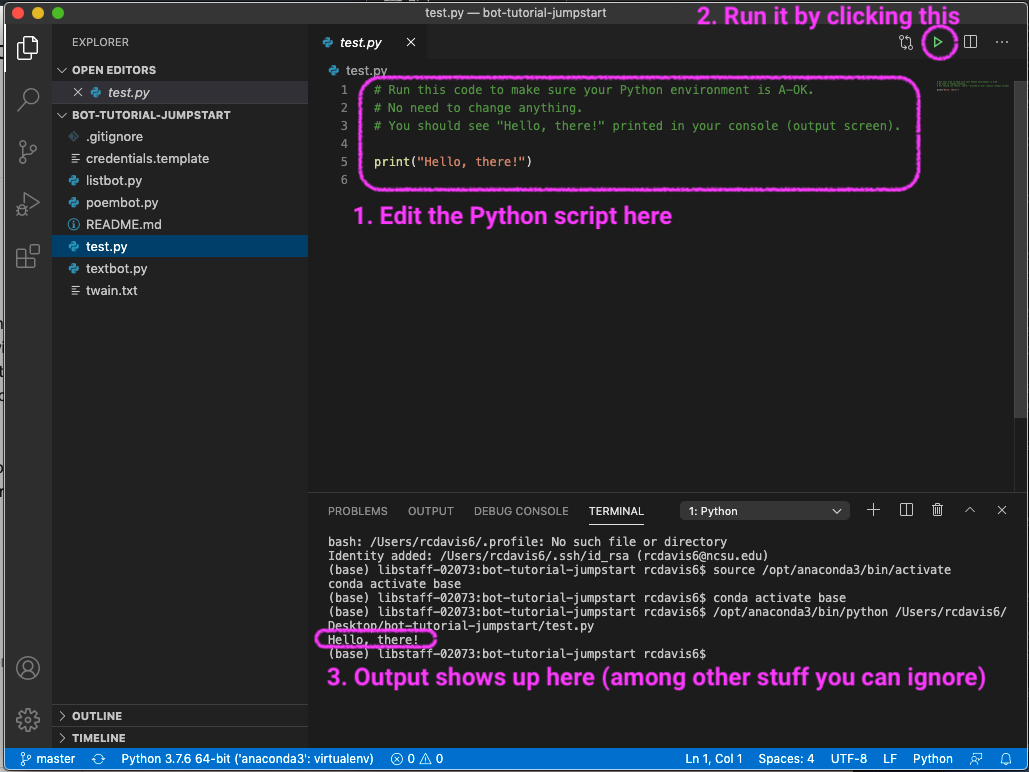
To test things out and get familiar with how we will be running code for this workshop, follow these steps:
- Using your finder or search box, find the folder on your desktop. Open the folder and open the file test.py in Visual Studio Code.
- To run the code, click the green triangle in the upper right corner of the VS Code window.
- Look for “Hello, there!” printed in the Terminal part of this window (the lower half).
View an annotated screenshot of how to edit and run Python code in VS Code
Give your Twitter script the passwords it needs to send tweets via code instead of using the Twitter website. (These steps may have changed since they were written, as Twitter is continually updating their developer account process.)
- Go to https://developer.twitter.com/en/portal/apps/new and name your new app. (If you get an error message when you click the "Complete" button, try going to the old sign-up form instead)
- This name isn't public; call it something like JumpstartBot
-
On the app's
Settingspage, scroll down to App Permissions and edit it, changing it from "Read only" to "Read & Write" -
Find the app's
Keys and Tokenspage (the tab next to the app's Settings)
- (Re)generate "Consumer API key & secret" and "Access token & secret"
-
Copy Consumer API Key/Secret and Access Token/Secret to credentials.template
-
Save that file as a new file named credentials.py
- (Why save with a new filename? Later on, you'll commit and push the changes you make to these files using Git, and those changes will be publicly viewable on your GitHub account. But you don't want to share your bot account's credentials/passwords. The file called .gitignore has credentials.py listed as a file to ignore, so Git will never even see it, and it won't get sent to your GitHub account.)
This script is a basic Twitter bot. It will tweet three things from a list inside the script.
-
Go to the bot-tutorial-jumpstart folder. Click on
listbot.pyto see the code -
Take a look at the script and try to figure out what it's doing. Use the comments (preceded by #) for context.
-
Clicking the green "run" triangle will run the bot. A Terminal will appear at the bottom of the screen with the output
Change it up!
- In
tweet_list, add new things for your bot to tweet - Increase/decrease time between tweets in
time.sleep(15)(15 is the number of seconds)
This script sends out five tweets from the first five lines of an external .txt file
-
Go to the bot-tutorial-jumpstart folder. Click on
textbot.py -
Also look at
twain.txtto see the text -
Take a look at both files and try to figure out what it's doing. Use the comments (preceded by #) for context.
-
Select
Run
Change it up!
- New text source
- Go to http://gutenberg.org and choose a different text for your bot to tweet. Pick the "Plain Text UTF-8" option when selecting a text format.
- Open a text editor. Copy and paste your gutenberg.org text (or any text of your choosing) into this blank file
- Remove junk at the beginning (and the end) of the file. Save the file as a .txt
- Replace double linebreaks with single linebreaks. If your file is very short you can maybe do this manually. If the file is very long, you can use advanced find/replace
- In textbot.py, replace
twain.txtwith thenewfilename.txt, then go to town
- Make the bot send more or fewer tweets, or change which lines, by editing the numbers in
for line in tweettext[0:5].[0:5]means from the first thing up to (but not including) the #5 thing. Programming languages consider 0 to be the first number, so what we'd call "line one" is actually "line zero" to the computer, and "line six" to humans is "line five" to the computer.
This script treats the poem This Is Just To Say (William Carlos Williams) as a mad-lib, filling in 3 blanks from 3 data sources: JSON files from @dariusk's collection of corpora and word lists.
Change it up!
- Choose different word lists. Make sure to change the URLs in lines
22-24and the list name in lines27-29. - Choose a different piece of text to make into a mad lib.
- Advanced: this script repeats a lot of things, like fetching and processing each .json file. Create a function or two to cut down on repetitive code.
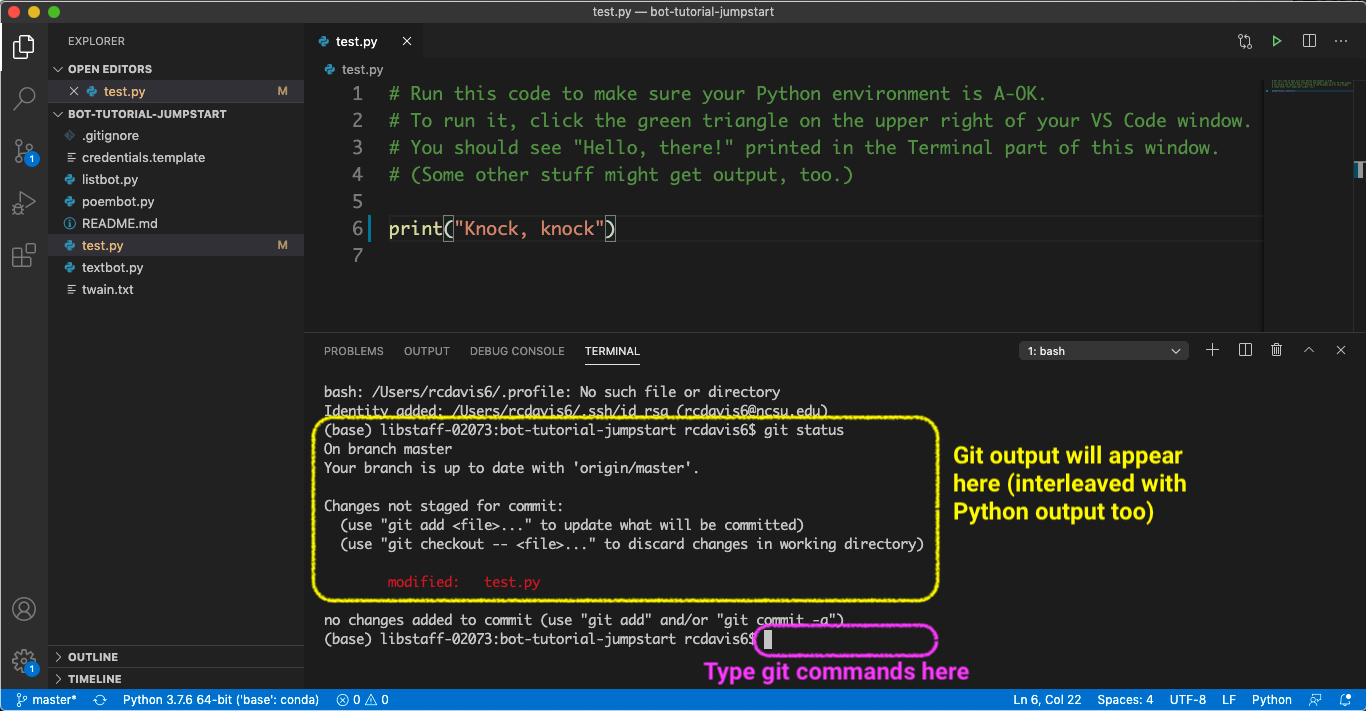
You've made changes to these scripts since you first forked them. Now you'll practice committing and pushing those changes so you have a record of your versions.
- In the Terminal window of VS Code, type
git statusand hit the return (enter) key to see the files you've changed. - Then type
git add listbot.py(or another filename) and hit return - (Optional) Type
git statusand hit return again to check what that did - Type
git commit -m "Changed what the bot tweets"(or another way to describe your change) and hit return
View an annotated screenshot of how to use Git in VS Code
At some point, you'll want the changes you've committed on your machine to appear on your GitHub repository.
- In the Terminal window again, type
git push origin masterand hit the return key. You should see a message of success.
This tutorial and its updated materials were originally put together by Robin Davis (@robincamille) and Mark Eaton (github.com/MarkEEaton) for a pre-conference workshop at Code4Lib 2018.
See original repo: https://github.com/robincamille/bot-tutorial
See also: Davis, Robin, and Mark Eaton. Make a Twitter Bot in Python: Iterative Code Examples. Journal of Interactive Technology and Pedagogy (Blueprints section). April 2016. (Verbose write-up featuring code from a previous version of this workshop.)