My repository for the final assignment for CSS to the Rescue, Web Design and Development 2024.
- Introduction to the assignment
- Installation
- My project
- Takeaway from feedback
- Reflection
- External Sources
The point of this class is that JavaScript is illegal to use; you should rely solely on CSS to get the job done. You could choose between four projects to create:
- Modular control panel
- Fireworks show
- Rubix cube
- Fold a paper plane
The requirement for 3. and 4. was to solve a math equation handed out by the teacher Sanne 't Hooft, and while I gave my best shot at one just for funs sake to see if I could do it, I didn't and didn't expect to get far. So I've stuck it to 1 or 2.
I liked both a lot, but when I started exploring the possibilities of what I could make for the modular control panel I became excited about the idea of making a game device from my youth in pure CSS. The Nintendo (3)DS was taken at the time and I didn't want to do what someone else was doing, and besides, I hold a special value in my heart for the PSP, so it came to me naturally. This is what I've decided to make for this assignment.
Here are the steps to install my project.
- Under the
Codetab at the top (the big green button). - Download this repository as a
.zipfile and unpack it. - Locate the folder
CSSttR- If you have
VS Code: From here, all you need to do is open the folder in your editor and use theLive Serverextension to start a local host. This allows you to also view the code and work more hands-on, should you desire. - If not, you can find the document on your device, navigate to the
index.htmlfile (this should be visible just by opening upCSSttR), right-click it and open in a browser of your choosing. I've used Arc and Google Chrome to test this project, so I can recommend these two.
- If you have
Inspired by the module option of this assignment, I quickly found myself grasping for devices from my youth to play with. Not wanting to go with the generic items like the Nintendo Switch, I opted for the Playstation Portable, or the PSP as it's better known by. For those unfamiliar, or just for a visual refresher, this is that module.
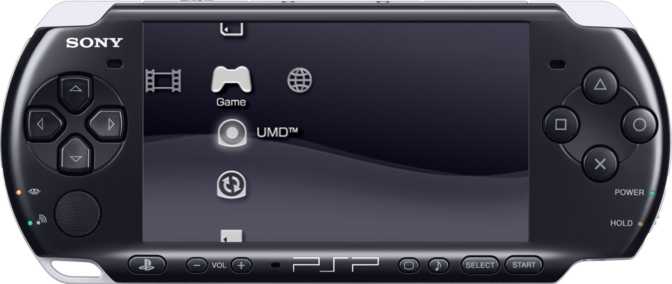
The PSP has a few things to note.
-
Its unique shape.
I tried to think a lot about how I could achieve the shape of the device but eventually decided to settle for a SVG I made because I didn't want to put too much valuable time into this over getting to the main layout and its functionality, as that by itself will take up a lot of time.
-
The buttons, which there are at least eight of excluding the power button, and the screen.
I struggled settling on what I wanted the buttons to do in relation to the screen. The screen needs to turn on, for one, but there is so much that the device could do. I thought of mapping through the PSP menu first, something I'm still kind of considering.. but there was also the option of making a mini Mario game where you can make him walk around, jump, pose, etcetera. Mario was never for the PSP, but this is CSS, so I've chosen not to care about that.. However, I'm still slightly on the fence about which one of these two options I'll choose. I think the Mario one allows for more of the buttons to be used, which might be a valuable reason to choose it over the menu, but I'll have to map this out and weigh out what I've got. For now, I just want to make sure I can get the layout right.
I decided to achieve the shape with an img with a path to an svg for ease, and the buttons, I immediately was reminded of our lessons about :has with radio-buttons and checkboxes, so this is what I think I'll do to achieve those. I found a code exerpt online that styles radio buttons in a way I think could be useful for my page. Find this link below or right here.
:has() is one that I'm fascinated by, and one that I know will be the feature every other student names too but it comes with good reason. It's like a little slice of JavaScript in CSS, which to me is fascinating and I'm excited to learn about what other possibilities will be implemented from :has() in the future. But I plan to use :has(input:checked) to toggle an animation on the PSP screen, when the input is checked: the input being the PSP buttons which I've styled.
Every friday, we have a feedback session with four students total and the teacher for the class, where we show our work, what we're struggling with, what we'd like to do and help eachother progress. Here's a log of each session.
During this feedback session, I realised what I really wanted to do; I had quite a couple of ideas but hadn't gotten very far quite yet. I really only had my sketches and this README to guide me. I had two ideas:
- Cannibals and Missionaries: As mentioned before, the requirement for being allowed to do the third and fourth project was to solve a math question handed out by Sanne. Now, I didn't really have an intent of doing either one of these, but I thought I'd give one a shot just to see how far I could get, just as most others in the class. Sanne suggested to me that I make this as my project for the class.. which I was actually very enthusiastic about, but as I started to map out in sketches and notes whether this was feasible, I found that it was too complicated to add that logic into a CSS game; or maybe there was something I had not thought of.
- The Modular Device: Inspired by my teammates and others I had spoken on their ideas, I decided I would make a PSP. Not much was known yet at this point, except that I wanted to try to experiment with
:has()and possibly calculating withn, but the latter only if my project required it as it didn't seem to be very suitable; there were simpler ways to achieve my goals.
At this point, I had looked more so into the logistics of how I wanted to achieve things. How did I want to style the grid? How did I want to style the buttons AND make sure they're capable of triggering a certain event? In terms of styling, I had the shape of the PSP laid out on the website and I had some checkboxes (I chose this specifically because I wanted multiple things to be possible to trigger at once), which I styled as PSP buttons. Listening to how my teammates were planning to achieve certain things, I got inspired and got nice suggestions on how to tackle things going into the first prototype. So I started tinkering.
NOTE: This was also the night where I started over again with my project. The code that I did have was messy to me and hard to have any view over. So I cleared everything and started again with a better plan in mind, going off of my notes from the feedback session from that day, I was able to make a decent starting point for a the layout, and could work a lot more easily considering I actually knew what was where, what did what, and why.
At this point, the styling was complete; the PSP lacked certain things like the 'Sony' logo and other such things like the LEFT/RIGHT buttons on the corners of the device, as well as the PSP logo itself.. but the buttons were there! This meant I could finally get started on actual functionality. I did not yet have these, but I did get a good source of inspiration from Sanne took a CodePen by Jon Kantner and made a more abstract version of it that was easier to follow. He suggested I use this for my D-PAD, to make Mario move left and right, something I found amazing and really wanted to do, so I kept this in the back of my mind.
NOTE: in actuality, I didn't manage to apply this: read why in Reflection.
Continuing on from March 15th: The final intake, it took me a lot of time to figure out how to stear the buttons and make them do what I wanted. This, and the fact that I had used checkboxes instead of buttons made it complicated to achieve. In hindsight I should have thought through more in depth what I wanted to do and how before choosing the elements for the D-PAD/ANALOG BUTTONS, but I was so focused on the concept of how to toggle code and we had learnt so much about using :has() on inputs that I completely overlooked this and did not make it personal to my goals.
All in all, I learned a lot from this project. This was my first time using display:grid; so extensively and I instantly found myself using it more. I'm sure there are a lot more clever ways to apply it than how I've done it, but I can see myself learning a lot about it, and I really want to as well; it seems to me like a much more reliable cousin to display:flex which I had become so accustomed to using, and if we ignore the finnicking with specific calculations for the frs, it saved me a lot of effort.
Not to mention the things I learned about that I had no idea even existed. I knew of custom properties, I, however, did not know how extensively they could be used. Sanne uses them to structure his code a lot more nicely, to create properties like for example --hue: 60; where you only have to pass in a value and it updates the hue. Of course, I used them mostly for colors but also for style queries, something which is also new to me. It's like a way of making your own states in CSS, something which I had ruled out as completely impossible, but it is now; CSS is making advances and this class has opened my eyes up to the insane world of what is possible with it, or more importantly, without JavaScript.
NOTE: on the style queries: I do think that I could have done this a little better in the parts where I define what should happen if a certain has been pressed AND the device is on, but I couldn't figure out how to make it work in time.
I cannot say this without mentioning :has() once again more explicitly. I keep up with new CSS trends as much as I can but I had not heard about this one, nor :is() or the apparent :where() which also exists?, until Sanne told us about it. What a life changer. Things thought to me impossible without JavaScript are now possible in CSS, and shockingly, they are possible with (in certain cases) much more concise code, less lines of it.
There are things I would improve with this project, but such things exist everywhere. I'm proud of how much I learnt, because at the end of the day that was what this was; a project to learn and explore the boundaries of CSS with. And as far as that goes, I definitely succeeded. It helps that it looks pretty neat too, but even there I think there are things to improve; although that's something for a future project. I definitely will be revisiting CSS-only works more and keeping an eye peeled for future developments in the language.