


- C# Snippet Productivity aims to increase the use of vscode editor as the main tool for console, web and game development in C# Programming Language providing the same shortcuts, efficiency, intellisense that is offered by Visual Studio Community.
- One of the first objectives is to reduce the amount of extensions downloaded for C# reducing the time and effort on configuration that has to be done by the user as well as to avoid extensions conflicts. Also great features to speed up your development workflow.
- New Feature added: Added all current scaffold commands from context menu available in the command palette.
- New Feature added: Added template validation against the .NET SDK installed on the machine.
- Fix: Adjusted the AddProject command to work with the new template validation and project group selection.
Observations:
- Not all templates from Project Creation are tested and validated. Please report any issues with the following information to help us to improve the extension:
- - Template Name
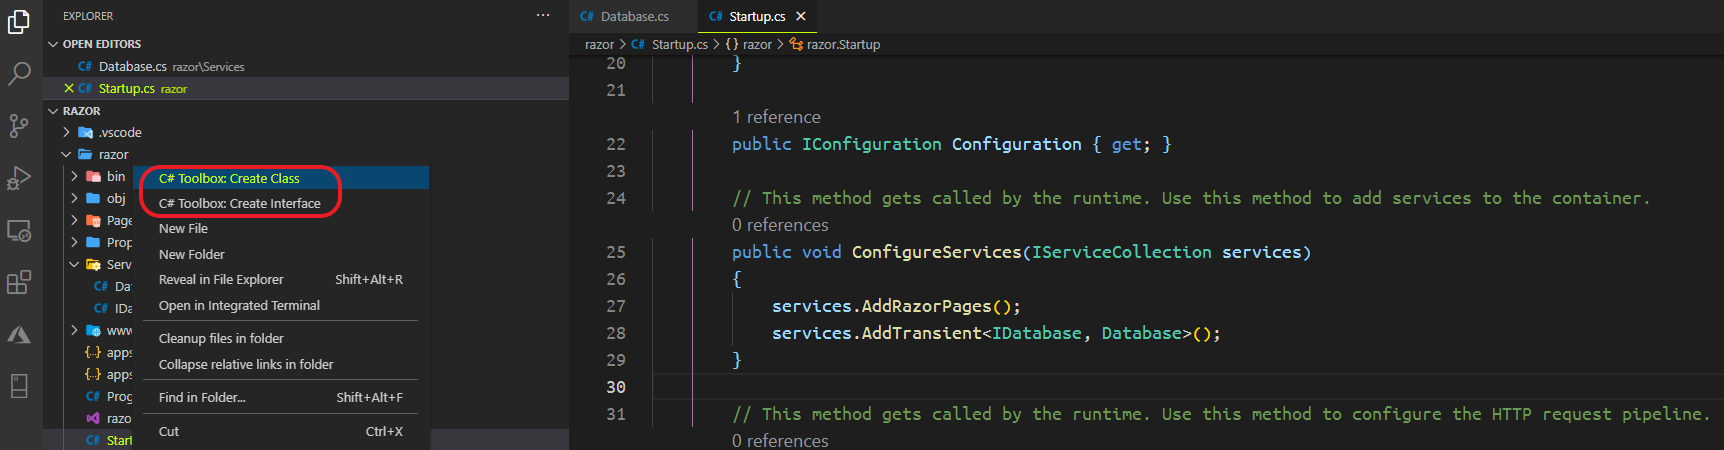
- - Template FrameworkThe commands available in the context menu follow a different workflow than the commands available in the command palette. The commands in the context menu will create the project or resource in the same clicked folder.
The commands in the command palette will ask the user to select the project, create or select the folder, and then create the project.
Expect a different interaction when using the commands in the context menu and the command palette.
All commands are available via shortcut keys. You can find the shortcut keys in the command palette.
Ctrl + alt + /+p- Create ProjectCtrl + alt + /+c- Create ClassCtrl + alt + /+i- Create InterfaceCtrl + alt + /+r- Create RecordCtrl + alt + /+s- Create StructCtrl + alt + /+a- Add Project to Solution
- Fix: Fixed issues related to design patterns snippets. Added a more modern code approach to the snippets.
- All Project Types: Added support for all project types and templates under project creation.
- Support for .NET 7.0 and .NET 8.0
- Performance improvements: Extension loading time decreased and command execution time decreased.
- Snippet improvements: Fixed snippet conflicts and non standard snippets.
- Project Template and Framework Compatibility Validation: Validates the project template and framework compatibility based on the .NET SDK installed on the machine.
- Add or Create Project with empty space: Added validation to avoid creating projects with empty spaces.
- Suggests the user to add the default folder: Reinforce the use of the default folder for project creation.
- New Feature added: Minimal Web API, MStest, xUnit, NUnit project template added.
- Fix: Creating Solution with the same name in the same directory.
- Improvement: Extension loading time decreased.
- New Feature added: Scoped namespaces in the .NET 6.0
- Improvement: Project creation highlighting the
create project buttonafter the project name is typed and tab is pressed.
- New Feature added: Project support for C# .NET Core 6.0
- Fix: Classes, Interfaces, and other types created correctly even when the user type incorrect names.
- New Features added: Added a default folder for project creation. Add this configuration to your settings with your path:
"csharp-snippet-productivity.defaultFolderForProjectCreation": "D:\\"{Your path}- New Features added:
- Add Project to a Solution : Capability to add projects to the same solution with a click of a button. You can select a different project framework as well as the template.
- Submenu With Options :
- Create Class
- Create Interface
- Create Record
- Create Struct
- Fix: .NET target frameworks list on project creation are based on OS and SDKs installed.
- Enhancement: Design patterns snippets added. It will create a commented pattern code to be used as reference
- singleton : Creational singleton pattern
- factoryMethod : Creational factory method pattern
- adapter : Structural adapter pattern
- observer: Structural observer pattern
- Enhancement: Regex snippet cheat sheet added.
- regex : Regex cheat sheet
- When creating classes or interfaces system will consider if you have a
<RootNamespace>YourUniqueNamespace</RootNamespace>tag on your .csproj. If the tag is not found system will use your project name as your root namespace- Added command to create Class from the context/menu
- Added command to create Interface from the context/menu
- How to use:
- Right click in the project folder or any folder inside of your project folder and select either Create Class or Create Interface
- Give it a name of your file and class or interface will be created automatically in the selected folder
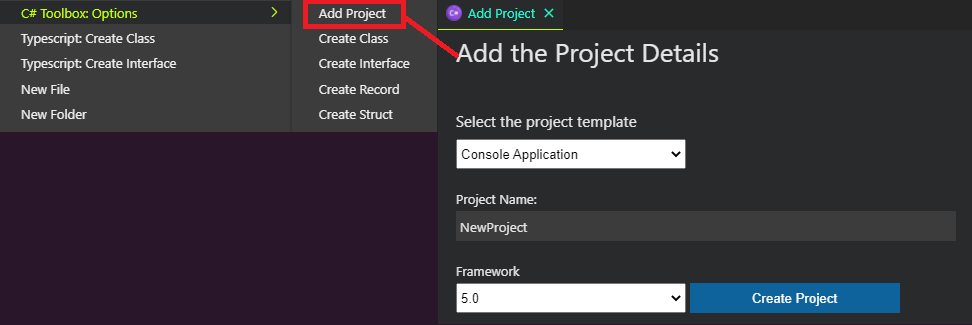
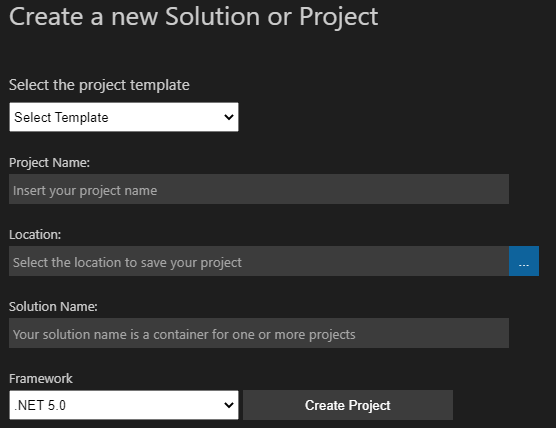
Command to create projects
Press CTRL + SHIFT + P: Then type: Create Project [ C# Toolbox: Create Project ]
Projects templates supported:
Blazor Server App
Blazor WebAssembly App
Console Application
Class Library
.NET Core: Empty, MVC, Razor Page, Angular SPA, React SPA, React/Redux SPA, Web Api, GRPC Services, Razor Class Library
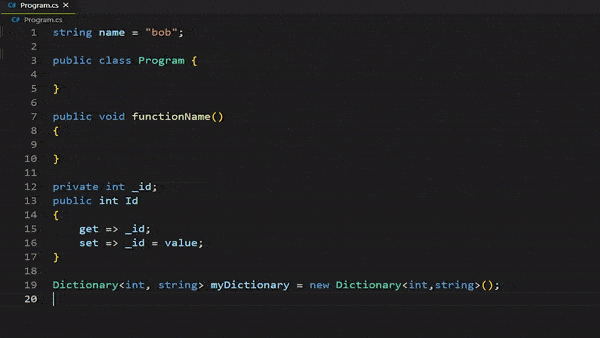
Added snippets for creating arrays, lists and dictionaries using var
- var myArray = new type[size];
- var myList = new List<type>();
- var myDictionary = new Dictionary<type,type>();
- Colorful and configurable comments to better emphasize your work
- Snippets:
- todo : comments
- review : comments
- bug : comments
- research : comments

- cw : console write/writeline
- cwi : console writeline interpolation
- cr : console readline
- crk: console readkey
- clr: console clear
- var: variable declaration
- if: if statement
- else: else statement
- ifelse: if/else statement
- iif: conditional operator
- enum: enum type
- switch: switch statement
- using: using statement
- while: while loop
- dowhile: do/while loop
- for: for loop
- foreach: foreach loop
- arr: array structure
- varr: array structure using var
- lst: list structure
- vlst: list structure using var
- ilst: Ilist structure
- dic: dictionary structure
- vdic: dictionary structure using var
- cdic: concurrent dictionary structure
- idic: idictionary structure
- func: create a void function
- vfunc: create a virtual function
- afunc: create an abstract function
- rfunc: create a function with return type
- sfunc: create a static function
- pfunc: create a function using params
- try: create a try/catch block
- namespace: add namespace
- struct: create a struct
- class: create a class based on the file name
- ctor: class constructor
- instantiate: object instantiation
- fclass: class created with a default constructor and three overrides [ToString, Equals, GetHashCode]
- sclass: create a static class
- aclass: create an abstract class
- interface: create an interface based on the file name
- prop: create a property
- prope: create an expanded property
- record: create a record
- xml-summary: this tag adds brief information about a type or member
- xml-remarks: the [remarks] tag supplements the information about types or members that the [summary] tag provides
- xml-returns: the [returns] tag describes the return value of a method declaration
- xml-value: the [value] tag is similar to the [returns] tag, except that you use it for properties
- xml-example: You use the [example] tag to include an example in your XML documentation. This involves using the child [code] tag
- xml-para: you use the [para] tag to format the content within its parent tag. [para] is usually used inside a tag, such as [remarks] or [returns], to divide text into paragraphs. You can format the contents of the [remarks] tag for your class definition
- xml-c: still on the topic of formatting, you use the [c] tag for marking part of text as code. It's like the [code] tag but inline. It's useful when you want to show a quick code example as part of a tag's content
- xml-exception: by using the [exception] tag, you let your developers know that a method can throw specific exceptions
- xml-see: the [see] tag lets you create a clickable link to a documentation page for another code element
- xml-seealso: you use the [seealso] tag in the same way you do the [see] tag. The only difference is that its content is typically placed in a "See Also" section
- xml-param: you use the [param] tag to describe a method's parameters
- xml-typeparam: You use [typeparam] tag just like the [param] tag but for generic type or method declarations to describe a generic parameter
- xml-paramref: sometimes you might be in the middle of describing what a method does in what could be a [summary] tag, and you might want to make a reference to a parameter
- xml-typeparamref: you use [typeparamref] tag just like the [paramref] tag but for generic type or method declarations to describe a generic parameter
- xml-list: you use the [list] tag to format documentation information as an ordered list, unordered list, or table
- xml-inheritdoc: you can use the [inheritdoc] tag to inherit XML comments from base classes, interfaces, and similar methods
- xml-include: the [include] tag lets you refer to comments in a separate XML file that describe the types and members in your source code, as opposed to placing documentation comments directly in your source code file
- All the snippets comments are shown as -> snippet name
- Snippets were created thinking on productivity and the extensive use of tab key
- Colored comments were created to increase visibility of todo's, reviews, bugs and research
- Fork the original repository to your own repository
- Clone it to your local
- Contribute to it
- Push it to your remote repo
- Send a PR
[Pull Request]to the main repo- Your contribution will be evaluated then we will merge your changes with the original repository. ❤
Enjoy!