Usage with the Chutzpah Runner extension for VS Code
The idea here with /openInBrowser and /coverage is that you can use khutzpa as a drop-in replacement for Chutzpah.exe with the Chutzpah Runner extension for VSCode, and khutzpa will digest the same Chutzpah.json configuration files that you had in your project already.
For instance, once set up as described, above, the Chutzpah Runner extension might send a command that looks like this:
khutzpa /usr/local/lib/node_modules/khutzpa/tests/fakeSite/ /engine chrome /browserArgs --disable-web-security --user-data-dir=/Users/yourName/ChromeDevSession /openInBrowser /trace /debug
khutzpa doesn't support all of those options, but will translate that call and do what's intended by this command, essentially:
khutzpa /usr/local/lib/node_modules/khutzpa/tests/fakeSite/ /openInBrowser
(Aka, "Heads up! Many of the options the Runner sends aren't currently supported and are ignored by khutzpa." Note also that tests run are not currently limited to those in that child directory; all tests matching the Chutzpah.json may also be run.)
WARNING: There's no threading right now. Things might freeze for a while, especially for larger test suites.
Chutzpah Runner with macOS
This takes a little work. There are two ways to link the extension with khutzpa:
- Use the shell file that came with the install, or
- Make a new shell file somewhere you can access that calls khutzpa.
Either way, you're going to set a setting in your VS Code preferences for the Chutzpah Runner extension which will point to the script from either 1. or 2.
Let's start with The Easy Way, #1: Use the script that came with your khutzpa install. We're going to hope it installed in the normal place, but if you're using nvm it might be somewhere else and these instructions won't work.
-
First you need to install the Chutzpah Runner extension in VS Code if you haven't.
-
If you haven't installed khutzpa globally, do that with (on macOS)
sudo npm install khutzpa -g -
Open a Terminal and type this:
sudo chmod 755 /usr/local/lib/node_modules/khutzpa/macKhutzpa.sh- This allows us to call that script and have it execute as an application.
-
NOTE: If you receive a message saying "No such file or directory", you probably have your npm global install in a nonstandard location.
- If that does happen, open an issue if you'd like and we can take a look.
-
Open VS Code. Hit
Cmd-,(so literally "Command and comma keys at the same time") to open your preferences. -
Hit
Command-Fand search forChutzpah. -
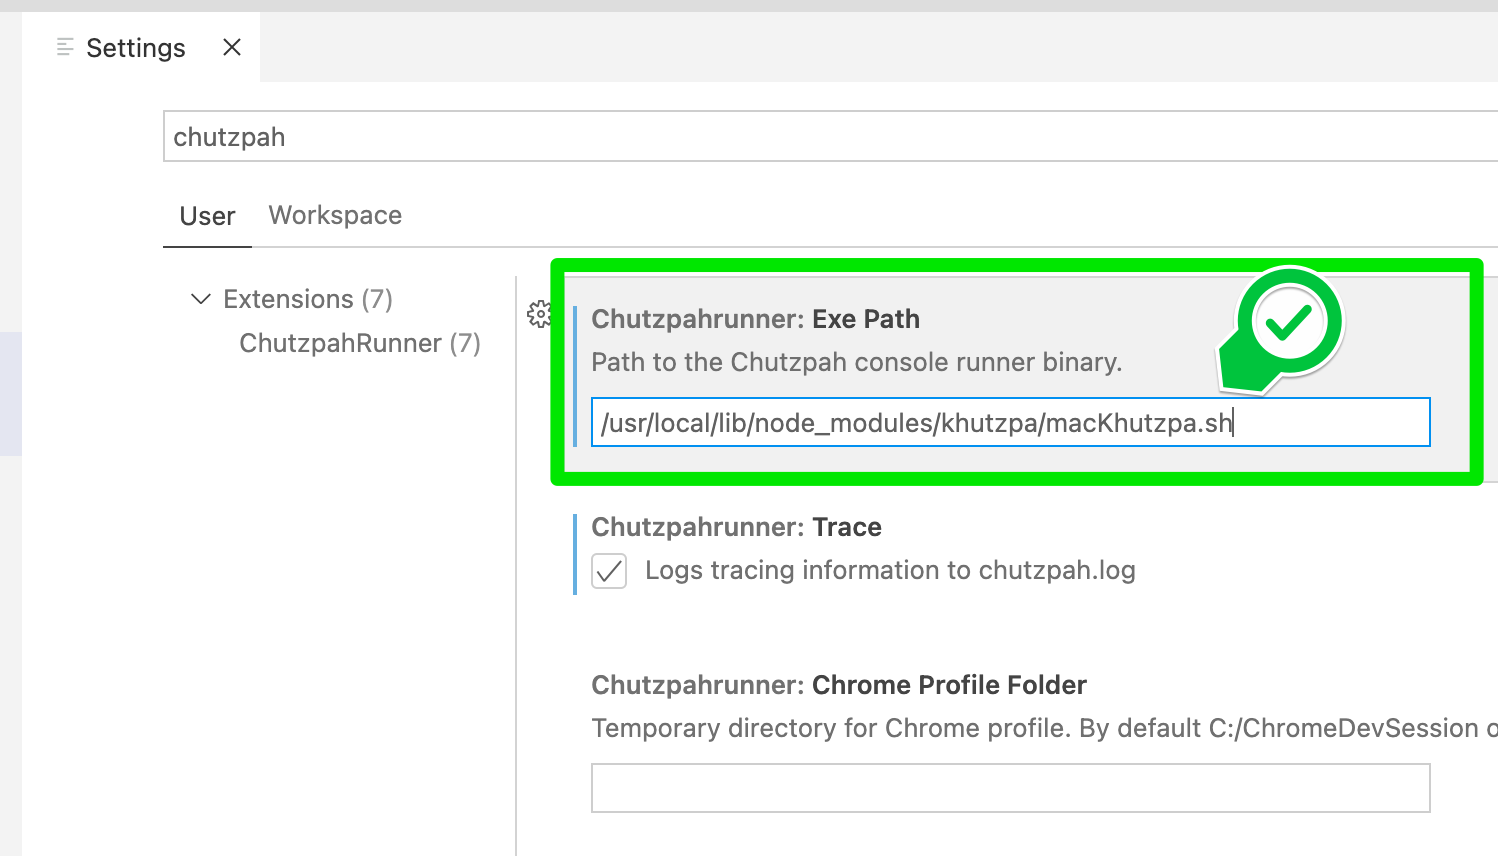
In the entry for "Chutzpahrunner: Exe Path", enter that same file with its full path:
/usr/local/lib/node_modules/khutzpa/macKhutzpa.sh
- Save settings and close the tab.
Now things should work! Right-click a file or folder in VS Code's Explorer and run some tests!
Note that khutzpa [purposefully] opens a new Terminal window that must be closed or the app quit before you can run it again. In the future, I may reuse the express server or have khutzpa check to see if the port it wants to use is already in use. Probably the former.
One limitation: Chutzpah Runner is sending a filename for the coverage output. You can see this under Chutzpah's command-line options.
The options, which you can view in VS Code's Output window, will look like this:
/coveragehtml /var/folders/ry/9v79xg1j7n9fzdfygqmb4q180000gp/T/coverage-4yOxQ2.html
For now, khutzpa is somewhat ham-handedly creating the coverage files where it normally does (usually in the same root dir as the Chutzpah.json file), copying all those files over to the directory given (/var/folders/ry/9v79xg1j7n9fzdfygqmb4q180000gp/T/ in the above example), and then copying index.html into whatever that crazy file name is (coverage-4yOxQ2.html in the example).
Probably not a huge deal, but note that this means you'll have two sets of html files in your file system with each coverage run for now, one from the Chutzpah Runner extension (that coverage-4yOxQ2.html represents) & the one khutzpa creates and copies over.
Chutzpah Runner with Windows
Very similar to macOS with a few tweaks. Here are the steps.
- First you need to install the Chutzpah Runner extension in VS Code if you haven't.
- If you haven't installed khutzpa globally, do that with
npm install khutzpa -g - Open VS Code. Hit
Ctrl-,(so literally "Control and comma keys at the same time") to open your preferences. - Hit
Ctrl-Fand search forChutzpah. - We need to set up a command in the
Chutzpahrunner: Exe Pathsection of in Chutzpah Runner's settings (see picture in macOS section, but enter the value discussed here).- We have two choices:
- Enter the path to the khutzpa npm installation and change the path to match your user name
C:\Users\[yourLogin]\AppData\Roaming\npm\khutzpa.cmd
- Create a .bat file that calls
khutzpa.- contents of .bat file:
khutzpa %* - Then enter the path to the file inclusive of filename in
Chutzpahrunner: Exe Path. - For instance, if I save that file in
C:\temp\runKhutzpa.bat, that's what should be inChutzpahrunner: Exe Path
- contents of .bat file:
- Enter the path to the khutzpa npm installation and change the path to match your user name
- We have two choices:
- Save settings and close the tab.
Now things should work! Right-click a file or folder in VS Code's Explorer and run some tests or a coverage report.
If things don't work, please open an issue.
NOTE: When you run the "in Chrome" option to open tests in a browser, the Chutzpah Runner is going to open a node terminal. You have to close this window yourself to start a new "open in browser" run.
Chutzpah Runner with Linux
[It might be a while before I set this up. Let me know if you do it! Should be reasonably straightforward.]