Dead simple cron service for making HTTP calls on a regular schedule. (link)

- 💯 Open source
- 🙈 Hosted version provided by Saasify
- 🙉 Self-hosted version is easy to set up
- 🐳 Built on top of Google Cloud Scheduler and Firestore
- 💪 Scales "infinitely" via serverless magics
- 👤 Users can only manage the jobs they own
- 🤖 Includes an auto-generated OpenAPI spec
- 👍 Super simple -- Google does all the hard work for us
# Install dependencies
yarn
# Configure your google service account and cloud scheduler
# See the Setup section below for more details
echo GOOGLE_APPLICATION_CREDENTIALS='/path/to/service-account.json' >> .env
echo GOOGLE_PROJECT_ID='XXX' >> .env
echo GOOGLE_PROJECT_LOCATION='XXX' >> .env
# Run the development server
yarn dev
# Or run the production server
yarn build
yarn startNow let's set up some useful environment variables for the following examples. We'll be using the local dev server and a fake user named nala (my wonderful kitty 😻).
export SIMPLE_CRON_URL=http://localhost:4000
export SIMPLE_CRON_USER=nala
All of the following examples use httpie, a modern alternative to curl. They're just normal HTTP REST calls, so feel free to replace them with your preferred REST language / client.
# Create a new job that will send a GET request to example.com once every minute
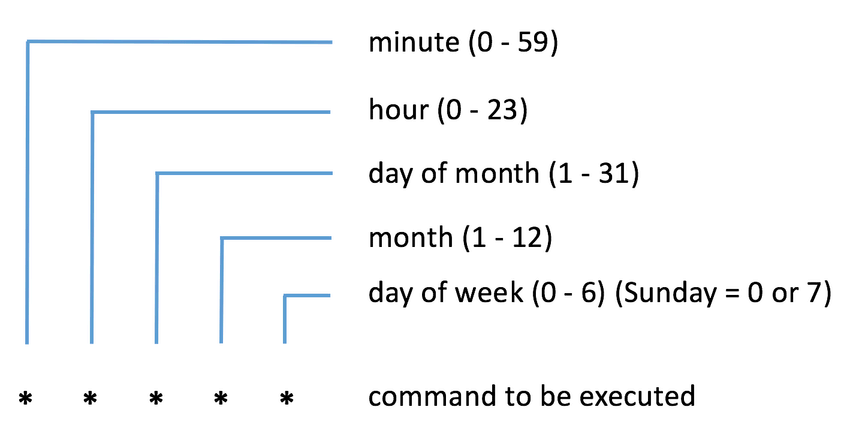
http POST ${SIMPLE_CRON_URL}/jobs schedule='* * * * *' url='https://example.com' x-saasify-user:${SIMPLE_CRON_USER}There are two required parameters: schedule and url.
schedule- (required string) A standard cron expression describing when your HTTP job should run.url- (required string) The URL to visit each time your job runs.httpMethod- (string, defaultGET) Optional HTTP method to use. (GET,POST,PUT,HEAD,DELETE,PATCH,OPTIONS)httpBody- (object, default{}) Optional JSON body to use.httpHeaders- (object, default{}) Optional HTTP headers to use.httpQuery- (object, default{}) Optional HTTP query parameters to add to the baseurl.timezone- (string, defaultAmerica/New_York) Optional time zone to use.name- (string) Optional metadata name.description- (string) Optional metadata description .tags- (string[]) Optional metadata tags .
The output of your newly created job should look something like this:
{
  "id": "sEfyx6mm2d9smI0xltYI",
  "schedule": "* * * * *",
  "url": "https://saasify.sh",
  "userId": "nala",
  "timezone": "America/New_York",
  "httpMethod": "GET",
  "httpHeaders": {},
  "description": "",
  "name": "Default",
  "tags": [],
  "createdAt": "2020-03-07T19:10:40.119Z",
  "updatedAt": "2020-03-07T19:10:40.119Z"
}
Here are some of the ways you can manage your job:
# Get the job via its id
http GET ${SIMPLE_CRON_URL}/jobs/sEfyx6mm2d9smI0xltYI x-saasify-user:${SIMPLE_CRON_USER}

# Pause the job
http PUT ${SIMPLE_CRON_URL}/jobs/sEfyx6mm2d9smI0xltYI x-saasify-user:${SIMPLE_CRON_USER} state=paused

# Resume the job
http PUT ${SIMPLE_CRON_URL}/jobs/sEfyx6mm2d9smI0xltYI x-saasify-user:${SIMPLE_CRON_USER} state=enabled

# Disable the job
http PUT ${SIMPLE_CRON_URL}/jobs/sEfyx6mm2d9smI0xltYI x-saasify-user:${SIMPLE_CRON_USER} state=disabled

# Delete the job
http DELETE ${SIMPLE_CRON_URL}/jobs/sEfyx6mm2d9smI0xltYI x-saasify-user:${SIMPLE_CRON_USER}Once you have the project working locally, you can deploy it anywhere you want: Heroku, AWS, GCP, etc.
For demonstration purposes, we've included an example of deploying to ZEIT now as a serverless function.
Assuming you have now set up locally, you will need to initialize the required environment variables first.
now secret add -- simple-cron-google-project-id "XXX"
now secret add -- simple-cron-google-project-location "XXX"
now secret add -- simple-cron-google-application-credentials "`base64 /path/to/service-account.json`"
Note that the base64 encoding is a workaround because the serverless environment won't be able to access the filesystem.
Once your now config is set up, you should be able to run:
yarn deployYou should be gucci now -- go forth and cron, my friend! ✌️
Be careful to never check your Google service account credentials into version control.
You need to set up a new Firebase project, following the prompts. Once you get to your Firestore database, make sure it's in native mode, not datastore mode so we can access it programatically.
You need to enable the Google Cloud Scheduler API in your cloud console and then figure out your project ID and location. For me, these were saasify and us-central1 respectively.
You need to create a new Google service account, assign the correct roles, and then download the resulting json key file.
The roles I used are Cloud Scheduler Admin, Cloud Scheduler Service Agent, Firebase Admin, Firebase Develop Admin, and Firebase Admin SDK Administrator Service Agent. You may need to add additional roles for optional functionality such as logging and monitoring.
These roles are a bit of a black box and I'm sure it would work with less roles, but this worked for me. If you figure out the minimal set of roles needed, please open an issue to let me know.
If you get permission denied errors along the way, don't worry -- you're in good company 😂
Just double check to make sure these APIs are enabled in your Google cloud console and that the service account you're using has the correct roles. If the errors still happen, try waiting a few minutes for the permissions to propagate which ended up working for me.
- EasyCron - Solid hosted cron service (not open source).
- Hosted cron services - Collection of hosted cron service providers.
- Saasify makes it easy to monetize these types of services.
MIT © Saasify
Support my OSS work by following me on twitter