Setting Up the Overlays, and Emerging GNOME from Scratch
Install GNOME 3.14 (with OpenRC) onto an existing Gentoo system!
I'm going to assume that, having followed the vanilla "Installing Gentoo" process from the Handbook, you are currently running a stock amd64 Gentoo system, and would now like to use GNOME 3.14 under OpenRC.
Note -
amd64covers Intel-based x86_64 systems too, the reference to AMD is an historical artefact.
The overall process is as follows:
- If necessary, migrate to
~amd64, and update@world; - Set up the
laymantool, and install the two necessary overlays using it; - Select the new, custom profile;
- Modify your Portage configuration;
- Perform an
@worldupdate; -
emergeGNOME! - Ensure you have the necessary kernel settings;
- Configure GNOME startup;
- Reboot and enjoy!
Let's go!
If you installed Gentoo on the 'stable' branch (amd64, with no tilde; the default if you have followed the Gentoo Handbook process), then you should migrate to ~amd64 before doing anything else (of course, if you have done this already, you can skip directly to step 2 now).
To migrate, issue (as root):
# nano -w /etc/portage/make.conf
and then add the following lines to the file:
# Use the 'testing' branch
ACCEPT_KEYWORDS="~amd64"
Save, and exit nano. Then issue:
# emerge --sync
# emerge --verbose --deep --with-bdeps=y --newuse --update @world
Let the process run to successful completion, run dispatch-conf if necessary, and then (for safety) reboot your machine.
This is just a 'vanilla' migration to
~amd64, so it should go through fine. If you have any problems, you can search for assistance on the Gentoo forums.
Next, if you haven't already installed layman(8) (Gentoo's overlay tool), do so now. Issue:
# emerge --ask --verbose app-portage/layman
# echo 'source "/var/lib/layman/make.conf"' >> /etc/portage/make.conf
Then, you need to set up two custom layman entries, for the funtoo-gnome-overlay and funtoo-2-gentoo overlays. Issue:
# nano -w /etc/layman/overlays/funtoo-gnome-gentoo.xml
And put the following text in the file:
<?xml version="1.0" encoding="UTF-8"?>
<!DOCTYPE repositories SYSTEM "/dtd/repositories.dtd">
<repositories xmlns="" version="1.0">
        <repo priority="60" quality="experimental" status="unofficial">
                <name>funtoo-gnome-gentoo</name>
                <description>Funtoo's Gnome overlay (by Dantrell B. et al) remapped for Gentoo.</description>
                <owner>
                        <email>sakaki@deciban.com</email>
                        <name>sakaki</name>
                </owner>
                <source type="git">https://github.com/sakaki-/funtoo-gnome-overlay.git</source>
        </repo>
</repositories>
Save, and exit nano. Then, issue:
# nano -w /etc/layman/overlays/funtoo-2-gentoo.xml
and put the following text in that file:
<?xml version="1.0" encoding="UTF-8"?>
<!DOCTYPE repositories SYSTEM "/dtd/repositories.dtd">
<repositories xmlns="" version="1.0">
        <repo priority="70" quality="experimental" status="unofficial">
                <name>funtoo-2-gentoo</name>
                <description>Allow use of Funtoo's Gnome overlay in Gentoo.</description>
                <owner>
                        <email>sakaki@deciban.com</email>
                        <name>sakaki</name>
                </owner>
                <source type="git">https://github.com/sakaki-/funtoo-2-gentoo.git</source>
        </repo>
</repositories>
Save, and exit nano. Then run the following, so layman picks up the new overlays, and starts using them:
# layman --sync-all
# layman --add="funtoo-gnome-gentoo"
# layman --add="funtoo-2-gentoo"
The funtoo-2-gentoo overlay makes a new, custom profile available for your use. This profile provides the files make.defaults, package.mask, package.unmask, package.use and use.mask, containing a compendium of settings copied over from Funtoo (which itself uses a different, more modular profile system than Gentoo).
These notes have been tested using a 'base'
default/linux/amd64/13.0installation as a starting point. As such, if you are attempting to come across from e.g., an existingsystemdprofile, you may experience some issues not mentioned here. (Of course, if you have managed to perform a 'crossgrade' of this type, please feel free to post information about it on this wiki, to help out others who may want to do a similar thing.)
Begin by listing your currently available profiles. Issue:
# eselect profile list
  [1]   default/linux/amd64/13.0 *
  [2]   default/linux/amd64/13.0/selinux
  [3]   default/linux/amd64/13.0/desktop
  [4]   default/linux/amd64/13.0/desktop/gnome
  [5]   default/linux/amd64/13.0/desktop/gnome/systemd
... additional output suppressed ...
  [20]  hardened/linux/uclibc/amd64
  [21]  funtoo-2-gentoo:default/linux/amd64/13.0/desktop/gnome/funtoo
The output line with the asterisk denotes your currently selected profile. Note the new default/linux/amd64/13.0/desktop/gnome/funtoo profile available as item 21 in the above (the numbering on your system may differ). Select that profile now; issue:
# eselect profile set 21
If the custom profile was listed under a different index number on your system, substitute that for
21in the above.
Check the new profile is now set correctly:
# eselect profile show
Current /etc/portage/make.profile symlink:
  funtoo-2-gentoo:default/linux/amd64/13.0/desktop/gnome/funtoo
As its name suggests, in addition to supplying custom information related to the use of the Funtoo overlay, this profile also inherits settings (transitively) from the existing default/linux/amd64/13.0/desktop/gnome profile.
Next, there are a few changes you will need to make to your Portage configuration files, before you are able to emerge GNOME.
First, (assuming you have ACCEPT_LICENSE="-* @FREE" set in /etc/portage/make.conf) you need to permit a few additional licenses; these are benign. Issue:
# nano -w /etc/portage/package.license
and append the following lines to the file (if not already present):
# required for kernel build
sys-kernel/gentoo-sources freedist
# required if not deblobbing
sys-kernel/linux-firmware freedist
# required by GNOME 3.14 (Funtoo)
>=x11-themes/adwaita-icon-theme-3.12.0 CC-Sampling-Plus-1.0
>=gnome-base/gdm-3.14.1 CC-Sampling-Plus-1.0
>=x11-themes/gnome-icon-theme-3.12.0 CC-Sampling-Plus-1.0
save and exit nano.
Next, you will need to make some changes to your /etc/portage/make.conf file. Issue:
# nano -w /etc/portage/make.conf
Then, modify (or add if not present) the lines setting the VIDEO_CARDS and INPUT_DEVICES variables, to suit your system. For example, if your machine is a typical Ultrabook laptop (with integrated Intel HD graphics), you could specify (still in /etc/portage/make.conf):
VIDEO_CARDS="intel i915 i965"
INPUT_DEVICES="evdev synaptics"
whereas if it is a desktop machine with an NVIDIA card (and you wanted to use open-source drivers), you could instead use:
VIDEO_CARDS="nouveau"
INPUT_DEVICES="evdev"
Once you have made the edit, save and exit nano.
Note: given that the GNOME
emergeis very lengthy, you might want to consider setting up parallel building before continuing. See this article for some good pointers.
Next, ensure that you have an /etc/portage/repos.conf file. If you do not, issue:
# nano -w /etc/portage/repos.conf
and place the following text in the file:
[DEFAULT]
main-repo = gentoo

[gentoo]
location = /usr/portage
sync-type = rsync

sync-uri = rsync://rsync.uk.gentoo.org/gentoo-portage
Obviously, modify the
sync-urivalue to suit your location; it should be the same as theSYNCvariable in your/etc/portage/make.conffile.
Save, and exit nano.
Finally, check you have a UTF-8 locale selected:
# eselect locale list
Available targets for the LANG variable:
  [1]   C
  [2]   POSIX
  [3]   en_GB
  [4]   en_GB.iso88591
  [5]   en_GB.utf8 *
  [ ]   (free form)
(your output may well vary from the above, which shows a valid setup for a UK machine).
If you do not have a UTF-8 locale selected, follow these Handbook instructions to create (if necessary) and set one now.
Now, before going any further, it is very important to update your software, since the profile change will have introduced significant USE flag changes, modifications to the @system set, etc.
Important: do not skip this step; if you do, the GNOME
emergein step 6 will probably fail.
Issue:
# emerge --sync
# emerge --verbose --deep --with-bdeps=y --newuse --update --pretend @world && echo 'Good to go!'
Assuming that displays Good to go!, issue:
# for ((i=0;i<5;i++)); do emerge --verbose --deep --with-bdeps=y --newuse --update @world && echo 'All done!' && break; done
This may take some time to complete! If you get the message All done!, the update has finished successfully.
Note: because this is such a large
emerge, it is possible that you will encounter some problems, particularly if using build parallelism, which can be solved with a re-try. That's why, although slightly inelegant, I have put theemergeabove in abashforloop. Feel free to modify if desired.
It is possible that you may lose network connectivity during the above, due to a re-install of
net-misc/dhcpcd. If so, simply try restarting this service (and then, if necessary, trying theemergeloop again).
Lastly, even if you receive (non-fatal) warnings about certain installed packages being masked, I would avoid performing any
emerge --depcleanuntil you have an operational system, at the end of step 9.
Finally, deal with any configuration-file clashes:
# dispatch-conf
OK, you are now ready to emerge GNOME! First, check that Portage thinks everything is in order - issue:
# emerge --verbose --noreplace --keep-going --pretend gnome-base/gnome && echo 'Good to go!'
assuming that reports Good to go!, issue:
# for ((i=0;i<5;i++)); do emerge --verbose --noreplace --keep-going gnome-base/gnome && echo 'All done!' && break; done
This will take a long time to run, on the order of half a day, even on modern machines. If you see the message All done!, it has completed successfully.
I have again used a
bashforloop for robustness. Feel free to modify if desired.
If you still have problems, and you are using build parallelism, you could try temporarily inhibiting this, using
MAKEOPTS="" EMERGE_DEFAULT_OPTS="" emerge --ask --verbose --keep-going gnome-base/gnomeinstead (some packages have problems with parallel make, and it is also possible to run out of memory). However, for most machines, the standard invocation above should work.
When complete, please double-check that you have the necessary X11 drivers emerged - it is possible for these to sometimes get dropped during the gnome-base/gnome emerge, yet the process still report that it has finished correctly. You should ensure you have x11-drivers/xf86-input-evdev (most machines), x11-drivers/xf86-input-synaptics (for machines with a touchpad), and the necessary video driver (e.g., x11-drivers/xf86-video-intel, x11-drivers/xf86-video-nouveau, x11-drivers/xf86-video-virtualbox etc., as appropriate for your system). These should all have been automatically emerged (to match the values you placed into VIDEO_CARDS and INPUT_DEVICES in /etc/portage/make.conf during step 4), but you must check, as without them, X11 (and hence GNOME) will not start up correctly.
If you do have problems, particularly with video drivers, try issuing:
# pushd /usr/src/linux
# make modules_prepare
# popd
and then re-emerge the missing modules explicitly.
Deal with any configuration file clashes:
# dispatch-conf
Next, you will need to ensure your kernel has the necessary drivers and options to support the graphics hardware used on your system. If your current kernel already has this set up correctly, on boot-up you'll most likely see the console switch to a nice 'high-resolution' version, prior to being offered the initial (textual) login prompt. If you see this, skip directly to step 8 now.
However, if you don't (and are currently working on fallback 'low-res' console mode on your machine), you almost certainly need to modify your kernel configuration. GNOME will not start up unless you address this.
Fortunately, if you built your initial kernel using the genkernel tool, per these Gentoo Handbook instructions, the process is very easy. Simply issue:
# genkernel --menuconfig --no-clean all
Eventually, this will bring you to the kernel build system's menuconfig interface, where you can select relevant kernel options. The most important ones (for our current purposes) are those under Device Drivers -> Graphics support -> Direct Rendering Manager (CONFIG_DRM). Make sure you select or modularize everything relevant to your hardware. For example, on an Ultrabook with integrated Intel graphics, you would need to choose as follows:
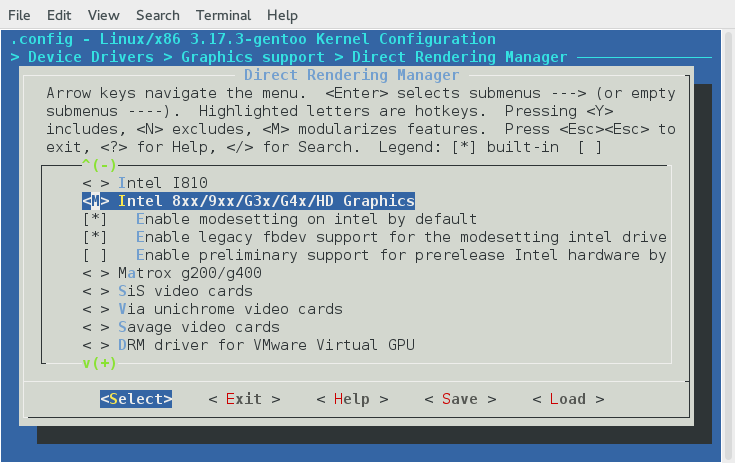
As above, be sure to select any 'modesetting' options, if available.
Obviously, choose settings appropriate for your particular hardware.
It is also recommended to have up-to-date firmware on your system (so that Wi-Fi, Bluetooth etc. will work properly); to emerge this, issue:
# emerge --ask --verbose --noreplace sys-kernel/linux-firmware
Reboot once done, and make sure you now see the switch to a high-res textual display during boot.
If you are familiar with the kernel build process, you can of course use your preferred workflow here, in place of
genkernel. The important thing is to ensure that your system is running a kernel with the appropriate drivers available (at least as modules), prior to attempting to run GNOME for the first time.
If you have reached this point, congratulations, you are ready to try out GNOME 3.14 under OpenRC!
I'm going to assume that you have (in accordance with Chapter 11 of the Gentoo Handbook) created at least one 'regular' user on your system. I'll use "sakaki" as that user's name in the below, obviously, substitute your own regular username.
First, start Bluetooth and printing services, and ensure that they come up on boot too. Issue:
# rc-update add bluetooth default
# rc-update add cupsd default
# rc
Next, if you are runing dhcpcd, per these notes it is strongly recommended that you remove it, since it clashes with NetworkManager in certain situations. To do this, issue:
# /etc/init.d/dhcpcd stop
# rc-update del dhcpcd default
# emerge --ask --verbose --depclean net-misc/dhcpcd
# pkill dhcpcd
and also, remove any other managed connections:
# for service in $(rc-update show default | grep 'net\.' | awk '{ print $1 }'); do rc-update del $service default; done
Lastly, due to some start-up dependencies, we need to make sure that net.lo provides the net service. Issue:
# echo 'rc_provide="net"' >> /etc/conf.d/net.lo
Right, now we can start NetworkManager, and make sure it comes up on boot too. Issue:
# rc-update add NetworkManager default
# rc
Ensure your regular user is in the appropriate groups:
# usermod -a -G lp,audio,video,cdrom,usb,users,portage,wheel sakaki
If running under VirtualBox, you should also
emerge -av app-emulation/virtualbox-guest-additions, and then add your user to thevboxguestandvboxsfgroups.
Next, become your regular user, and then set their ~/.xinitrc file appropriately (this is only necessary for this test run):
# su - sakaki
sakaki> nano -w ~/.xinitrc
and edit that file so it reads:
export XDG_MENU_PREFIX=gnome-
exec ck-launch-session gnome-session
Save and exit nano.
Now you can try running GNOME manually. Still as the regular user, issue:
sakaki> startx
And hopefully you should be dropped into a GNOME session, logged in as your regular user (you may need to move the mouse to unblank the screen)!
If you get presented with one or more 'Authentication Required' dialogs, just click cancel to dismiss them.
If that works, simply log out of the GNOME session (click on the menu in the top right of the screen, then click on your user name to reveal the option), and you should be dropped back to your regular user's text prompt (with a lot of X11 output!).
Come back out to be root and set the GNOME display manager, gdm, up to run on boot, so you will have a graphical login automatically; issue:
sakaki> exit
# nano -w /etc/conf.d/xdm
and edit the line that defines the DISPLAYMANGER variable, so that it reads:
DISPLAYMANAGER="gdm"
Save and exit nano.
Note that this should have been set automatically for you by the install, but it is best to check.
Then issue:
# rc-update add xdm default
to ensure that the display manager starts at boot.
Lastly, issue:
# reboot
When your machine comes back up, you should be prompted with a GNOME graphical login screen (if you get a blank screen, be sure to try moving the mouse / pressing some keys). Have fun ^-^
If you have any issues with the password entry on login, it may be due to incorrect keyboard settings in GNOME, which you haven't configured yet. Use the 'man in a circle' icon to bring up an on-screen keyboard, and enter the password for your first login using that. Once successfully logged in, you can easily adjust the keyboard settings within GNOME itself.
Note that to play MP4 videos in GNOME (in Totem and Web), you'll need to install the gst-plugins-libav package (emerge --ask --verbose media-plugins/gst-plugins-libav, as root).
You may wish to clean up your installation at this point (to remove any warnings about emerged masked packages etc.). This is optional, but to proceed, open a terminal within GNOME, get root, then issue:
# emerge --ask --depclean
# emerge --ask --verbose @preserved-rebuild
I also recommend you install the eix tool. This not only makes it simple to review packages' USE flags, versions etc., it also enables you to synchronize your main Portage tree, and any installed overlays, with a single operation.
To install eix, issue:
# emerge --ask --verbose app-portage/eix
Next, issue:
# nano -w /etc/eix-sync.conf
and place the following text in that file:
# Per https://wiki.gentoo.org/wiki/Overlay#eix_integration
# Sync all overlays
*

# Regenerate overlay metadata
@emerge --regen || true
save and exit nano.
Next issue:
# nano -w /etc/eixrc/01-cache
and put the following text in that file:
# Per https://wiki.gentoo.org/wiki/Overlay#eix_integration
OVERLAY_CACHE_METHOD="assign"
Finally, to ensure eix produces sane colour output on a GNOME terminal, issue:
# echo 'SOLARIZED=true' > /etc/eixrc/99-colour
Next, see these notes about using eix to keep your system up to date.
