This tutorial is a shorter version of the more complete one here, which was provided by LCAV.
- Introduction
- Anaconda
- Installing Python and IPython Notebooks
- IPython Notebooks
- Working with Github
- Downloading Course Material
- Contact Us
However, the very fact that Python is a general purpose language and not a software specific to scientific computing may be considered a drawback of it, too. To address this problem, several scientific computing packages (i.e. sets of function,classes,...) have been developed and released for it so far. These packages contain a large variety of functions which can solve everyday computational problems of researchers in many fields of engineering and science.
But the remaining problem is to find, install, maintain, manage updates and retain the consistency among all such packages as well as the Python system itself. This is where Anaconda comes in.
Anaconda is a completely free Python distribution (i.e. set of packages) for scientific purposes, as stated in their website. It contains more than 125 Python packages for science, mathematics, engineering and data analysis.Installing Anaconda will not only give you an out-of-the-box ready python system as well as a fully-featured IDE (Integrated Development Environment), but also it will release you from the burden of manually installing and taking care of dependency and consistency requirements between various packages.
To download the Anaconda, you can simply go to the link http://continuum.io/downloads and download the zip file compatible with your system. The download page looks like this:
It may ask for your e-mail as well. Please note that the Python version Anaconda uses is Python 2.7.
$ bash Anaconda-1.x.x-Linux-x86[ 64].sh
No root access is required. However, you will need to manually add Python executable files to your Path environment if you want to run them from every folder. This can be done by adding the following line of code to your ~/.bashrc file:
export PATH= /anaconda:$PATH


It seems to happens for older versions of OS X that the following error is generated when launching the ipython notebook (see section 12)
In that case, run the command locale in the terminal and inspect the value of the environment variable LC_CTYPE. It is probably just UTF-8.
Now open the file ~/.profile and add the following line
export LC_CTYPE='us_EN.UTF-8'
Then close the terminal session and try again. You might need to replace us_EN by a different value matching your system configuration.
Alternatively, you might be interested in taking a look at this tutorial, which was procided by LCAV here at EPFL.
IPython notebooks are very interesting novel features added to recent versions of IPython. Notebooks are interactive documents that allow running Python code and reading (or writing) notes and documentations in the same place. Therefore, one can not only see the results he is reading about, but also can produce different results by changing the documented code.A notebook is actually an extended HTML file which contains specific markup to distinguish Python codes inside the page. When displayed using a custom web server, it allows interactive execution and editing of the code inside the document. However, it can also be viewed as a usual, nicely-formatted HTML page. The document you are currently reading is itself an IPython notebook.
The command to run the IPython Notebooks web server is the following:
$ ipython notebook
When you execute the command above, a new browser window is opened which shows the notebooks in the current folder. The IPython notebook files have the ".ipynb" extension.
You can use your IPython Notebook to create slideshows as well. We have put a somewhat detailed set of instructions in thePresentation folder (check here).
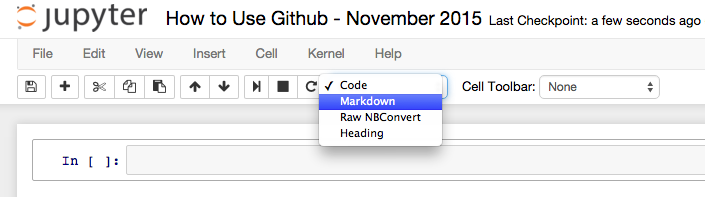
You can type math formulas just like the way you do with Latex in the IPython Notebooks. To do so, select Markdown in the cell type dropdown menu (see te figure below).
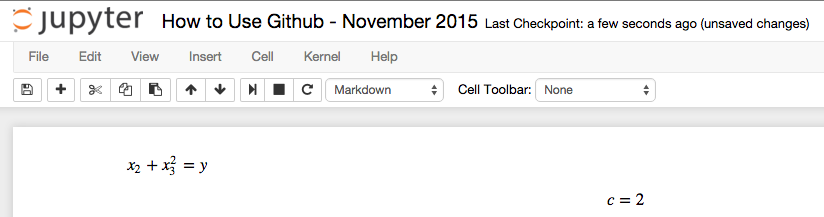
Now you can type math formulas following the latex format. For instance
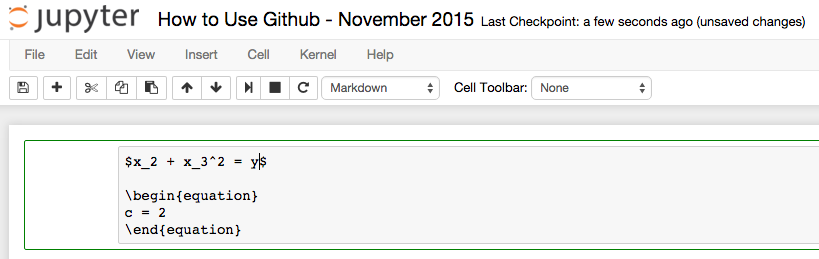
And the result will be
You can also export yout notebooks into latex by opening a "terminal/command prompt" and using *nbconvert* command as follows
- Go to the folder that contain your IPython Notebook
- In the command line, type
$ ipython nbconvert --to latex your_notebook_name
Another interesting source is the book "Python For Signal Processing" which is publicly available as a series of IPython notebooks available at this address.
- Sign in to your Github account (or signup by creating an account)
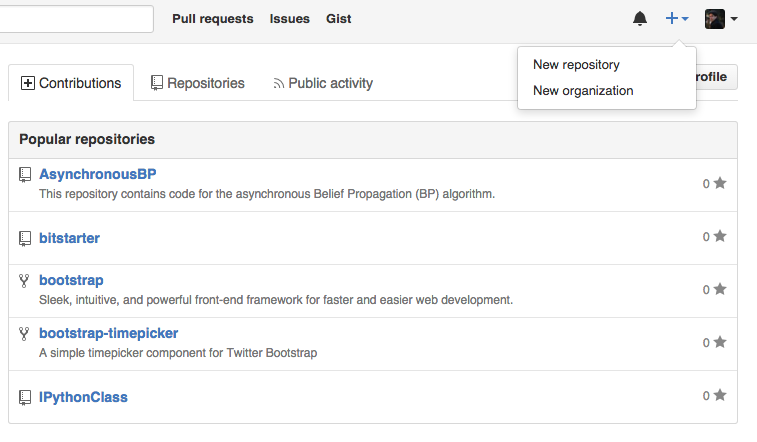
- Once signed in, click on the "+" sign on top right of your screen (see the figure below) and select "New Reprository".
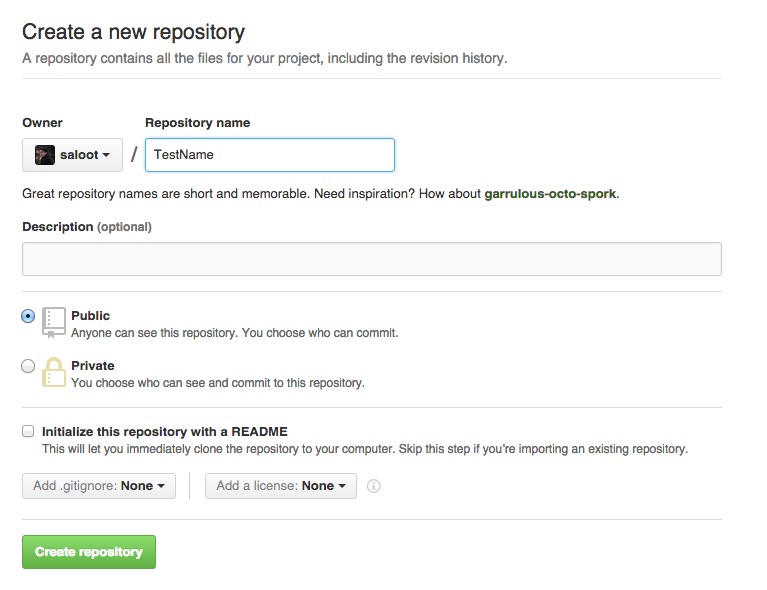
- Select a name for your repository and click on "Create reprository".
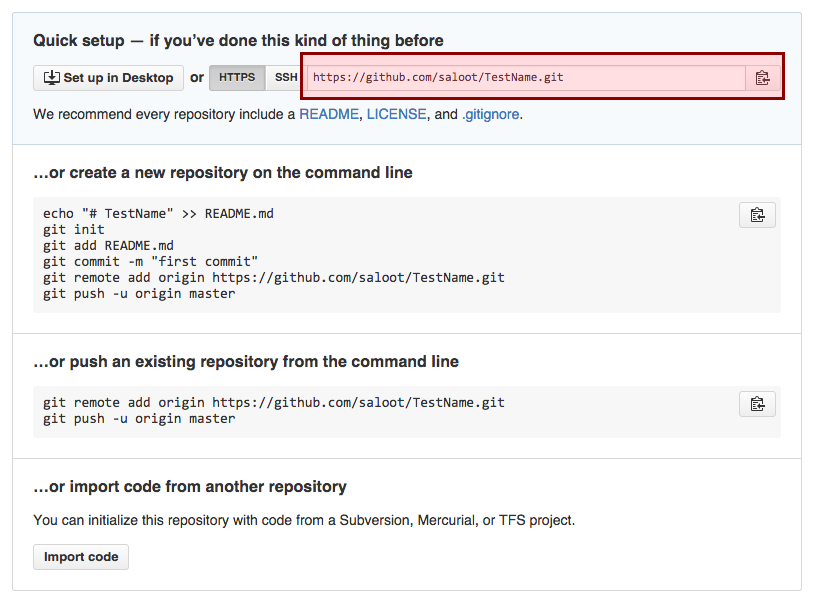
- Congratulations! Once you see a screen like the one below you are done :) Make sure to keep the URL specified in the figure below somewhere handy.
We will need it shortly. Also, do not close this window for now!.
- Open a "Terminal" and navigate to the folder containg your codes (make sure you have some files in the folder).
- Execute the following commands
$ git add ./*

$ git commit -m "first commit"

$ git remote add origin the_url_to_your_repository

$ git push -u origin master
Note that the "the_url_to_your_repository" is the same URL that you have "kept somewhere handy". Here's when we need it ;)

- Donwload the Github client for Windows from here and install it.
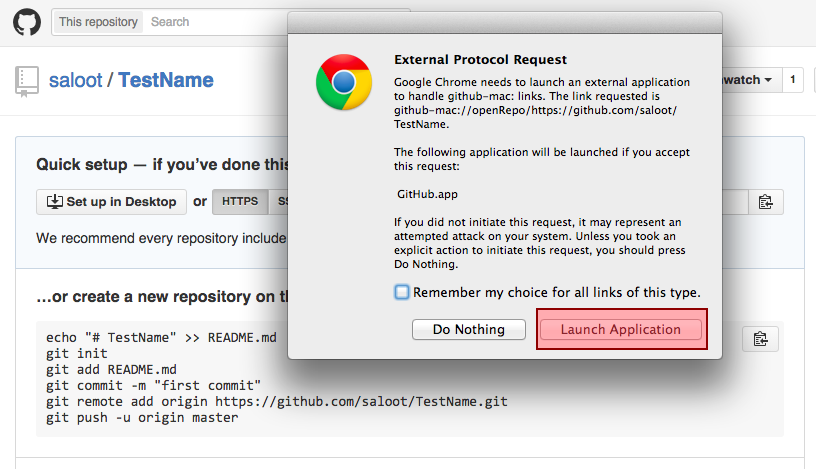
- After installation, in your browser, navigate to the Github page you saw in the Step 4 above. Then, select Setup in Dekstop (see figure below)
- The browser will ask for permission to launch the Github application. Please allow it ;)
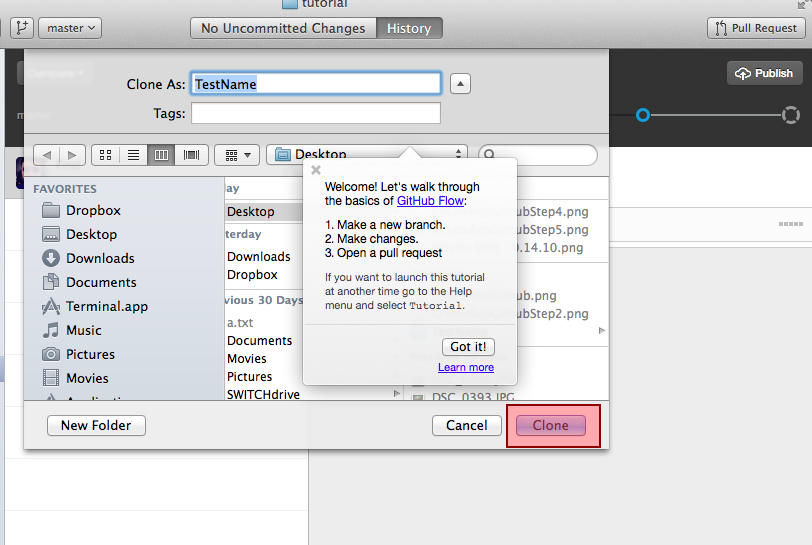
- Once opened, navigate to the place you want your repository be on your hard drive and clik on Clone.
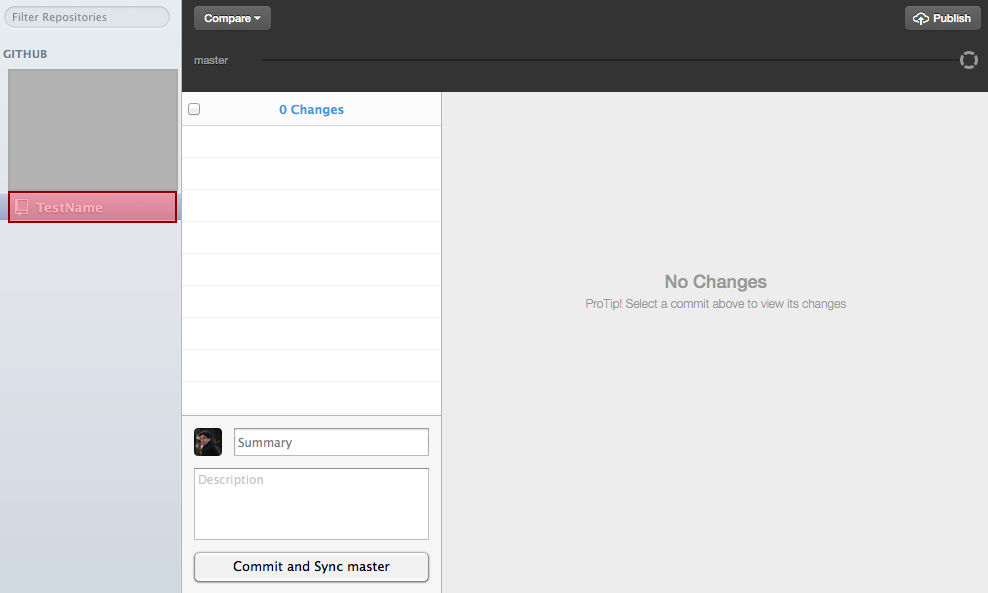
- You should now see a repository on the left panel in your Github application.
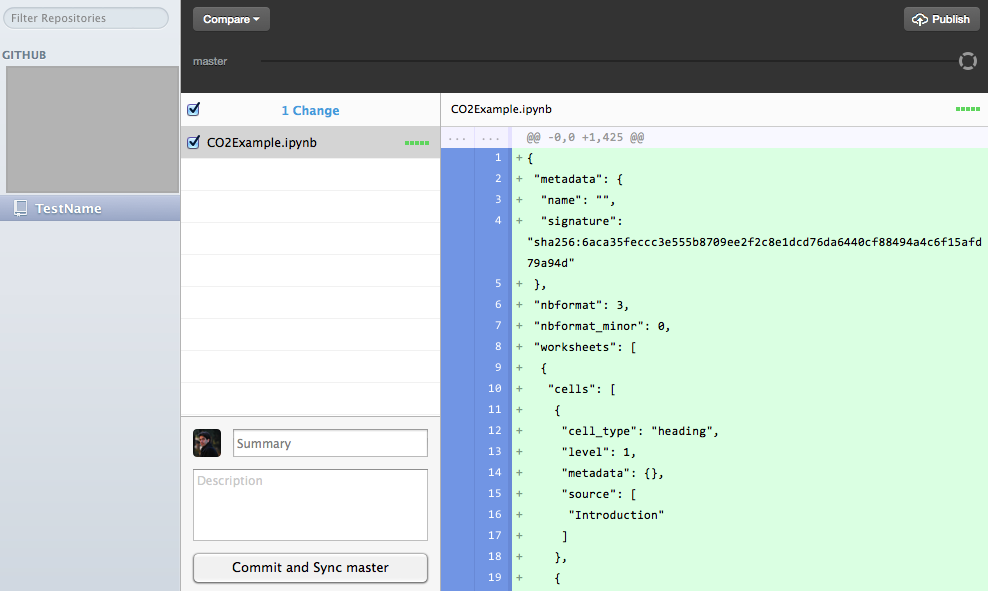
- On your hard drive, add your codes to the repository folder. Then, go back to the Github application and you should see that new changes have been found in your repository.
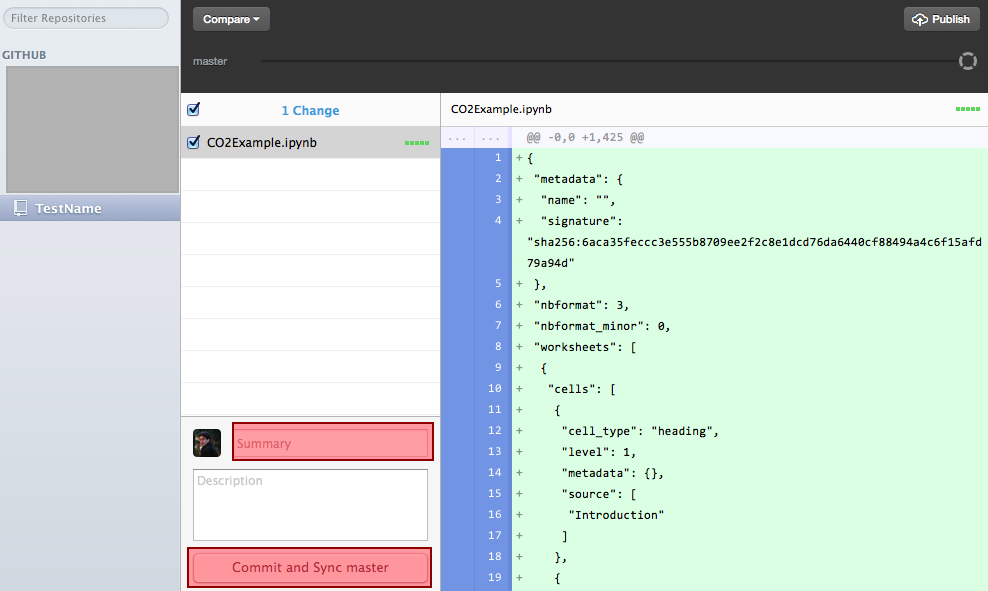
- At this point, add some comment to the "Summary" filed about what you changed and then click on Commit and Sync master.
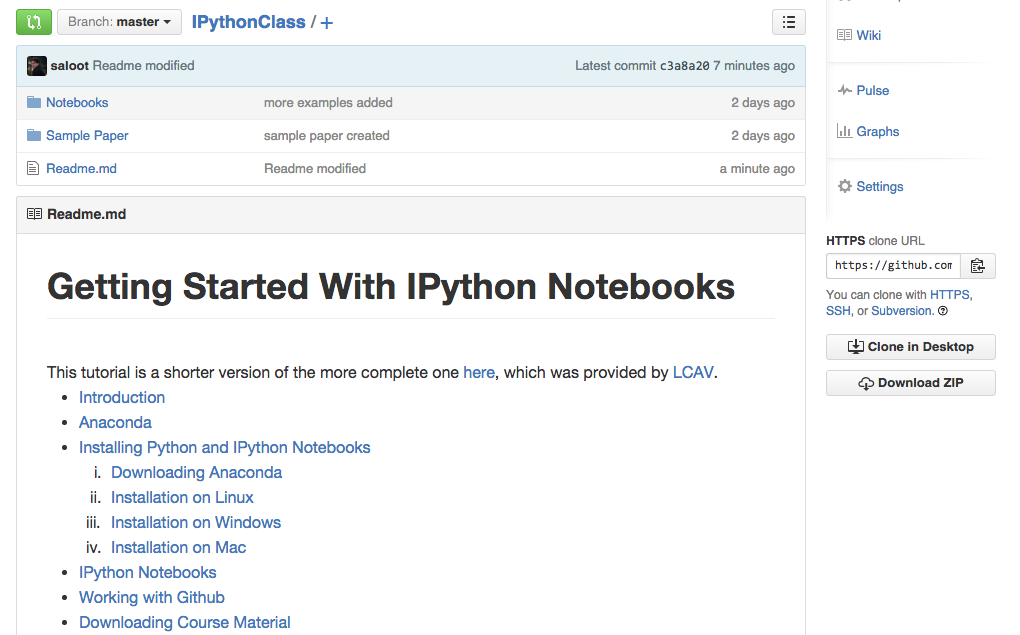
- Congratulations! You have successfully submitted your code. To verify, go back to your web browser and navigate to your Github repository on the web. You should see a page like the one below.
- Now, you can edit the code on your hard drive and submit it regularly (to backup and do version control) just like what we did above. Once finished, you can share the URL of your repository with your colleagues and let them to enjoy your magnificent work as well :) Happy coding!

- A list of good resources for learning Git and Github from Github website.
- A simple Github "Hello World" Example
- Nice introductory course on using Git and Github