
This is mini Arduino based machine to wind guitar pickup coil.
Hello friends in this post I have made a simple mini arduino based guitar pickup coil winding machine. Winding hundreds of turn with hand is quite boring & time consuming job. so I build this mini machine, I have used two stepper motors in this project and HMI for user interface. and I have used a multipurpose PCB for this project.

This is the guitar pickup coil this is the esential part of electric guitars. A single coil pickup is a type of magnetic transducer, or pickup, for the electric guitar and the electric bass. It electromagnetically converts the vibration of the strings to an electric signal. Single coil pickups are one of the two most popular designs, along with dual-coil or "humbucking" pickups.
First of all please watch the complete video I have shown there complete steps how to build a pickup coil winder machine https://youtu.be/xya4ipu7bTk
Followings are the components used in this project.
- Arduino Nano - https://amzn.to/3gnjnRV
- NEMA 17 stepper motor 2nos. - https://amzn.to/3cIgkBI
- A4988 driver IC 2nos. - https://amzn.to/3xp1vMu
- SK8 Shaft holder - https://amzn.to/3xgw8U2
- 8mm SS rod 100mm long 2nos. - https://amzn.to/3xmkLtL
- 8mm Liner bearing LMK8LUU - https://amzn.to/3gld813
- 8mm T8 NUT - https://amzn.to/2RW2ch7
- 8MM T8 Lead screw 100mm long - https://amzn.to/2RW2ch7
- Stepper motor coupler - https://amzn.to/35nDBF8
- Nextion NX3224K028 2.8''HMI - https://amzn.to/2TuYOu7

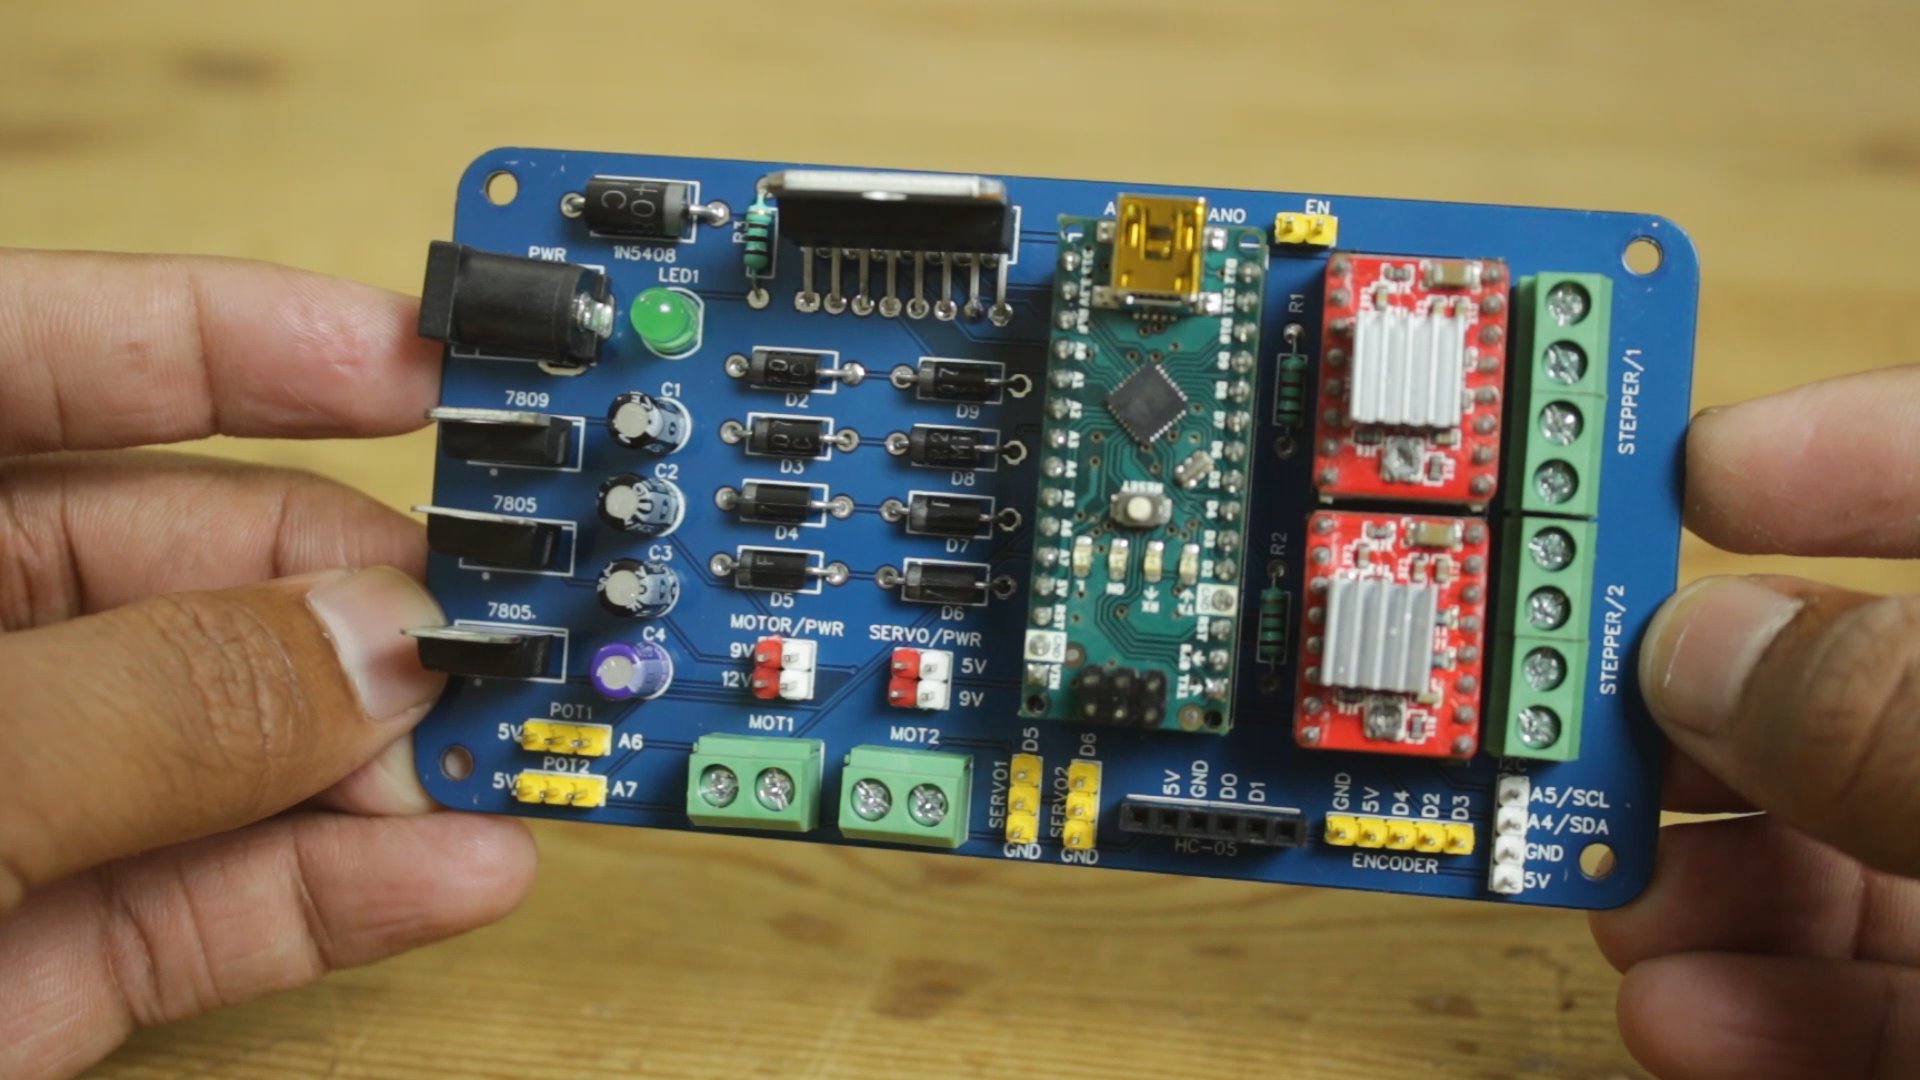
Making such projects without PCB is night mare yes trust me you cannot get wanted result and professional touch in your project if you ignore PCB So some days back I have developed my Multipurpose PCB. This PCB is used to build wide range of arduino projects
followings are the some features of PCB
- Wide range of power input 9V to 24V DC
- Cross polarity protection
- DC motor voltage selection 9V or 12 V DC
- Servo motor voltage selection 5V or 9V DC
- Manual microstepping setting for stepper motor
- Power indication LED
- L298N IC for heavier DC motor
- ON board 5V and 9V regulator no need to arrange different power sources
- Header pins and screw terminals for easy connections
List of the Components you can connect to the PCB
- 2 DC motor ( 9V to 24V DC)
- 2 Potentiometer
- 2 Servo motors ( 5V to 9V DC)
- 1 Serial device (BT module, HMI, Communication module, RX, TX)
- 1 Encoder (2 interrupt pin & 1 PB pin)
- 1 I2C device (SCL/SDA Device, display, MPU6050 etc)
- 2 Stepper motors

I have design circuit and PCB in easyEDA and ordered PCB from JLCPCB
This is the link of PCB editabl file
If you seriously need quality PCB quickly in your hand then you must have to try JLCPCB PCB manufacturing service. They have Special offer of $2 for 1-4 Layer PCBs, free SMT assembly monthly. If you get yourself registered today at JLCPCB you get 18$ welcome coupon from JLCPCB.

First I cut the wooden based of size 120 x 120 mm of 12 mm thick. we are going to mount all of the machine parts on to this board.

Here I marked the mounting hole location for nema 17 stepper motor and drilled them with the help of drill machine. and bigger holes are made by using hole saw cutter

Then I have mounted the NEMA 17 motor bracket on the base with the help of screw.

In this project, we are going to use two stepper motors. one for the coil winder and one for copper wire guider. both of this stepper motors are controlled with A4988 stepper motor driver IC.

This is the copper wire guider assembly here I 3D printed the basic part of guider. Then I mounted two 8mm linear bearing and one T8 lead screw Nut. In this way the construction of machine is completed now we can move towards the pogramming & HMI part.


In order to do winding user have to provide following data
- Wire dia
- Width of Coil
- Number of turn
for user interface I have used a Netion HMI 2.8" Using HMI is very good for such projects because you will get nice cool user interface and no need to do wiring for any other components like push buttons, knob, sliders etc. all of such components we can design in HMI it self This HMI is embedded with STM32 uController on board means there is no extra load of GUI on arduino only Serial communication between arduino and HMI.

Please download the code attached to upload HMI code you need to first download and install Nextion HMI editor https://nextion.tech/nextion-editor/ please note that HMI code is version sensitive it works on with Nextion NX3224K028 2.8''HMI