
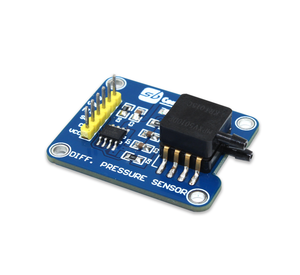
This new edition has NXP's MPXV5010DP sensor which is an integrated on-chip silicon pressure sensor that is signal-conditioned, temperature compensated and calibrated. Two axial ports are included in the Pressure Sensor Board for Pico to allow industrial-grade tubing. The sensor's maximum error rate between 0 and 85 degrees Celsius is 5.0%. It communicates with the target microcontroller over the SPI interface (CS, SCK, MISO). Pressure Sensor Board for Pico W is made to compare two pressure readings. Taking the difference in gas pressure in a flow tube with different diameters, for instance.
This github provides getting started guide and other working details for Pressure Sensor Board for Pico W
- Raspberry Pi Pico W controller
- MPXV5010DP Pressure sensor for accurate reading
- 1.3" Display for visual interaction
- Drag-and-drop programming using mass storage over USB
- 5-Way Joystick for adding additional control features
- Additional GPIOs breakout for peripheral interfacing
- Multi-tune Buzzer to add audio alert into project
- Multi-platform support like Arduino IDE, MicroPython and CircuitPython.
- MPXV5010DP Pressure sensor:
- 5.0% Maximum Error over 0° to 85°C
- Ideally Suited for Microprocessor or Microcontroller-Based Systems
- Durable Epoxy Unibody and Thermoplastic (PPS) Surface Mount Package
- Temperature Compensated over -40 to +125C
- Patented Silicon Shear Stress Strain Gauge
- Available in Differential and Gauge Configurations
- Available in Surface Mount (SMT) or Through-hole (DIP) Configurations
- Powered by RP2040 microcontroller which is dual-core Arm Cortex-M0+ processor, 2MB of onboard flash storage, 264kB of RAM
- On-board single-band 2.4GHz wireless interfaces (802.11n) for WiFi and Bluetooth® 5 (LE)
- WPA3 & Soft access point supporting up to four clients
- Operating voltage of pins 3.3V and board supply 5V
- Display resolution is 240 x 240 pixels
- MPXV5010DP Pressure sensor:
- Pressure Range : 0 - 10kPa
- Response Time : 1ms
- Operating Temperature: -40°C to 125°C

-
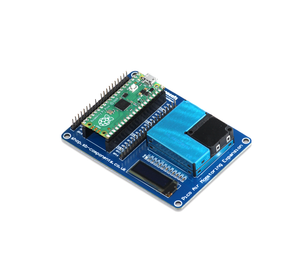
Pico W and Pressure Sensor module interfacing
Pico W Pressure Sensor Pin Function GP26 Vout Analog Data pin -
Pico W and Display interfacing
Pico W Display Pin Function GP10 SCLK Clock pin of SPI interface for display GP11 DIN MOSI (Master OUT Slave IN) data pin of SPI interface GP8 DC Data/Command pin of SPI interface GP9 CS Chip Select pin of SPI interface for display GP12 Reset Display Reset Pin GP13 BL Backlight of Display -
Joystick, Buzzer and LED Interfacing with Pico W
Pico W Buttons Function GP19 JY_R Programmable Joystick button GP17 JY_L Programmable Joystick button GP16 JY_U Programmable Joystick button GP18 JY_D Programmable Joystick button GP20 JY_Sel Programmable Joystick button GP15 Buzzer Buzzer positive GP25 LED OnBoard LED pin of Pico W -
Breakout GPIOs
Pico W Physical Pin Multi-Function GP0 1 General IO / SPI0 RX / I2C0 SDA / UART0 TX GP1 2 General IO / SPI0 CSn / I2C0 SCL / UART0 RX GP2 4 General IO / SPI0 SCK / I2C1 SDA GP3 5 General IO / SPI0 TX / I2C1 SCL GP4 6 General IO / SPI0 Rx / I2C0 SDA / UART1 TX GP5 7 General IO / SPI0 CSn / I2C0 SCL / UART1 RX GP6 9 General IO / SPI0 SCK / I2C1 SDA GP7 10 General IO / SPI0 TX / I2C1 SCL Pico W Physical Pin Multi-Function 5V - Supply Positive 5V GND - Supply Ground 3V3 - Supply Positive 3.3V GP28 34 General IO / ADC2 GP27 32 General IO / ADC1 GP14 19 General IO / SPI1 SCK / I2C1 SDA GP22 29 General IO GP21 27 General IO / I2C0 SCL
- Every board will be provided with boot firmware already installed on Pico W, so you can skip this step and directly go to step 2.
- If in case you want to install firmware for your board, Push and hold the BOOTSEL button and plug your Pico W into the USB port of your computer. Release the BOOTSEL button after your Pico is connected.

- It will mount as a Mass Storage Device called RPI-RP2.
- Drag and drop the MicroPython UF2 - Firmware file provided in this github onto the RPI-RP2 volume. Your Pico will reboot. You are now running MicroPython on ArdiPi.
-
Download Thonny IDE from Download link as per your OS and install it.
-
Once done start Thonny IDE application, Connect Pico W onboard to laptop/PC.
-
Select device at the bottom right with a suitable COM port, as shown in the below figure. You might get a different COM port.


-
Write simple onboard blink Python code or Download Led blink code, then click on the green run button to make your script run on Pico W.

Now that we've reached this point, you're executing your script through Thonny IDE, so if you unplug Pico W, it will stop running. To run your script without using an IDE, simply power up Board and it should run your script, go to step 3. Once you have transferred your code to the Pressure sensor board, to see your script running, just plug in power either way using micro USB or via Vin, both will work.


-
Click on File -> Save Copy -> select Raspberry Pi Pico , Then save file as main.py

In similar way you can add various python code files to Pico. Also you can try out sample codes given here in examples folder.
-
But in case if you want to move multiple files at one go, example suppose you are interested to save library files folder into Pico W, below image demonstrate that

NOTE: Don't rename lib files or and other files, only your main code script should be rename as main.py for standalone execution without Thonny.
Save whatever example code file you want to try as main.py in Pico W as shown in above step 3, also add related lib files with default name if required any. In example folder you will find demo example script
- Buzzer : code to test onboard Buzzer
- Display : Display working demo code
- Pressure Sensor: Demo code to test Pressure sensor
Using this sample code as a guide, you can modify, build, and share codes!!
- Schematic
- Hardware Files
- Step File
- MicroPython getting started for RPi Pico/Pico W
- Pico W Getting Started
- RP2040 Datasheet
- MPX5010 Pressure Sensor Datasheet

This is open source product. Kindly check LICENSE.md file for more information.
Please contact support@sb-components.co.uk for technical support.