Version 0.90, 02.09.2018
Ever read something about Beyond Corp [https://cloud.google.com/beyondcorp/] ? This is a very cool approach from Google and others basically to make all former intranet services available in the internet based on zero trust approaches. This Beyond corp approach drives efficiency dramatically and reduces vpn bottlenecks a lot.
Why ?
- users do not need anymore VPN dialins (ok, for most cases this makes sense, critical admin stuff I would still do via VPN), saving per user some time per day
- If you VPN is limited to a certain bandwidth, you have a dramatically better surfing experience, if you not use use VPN
- bandwidth of your services in general is not limited the capacity of a single vpn gateway or cluster
- cost reduction (no intranet infrastructure anymore)
Zero trust approach means, that you don't even trust a client in your intranet, access to your resources depends on the knowledge of the system and the user.
A typical BC architecture looks like this
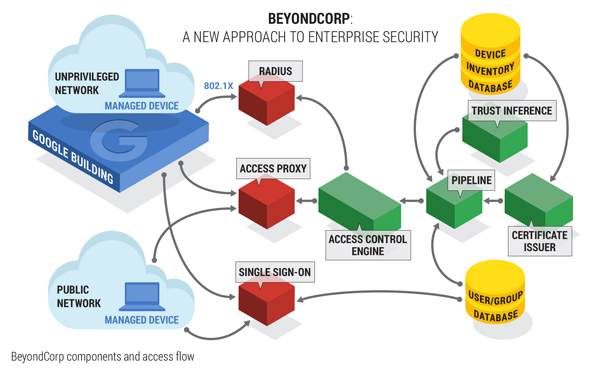
So the main components are
- an identity and access management (IAM) solution
- an access gateway / access proxy
In a company you have device management systems, which could e.g. push device certificates on approved systems and you could enforce 2FA authentication.
I am fascinated by the Beyond Corp idea and wanted to use this approach to secure my own private servers, but fully based on Opensource. Obviously I had to make some assumptions here, so a secure system is identified by a certificate and the user authentication is handled also very certificates. Often you see BC platforms, which also check the validity of the system itself much more complex, but for my home approach, I decided to keep it simple.
The scope of this paper is to provide you an overview and a good start set.
As IAM solution I decided to use the great keycloak toolkit !. The access proxy is based on the known Apache 2 server with mode-auth-openidc . All external facing certificas were issued by the letsencrypt ca.
Full beyond corp approaches authenticate user and machine. For this approach here, only the user is authenticated with a browser certificate (hardware based approaches also work). If you want additionally to authenticate the machine, a test for a machine certificate could be also tested directly in front of the Keycloak installation based on standard Apache2 authentication mechanisms.
(Note: I struggled into problems, as I did not find an easy way to use Letsencrypt certifcates and self signed machine certificates within Apache, however NGINX seems to be work more easy here).
- [Keycloak 4.0.0] (https://www.keycloak.org/)
- Apache 2
- mode-auth-openidc (evtl. in universe package from Ubuntu), version from 20th of June 2018
- letsencrypt
- Generate a certificate for your domain using letsencrypt
- Convert it to pkcs12 to import it in your java key store
openssl pkcs12 -export -in /etc/letsencrypt/live/yourdomain.com/fullchain.pem
-inkey /etc/letsencrypt/live/yourdomain.com/privkey.pem
-out /etc/letsenscrypt/live/yourdomain.com/pkcs.p12
-name mytlskeyalias -passout pass:mykeypassword
This step is needed, if your keycloak server is directly connected to the internet and no apache / nginx server is in front. For my test setup, I used exactly this setup, for production, a reverse proxy clearly makes sense.
Key store should now like this

- Generate own ca and client certificate
Create a Certificate Authority root (which represents this server) Organization & Common Name: Some human identifier for this server CA.
openssl genrsa -des3 -out ca.key 4096
openssl req -new -x509 -days 365 -key ca.key -out ca.crt
Create the Client Key and CSR Organization & Common Name = Person name
openssl genrsa -des3 -out client.key 4096
openssl req -new -key client.key -out client.csr
openssl x509 -req -days 365 -in client.csr -CA ca.crt -CAkey ca.key -set_serial 01 -out client.crt
Convert Client Key to PKCS So that it may be installed in most browsers.
openssl pkcs12 -export -clcerts -in client.crt -inkey client.key -out
client.p12
Convert Client Key to (combined) PEM
Combines client.crt and client.key into a single PEM file for programs using openssl.
openssl pkcs12 -in client.p12 -out client.pem -clcerts
Add this keys to the truststore for the Java environment. For the demo case I have used my private email adress as CN etc.

This truststore must contain all CA keys for the to be authenticated users via x.509.
- Unpack Keycloack
- Edit standalone.xml in /standalone/configuration/
add within
<security-realm name="ssl-realm">
     <server-identities>
         <ssl>
             <keystore path="application.keystore" relative-to="jboss.server.config.dir" keystore-password="<yourpassword>" alias="dev.mschmall.de (let's encrypt authority x3)" key-password="<yourpassword>" />
         </ssl>
     </server-identities>
     <authentication>
         <local default-user="$local" allowed-users="*" skip-group-loading="true"/>
         <properties path="application-users.properties" relative-to="jboss.server.config.dir"/>
     </authentication>
             <authentication>
                     <truststore path="server.truststore" relative-to="jboss.server.config.dir" keystore-password="<yourpassword" />
             </authentication>

 </security-realm>
This step is needed to enable the access to the https certificate and also the trusted client CAs.
N.B. In keycloak there exists an application realm with nearly the same entries, I have still added the additional "ssl-realm".
Additional search for the HTTPS listener and add a "very-client = preferred" entry.
Create admin user for keycloak locally on the system where you installed keycloak.
./add-user-keycloak.sh -u admin
Start keycloak by calling ./standalone.sh -b
Start configuring Flows / Grants (taken from https://www.keycloak.org/docs/3.3/server_admin/topics/authentication/x509.html)
Now create a client within keycloak  (Important here is that the client is set to confidential, if you really control the client).
-
Disable login confirmation (last point on the page)

-
After Keycloak is now setup, prepare your Apache servers
A sample configuration could look like this (Jenkins is listening local on port 9443, keycloack is listening on the public ip on port 8443)
<IfModule mod_ssl.c>


NameVirtualHost *:443

<VirtualHost *:443>
 ServerName <your server name>
 DocumentRoot /var/www/dev

 SSLEngine on
 SSLProxyEngine on
 SSLCertificateChainFile /etc/letsencrypt/live/<your server name>/fullchain.pem
 SSLCertificateFile /etc/letsencrypt/live/<your server name>/cert.pem
 SSLCertificateKeyFile /etc/letsencrypt/live/<your server name>/privkey.pem

 OIDCProviderMetadataURL https://<your server name>:8443/auth/realms/master/.well-known/openid-configuration
 OIDCRedirectURI https://<your server name>/secure/jenkins/

 OIDCCryptoPassphrase <YOUR SECRET PASSPHRASE>
 OIDCClientID <YOUR CLIENT ID CREATED WITHIN KEYCLOAK>
 OIDCClientSecret <YOUR SECRET>


  <Location "/login">
     AuthType openid-connect
     Require valid-user
     ProxyPass https://<YOUR INTERNAL SERVER>:9443/login
     ProxyPassReverse https://<YOUR INTERNAL SERVER>:9443/login
 </Location>

  <Location "/secure">
     AuthType openid-connect
     Require valid-user
  </Location>

  <Location "/secure/jenkins">
     AuthType openid-connect
     Require valid-user
     ProxyPass https://<YOUR INTERNAL SERVER>:9443/
     ProxyPassReverse https://<YOUR INTERNAL SERVER>:9443/
 </Location>

 <Location "/">
   AuthType openid-connect
   Require valid-user
   ProxyPass https://<YOUR INTERNAL SERVER>:9443/
   ProxyPassReverse https://<YOUR INTERNAL SERVER>:9443/
</Location>
Surfing to https:// will bring you to the keycloak authentication and afterwards to your internal server listening at port 9443 (in my case Jenkins).
Surfing to https://:8443 will bring you to the keycloak authentication.
- add more text
- implement single sign on with Jenkins
Problems / challenges I run into:
The correct value for OIDCRedirectURI (URI to be redirected after successful login) caused me headaches, as I often saw invalid URLs, the above mentioned example works, the basic idea is to point the URI within the protected area.
"Beyond corp" approaches for the home environment are relative easy to setup using existing open source tooling.
During my research I also found some more interesting topics to look more deeply into such as