Installation (v3)
These are the instructions for installing V3 of RWSOLS.
Ready to get the Remote Wake/Sleep-on-LAN Server (RWSOLS) installed? OK! You should read the terminology page first, so you know what we're talking about. Done? Cool.
You'll need to get your remote machine(s) set up to support WOL Magic packets. If you're using a Windows remote machine, and you want to be able to put it to sleep Remotely, too, you need to set that up.
- Ensure that the remote computer(s) supports Wake-On-Lan (WOL) functionality. You may need to boot into the BIOS and permit the computer to be woken up via the network interface. This will look different on nearly every BIOS. You also need to configure the network interface from within the OS to not go into power save mode, and to support Wake events from magic packets. HowToGeek has a good tutorial showing how to enable WOL functionality.
- If the remote computer is Windows 8 or 10, you might need to change some settings to make it reply to ping requests (or else you won't know when it has woken up, and the webapp won't be able to ascertain its state). Follow these instructions to make it reply.
- If you want to be able to put your computer to sleep remotely, in addition to being able to wake it up, you need to install and run the Sleep-on-LAN application server. Download the Sleep on LAN software (original download link) (v1.1 alt download link) and run it on your windows computer. Set it to launch at boot so that it will always be ready to go.
- If the Remote computer is Windows 10, its Sleep settings may prevent it from supporting Wake-On-LAN. You can fix this by disabling "Fast Boot". You can find instructions how to disable Fast Boot, here.
If you want to wake/sleep your machines from outside your network, you'll need to setup static DHCP leases, port forwarding, NAT Loopback, and a dynamic DNS service.
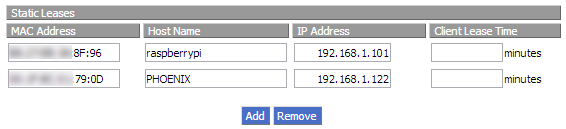
- Log into your Router’s administration panel (in most scenarios you can do this by visiting your Gateway IP from your browser). Find the status page and locate the listing of attached clients. Identify your Raspberry Pi and your computer by their hostnames, and copy down their MAC addresses, and IP addresses. In the screenshot below, the hostname of the computer I want to control is “PHOENIX” and the Pi’s hostname is, appropriately, “raspberrypi.” This will vary by router, but the listing will look something like this (Note: I blurred out some of my personal info):

- Now, find the “DHCP Reservation” or “Static Leases” list in your router’s administration panel. You’ll configure your router to always assign your remote computer and the raspberry pi the same IP address every time they connect to the network. This ensures that you’ll be able to reliably forward data to them through the router. It will look something like this. You can use the currently assigned IP addresses, just make sure that you reserve them for those MAC addresses:
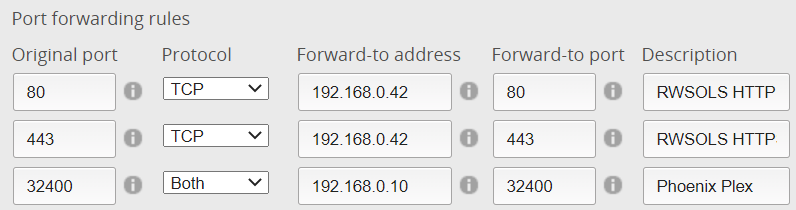
- Next, find the port forwarding configuration screen in your router’s administration panel. You’ll want to route the HTTP port (TCP 80) and HTTPS port (TCP 443) to the Raspberry Pi's IP. These ports will be used to send data to the Raspberry Pi. You’ll also need to forward any remote service ports that you want to use to access the remote computer. If your ISP blocks incoming traffic on port 80 and/or 443, you can route an arbitrary external port to the internal port 80 or 443 on your Raspberry Pi. If you do this, when you eventually access the WOL server, you’ll need to specify the port, like this: wol.example.com:5000. NOTE that if you do this, automatic encryption setup will NOT be possible, so I strongly recommend that you route external port 80 to your Pi if you can. Route the appropriate port for whatever services you want to access on the remote computer. In the screenshot below, I’ve routed port 32400 for Plex Media Server on my Desktop computer that the Pi will will wake up. If you wanted to access an SSH server or SFTP server running on the remote computer, you could additionally route port 22. You can find a listing of ports used by various services on wikipedia. Note that you can always use an arbitrary external port and route it to appropriate internal port. For example, if you wanted to externally access the SSH interface on your desktop, you might consider forwarding external port 5022 to internal port 22 of that computer, since bad actors like to scan the web for open SSH ports and try brute-force attacks on them.
- Ensure that NAT Loopback is enabled on your router. This is necessary for the automatic cert script setup. Most modern routers support this, but you might have to turn it on if it isn't enabled by default.
Your home network is connected to the internet via your router. The WAN port of your router connects to your ISP via a modem, and is assigned a public-facing IP address. If this IP address is static (unchanging) then you can simply point a domain name that you own at this IP address, and you'll be able to access it using that URL. However, most residential ISPs will not assign you a static IP unless you pay extra for the privledge. Instead, your home's public-facing IP is "dynamic" - it is likely to change whenever your modem power-cycles, or at any other interval the ISP deems fit. If your public-facing IP address is constantly changing, then how can we point a URL at this IP? The answer is to use a "Dynamic DNS Service". These services use a small application within your home network to periodically query for your public-facing IP and automatically update your domain name's DNS record to point at your new IP when it changes. This ensures that when you navigate to your URL (like wol.example.com), it will be pointing at your home network's public facing IP.
Before you decide on your preferred approach for updating your DNS entry, decide what kind of URL you want to use. You can either use a free service like no-ip.com (described below) to get a URL like yoursite.no-ip.org, or you can use your own domain/subdomain. For instance, if you already own a domain like johnsmith.com, you might as well just create a subdomain like myhome.johnsmith.com. You're paying for the domain anyways (subdomains won't cost you any extra), and it will be easy for you to remember. Or, you could also just buy a dedicated domain to point at your home, like johns-home.com. Domains have become very affordable in recent years, with .com domains costing only about $10/year. Note that if you plan to enable encryption for your WOL server, and your ISP blocks port 80 traffic, then you must use a domain provider that allows you add DNS TXT records to authenticate a signed certificate. I don't think that the free no-ip.com allows you to do this. If using your own domain name, I suggest transferring your registration to a registrar that natively supports synthetic DDNS records. Google Domains makes it really easy to do this, and its what I used to use for my home's DDNS. When Google sold their domain business to Squarespace, I moved my domains to CloudFlare (where I was already hosting the DNS), which also supports API-based Dynamic DNS changes.
You have two options for how to configure a Dynamic DNS updater client:
- Run ddclient on the Raspberry PI that is hosting your WOL server.
- Use a dynamic DNS updating service that is built into your router, if available.
Option 1 is nice because it keeps all the related functions of the RWSOLS on your Pi. Option 2 is nice because it will continue to work even if you stop needing a WOL Pi server. Option 2 is also more likely to "just work", but it limits the providers that you can use. Instructions for both are provided below.
If you decide to have your Pi update your DDNS entry, just make sure you've selected a domain name provider that is compatible with ddclient: https://sourceforge.net/p/ddclient/wiki/protocols. There are other methods for updating other providers from linux, but they aren't covered in these instructions. You'll follow instructions during the Pi software setup below to setup your ddclient config file.
Sign up for a dynamic DNS updating service that your router supports. Different routers support different services. In the screenshot below, I'm using DynDNS. Unfortunately, DynDNS no longer offers its free services, but NoIP.com does, and is supported by many routers. Another free option is Dynu. Sign up for a free account, and get a URL that looks something like this: yoursite.no-ip.org. Once you’ve got your dynamic DNS account, find the Dynamic DNS (DDNS) updating screen in your router’s administration panel, and enter your account info. Now, you’ll always be able to access your home network, without knowing the IP addresses, and the router will handle automatically updating where the URL directs when your dynamic IP changes!

You're done setting up the network. Time to move on to setting up your actual Raspberry Pi Server!
Now that your router is all set to handle everything, it’s time to get the Raspberry Pi setup. Please note, as of February, 2024, RWSOLS is tested and confirmed to work on the "Bookworm" release of Raspberry Pi OS Lite, with Apache 2.4.57 and PHP 8.2. It likely will not work correctly on pre 2.4.x versions of Apache, as Apache made several non-backwards-compatible changes to config file formats. I suggest you start with a fresh Pi (any model should work) running Raspberry Pi OS Bookworm Lite. It should also work on the previous OS version (Bullseye).
If you need to use older software for some reason, Version 2.x of RWSOLS was tested on Raspbian Jessie and used PHP5/7.0/7.3.
- Setup your Raspberry Pi with Raspberry Pi OS Lite if you haven’t already, and get it connected to your network. I highly recommend using the official Raspberry Pi Imager application to install the LITE version of the Raspberry Pi OS.
- Since you will presumably be running this Pi headless, I suggest using the boot partition special files to enable SSH, and optionally to configure your Wi-Fi interface if this Pi will be be using Wi-Fi instead of Ethernet.
- Access your Raspberry Pi over SSH and log in with the username (pi) and the default password. Then, obviously, change the password!
- Update your Pi, and install Git:
sudo apt update && sudo apt upgrade -y && sudo apt install git -y - Reboot your Pi! This ensures that any new kernels that were installed during the upgrade process are applied:
sudo reboot - SSH back into the pi after it reboots, and ensure you are in the home directory:
cd $HOME - Clone this Repository to your home directory and then enter it:
git clone https://github.com/sciguy14/Remote-Wake-Sleep-On-LAN-Server.git && cd Remote-Wake-Sleep-On-LAN-Server - Run the setup script, which will perform the necessary package installation, configure permissions, and make adjustments to improve security. As with all scripts from the internet, I suggest you read it and understand it before blindly executing it!
python3 setup.py - Follow the instructions in that script until it tells you it is done. The script will automatically handle setting up encryption with an automatically-renewing signed certificate if your Pi can be reached on port 80.
- If your Pi is not reachable on port 80, the script will give you additional options for installing a self-signed cert, or not enabling encryption.
- At the end of the setup process, you will provide a password that will be used to authenticate you, and you'll be dropped into a text editor for the config file where you can enter the IP/MAC/Name info for the computers you wish to wake/sleep.
You can now access your web site at the dynamic DNS URL that you specified! Enjoy Waking and Sleeping remotely.