Home
- No longer Supported
- Introduction
- Using ScratchX
- Writing Extensions for ScratchX
- Sharing Extensions
- Developer FAQ
ScratchX is now archived and no longer supported because Adobe Flash has reached end of life. If you're interested in developing extensions for Scratch, please visit the Scratch-GUI repo as a starting point for building a local version of the Scratch editor. It can be linked to your local version of Scratch-VM, where you can create your own extensions.
ScratchX is a platform that enables people to test experimental functionality built by developers for the visual programming language Scratch. This experimental functionality, which we call Experimental Extensions, makes it possible for Scratch to interface with external hardware and information outside of the Scratch website through new blocks. Some Experimental Extensions enable Scratch to connect with physical hardware, such as robots or programmable devices. Other Experimental Extensions connect web-based data and services to Scratch, such as weather data or text-to-speech services. Extensions are written in JavaScript for the online ScratchX project editor.
This documentation serves as a guide for developers who want to create Experimental Extensions for Scratch and run them on the ScratchX platform. If you are not a developer and have have questions about using ScratchX or Experimental Extensions, please read the ScratchX FAQ. If you are looking for Official Extensions within Scratch, such as the LEGO WeDo, you can learn more about Scratch 2.0 extensions on the Scratch Wiki.
( For information about Scratch 2.0 HTTP extensions please see this page. In this document the word extension will only refer to Scratch 2.0 Javascript Extensions. )
The ScratchX interface is very similar to the Scratch 2.0 interface with the exception of a set of features for loading Experimental Extensions. You can load your extension into ScratchX in the following ways:
The quickest way to get started is to load an extension file into the ScratchX editor. There is a simple example that loads a "random wait" block here. Save that file and then:
- Visit http://scratchx.org/#scratch
- Control-click (or shift-click) on the "Load Experimental Extension" button
- Navigate to your extension file and open it
Your extension should load, and the new blocks it defines should appear in the "More Blocks" area.
Now, when you modify and save the extension file, you can reload it using the button next to the extension name to see your changes.
ScratchX does not host JavaScript extensions directly. Instead, we provide a way to load a publicly-accessible JavaScript extensions within the ScratchX editor. Currently hosts for JavaScript extensions are restricted to the github.io domain.
To create a publicly accessible JavaScript extension, you need to
- Create a public repository on Github
- Create a
gh-pagesbranch in that repository - Clone the branch locally and then
git addandgit committhe JavaScript files to thegh-pagesbranch. - Push the updated branch to Github
This will utilize the Pages service of GitHub to make the JavaScript files available over <your_github_username>.github.io/<repository_name>. Details on how to use Github Pages are available here.
You will also need to set up a crossdomain.xml file.
Need to encourage people to think about backwards compatibility
Next, to link ScratchX to your hosted file, click on the ‘Load Experimental Extension’ from within the ‘More Blocks’ category in the blocks menu:
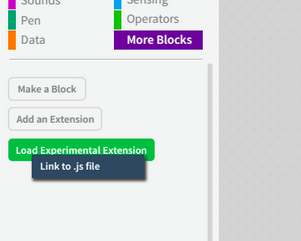
This launches a dialogue that prompts you to link to the JavaScript file hosted on Github.io. You’ll need to copy the link to your publicly-hosted JS file on Github and then paste it into the box on the dialogue:

You can load an SBX (.sbx) file that contains a pointer to your extension from the homepage directly through this element:

The same dialogue can be launched from within Scratch by clicking on the green ‘Load Experimental Extension’ in the top right or from within the ‘More Blocks’ section of the blocks menu:

For help on creating SBX files / projects with pointers to Github-hosted JS files, see our documentation on sharing here.
Developers who have hosted their extensions (.js file) or sample projects (.sbx file) on Github can create a ScratchX url that points directly to their extension. This link can then be shared with the public. Learn how to generate the ScratchX link later on in this documentation.
Users can then visit that URL directly in their browsers or enter it into the homepage element on ScratchX.org:

Writing a Javascript extension for Scratch 2.0 starts with some boilerplate code, which looks like the following:
(function(ext) {
    // Cleanup function when the extension is unloaded
    ext._shutdown = function() {};

    // Status reporting code
    // Use this to report missing hardware, plugin or unsupported browser
    ext._getStatus = function() {
        return {status: 2, msg: 'Ready'};
    };

    // Block and block menu descriptions
    var descriptor = {
        blocks: [
        ]
    };

    // Register the extension
    ScratchExtensions.register('Sample extension', descriptor, ext);
})({});An extension may define a number of blocks, of different types (e.g. a command block, or a hat block, or a reporter block). Blocks can take in parameters.
To add a simple command block, there needs to be an entry in the descriptors.blocks list, and a corresponding function for it. The simplest block possible is shown below (it does nothing).
(function(ext) {
    // Cleanup function when the extension is unloaded
    ext._shutdown = function() {};

    // Status reporting code
    // Use this to report missing hardware, plugin or unsupported browser
    ext._getStatus = function() {
        return {status: 2, msg: 'Ready'};
    };

    ext.my_first_block = function() {
        // Code that gets executed when the block is run
    };

    // Block and block menu descriptions
    var descriptor = {
        blocks: [
            // Block type, block name, function name
            [' ', 'my first block', 'my_first_block'],
        ]
    };

    // Register the extension
    ScratchExtensions.register('My first extension', descriptor, ext);
})({});Sometimes it is necessary to have a command block that waits (e.g. if a block plays a sound, it may be a good idea to wait till the sound playback finishes). The sample extension below implements a "random wait" block to show how that can be done. Note the use of the console.log statement in the code - most Javascript methods, as well as jQuery methods will work fine in an extension.
(function(ext) {
    // Cleanup function when the extension is unloaded
    ext._shutdown = function() {};

    // Status reporting code
    // Use this to report missing hardware, plugin or unsupported browser
    ext._getStatus = function() {
        return {status: 2, msg: 'Ready'};
    };

    // Functions for block with type 'w' will get a callback function as the
    // final argument. This should be called to indicate that the block can
    // stop waiting.
    ext.wait_random = function(callback) {
        wait = Math.random();
        console.log('Waiting for ' + wait + ' seconds');
        window.setTimeout(function() {
            callback();
        }, wait*1000);
    };

    // Block and block menu descriptions
    var descriptor = {
        blocks: [
            ['w', 'wait for random time', 'wait_random'],
        ]
    };

    // Register the extension
    ScratchExtensions.register('Random wait extension', descriptor, ext);
})({});Blocks can also return values, and they are called reporter blocks. The corresponding JavaScript function for a reporter block needs to return a value, as shown in the example below (note that this example also shows how to make blocks accept parameters).
(function(ext) {
    // Cleanup function when the extension is unloaded
    ext._shutdown = function() {};

    // Status reporting code
    // Use this to report missing hardware, plugin or unsupported browser
    ext._getStatus = function() {
        return {status: 2, msg: 'Ready'};
    };

    ext.power = function(base, exponent) {
        return Math.pow(base, exponent);
    };

    // Block and block menu descriptions
    var descriptor = {
        blocks: [
            // Block type, block name, function name, param1 default value, param2 default value
            ['r', '%n ^ %n', 'power', 2, 3],
        ]
    };

    // Register the extension
    ScratchExtensions.register('Sample extension', descriptor, ext);
})({});One common use-case for reporter blocks is getting data from online web-services, where the blocks need to wait for the web-api call to complete. The following example shows how to fetch the current temperature of a city using an AJAX call to Open Weather Map API. Note that the block type is R instead of r (which is for a non-blocking reporter).
(function(ext) {
    // Cleanup function when the extension is unloaded
    ext._shutdown = function() {};

    // Status reporting code
    // Use this to report missing hardware, plugin or unsupported browser
    ext._getStatus = function() {
        return {status: 2, msg: 'Ready'};
    };

    ext.get_temp = function(location, callback) {
        // Make an AJAX call to the Open Weather Maps API
        $.ajax({
              url: 'http://api.openweathermap.org/data/2.5/weather?q='+location+'&units=imperial',
              dataType: 'jsonp',
              success: function( weather_data ) {
                  // Got the data - parse it and return the temperature
                  temperature = weather_data['main']['temp'];
                  callback(temperature);
              }
        });
    };

    // Block and block menu descriptions
    var descriptor = {
        blocks: [
            ['R', 'current temperature in city %s', 'get_temp', 'Boston, MA'],
        ]
    };

    // Register the extension
    ScratchExtensions.register('Weather extension', descriptor, ext);
})({});
Hat blocks go on top of block stacks - examples of Scratch hat blocks include "when green flag clicked" or "when this sprite clicked". To create a hat block through an extension, the block type needs to be set to h, as shown in the example below.
(function(ext) {
    var alarm_went_off = false; // This becomes true after the alarm goes off

    // Cleanup function when the extension is unloaded
    ext._shutdown = function() {};

    // Status reporting code
    // Use this to report missing hardware, plugin or unsupported browser
    ext._getStatus = function() {
        return {status: 2, msg: 'Ready'};
    };

    ext.set_alarm = function(time) {
       window.setTimeout(function() {
           alarm_went_off = true;
       }, time*1000);
    };

    ext.when_alarm = function() {
       // Reset alarm_went_off if it is true, and return true
       // otherwise, return false.
       if (alarm_went_off === true) {
           alarm_went_off = false;
           return true;
       }

       return false;
    };

    // Block and block menu descriptions
    var descriptor = {
        blocks: [
            ['', 'run alarm after %n seconds', 'set_alarm', '2'],
            ['h', 'when alarm goes off', 'when_alarm'],
        ]
    };

    // Register the extension
    ScratchExtensions.register('Alarm extension', descriptor, ext);
})({});
The extension descriptor can be used for more than just listing the blocks offered by your extension. Here is an example of a more complex descriptor:
var descriptor = {
    blocks: [
        ['w', 'turn motor on for %n secs',             'motorOnFor', 1],
        [' ', 'turn motor on',                         'allMotorsOn'],
        [' ', 'turn motor off',                        'allMotorsOff'],
        [' ', 'set motor power %n',                    'startMotorPower', 100],
        [' ', 'set motor direction %m.motorDirection', 'setMotorDirection', 'this way'],
        ['h', 'when distance %m.lessMore %n',          'whenDistance', '<', 20],
        ['h', 'when tilt %m.eNe %n',                   'whenTilt', '=', 1],
        ['r', 'distance',                              'getDistance'],
        ['r', 'tilt',                                  'getTilt']
    ],
    menus: {
        motorDirection: ['this way', 'that way', 'reverse'],
        lessMore: ['<', '>'],
        eNe: ['=','not =']
    },
    url: 'http://info.scratch.mit.edu/WeDo',
    displayName: 'LEGO WeDo 1.0'
};The blocks property is an array of block definitions. Each block definition is an array of three or more items. The required items are: op code, formatted label, and method name. These may optionally be followed by default block argument values.
The full list of block types available to an extension is as follows. Note that any operation that will run for more than a few milliseconds or will wait for an external event should be run asynchronously, as described above in the Reporter blocks that wait and Command blocks that wait sections.
| Op Code | Meaning |
|---|---|
' ' (space) |
Synchronous command |
'w' |
Asynchronous command |
'r' |
Synchronous reporter |
'R' |
Asynchronous reporter |
'h' |
Hat block (synchronous, returns Boolean, true = run stack) |
'b' |
Boolean reporter (like 'r' but returns only true or false) |
Each block argument is identified by a % character and the character following it specifies the type. The types are: %n for number, %s for string, and %m for menu. Menus also identify which menu to use with a period and the name of the menu like this: %m.menuName.
The menus property is an object whose properties define the menus used by block arguments in the extension. The property name is the menu name as it is used in the block definition(s). The property value is an array of options to display in the menu dropdown interface in Scratch.
For example, the setMotorDirection block in the example above includes %m.motorDirection, which will cause it to display a menu with 'this way', 'that way', and 'reverse' as options.
The url property refers to a web page which describes the extension. Ideally, this page would describe each block, give examples, and identify any hardware or software required to use the extension. If the user clicks the 'About [extension name]...' menu item within Scratch, this is the URL that will be opened.
If present, the displayName property will be used instead of the name given to ScratchExtensions.register when the extension is displayed to the user, such as in the Extension header in the More Blocks Scratch palette.
Scratch provides its own set of APIs in order to allow extensions to access certain types of hardware. Currently, Scratch extensions may access the following types of hardware:
- Serial devices such as the PicoBoard
- USB HID devices such as joysticks or the LEGO WeDo
Extensions that request hardware access are required to implement two additional methods on the extension instance: _deviceConnected() and _deviceRemoved(). Both methods receive a device instance. To use the integrated hardware functions of the Scratch Extension API you pass the hardware information in the registration call:
ScratchExtensions.register('Example Name', descriptor_object, ext_instance[, hardware_info]);The _getStatus() method of your extension can be used to indicate whether your extension has successfully communicated with a hardware device. For example:
ext._getStatus = function() {
    if(!device) return {status: 1, msg: 'Device not connected'};
    return {status: 2, msg: 'Device connected'};
}
The value returned by _getStatus() corresponds to the color of the status 'light' in Scratch and indicates the general state of your extension. The msg property can be used to provide more specific information.
| Value | Color | Meaning |
|---|---|---|
| 0 | red | error |
| 1 | yellow | not ready |
| 2 | green | ready |
The details of the hardware_info parameter and the _deviceConnected() and _deviceRemoved() methods are described below in sections specific to each type of device.
API Note: The hardware API is still somewhat experimental and may change in the future. In particular, we recently made a change to methods that return hardware data, such as read() for HID devices: these methods now take a callback instead of returning data directly. This change is necessary to improve compatibility and allow us to expand the variety of environments in which hardware extensions are available.
An example HID device extension is available here. More information about the HID protocol is available here.
To let the extension system know that your extension is interested in USB HID devices, pass an object like this for the hardware_info parameter of the register() method:
var hid_info = {type: 'hid', vendor: 0x0694, product: 0x0003};
ScratchExtensions.register('Example', descriptor, ext, hid_info);
The vendor and product values indicate the USB vendor and product ID of the device your extension supports. These values are frequently expressed as four-digit hexadecimal values, as indicated with the 0x prefix in the JavaScript above.
If a device is connected with matching vendor and product IDs, Scratch will call the _deviceConnected() method on your extension and pass an object representing that device. Your _deviceConnected() method should keep track of the device object and set up communication as necessary for your needs. For example, this will start polling the device for new HID data every 20 milliseconds:
var poller = null;
function deviceOpened(dev) {
    // if device fails to open, forget about it
    if (dev == null) device = null;

    // otherwise start polling
    poller = setInterval(function() {
        rawData = device.read();
    }, 20);
};
ext._deviceConnected = function(dev) {
    if(device) return;

    device = dev;
    device.open(deviceOpened);
};
Once a connection to your device is established, your extension may use the read() and write() methods on the device object to communicate with it. These methods use ArrayBuffer objects to contain data being sent or received.
-
device.read(48, callback)will attempt to read 48 bytes of data and callcallbackwith an ArrayBuffer containing any data successfully read. Note that one packet of HID data is 48 bytes. This method recently changed. See the API Note above. -
device.write(buffer)will send the given ArrayBuffer's data to the device.
Your extension will also be notified if a matching device is disconnected, allowing your extension a chance to stop communication:
ext._deviceRemoved = function(dev) {
    if(device != dev) return;
    if(poller) poller = clearInterval(poller);
    device = null;
};
Finally, your extension's _shutdown() method will be executed when the extension itself is shut down. For example:
ext._shutdown = function() {
    if(poller) poller = clearInterval(poller);
    if(device) device.close();
    device = null;
}An example serial device extension is available here.
To let the extension system know that your extension is interested in serial devices, pass an object like this for the hardware_info parameter of the register() method:
var serial_info = {type: 'serial'};
ScratchExtensions.register('Example', descriptor, ext, serial_info);
Your extension's _deviceConnected() method will be called for each serial port present on the computer. Your extension is responsible for checking if a suitable device is attached to that port and continuing on to the next port if necessary. Do not assume that the first time Scratch calls your _deviceConnected() will correspond to your device's serial port. The PicoBoard extension shows an example of how to deal with this situation: if no valid PicoBoard communication is received on a given port within a particular timeout, the extension assumes that there is no PicoBoard on that port and continues scanning to the next port.
var potentialDevices = [];
ext._deviceConnected = function(dev) {
    potentialDevices.push(dev);

    if (!device) {
        tryNextDevice();
    }
}
To communicate with a given serial port, your extension should open it with whichever options are appropriate for your device. These parameters are based on Boost.Asio's serial port options. For a PicoBoard:
device.open({ stopBits: 0, bitRate: 38400, ctsFlowControl: 0 }, deviceOpened);The full set of options available for a serial port are as follows:
| Option | Default | Valid values | Description |
|---|---|---|---|
| bitRate | 9600 | Any valid baud rate | Up to The bit (or baud) rate at which to communicate. |
| bufferSize | 4096 | Up to 8192 | The maximum amount of data that can be received at a time. |
| ctsFlowControl | 1 (software) | 0 (none), 1 (software), 2 (hardware) | The type of flow control to use. |
| dataBits | 8 | 5, 6, 7, 8 | The number of data bits per character. |
| parityBit | 0 (none) | 0 (none), 1 (odd), 2 (even) | Whether and how to use the parity bit in each character. |
| stopBits | 1 (1.5 bits) | 0 (1 bit), 1 (1.5 bits), 2 (2 bits) | The number of stop bits per character. |
Once a connection to your device is established, your extension may use the send() method to send data to your device, and the set_receive_handler() method to register a function to handle received data. These methods use ArrayBuffer objects to contain data being sent or received.
-
device.send(buffer)will send the given ArrayBuffer's data to the device. -
device.set_receive_handler(myReceiveHandler)will result inmyReceiveHandler(buffer)being called any time Scratch receives data from the device. Your receive handler will be supplied an ArrayBuffer containing the received data.
Your extension will also be notified if a device is disconnected, allowing your extension a chance to stop communication:
ext._deviceRemoved = function(dev) {
    if(device != dev) return;
    if(poller) poller = clearInterval(poller);
    device = null;
};
Finally, your extension's _shutdown() method will be executed when the extension itself is shut down. For example:
ext._shutdown = function() {
    if(poller) poller = clearInterval(poller);
    if(device) device.close();
    device = null;
}ScratchX does not host JavaScript extensions. Instead, we provide a way to link ScratchX to a Github-hosted JavaScript extension. ScratchX can also point to a Github-hosted project file (.sbx) that in turn points to a Github-hosted JavaScript (.js) file. This is particularly useful if you’d like to share a demo project that makes use of an experimental extension.
The first step is to set up a Github account if you don’t already have one, and push your JS file and/or SBX file to a Github page. You will also need to set up a crossdomain.xml file.
ScratchX can automatically load an extension or project specified on its URL. To do this, simply add ?url=https://... to the end of the ScratchX URL. For example, if your extension is at https://user.github.io/repository/extension.js then your ScratchX URL would be:
http://scratchx.org/?url=https://user.github.io/repository/extension.js
Just as saving a project from Scratch keeps track of the extensions used by the project, saving a project .sbx file from ScratchX keeps track of the GitHub URLs of the experimental extensions in use. As an extension author, this means that you can save an example project and share that .sbx file to give others an idea of what can be done with your extension.
You can construct a URL for a project .sbx file the same way as for an extension. For example, if your project is at https://user.github.io/repository/example.sbx then your ScratchX URL would be:
http://scratchx.org/?url=https://user.github.io/repository/example.sbx
Clicking on these URLs will open a ScratchX editor with your extension and/or project data loaded from Github. You can now share that link with the world!
In order for ScratchX to load your extensions and sample projects from GitHub Pages, you will need to put a file called crossdomain.xml into your user or organization repository. This security file lets Flash know that it is allowed to load resources from your site. It will grant Flash access to files on your public repositories, but will not grant access to any private repositories. For more information about crossdomain.xml, please see this article on Adobe Developer Connection.
Please note that the crossdomain.xml file must be in the root of the host. That is, if your extension file is at https://user.github.io/repository/extension.js then Flash will look for https://user.github.io/crossdomain.xml. This means that the crossdomain.xml file cannot be a part of a project repository.
Follow these steps to set up a basic crossdomain.xml that will grant access only to ScratchX:
- Follow the instructions on the GitHub Pages site to create a user or organization repository and then clone the repository.
- Instead of (or in addition to) creating an
index.htmlfile, create a file calledcrossdomain.xml-- see example below. - Commit the
crossdomain.xmlfile and push or sync it to GitHub as shown in the GitHub Pages instructions.
Here is an example crossdomain.xml suitable for use with ScratchX:
<cross-domain-policy xmlns:xsi="http://www.w3.org/2001/XMLSchema-instance" xsi:noNamespaceSchemaLocation="http://www.adobe.com/xml/schemas/PolicyFile.xsd">
  <site-control permitted-cross-domain-policies="master-only"/>
  <allow-access-from domain="scratchx.org" secure="false"/>
  <allow-access-from domain="llk.github.io"/>
</cross-domain-policy>ScratchX is a platform that enables people to test experimental functionality built by developers for the visual programming language Scratch.
Scratch is a programming language and online community where you can create your own interactive stories, games, and animations. ScratchX is a separate experimental platform built to test experimental Scratch features, also known as Experimental Extensions. There is no login or community component to ScratchX, and projects created within ScratchX can only be run on ScratchX.
Scratch extensions make it possible for Scratch to interface with external hardware and information outside of the Scratch website through new blocks. Extensions are written in JavaScript for the ScratchX project editor.
Experimental Extensions are extensions created for Scratch by the community; they are not managed or endorsed by Scratch in any way. Experimental Extensions can run only in the ScratchX environment. Official Extensions can be found and run from within Scratch 2.0 (both online and offline editors), accessible in the ‘More Blocks’ section of the blocks menu.
At this time, we’re focused on gathering a number of Experimental Extensions to post on the ScratchX site. We plan to work with developers over time to bring many of these Experimental Extensions into Scratch as official extensions.
If you’d like to suggest your extension be highlighted on ScratchX, please email us at scratch-extensions@scratch.mit.edu. We’ll be in touch!
Here are some of the criteria we’ll be using to decide whether or not to add an extension to the library:
- Security
- Ease of Use
- Quality (documentation, design, code)
- Requirements (browsers, operating system, hardware, etc)
- Content (age-appropriate, copyright infringement)
You can find a number of highlighted extensions on ScratchX on the 'All Extensions' page. There is also a community-curated list of extensions that can be found on the ScratchX wiki.
Since you’re hosting your extension on your own GitHub account, you don’t have to worry right now about licensing your extension in any particular way for use on the ScratchX page. However, developers whose extensions are added to the main Scratch site will need to license their work to be compatible with the main Scratch code under GPL v2.0.
Developers with a GitHub account and a knowledge of JavaScript can create and test Experimental Extensions on ScratchX. To learn more about how to make extensions, see our documentation here
You can learn more about how to create a Scratch extension in our documentation here
The easiest way to share your experimental extension is to create a scratchx.org url that points to your extension (hosted on GitHub). You can learn more about sharing your extension here.
The SBX (.sbx) ScratchX file format is the file format used to encode ScratchX projects when they are downloaded to a user's computer. SBX files can only be used on the ScratchX site. Other Scratch environments use different formats, including the .sb2 format for Scratch 2.0 (read more here) and .sb format for Scratch 1.4 (read more here)
Experimental Extensions are extensions created for Scratch by the community and are not managed or endorsed by Scratch in any way. Because of this, we do not allow Experimental Extensions to run on the larger Scratch site.
Once you’ve published your code on Github, post a link to it in the Scratch extension developers forum asking other developers for help.
We plan to phase out the older Experimental Extensions platform on Scratch 2.0 at the end of November 2015. We encourage everyone to migrate their extensions out of Scratch 2.0 and into GitHub for use in ScratchX before November 2015.
We would love to hear your thoughts and suggestions. Submit them as issues here on our GitHub repository.