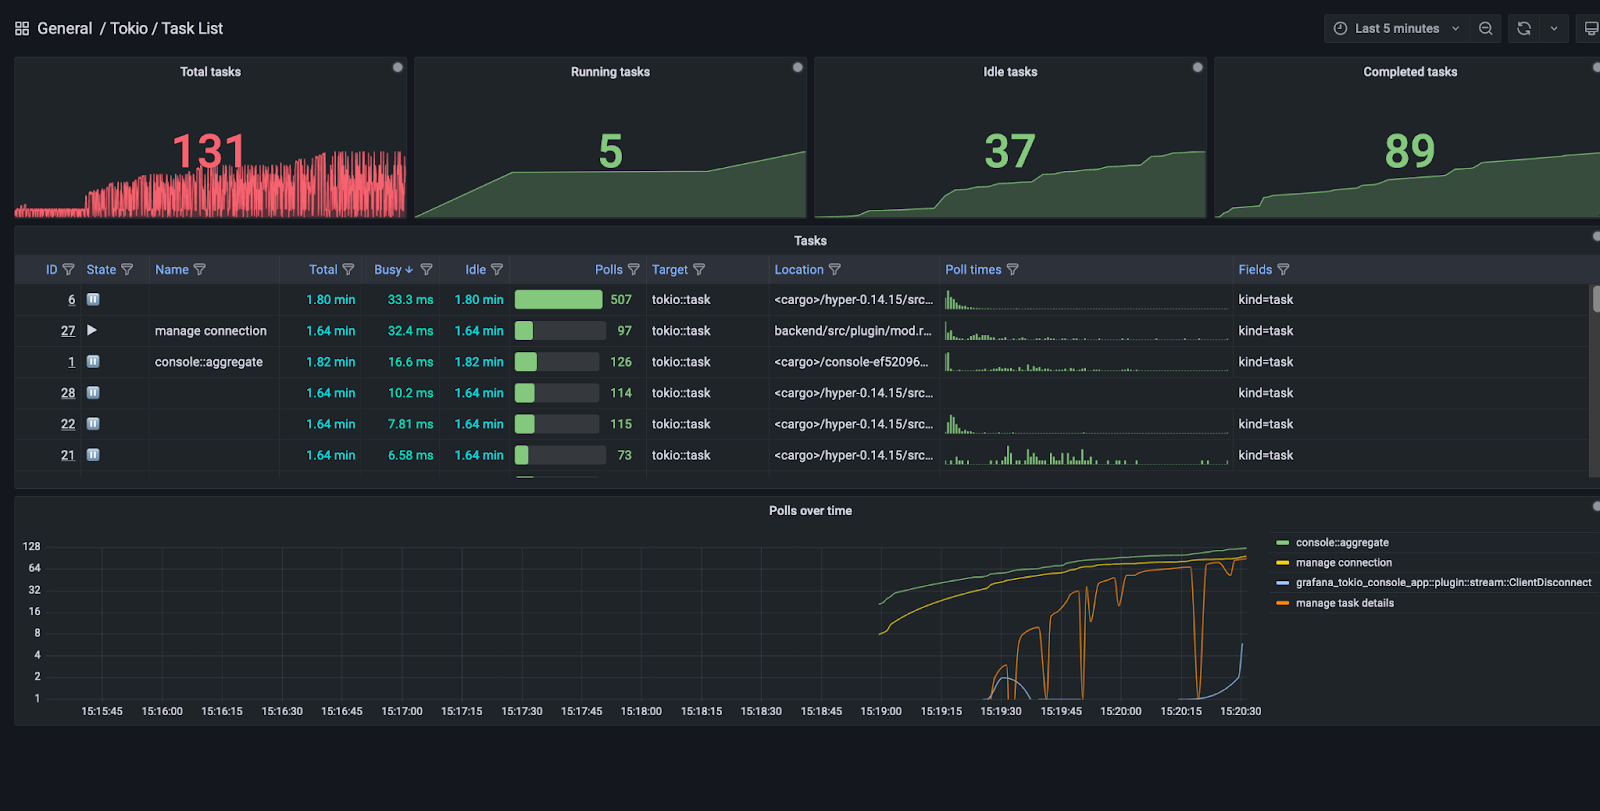
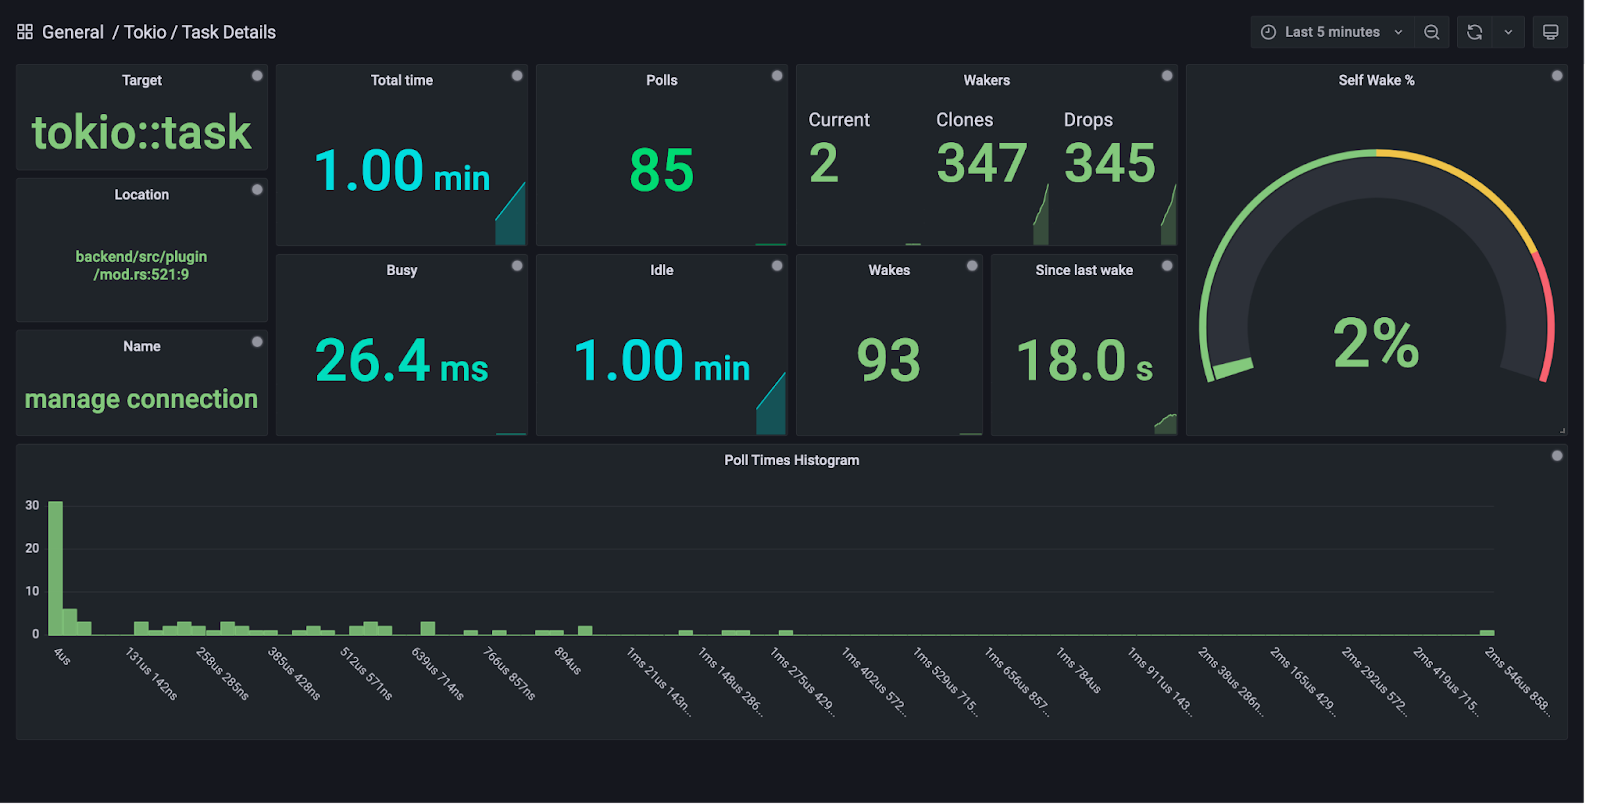
This is a streaming Grafana data source which can connect to the Tokio console subscriber. It provides similar functionality to the console TUI frontend (albeit more limited at the moment!).
# On Linux or MacOS
docker run --rm -p 3000:3000 sd2k/grafana:with-tokio-console-datasource
# Or, on Linux, if you want to access console-enabled processes running on the host
docker run --rm --net=host sd2k/grafana:with-tokio-console-datasource
This will start a custom-built Grafana build serving on port 3000 with the Console datasource already installed.
Three datasources will already be configured:
- Tokio Console - Grafana plugin - connects to the console-enabled Grafana plugin backend itself, as an example. Note that the plugin serves on
localhost:6668. - Tokio Console - localhost:6669 - connects to a console-enabled process at
localhost:6669, the default address - Tokio Console - host.docker.internal:6669 - connects to a console-enabled process at
host.docker.internal:6669. On MacOS (and possibly Windows - untested) this lets the Grafana process running inside Docker communicate with processes running outside Docker using the specialhost.docker.internaladdress.
The plugin is available on the Grafana plugin marketplace so can be installed from there similarly to any other plugin.
At the repository root:
-
Install dependencies
yarn install
-
Build plugin in development mode or run in watch mode
yarn dev
or
yarn watch
-
Build plugin in production mode
yarn build
Make sure you have a recent version of Rust (run rustup update stable), and install cargo-watch.
Then run:
cargo xtask watchThis will run the watch task using the cargo-xtask pattern, which rebuilds the backend component on changes, copies the binary into the correct location, and restarts the plugin process (which Grafana subsequently restarts).
You'll need to clone a fork Grafana and run a specific branch to get some nice extra things working (namely the poll time histograms inside the main task list table):
-
Clone Grafana
git clone git@github.com/sd2k/grafana
-
Check out the custom branch
git checkout table-charts
-
Build the frontend
yarn && yarn devor, to watch for changes
yarn && yarn watch -
Change some config - make sure to change the 'plugins' path to the parent directory of this repo.
cat <<EOF > conf/custom.ini
app_mode = development
[log]
level = debug

[paths]
plugins = /Users/ben/repos/grafana-plugins  # or wherever you cloned this repo

[plugins]
plugin_admin_enabled = true
-
Run the Grafana backend
make run
-
Add a Tokio Console datasource
In your browser, navigate to http://localhost:3000/datasources/new, find the 'Tokio Console' datasource, and add a new instance Using the placeholder value of http://127.0.0.1:6669 should work; this datasource instance will connect to the plugin backend process itself, which is serving the console subscriber service.
You can then head to the datasource's Dashboards tab and import the provided dashboards.
-
Install the relevant cross compiler toolchains. Using Homebrew:
brew tap messense/macos-cross-toolchains
brew install armv7-unknown-linux-musleabihf
brew install aarch64-unknown-linux-musl
brew install x86_64-unknown-linux-musl
brew install mingw-w64
-
Install the relevant Rust targets. Using
rustup:rustup target add armv7-unknown-linux-musleabihf rustup target add aarch64-apple-darwin rustup target add x86_64-apple-darwin rustup target add aarch64-unknown-linux-musl rustup target add x86_64-unknown-linux-musl rustup target add x86_64-pc-windows-gnu
-
Run the following to compile the plugin in release mode for each target:
CARGO_TARGET_ARMV7_UNKNOWN_LINUX_MUSLEABIHF_LINKER=armv7-unknown-linux-musleabihf-ld cargo build --release --target armv7-unknown-linux-musleabihf
cargo build --release --target aarch64-apple-darwin
cargo build --release --target x86_64-apple-darwin
CARGO_TARGET_AARCH64_UNKNOWN_LINUX_GNU_LINKER=aarch64-unknown-linux-gnu-gcc cargo build --release --target aarch64-unknown-linux-gnu
CARGO_TARGET_AARCH64_UNKNOWN_LINUX_MUSL_LINKER=aarch64-unknown-linux-musl-gcc cargo build --release --target aarch64-unknown-linux-musl
CARGO_TARGET_X86_64_PC_WINDOWS_GNU_LINKER=x86_64-w64-mingw32-gcc cargo build --release --target x86_64-pc-windows-gnu