
to.get is an application created by team See Shore of the CDM to facilitate group buying on campus and to tackle plastic waste reduction. for additional resources, such as the full report and video of the process, click here: https://bit.ly/togetcdm
Developers: James Chung (UBC), Jaddie Tan (SFU)
Product Owners: Xiao Chen (CDM), Javier (Monkey) Fernandez (CDM)
Project Manager: Maia Puyat (CDM)
UI/UX Designer: Oscar Chu (CDM)
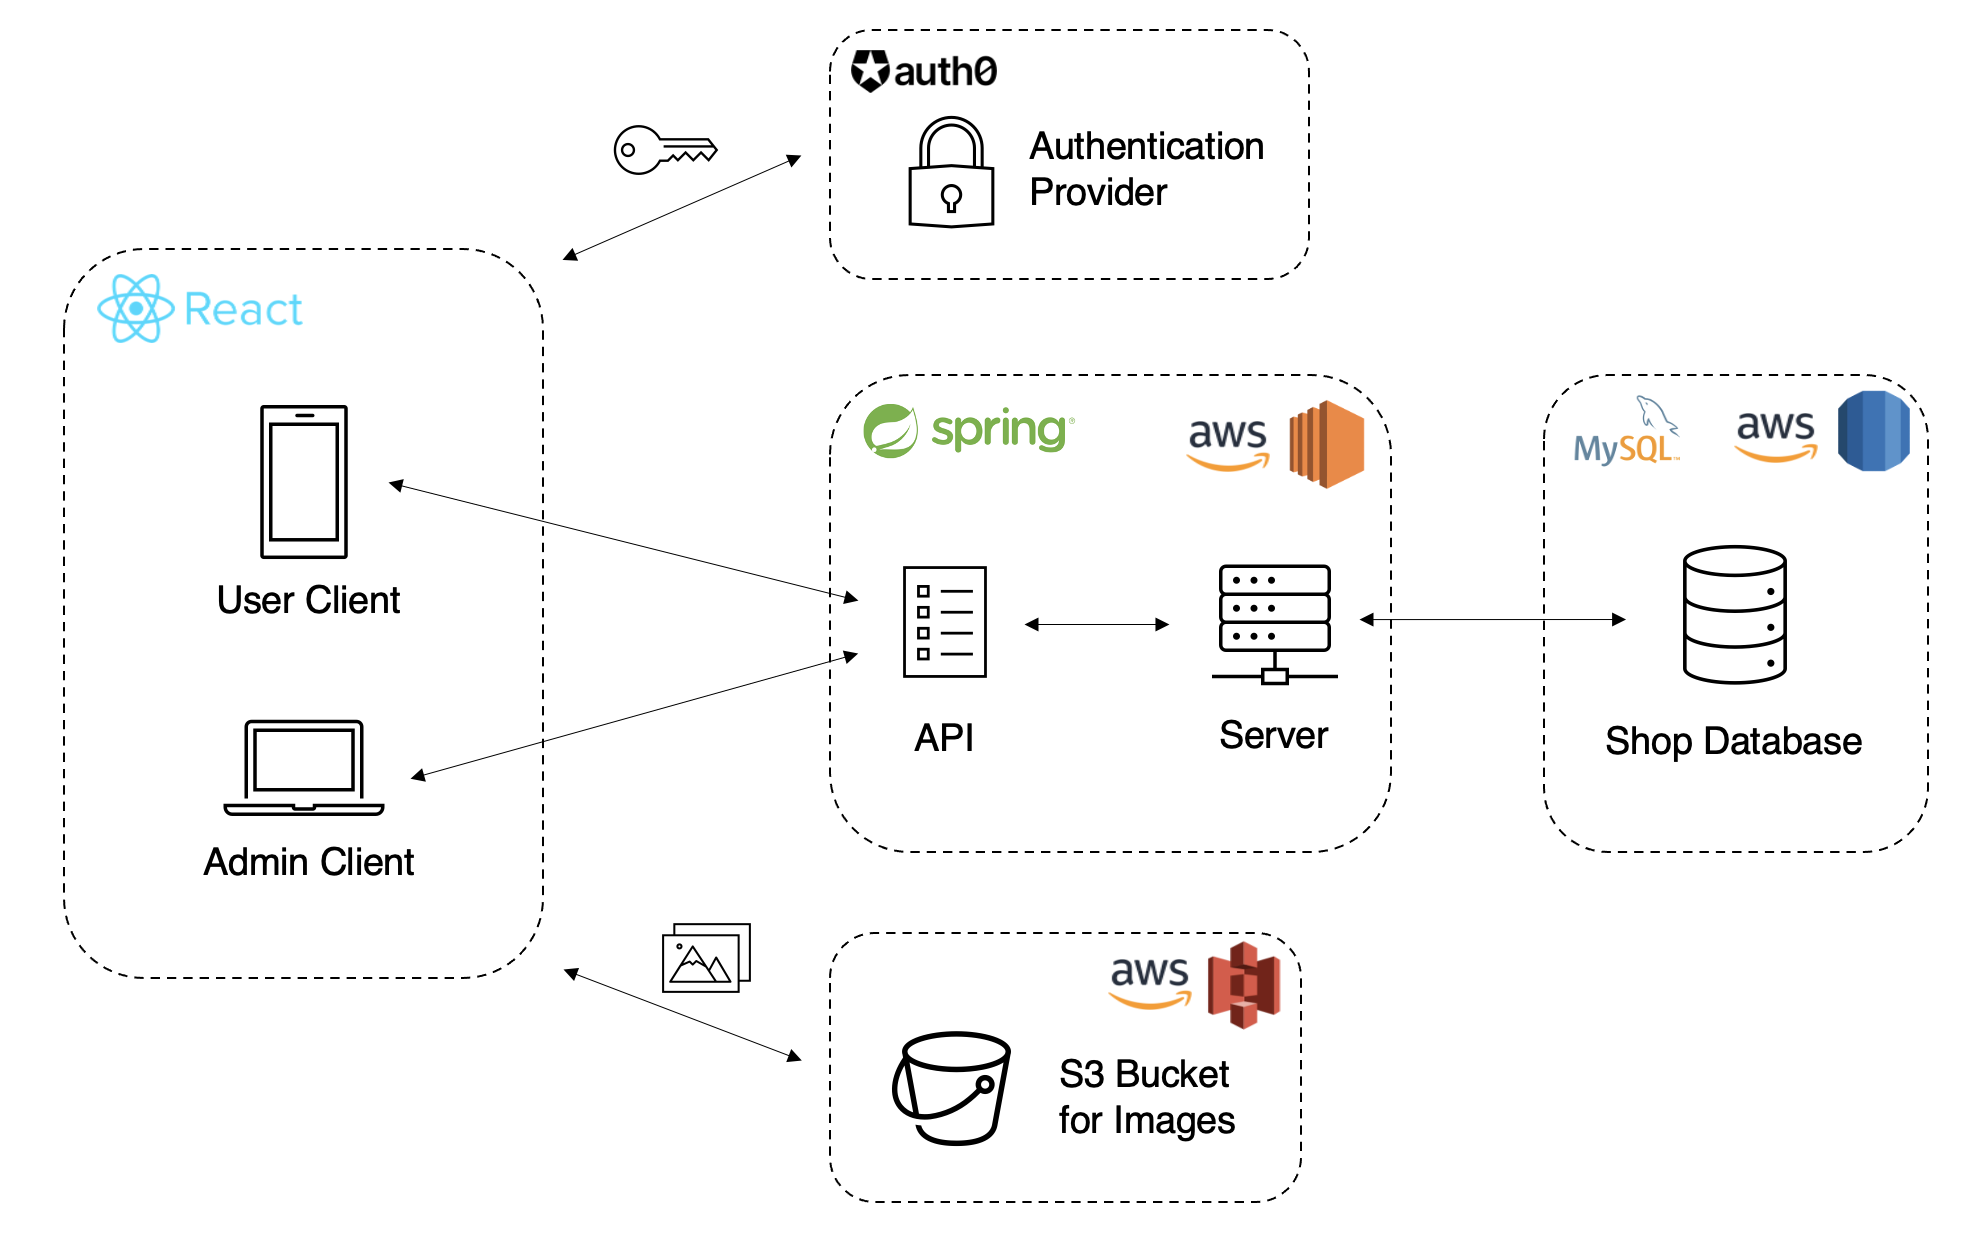
- Spring Boot server
- React.js & Redux.js client
- MUI components
- AWS RDS MySQL DB
- Images hosted on AWS S3
- Server hosted on AWS EC2
After cloning the repository, go to the root directory of the project and:
cd ./src/main/resources
touch application.yml
In the new YAML file, paste:
spring:
  datasource:
    username: admin
    password: <DB_PASSWORD>
    url: jdbc:mysql://toget-db.cq3uctxl0ape.us-west-2.rds.amazonaws.com:3306/toget
    driverClassName: com.mysql.cj.jdbc.Driver
  jpa:
    hibernate:
      ddl-auto: update
      dialect: org.hibernate.dialect.MySQL5Dialect
    generate-ddl: true
    show-sql: true
aws:
  accessKey: <ACCESS_KEY>
  secretKey: <SECRET_KEY>
  s3:
    region: us-west-2
    bucketName: to-get
server:
  port: 443
  http:
    port: 80
  ssl:
    enabled: true
    certificate-private-key: cert/privkey.pem
    certificate: cert/fullchain.pem
security:
  require-ssl: true
  basic:
    enabled: false
Ask the project admins for credentials to the AWS RDS database and the S3 bucket and replace the password and key placeholders above.
After cloning the repository, go to the root directory of the project and:
cd ./client
touch .env
In the .env file, paste:
REACT_APP_AUTH0_DOMAIN=<AUTH0_DOMAIN>
REACT_APP_AUTH0_CLIENT_ID=<AUTH0_CLIENT_ID>
REACT_APP_AUTH0_CONNECTION=<AUTH0_CONNECTION>
Ask the project admins for the Auth0 details and replace the placeholders above.
The server runs on port 8080 and the client runs on port 3000.
Server base URL: http://localhost:8080/
Client base URL: http://localhost:3000/
- To run the server, remove the
serverandsecuritysections of theapplication.ymlfile. You will also need to temporarily delete or comment out the/config/PortConfig.javaconfiguration file. Then use the IDE (IntelliJ recommended) to build the project and run it. - To run the client, go to the root of the
clientdirectory andnpm start.
The client is built using Webpack (refer to scripts.build in package.json). In the client root directory, create a new webpack.config.js file.
Paste the following into webpack.config.js and replace the Auth0 placeholders at the end of the file.
var path = require('path');
var webpack = require('webpack');

module.exports = {
  entry: './src/index.js',
  devtool: 'source-map',
  cache: true,
  mode: 'development',
  output: {
    path: __dirname,
    filename: '../src/main/resources/static/built/bundle.js'
  },
  module: {
    rules: [
      {
        test: path.join(__dirname, '.'),
        exclude: [/(node_modules)/, /\.json$/],
        use: [{
          loader: 'babel-loader',
          options: {
            presets: ['@babel/preset-env', '@babel/preset-react']
          }
        }]
      },
      {
        test: /\.(png|jpg|jpeg)$/,
        use: [
          {
            loader: 'url-loader',
            options: {
              limit: 8192
            }
          }
        ]
      },
      {
        test: /\.css$/,
        use: [
          { loader: 'style-loader' },
          { loader: 'css-loader' }
        ]
      }
    ]
  },
  plugins: [
    new webpack.DefinePlugin({
      "process.env": {
        "REACT_APP_AUTH0_DOMAIN": JSON.stringify(<AUTH0_DOMAIN>),
        "REACT_APP_AUTH0_CLIENT_ID": JSON.stringify(<AUTH0_CLIENT_ID>),
        "REACT_APP_AUTH0_CONNECTION": JSON.stringify(<AUTH0_CONNECTION>)
      }
    }),
  ]
};
Then run the build by executing npm build from the client root directory. The build file will be found in ./src/main/resources/static/built/bundle.js from the project root.
The server can be built by running mvn clean install from the project root. This will build the .jar file, which will also contain the client build (bundle.js). Copy the .jar file into the EC2 instance. The .jar can be run by itself without any support (no need for Apache or Tomcat).