2 Github workflow
Please make sure that before you get started, you completed the First time setup of Git and Github.
- Overview of the workflow
- Step 0: Open project in RStudio
- Step 1: Pull remote repository
- Step 2: Create a branch
- Step 3: Write code and commit changes
- Step 4: Push changes to Github
- Step 5: Pull request - Integrate your changes into the main branch
The basic idea of the workflow is that the main branch of the repository remains clean and contains only accepted and reviewed code. The main branch will later also be the version of the project that is published.
Therefore, you cannot work directly to the main branch. Instead, you or your team work on your own separate branch and when the code is ready you create a pull request to integrate your code into the main codebase.
The basic steps of such a workflow are shown in the figure below. Every step of the process is described in detail in the following. But the general idea is:
- Pull the most current version of the repository from Github (the remote) onto your machine.
- Create a separate branch for you/your team.
- Work on the code and commit your changes to your branch.
- Push your local branch and changes to Github.
- When you are finished with the code, create a pull request that can be reviewed and then accepted into the
maincode base.
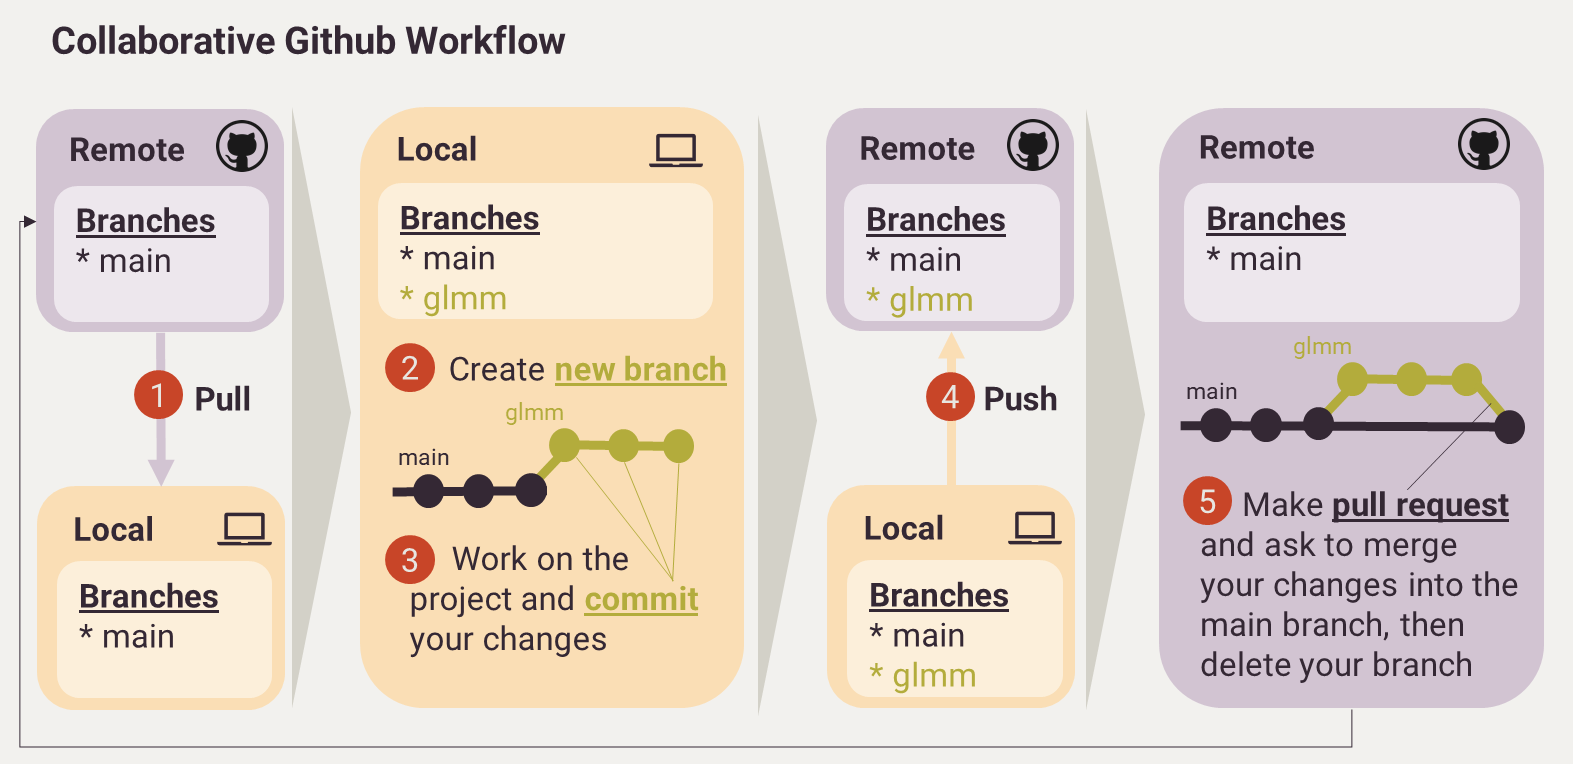 Example of the Github workflow starting from the left.
Before you can get started, open the sCaleGrassDiv project in RStudio. To do this,
go to the folder where the project is located (the location that you cloned it to)
and double click on the sCaleGrassDiv.Rproj file.
This will open the project for you in R Studio.
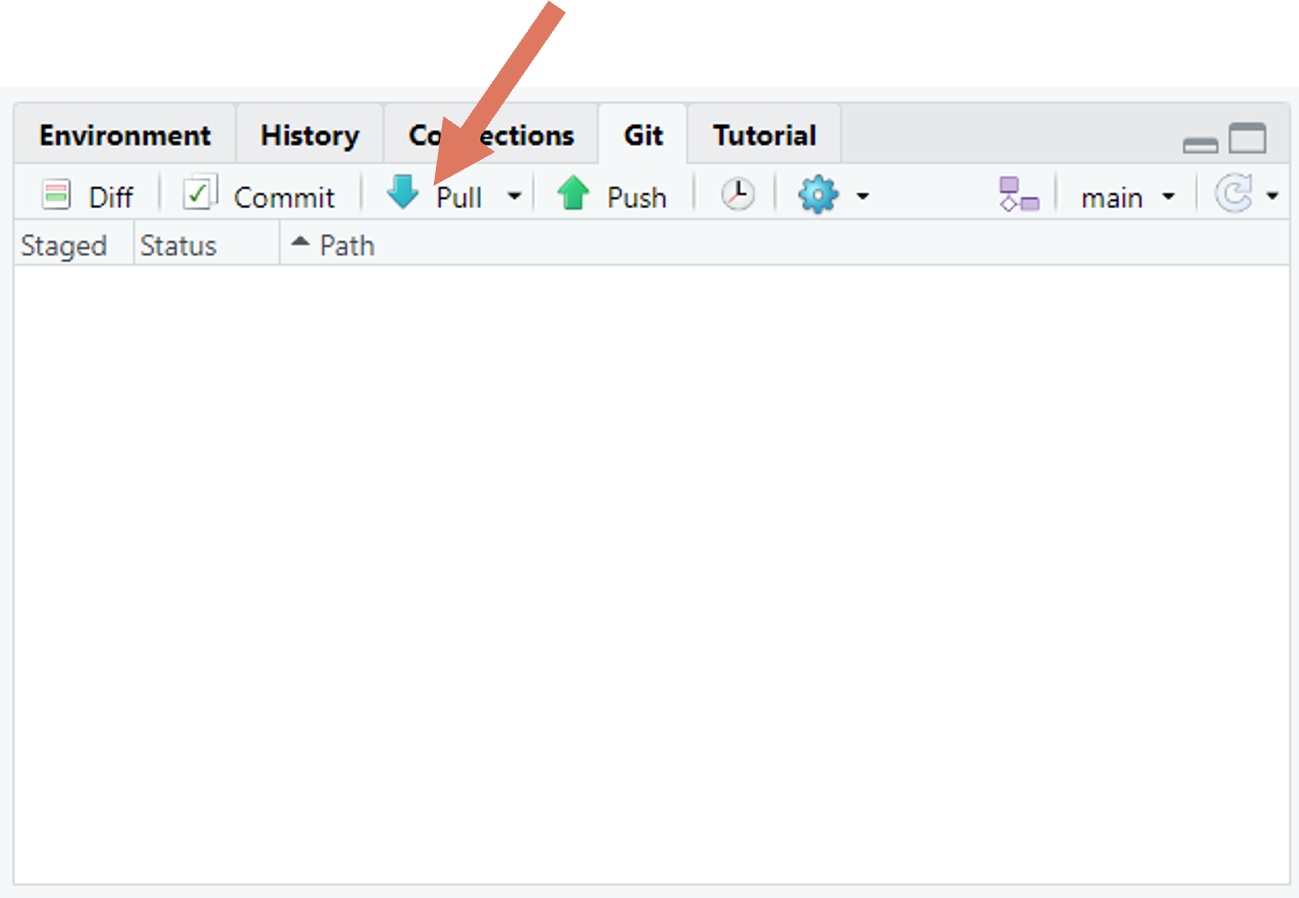
Locate the Git panel
If you completed all the instructions from the first time setup,
your project is already a Git repository and it is connected with the remote
repository on Github that we all share.
All the git operations I describe below can be done in the Git panel inside RStudio.
You can find it in the top right window of R Studio and it should look
something like this:

Note: Everything that I show below can be done in many different ways. One other possibility is to use Github desktop for the Git workflow. However, I chose to show everything in RStudio so you can stay inside one program when coding for the project.
Before you start working, always make sure you have the most current version of the code base on your machine. To do this pull all changes from the remote repository (aka Github), by clicking on the blue pull button:
If you do this for the first time, Github might ask you to log into
your account to allow RStudio to pull from the project. If your are authenticated successfully,
a popup will open in RStudio that tells you which changes were just pulled from Github. In
this example, I pulled some small changes to the README.md file.

Now your codebase is updated with the most current changes on Github.
❗Careful:❗
Git will not let you pull changes from Github for files that you also altered locally because then it is unclear which change should "win" in case of a conflict. If this happens, please first have a look at your local changes and commit them if possible (see step 3), then try to pull again. If in doubt, just ask Selina.
Create your (or your team's) own branch to work on, so the main branch remains
clean. You can name your branch either after your name, or after the change you
are currently working on. For this example, I create a branch called glmm because
I want to use it to work on a glmm analysis.
To create a new branch, go to the Git tab in RStudio and click on the purple icon (left image below).
This will open a pop up (right image below) where you have to enter the name of your branch and click on Create (everything else in the popup can be left at default):

Now another pop up will summarize the branch creation for you. This popup can be closed.
If you look at the Git panel in RStudio again, you will now see that you are now
longer in the main branch of the project, but in the glmm branch.
The branch you are currently on is always indicated in the top right corner.
To switch back to the main branch, you can click on the little black arrow next to the branch name:

If you have not made any changes to your branch yet, your branch and the main branch
are identical. But they will start diverging as soon as you start making changes
to your own branch.
Make sure that while you work on the project, the current branch is always your branch
and never the main branch.
Now you can start working on the project in R Studio like you are used to. You can write code, add or delete files, create new folders, etc. Please also have a look at the Coding guidelines of the project to make sure the coding style is best practice and consistent throughout the repository.
All changes are now being recorded. In the Git tab of RStudio you can now find a list of all the files that you changed since the last commit:

Whenever you made enough changes it's time to make a commit.
What is a commit and when should I do one?
A commit is basically a snapshop of your project at a specific time. You can roll back the project to any of the commits done. You decide for yourself when it's time to make a commit. Usually it makes sense to wait until you have done a small but meaningful chunk of work to commit. It is not good to wait too long with a commit because this will limit your ability to go back in time in small steps. In theory, you can commit as often as you want.
To commit your work, click on the Commit button in the Git tab:

This will open up an interface where you can select the files to commit, view all your changes and do the actual commit. To do a commit follow these steps:
- Select the changed files you want to include in the current commit by checking the checkbox left of the respective files (this process is also called staging).
- Optional: Have a look at the changes made to these files to make sure everything is correct.
- Enter a commit message and an optional description of your changes (see below for details).
- Click on commit.

The commit message
It is important to think of a good commit message that describes your changes well. The main commit message (the first header line of the commit) should be short and concise. If necessary, this header can be followed by one blank line and then a more lengthy description of your changes (see in the figure above). The others can read your commit messages to see what you did and why you did it.
Some hints on good commit messages:
- Limit the commit header to 50 characters
- Start with a capital letter
- Use imperative
- Separate commit header and details by one blank line
You can now publish your branch together with all the changes on it on Github. This will allow the others to see the changes in your branch, pull them down to their machines and make some changes to it as well.
To push your changes to Github, simple click on the Push button in the Git panel
in R Studio:

This will open another pop up that hopefully will tell you that all your changes were successfully pushed to Github.
You can repeat step 3 and 4 as often as you like. Whenever you think your changes are ready to be integrated into the main branch, you can start a pull request.
This is most easily done directly on Github.
Go to the sCaleGrassDiv repository start page on Github. On top, Github will tell you that your branch has new changes to be integrated into the
main branch and it suggests you to compare your changes and do a pull request.
Start a pull request by clicking on the Compare & pull request button:

This will open a new page where you can describe details about your pull request. This is mainly a descriptive title of your changes and some details that are needed so every one understands what you did and why you did it. You can write as much into the description box as you want. You can even add screenshots or attach pdfs if that's necessary. Below the description box you find another overview of all the changes that will be part of your pull request.
When you are done filling this out, click on Create pull request.

Now your pull request is part of the list of open pull requests for the sCaleGrassDiv
repository. To see all pull requests, switch to the Pull requests tab on top:

Others in the team can now read your pull request, review and discuss the code and then finally
approve it or request some more changes before it is merged with the
main branch. If they request changes or want to discuss something with you, they
will write you a comment on your pull request. So keep an eye on the request to
take action if necessary. Usually you will get an email if there is a new comment
on your pull request.
To see how you can review and approve a pull request made by others, have a look at the section Review pull requests.