Add article3 #10
There are no files selected for viewing
This file contains bidirectional Unicode text that may be interpreted or compiled differently than what appears below. To review, open the file in an editor that reveals hidden Unicode characters.
Learn more about bidirectional Unicode characters
| Original file line number | Diff line number | Diff line change |
|---|---|---|
| @@ -0,0 +1,131 @@ | ||
| --- | ||
| title: "zenn-cli + reviewdog + textlint + GitHub Actions で執筆体験を最高にする" | ||
| emoji: "📚" | ||
| type: "tech" # tech: 技術記事 / idea: アイデア | ||
| topics: ["Zenn", "textlint", "GitHubActions", "reviewdog"] | ||
| published: true | ||
| --- | ||
|
|
||
| # はじめに | ||
|
|
||
| 前回の記事を書く際に textlint + reviewdog + GitHub Actions を導入してみたところ、Zenn での執筆体験がさらに上がったので紹介します。 | ||
|
|
||
| 具体的には、このようにプルリクエストのレビューコメントが自動でつくようになります。 | ||
|
|
||
| 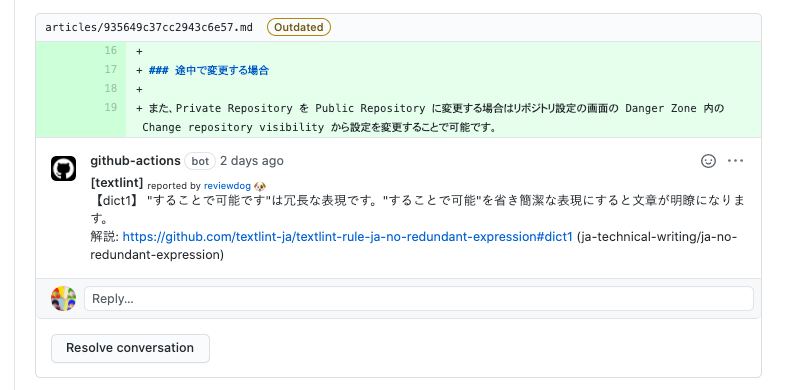 | ||
|
|
||
| 手順通りに行えば、おそらく 10 分程度で設定ができるはずです。Zenn でより質の高い記事を投稿したいと考えている方はぜひトライしてみてください。 | ||
|
|
||
| # 導入手順 | ||
|
|
||
| :::message | ||
| 自分にあった lint ルールがあるはずなので、適宜読み替えてください。 | ||
| まずは運用してみてからカスタマイズしたいという方は、この手順通りに進めてみてください。 | ||
| ::: | ||
|
|
||
| 1. textlint と textlint のプリセットルールをインストール | ||
| ```bash | ||
| $ npm install --save-dev textlint textlint-rule-preset-ja-technical-writing textlint-rule-preset-ja-spacing | ||
| ``` | ||
| 2. `.textlintrc` を作成し、以下の内容をペースト | ||
| ```json | ||
| { | ||
| "plugins": { | ||
| "@textlint/markdown": { | ||
| "extensions": [".md"] | ||
| } | ||
| }, | ||
| "rules": { | ||
| "preset-ja-technical-writing": { | ||
| "no-exclamation-question-mark": { | ||
| "allowFullWidthExclamation": true, | ||
| "allowFullWidthQuestion": true, | ||
| }, | ||
| "no-doubled-joshi": { | ||
| "strict": false, | ||
| "allow": ["か"], // 助詞のうち「か」は複数回の出現を許す(e.g.: するかどうか) | ||
| } | ||
| }, | ||
| "preset-ja-spacing": { | ||
| "ja-space-between-half-and-full-width": { | ||
| space: "always", | ||
| exceptPunctuation: true, | ||
| }, | ||
| "ja-space-around-code": { | ||
| "before": true, | ||
| "after": true | ||
| } | ||
| }, | ||
| "ja-technical-writing/ja-no-mixed-period": { | ||
| "allowPeriodMarks": [":"], | ||
| }, | ||
| "ja-technical-writing/sentence-length": false //100文字数制限の無効化 | ||
| } | ||
| } | ||
| ``` | ||
| 3. `.github/workflows/reviewdog.yml` を作成し以下の内容をペースト | ||
| ```yaml | ||
| name: reviewdog | ||
| on: [pull_request] | ||
| jobs: | ||
| textlint: | ||
| name: runner / textlint | ||
| runs-on: ubuntu-latest | ||
| steps: | ||
| - uses: actions/checkout@v2 | ||
| with: | ||
| submodules: true | ||
| - name: textlint-github-pr-review | ||
| uses: tsuyoshicho/action-textlint@v1 | ||
| with: | ||
| github_token: ${{ secrets.github_token }} | ||
| reporter: github-pr-review | ||
| level: warning | ||
| textlint_flags: "articles/**" | ||
| ``` | ||
| 4. master ブランチに commit & push | ||
|
|
||
| これで導入は完了です。 | ||
|
|
||
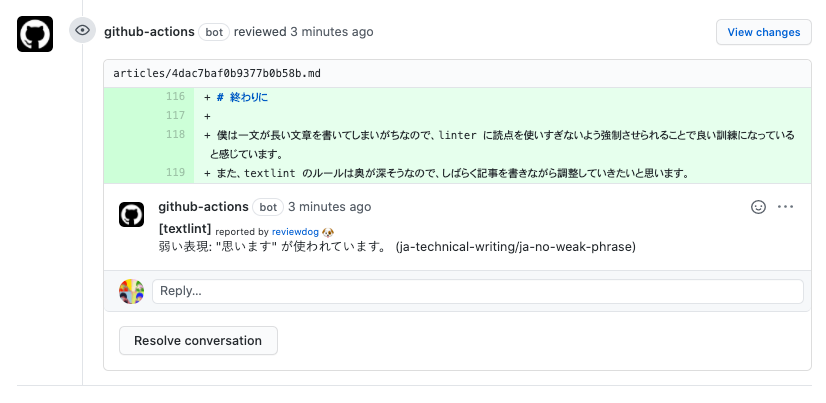
| master から新たにブランチを切り、記事を commit & push & プルリクエストを作成してみてください。GitHub Actions が起動し、reviewdog が textlint のルールに従ってレビューコメントが投稿されるはずです。 | ||
|
|
||
| まさにこの記事に対してレビューコメントが投稿されました。ここでは「思います」という表現に対して指摘が入りました。実際の Pull Request は[こちら](https://github.com/serima/zenn-content/pull/10)で見れるようになっています。 | ||
|
|
||
|  | ||
|
|
||
|
|
||
| ## さらにカスタマイズしたい方向けの参考資料 | ||
|
|
||
| 今回導入したライブラリやルールプリセット、また僕が設定する際に参考させて頂いた資料を記載しておきます。 | ||
|
|
||
| - [GitHub: textlint/textlint](https://github.com/textlint/textlint) | ||
| - [GitHub: reviewdog/reviewdog](https://github.com/reviewdog/reviewdog) | ||
| - [GitHub Action: Run textlint with reviewdog](https://github.com/tsuyoshicho/action-textlint) | ||
| - 今回導入した GitHub Action のリポジトリ | ||
| - [GitHub: textlint-rule-preset-ja-technical-writing](https://github.com/textlint-ja/textlint-rule-preset-ja-technical-writing) | ||
| - かなりメジャーな技術文書向けの textlint ルールプリセット | ||
| - [GitHub: textlint-rule-preset-ja-spacing](https://github.com/textlint-ja/textlint-rule-preset-ja-spacing) | ||
| - 日本語周りにおけるスペースの有無を決定する textlint ルールプリセット | ||
| - [zenn-cli から記事を書く際に textlint で文章をチェックする](https://zenn.dev/ria/articles/45632471ce94dd8f1b38) | ||
| - `.textlintrc` はこちらの記事から大部分を拝借しました | ||
| - [reviewdog + textlintでブログの自動校正をする](https://meuniere.dev/posts/2020/08/10/add-reviewdog-textlint.html) | ||
| - VuePress 向けですが、非常に丁寧で分かりやすい | ||
|
|
||
| ## 番外編: vscode-textlint | ||
|
|
||
| 執筆環境として VS Code を利用している場合は [vscode-textlint](https://marketplace.visualstudio.com/items?itemName=taichi.vscode-textlint) というプラグインを導入するとさらに良いでしょう。 | ||
| インストール後 VS Code を再起動すると textlint が有効なプロジェクトの場合は自動的に適用され、以下のように指摘をしてくれるようになります。 | ||
|
|
||
|  | ||
|
|
||
| さらに詳細を知りたい場合はこちらの [textlint と VS Code で始める文章校正](https://qiita.com/takasp/items/22f7f72b691fda30aea2) という記事が抜群に分かりやすいのでぜひご覧ください。 | ||
|
|
||
| # 終わりに | ||
|
|
||
| 僕は一文が長い文章を書いてしまいがちなので、linter に読点を使いすぎないよう強制させられることで良い訓練になっていると感じています。 | ||
| また、textlint のルールは奥が深そうなので、しばらく記事を書きながら調整していきたいと思います。 | ||
|
There was a problem hiding this comment. [textlint] reported by reviewdog 🐶 |
||
|
|
||
| --- | ||
|
|
||
| この記事は GitHub 連携で書いています。加筆修正など修正 PR を受け付けています! | ||
| https://github.com/serima/zenn-content | ||
Add this suggestion to a batch that can be applied as a single commit.
This suggestion is invalid because no changes were made to the code.
Suggestions cannot be applied while the pull request is closed.
Suggestions cannot be applied while viewing a subset of changes.
Only one suggestion per line can be applied in a batch.
Add this suggestion to a batch that can be applied as a single commit.
Applying suggestions on deleted lines is not supported.
You must change the existing code in this line in order to create a valid suggestion.
Outdated suggestions cannot be applied.
This suggestion has been applied or marked resolved.
Suggestions cannot be applied from pending reviews.
Suggestions cannot be applied on multi-line comments.
Suggestions cannot be applied while the pull request is queued to merge.
Suggestion cannot be applied right now. Please check back later.
There was a problem hiding this comment.
Choose a reason for hiding this comment
The reason will be displayed to describe this comment to others. Learn more.
[textlint] reported by reviewdog 🐶
弱い表現: "思います" が使われています。 (ja-technical-writing/ja-no-weak-phrase)