Have you ever seen those “Sign in with…” buttons?
- Sign in with Twitter
- Sign in with Google
- Sign in with Github
- Sign in with Facebook
How does that work!? Are you just handing random web applications your username and password. Is that secure!? o.O
What happens when you click one of those buttons? What kind of conversation is happening between the website and Google/Twitter/Facebook?
Aren’t you tired of usernames and passwords!?
From the user’s perspective:
- OAuth allows users to login to a number of websites without creating a new username and password. Single Sign-On is a big win!
- OAuth allows users to share/import some of their data (email, contacts, photos, tweets) with third party applications.
- Caveat: This often feels like a gross invasion of privacy.
From the developer’s perspective:
- OAuth makes the signup/registration process a little easier.
- If the User forgets their username/password, it’s not our problem!
- OAuth provides us with a source of data/feeds (user info, photos, tweets).
- Major Caveat: You’ve struck a deal with the devil! (Facebook/Google/Twitter).
Instead of reusing a user’s Username and Password, OAuth uses application-specific keys. There are always two keys: a public key, and a private key.
Both your application (consumer) and your application-user (client) have a set of public/private keys associated with them. These keys are provided/distributed by the OAuth provider, and they are never reused (google/facebook/twitter).
Remember:
CONSUMER === Your Application
CLIENT === Your User
Here’s what the request response cycle looks like:
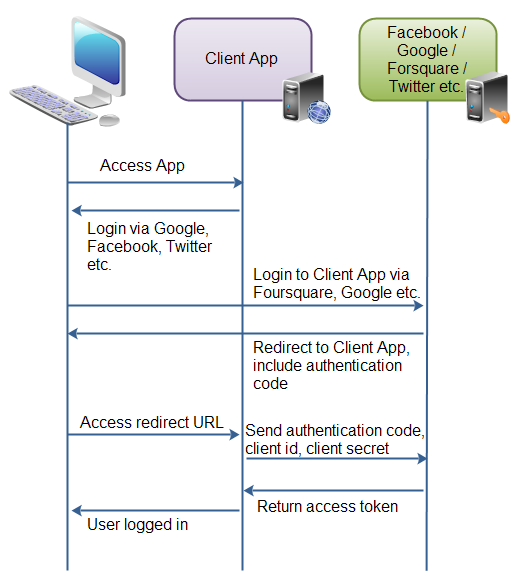
source: http://tutorials.jenkov.com/oauth2/overview.html
- Log into twitter
- Go to your Twitter Profile and add your phone number and verify it (required).
- Go to the developer section
- Create a new application
- Name: mean_questions_oauth
- Description: learnings the twitters oath
- Website: http://www.localhost-for-now.com
- Callback Url:
http://127.0.0.1:3000/auth/twitter/callback(akalocalhost:3000!)
- Create a new application
Once you’ve registered your application, you should see the following information:
- Your application’s “Consumer Key (API Key)”
- Your application’s Callback Url
- Twitter’s oath endpoints:
| description | endpoint |
|---|---|
| App-only authentication | https://api.twitter.com/oauth2/token |
| Request token URL | https://api.twitter.com/oauth/request_token |
| Authorize URL | https://api.twitter.com/oauth/authorize |
| Access token URL | https://api.twitter.com/oauth/access_token |
Make a note of your Public Consumer Key and your Private Consumer Key (we’re going to need these shortly)
We will be using a javascript module called passport.js to help with user authentication. Passport enables us to have multiple different authorization “strategies” — local authentication, OAuth through Facebook, OAuth through Twitter, OAuth through Github, Google, etc. If we had to roll our own OAuth for every single one of these services, we’d never get anything else done!
Documentation: Passport.js
We’re going to be using the Twitter OAuth Authentication Strategy.
Please make your changes inside of auth.js.
For the rest of this tutorial, please follow the instructions for passport-twitter.
Clone this repo.
npm install
# installs node modules
# (!) installs bower components in the /public/vendor directory

mongod # run the database server (do this in a seperate tab!)
node seed.js # adds a few questions to the databse

nodemon # run the server
open http://localhost:3000 # launch the application in the browser