Getting Started Tutorial
In this tutorial, we’ll create a simple client-server contacts app using the Codename One Spring Template.
You can see the full completed project source here.
Before we begin, ensure that you have Yeoman, Ant, and Git installed in your command-line environment’s PATH.
We will generate our project into a directory named "spring-contacts" with this command:
$ yo cn1-spring-app spring-contacts
You’ll then be prompted to enter the base app package. For the base app package I’m going to use "ca.weblite.contacts"
? Base app package (com.example.myapp): ca.weblite.contacts
Hit enter, sit back and let the magic happen. It will download this repository, and set up your application to that you’re ready to go.
Once the setup is complete, you can take a look inside the spring-contacts directory to see what gets generated.
Steves-iMac:test1 shannah$ cd spring-contacts/
Steves-iMac:spring-contacts shannah$ ls
README.md		config.done.properties	shared
build.xml		config.properties
client			server
-
build.xml - Includes ant build targets for doing useful things in the project - like building war files, Android apps, iOS, apps, etc..
-
client - Codename One Netbeans Project for the client mobile app. This will allow you to build a native mobile app for Android, iOS, and many other platforms.
-
server - A Spring Maven project used for the server side of our mobile app.
-
shared - A Netbeans java project for your shared (DTO) classes that need to be used in both the client and server projects.
This application will be a simple contact list. The client will get a list of contacts from the server and display them in a list. For that we’ll use a shared class named "Contact" to pass back and forth between the client and server.
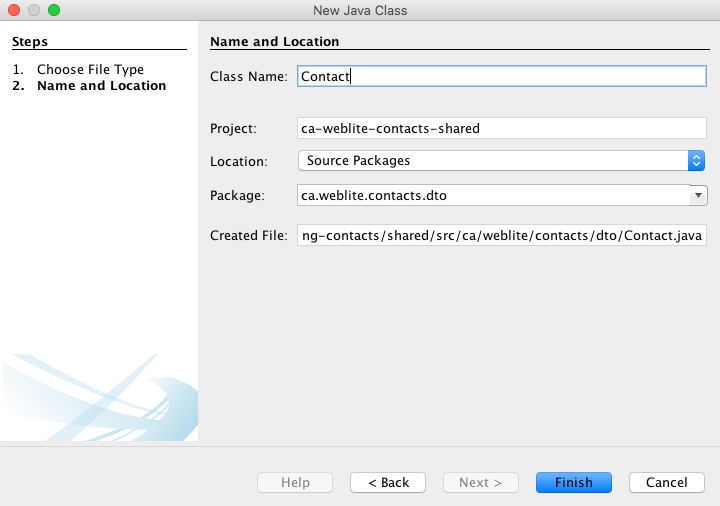
Create a new class named "ca.weblite.contacts.dto.Contact".
|
Note
|
If you specified a different value for your base app package, then your class name might be slightly different. It must be located in the dto subpackage of your base package name. E.g. If your base package name is "com.example.myapp", then the Contact class must be inside the "com.example.myapp.dto" package (or subpackages thereof).
|
The "New Class" dialog in Netbeans:
The Basic source:
package ca.weblite.contacts.dto;

/**
 *
 * @author shannah
 */
public class Contact {
    private long id;
    private String name;
    private String email;
}|
Note
|
The above code is incomplete as we still need to add getters and setters for any property that we want to be able to serialize. I chose to post the "before" snippet to reiterate how little you need to do to create a POJO that can be passed between client and server. I will use Netbeans' refactoring feature "Encapsulate fields" to automatically generate the setters and getters for me. |
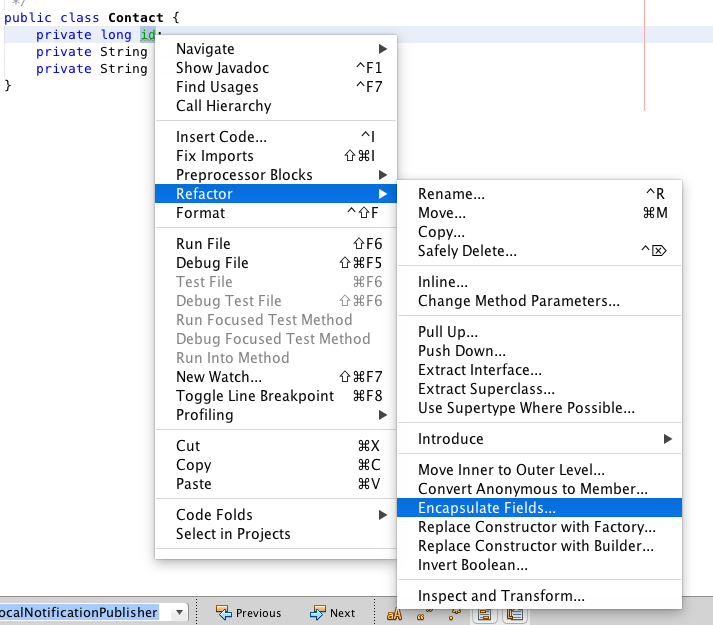
We add setters and getters by selecting any of the properties in the source code, right click and then select "Refactor" > "Encapsulate Fields" from the contextual menu:
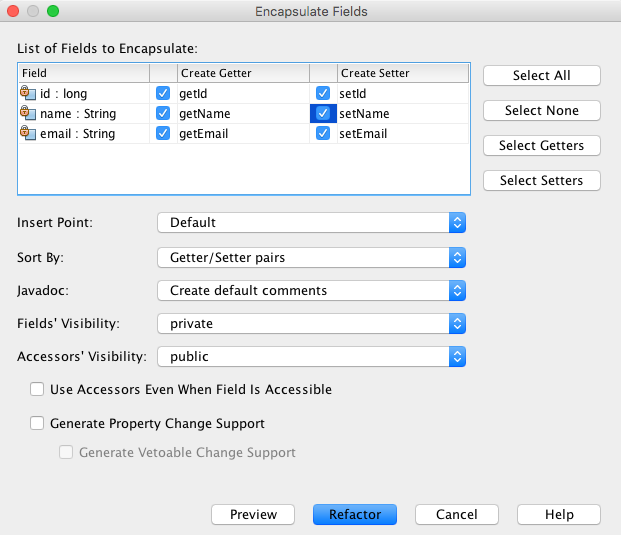
Then select all of the fields in the dialog and hit enter.
After adding setters and getters, the full class looks like:
package ca.weblite.contacts.dto;

/**
 *
 * @author shannah
 */
public class Contact {
    private long id;
    private String name;
    private String email;

    /**
     * @return the id
     */
    public long getId() {
        return id;
    }

    /**
     * @param id the id to set
     */
    public void setId(long id) {
        this.id = id;
    }

    /**
     * @return the name
     */
    public String getName() {
        return name;
    }

    /**
     * @param name the name to set
     */
    public void setName(String name) {
        this.name = name;
    }

    /**
     * @return the email
     */
    public String getEmail() {
        return email;
    }

    /**
     * @param email the email to set
     */
    public void setEmail(String email) {
        this.email = email;
    }
}|
Warning
|
DTO objects have certain constraints that must be observed, such as they need to have a no-arg public constructor, and they can only have public properties that can be serialized. This includes primitives, boxed primitives, dates, strings, lists, maps, other DTO objects, and arrays thereof. |
Once we have saved our "Contact" class, we need to run the "install-shared" ant task again to make it available to the client and server projects:
Steves-iMac:tutorials shannah$ ant install-shared
The server project is a Spring Maven project. It includes a REST service class that provides the access point for our client to communicate with us. The REST service class is "ca.weblite.contacts.webservice.RESTService".
|
Note
|
Depending on the "base.package-name" you provided in your configuration, your class may have a different package name. If you provided base.package-name=com.example.contacts in your config.properties, then your REST class will be named "com.example.contacts.webservice.RESTService".
|
The Bare-bones RESTService class looks like:
package ca.weblite.contacts.webservice;

import ca.weblite.contacts.dto.UpdateDeviceRequest;
import ca.weblite.contacts.dto.UpdateDeviceResponse;
import ca.weblite.contacts.dto.enums.ResponseCode;
import java.io.BufferedReader;
import java.io.IOException;
import java.io.InputStreamReader;
import java.io.OutputStream;
import java.net.HttpURLConnection;
import java.net.URL;
import java.net.URLEncoder;

import java.util.HashMap;
import java.util.Map;
import org.springframework.web.bind.annotation.RequestBody;
import org.springframework.web.bind.annotation.RequestMapping;
import org.springframework.web.bind.annotation.RequestMethod;
import org.springframework.web.bind.annotation.RestController;

/**
 *
 * @author shannah
 */
@RestController
public class RESTService {


    // A utility class for representing a location.
    private class Location {
        double latitude;
        double longitude;

        Location(double latitude, double longitude) {
            this.latitude = latitude;
            this.longitude = longitude;
        }
    }

    Map<String,Location> deviceLocations = new HashMap<String,Location>();

    private boolean sendPush(String[] deviceIds, String message, String type) throws IOException {
        // ... Some code to perform push...  See Push setup instructions for information
        // on configuring push.
    }

    @RequestMapping(value = "/updateDevice", method = RequestMethod.POST)
    public UpdateDeviceResponse updateDevice(@RequestBody UpdateDeviceRequest request) {
        deviceLocations.put(request.getDeviceId(), new Location(request.getLatitude(), request.getLongitude()));
        UpdateDeviceResponse response = new UpdateDeviceResponse();

        response.setCode(ResponseCode.OK);
        response.setMessage("Device location updated");

        return response;
    }

}
This class includes a sendPush() method that we’ll learn to use later, and an updateDevice method that can be used for the client device to "phone home" and let the server know its location.
Returning Contacts:
For the purposes of this tutorial, we’re just going to store our contacts inside an ArrayList. In a real application we’d probably store them in a database of some kind.
Adding a web service access point in Spring is really easy. Simple add a method, and include a few annotations mark it as a web service. We’ll add an access point at the url "/getContacts". The code is as follows:
    private List<Contact> getContacts() {
        if (contacts == null) {
            contacts = new ArrayList<Contact>();
            contacts.add(createContact("Jack Bauer", "jbauer@ctu.us"));
            contacts.add(createContact("Jack Ryan", "jryan@cia.gov"));
            contacts.add(createContact("Jason Bourne", "jbourne@hotmail.com"));
            contacts.add(createContact("Han Solo", "hsolo@empire.net"));
            contacts.add(createContact("John McLane", "jmclane@nakatomi.net"));
        }
        return contacts;
    }

    private Contact createContact(String name, String email) {
        Contact out = new Contact();
        out.setName(name);
        out.setEmail(email);
        return out;
    }

    @RequestMapping(value = "/getContacts", method = RequestMethod.POST)
    public BaseResponse getContacts(@RequestBody BaseRequest request) {
        BaseResponse res = new BaseResponse();
        HashMap responseData = new HashMap();
        responseData.put("contacts", getContacts());
        res.setResponseData(responseData);
        res.setCode(ResponseCode.OK);
        return res;
    }
The code snippet above includes some helper methods for creating contact objects, but the method of interest here is the last one, as it provides the HTTP access point.
Some things to notice here:
-
The
@RequestMappingannotation marks this method as a web service so that it will respond to HTTP requests for the "/getContacts" url. Themethodattribute says that we only want to respond to POST requests. -
It returns a
BaseResponseobject. For our client-server app, all web services must return either aBaseResponseor a subclass ofBaseResponse. -
It takes a single
BaseRequestobject as an argument. For our client-server app, all web services must take either aBaseRequestor a subclass ofBaseRequestas its single parameter. This argument must include the@RequestBodyannotation.
That’s all the code we need for our web service. Now for the client code.
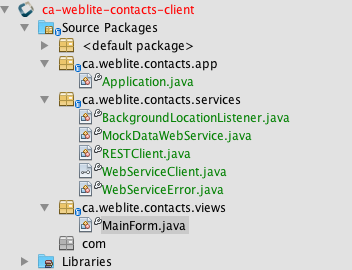
Open the client project in NetBeans, and take a look at the file structure:
The bare-bones application just starts up and displays the "ca.weblite.contacts.views.MainForm" form. This is just a blank form to start with, so we’re going to change it so that it loads the contacts from the server, and displays them in a list.
Right now our form looks like
package ca.weblite.contacts.views;

import com.codename1.ui.Form;

/**
 *
 * @author shannah
 */
public class MainForm extends Form {
   public MainForm() {
        super("My Application");

    }

}
We’re going to provide it with a list of Contact objects, which it will display as a sort of list.
A basic implementation of this form, which includes a list of contacts, and a "Refresh" button, looks like:
package ca.weblite.contacts.views;

import ca.weblite.contacts.dto.BaseRequest;
import ca.weblite.contacts.dto.BaseResponse;
import ca.weblite.contacts.dto.Contact;
import ca.weblite.contacts.services.RESTClient;
import com.codename1.components.ToastBar;
import com.codename1.io.Log;
import com.codename1.ui.Button;
import com.codename1.ui.Container;
import com.codename1.ui.Display;
import com.codename1.ui.Form;
import com.codename1.ui.Label;
import com.codename1.ui.layouts.BorderLayout;
import com.codename1.ui.layouts.BoxLayout;
import com.codename1.util.Callback;
import java.util.List;

/**
 *
 * @author shannah
 */
public class MainForm extends Form {


    private List<Contact> contacts;
    private Container contactsContainer;

    public MainForm() {
        super("My Application");
        contactsContainer = BoxLayout.encloseY(new Label("Loading..."));
        setLayout(new BorderLayout());
        addComponent(BorderLayout.CENTER, contactsContainer);
        Button refresh = new Button("Refresh Contacts");
        refresh.addActionListener(e->{
            refreshContacts();
        });

        Display.getInstance().callSerially(()->{refreshContacts();});

    }

    private void update() {
        contactsContainer.removeAll();
        if (contacts != null) {
            for (Contact c : contacts) {
                contactsContainer.add(new Label(c.getName()));
            }

        }
        revalidate();
    }


    private void refreshContacts() {
        RESTClient client = new RESTClient();

        client.sendRequest("/getContacts", new BaseRequest(), new Callback<BaseResponse>() {

            @Override
            public void onSucess(BaseResponse value) {
                contacts = (List<Contact>)value.getResponseData().get("contacts");
                update();
            }

            @Override
            public void onError(Object sender, Throwable err, int errorCode, String errorMessage) {
                ToastBar.showErrorMessage(errorMessage);
                Log.e(err);
            }

        });
    }
}
This is mostly just a basic form. Pay special attention to the refresh() method which calls the webservice that we created on the server.
Now that our code is complete, let’s test out our app.
First we need to start the server. With any file from the server project opened in NetBeans, you should be able to just click "Run", and it will prompt you to choose a deployment server. I generally just use the GlassFish 4.1 server that is bundled with Netbeans. And select "Remember Permanently".
This will package your application as a .war file.
|
Note
|
This step will open your app’s index.html file in your local web browser which will show you a 404 error. Don’t worry about this. We don’t have an index.html file, so this 404 error is correct. |
Now proceed over to the client app, and run that from Netbeans also.
The result will look something like the following in the simulator:
Now that we’ve proven that our application works running both the client and server on our desktop, we’ll proceed to testing the client on an actual device. When we first tested our app, it was running the server on localhost, and the client was simply connecting to the address "http://localhost:8080/ca-weblite-contacts" (the default URL that netbeans will deploy the server on). This address won’t work on your device because "localhost" will just point to the device itself - not your computer. Therefore you’ll need to configure the client to connect to the server at an address that can be reached by the client.
If your device is running on the same WiFi network as your PC, then you should be to access the server at a local IP address. The following are some useful tutorials on how to find your computer’s private and public IP addresses:
Firewalls notwithstanding, you just need to find your computer’s "private" IP address so that you can connect to it from the device.
Once you have your computer’s IP address, you’ll need to enter it into the "client" project’s "runtime.local.properties" file. If this file doesn’t exist yet, copy the "runtime.local.properties.sample" file into "runtime.local.properties":
Steves-iMac:spring-contacts shannah$ cd client
Steves-iMac:client shannah$ cp runtime.local.properties.sample runtime.local.properties
Then open the runtime.local.properties file in your preferred editor.
By default, it’s contents will be as follows:
BASE_URL=http://localhost:8080/ca-weblite-contacts
GOOGLE_PROJECT=xxx
PUSH_TOKEN=xxx
The BASE_URL property should point to where your server project is deployed. You see that the default is a localhost address. You’ll need to change it to your computer’s network address so that it can be accessed from the device.
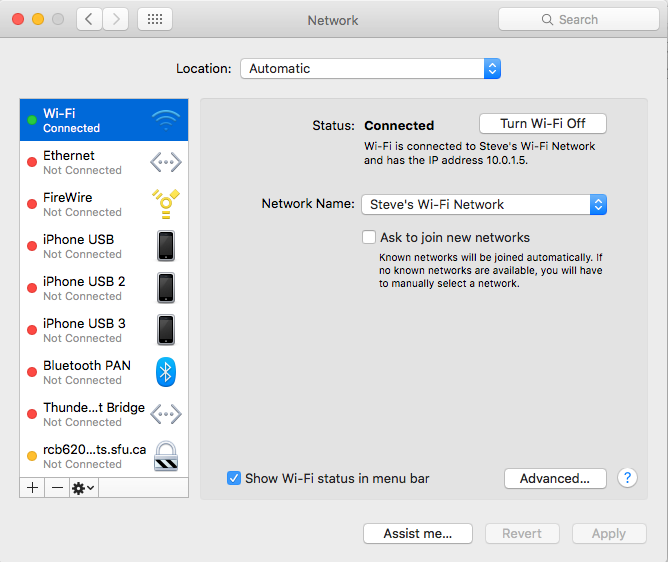
As I can see from my network settings, on my machine, the network address is "10.0.1.5", so I’ll change my BASE_URL to http://10.0.1.5:8080/ca-weblite-contacts.
|
Note
|
The GOOGLE_PROJECT and PUSH_TOKEN properties you see in the snippet above are used for push notifications. We’ll discuss that later. |
After your change you’ll have
BASE_URL=http://10.0.1.5:8080/ca-weblite-contacts
GOOGLE_PROJECT=xxx
PUSH_TOKEN=xxx
Except you’ll have your own computer’s address instead of "10.0.1.5".
You can test your address by pointing your web browser to it. You should see the same Glassfish 404 error page that you received when you went to the localhost address.
The easiest platform to test on is Android because it doesn’t require any approval from an outside organization (like Apple or Microsoft). You can just generate a certificate, and go.
See the Codename One developer guide for information on setting up an android development certificate.
After you have set up your certificate in the codename one properties, proceed to build the app using ANT
|
Important
|
You need to build the app using the build.xml script in the root directory ("spring-contacts"), not the "client" project. And you can’t simply build it from the IDE menu to build and android project. The "root" ANT script includes some extra bootstrapping of runtime configuration - such as the location of the server. |
From the command line, inside the "spring-contacts" directory:
Run "ant -p" to see all of the available targets:
Steves-iMac:spring-contacts shannah$ ant -p
Buildfile: /Users/shannah/cn1_files/tutorials/spring-contacts/build.xml
Codename One Spring Template Build Tasks
Main targets:

 build-local-android          Builds APK that runs against local server
 build-local-ios              Builds iOS app that runs against local server
 build-local-webservice       Build the web service on your local machine.
 build-production-android     Builds APK that runs against the production server
 build-production-ios         Builds iOS app that runs against the production server
 build-production-webservice  Build the web service for the production deployment
 clean                        Clean all targets
 configure                    Download dependencies
 install-shared               Build the shared library and install in both client and server projects.
 run-local-simulator          Runs mobile app in simulator against local server
 run-production-simulator     Runs mobile app in simulator against production server
 setup                        Set up the template
Default target: configure
In our case, we would like to "build-local-android". So type:
Steves-iMac:spring-contacts shannah$ ant build-local-android
This will build the application and send it to the Codename One build server.
It will take a couple of minutes to build, then you can install it on your android device and test it.
This app isn’t terribly exciting, but it should give you the foundation you need to get started with the Codename One Spring Template. Once you have a working app, you’ll want to deploy your app to a production server. You may also want to enable some more advanced communication features like push and websockets.
More documentation to come. Let me know what kind of documentation you’re interested in.