#Vehicle Detection and Tracking
##Histogram of Oriented Gradients (HOG)
The code for this step is contained in the get_feature() method of CarClassifier class in car_classifier.py file.
I started by reading in all the vehicle and non-vehicle images. Here is an example of one of each of the vehicle and non-vehicle classes:

below is the code for extracting combined features of an image
def get_feature(self, img):
        """ Get feature of img
        Attr:
            img: image object
        Returns:
            feature vector
        """
        feature = []
        color_trans_img = cv2.cvtColor(img, cv2.COLOR_BGR2YCrCb)
        img_shape = color_trans_img.shape

        # Spatial feature
        spatial_features = cv2.resize(color_trans_img, (16,16)).ravel()
        feature.append(spatial_features)
        # Histogram feature
        hist_features = self.get_color_hist(color_trans_img)
        feature.append(hist_features)
        # Hog feature
        hog_features = []
        for channel in range(img_shape[2]):
            hog_feature = hog(color_trans_img[:,:,channel], orientations=8,
                   pixels_per_cell=(8, 8),
                   cells_per_block=(2, 2),
                   transform_sqrt=True,
                   visualise=False, feature_vector=True)
            hog_features.append(hog_feature)
        hog_features = np.ravel(hog_features)
        feature.append(hog_features)

        return np.concatenate(feature)
Car and Corresponding HOG feature visualization
Car

HOG Feature

I tried various combinations of parameters and looked for experiment results in various blog posts. Finally the following parameters worked well
orientations=8
pixels_per_cell=(8, 8)
cells_per_block=(2, 2)
transform_sqrt=True
I trained a linear SVM in CarClassifier class in car_classifier.py using the combined features extracted from image. The training is done in fit() method of CarClassifier class
def fit(self):
        """ Fit classifier to car and not car data
        """
        if os.path.isfile('model.p'):
            with open('model.p', 'rb') as data_file:
                data = pickle.load(data_file)
                self.model = data['model']
                self.scaler = data['scaler']
            return self.model

        x_train, y_train, x_test, y_test = self.get_data()
        svc = LinearSVC(max_iter=20000)
        svc.fit(x_train, y_train)
        data = {
            'model' : svc,
            'scaler' : self.scaler
        }
        with open('model.p', "wb") as data_file:
            pickle.dump(data, data_file)
        self.model = svc
        return self.model
###Sliding Window Search
####1. Sliding winodw is determined to be larger when closer to camera and smaller for further distance. With different overlapping and region of interest. This is done in init() and get_windows()method VehicleDetector class in vehicle_detector.py.
def get_windows(self, x_start_stop, y_start_stop, xy_window, xy_overlap):
        """ Get window bounding boxes
        Attr:
            x_start_stop: tuple of start and stop pixels in X direction
            y_start_stop: tuple of start and stop pixels in Y direction
            xy_window: window size
            xy_overlap: fraction of overlap size in x, y
        Returns:
            bounding boxes of windows
        """
        # Compute the span of the region to be searched
        xspan = x_start_stop[1] - x_start_stop[0]
        yspan = y_start_stop[1] - y_start_stop[0]
        # Compute the number of pixels per step in x/y
        nx_pix_per_step = np.int(xy_window[0]*(1 - xy_overlap[0]))
        ny_pix_per_step = np.int(xy_window[1]*(1 - xy_overlap[1]))
        # Compute the number of windows in x/y
        nx_windows = np.int(xspan/nx_pix_per_step) - 1
        ny_windows = np.int(yspan/ny_pix_per_step) - 1
        # Initialize a list to append window positions to
        window_list = []

        for ys in range(ny_windows):
            for xs in range(nx_windows):
                # Calculate window position
                startx = xs*nx_pix_per_step + x_start_stop[0]
                endx = startx + xy_window[0]
                starty = ys*ny_pix_per_step + y_start_stop[0]
                endy = starty + xy_window[1]
                # Append window position to list
                window_list.append(((startx, starty), (endx, endy)))
        # Return the list of windows
        return window_list

self.windows = []
self.windows += self.get_windows(x_start_stop = (0,1280),
                        y_start_stop = (400,500), xy_window = (96,64),
                        xy_overlap = (0.75, 0.75))
self.windows += self.get_windows(x_start_stop = (0,1280),
                        y_start_stop = (400,500), xy_window = (192,128),
                        xy_overlap = (0.75, 0.75))
self.windows += self.get_windows(x_start_stop = (0,1280),
                        y_start_stop = (430,550), xy_window = (192,192),
                        xy_overlap = (0.5, 0.5))
All sliding windows

####2. These windows are searched for cars within and only those having positive results are picked. This is done in get_positive_windows() method of VehicleDetector class
def get_positive_windows(self, img):
        """ Get windows that have cars in it
        Attr:
            img: image to search within
        Returns:
            list of windows having cars
        """
        positive_windows = []
        counter = 1
        for window in self.windows:
            test_img = cv2.resize(img[window[0][1]:window[1][1], window[0][0]:window[1][0]], (64, 64))
            # cv2.imwrite('output_images/' + str(counter) + '.jpg', test_img)
            counter = counter + 1
            if self.car_clf.predict(test_img) == 1:
                positive_windows.append(window)
        return positive_windows
This resulted in dectecting boxes where car exists.
Sliding windows with cars

####3. Generated heat map from positive windows to determine the bounding bos where cars exist. this is done in process_image() method of VehicelDetector class
heat = self.add_heat(heat,positive_windows)
# Apply threshold to help remove false positives
heat = self.apply_threshold(heat,4)
# Visualize the heatmap when displaying
heatmap = np.clip(heat, 0, 255)

def add_heat(self, heatmap, bbox_list):
        """ Add heat according to bounding box list
        Attr:
            heatmap: heat map initiliazed to image size
            bbox_list: bounding boxes
        Returns:
            resulted heat map image
        """
        # Iterate through list of bboxes
        for box in bbox_list:
            # Add += 1 for all pixels inside each bbox
            # Assuming each "box" takes the form ((x1, y1), (x2, y2))
            heatmap[box[0][1]:box[1][1], box[0][0]:box[1][0]] += 1

        # Return updated heatmap
        return heatmap

def apply_threshold(self, heatmap, threshold):
        """ Apply threshold to heat image
        Attr:
            heatmap: calculated heat image
            threshold: threshold value
        """
        # Zero out pixels below the threshold
        heatmap[heatmap <= threshold] = 0
        # Return thresholded map
        return heatmap
Heat map image

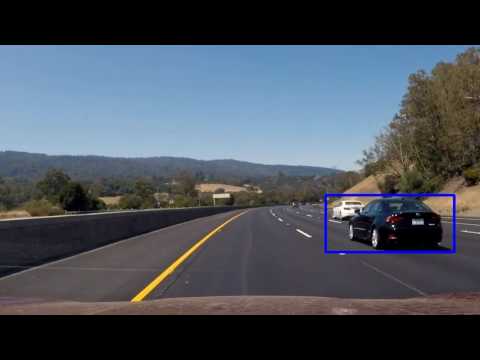
####4. Then drew final bounding box around the heat map in draw_labeled_bboxes() of VehicleDetector class
def draw_labeled_bboxes(self, img, labels):
        """ Draw bounding boxes according to heat map
        Attr:
            img: image ot draw on
            labels: labels of heat map
        """
        centroids = []
        # Iterate through all detected cars
        for car_number in range(1, labels[1]+1):
            # Find pixels with each car_number label value
            nonzero = (labels[0] == car_number).nonzero()
            # Identify x and y values of those pixels
            nonzeroy = np.array(nonzero[0])
            nonzerox = np.array(nonzero[1])
            # Define a bounding box based on min/max x and y
            bbox = ((np.min(nonzerox), np.min(nonzeroy)), (np.max(nonzerox), np.max(nonzeroy)))
            centroid_x = (bbox[1][0] + bbox[0][0]) / 2.
            centroid_y = (bbox[1][1] + bbox[0][1]) / 2.
            centroids.append((centroid_x, centroid_y))
            # Draw the box on the image
            if self.is_tracking:
                if self.does_history_exist((centroid_x, centroid_y)):
                    cv2.rectangle(img, bbox[0], bbox[1], (0,0,255), 6)
            else:
                cv2.rectangle(img, bbox[0], bbox[1], (0,0,255), 6)
        self.frame_history = centroids
        # Return the image
        return img
Final result


####1. This is the link to video output that has been generetaed using similar pipeline used for individual images. Here's a link to my video result
####2. To tackle false positives and overlapping bounding boxes both heatmap calculation and history tracking is used. Heat map calculation is done in process_image() method. I have used scipy.ndimage.measurements.label() to find the final boxes after threshodling.
heat = self.add_heat(heat,positive_windows)
# Apply threshold to help remove false positives
heat = self.apply_threshold(heat,4)
# Visualize the heatmap when displaying
heatmap = np.clip(heat, 0, 255)

def add_heat(self, heatmap, bbox_list):
        """ Add heat according to bounding box list
        Attr:
            heatmap: heat map initiliazed to image size
            bbox_list: bounding boxes
        Returns:
            resulted heat map image
        """
        # Iterate through list of bboxes
        for box in bbox_list:
            # Add += 1 for all pixels inside each bbox
            # Assuming each "box" takes the form ((x1, y1), (x2, y2))
            heatmap[box[0][1]:box[1][1], box[0][0]:box[1][0]] += 1

        # Return updated heatmap
        return heatmap

def apply_threshold(self, heatmap, threshold):
        """ Apply threshold to heat image
        Attr:
            heatmap: calculated heat image
            threshold: threshold value
        """
        # Zero out pixels below the threshold
        heatmap[heatmap <= threshold] = 0
        # Return thresholded map
        return heatmap
Heat map image
Furthermore I saved the centroids of each bounding boxes found in previous frame. I used this history to determine if a bounding box around same region in the next frame is valid or invalid by its past existence. It has benn done in does_history_exist() method of VehicleDetector class. I used euclidean distance of maximum 10 pixels as a threshold for same car apperaing in two consecutive frames. Otherwise it is a false positive
def does_history_exist(self, centroid):
        for c in self.frame_history:
            if euclidean(c, centroid) < 10:
                return True
        return False
###Discussion
####1. The pipeline is very sensitive to region of interest and size of sliding windows. Cars that dont fit in window size returns incomplete bounding box. Also the pipeline is slower.
####2. In future further experimentation of sliding windows will improve both accuracy and processing time. Also history tracking can be applied to more than one previous frames for smooth detection and discarding false positives.