Deployed a PHP based School Management System with MySQL database on AWS cloud along with a resizing image functionality written in python.
Amazon EC2, Amazon S3 bucket, AWS RDS, Lambda function, AWS lambda
In this case study, I’ll be writing about how to deploy a school management system on AWS cloud using different services. The school management system is created as a PHP web application with backend datastore as the MySql database. The web application has an additional functionality that updates a smaller version of the image whenever a student uploads a new picture through the web application. This functionality is written in Python. Now, I’ll be writing steps to deploy this application.
Below is the architecture of the system using the different AWS services.
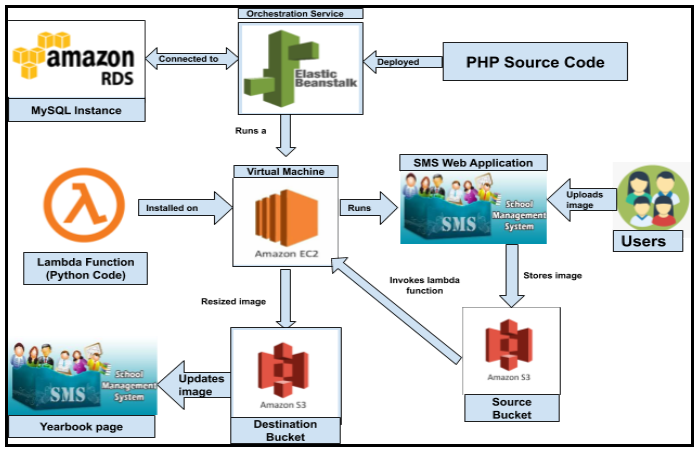
The above deployment can be done in a number of ways. As it can be seen from the diagram above the most essential services that are required are an Amazon RDS for MySQL database to store your data, a running EC2 instance to deploy our application on, a lambda function that will help us to run the python code to resize the images. The creation of Virtual machines can be done using two methods: One in by manually creating an EC2 instance and related services or we can use the Amazon Elastic Beanstalk service which has several of its own benefits. I primarily chose the Amazon Elastic Beanstalk service but have also written about the alternative way.
● The first and the foremost step was to create an AWS account so that I have full access to the necessary services.
● Next, I logged into the AWS account using the root credentials.
● It is good to create a seperate IAM user for the school if in case they need access to several features such as the billing history, etc.
● A new user was created under the IAM -> Users section which has AWS Management Console access with a defined name and password, with a limited access to services.
● To create the database we first went to the RDS console, clicked on Database and then Create Database.
● I chose the standard create option as it provides additional configuration options.
● Next, I selected the MySQL engine type and the desired MySQL version.
● I then set the Instance name, chose the DB Instance class, the desired instance storage size and a master username and password to access the database.
● After verifying the details I created the database.
● In the next step I modified the inbound rule for the RDS Instance’s security group.
● The RDS instance is ready.
Our next step is to set up the EC2 instance and other desired things for which I have used the AWS Elastic Beanstalk service.
The advantage of using Elastic Beanstalk environment is that it being an orchestration service orchestrates various AWS services, including EC2, S3, Simple Notification Service, CloudWatch, autoscaling, and Elastic Load Balancers instead of setting these one by one. ● I first opened the Elastic Beanstalk Console and selected Environments.
● Then I started the process to create a new environment by choosing the Create a new environment option.
● I then entered an environment name and the application name as ‘School management system’.
● We can also set up a domain name for our application at this point or else an auto-generated Domain is created.
● The next step was to choose the desired platform. As our desired web application is written in PHP I selected the platform as PHP and the desired PHP version.
● The next step is to provide the application code, for which Elastic Beanstalk provides us to upload the source code from our local machine. But for now I chose Sample application.
● Lastly, I reviewed all the details and launched the Elastic Beanstalk environment.
● The environment creation took around 5 minutes and created the following resources: EC2 instance, Instance security group, Load balancer ,Load balancer security group, Auto Scaling group, Amazon S3 bucket, Amazon CloudWatch alarms, AWS CloudFormation stack and a Domain name.
● We can configure security groups, environment properties, and scaling for the created environment.
Alternatively, instead of creating the AWS Elastic Beanstalk environment, we can also just launch an EC2 instance, using a desired AMI, instance size, etc. Once the VM is ready we can install the desired packages, a web server like Apache or Nginx to deploy our PHP source code. Additionally, we need to make modifications in the security groups, create load balances, domain names manually for this procedure.
STEP 5: Configure environment properties on Elastic Beanstalk to connect with Amazon RDS DB instance
● To configure the environment properties we select the created environment, go to the configuration page and make changes to connect to the Amazon RDS DB instance.
● I entered the properties names and values needed for the connection such as: RDS_HOSTNAME, RDS_PORT, RDS_DB_NAME, RDS_USERNAME and the RDS_PASSWORD.
● After reviewing I applied the following configuration. We can also configure the environment's Auto Scaling group with a higher minimum instance count. I made the count to two instances running at all times to prevent the web servers in your environment from being a single point of failure.
● In this step we deploy the main PHP web application.
● For this, AWS Elastic Beanstalk provides us with a feature to Upload and Deploy.
● Under the created environment I selected the Upload and Deploy option, then selected the desired PHP file containing the source code for the School Management system and uploaded it.
● On clicking on deploy the PHP file is deployed on the EC2 instance.
● We can now use the domain name created to check the webpage for the School Management System.
Alternatively, if manually deploying on an EC2 instance then, after installing the required web server, we will make changes in the configuration file that comes along the School Management System code to connect to the RDS MySQL instance. After successful connection we can restart the webserver we used i.e Apache or Nginx to open the desired webpage.
In this part we will create a lambda function which gets triggered whenever a student uploads a new picture through the web application and a smaller version of the uploaded image is updated on the yearbook page.
● I created a new user with administrator access and kept the Access Key ID, the Secret access key and the account ID with me.
● Next, I created a role which allows the lambda function to access the S3 service.
● Here, we get to choose the entity which is ‘Lambda’ in our case and under permissions we select ‘AmazonS3FullAccess’ and then finally give the role a name.
● I first created a source bucket with the name ‘SMS_source’.
● I then created a destination bucket similar to the source bucket and named it as ‘SMS_resized’.
● As I already have an EC2 instance launched earlier, I will go to the EC2 console, select the VM and ‘create a new key pair’ in order to set up the AWS CLI on the VM.
● Next, I logged on to the EC2 instance using the newly created user and then configured the AWS CLI.
● Next, for the lambda function I installed python 3.6.
● Next, I created a python 3 virtual environment and activated it.
● Next, I installed the required python libraries such as boto and Pillow.
● I then created a deployment package, that is a zip archive containing the packages installed.
● Then, I took the python file that contains the code to resize the images and copied/placed it on the EC2 instance.
● I then created the lambda function on aws passing the account ID of the AWS account.
● Now this created function can be seen on the lambda console.
● The PHP file that contains the source code saves the images in the source bucket.
● Then, I gave the S3 source bucket the permission to invoke the lambda function.
● Then, I created a notification on the source bucket.
● So, whenever a student uploads an image on the web application, the image gets stored in the source bucket named ‘SMS_source’. Then the bucket invokes the lambda function(python file), picks the image from the source bucket, resizes the image and then adds the resized image to the destination bucket.
● At last, the resized images from the destination bucket are updated on the yearbook page.
All the above services that we are using will be monitored by the AWS Cloudwatch service that can give us information about any errors, etc if any. Finally, we are ready with the entire setup and a full-functional School Management System Web Application with MySql database which supports the functionality of resizing images uploaded by students and updates the smaller version of it in the yearbook.