Create an Extract Transform Load pipeline using python and automate with airflow.
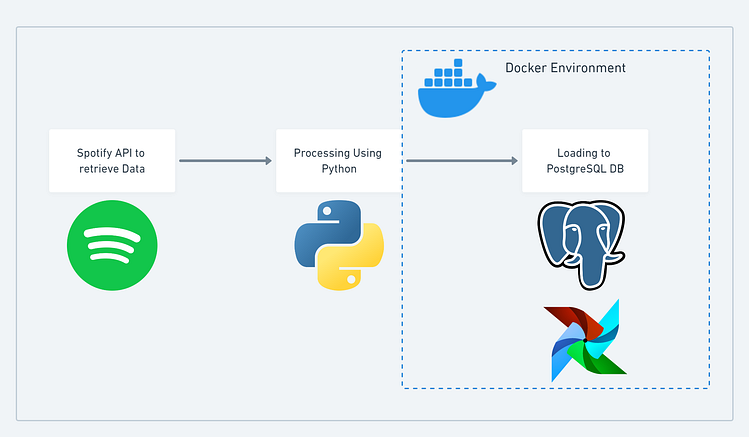
Image by Author
Inthis blog post, will explain how to create a simple ETL(Extract, Transform, Load) pipeline using Python and automate the process through Apache airflow.
We need to use Spotify’s API to read the data and perform some basic transformations and Data Quality checks finally will load the retrieved data to PostgreSQL DB and then automate the entire process through airflow. Est.Time:[4–7 Hours]
- Python
- API’s
- Docker
- Airflow
- PostgreSQL
- Knowledge on API
- Understand what docker and docker-compose
- Intermediate Python and SQL
- A basic understanding of Airflow this will help
- Understand how to interact with API to retrieve data
- Handling Dataframe in pandas
- Setting up Airflow and PostgreSQL through Docker-Compose.
- Learning to Create DAGs in Airflow
This is a beginner-friendly project to get started with building a simple pipeline and automating through airflow. First, we will focus on entirely building the pipeline and then extend the project by combining it with Airflow.
Dataset: In this project, we are using Spotify’s API so please go ahead and create an account for yourself. After creating the account head to this page. Now you will be able to see a get token icon click that and select user recently played and click get token.

Image by Author
You can see your token like this.

Image by Author
Now, this is the procedure to get the token. You may need to generate this often as it expires after some time.
We are using this token to Extract the Data from Spotify. We are Creating a function return_dataframe(). The Below python code explains how we extract API data and convert it to a Dataframe.
Here we are exporting the Extract file to get the data.
def Data_Quality(load_df): Used to check for the empty data frame, enforce unique constraints, checking for null values. Since these data might ruin our database it's important we enforce these Data Quality checks.
def Transform_df(load_df): Now we are writing some logic according to our requirement here we wanted to know our favorite artist so we are grouping the songs listened to by the artist. Note: This step is not required you can implement it or any other logic if you wish but make sure you enforce the primary constraint.
In the load step, we are using sqlalchemy and SQLite to load our data into a database and save the file in our project directory.
Finally, we have completed our ETL pipeline successfully. The structure of the project folder should look like this(inside the project folder we have 3 files).
E:\DE\PROJECTS\SPOTIFY_ETL\SPOTIFY_ETL
│ Extract.py
│ Load.py
│ my_played_tracks.sqlite
│ spotify_etl.py
│ Transform.py
└───
After running the Load.py you could see a .sqlite file will be saved to the project folder, to check the data inside the file head here and drop your file.

Image by Author
Now we will automate this process using Airflow.
For those who have made it this far I appreciate your efforts 👏 but from here it gets a little tricky. Hence, I am mentioning some important points below.
- We have completed an ETL and this itself is a mini project hence save the work.
- Now we are going to extend this with airflow using docker.
- Why docker? we are using docker since it’s easier to install and maintain and it's OS independent.
- How to set up airflow using Docker? Follow the guide provided in this blog.
- You need to change the Yaml file alone from the above guidelines please refer here.
- After setting up the airflow place your dags inside the dags folder.
- After the docker is up you could see 4 services running.

Image by Author
Your Airflow folder should look like the below structure.
C:\USERS\SIDHA\DOCKER\AIRFLOW
│ docker-compose.yml
├───dags
│ │ YOUR_DAGS.py
├───logs
├───plugins
└───scripts
Now that we have set up airflow we can view the airflow UI by visiting the 8080 port. The username and password would be airflow.
It’s time to create the required Dag for our project. But Before Jumping on to DAG let us understand what dag is DAG stands for Directed Acyclic Graph which is a set of tasks defined in the order of execution.

Image by Author
So inside our dag, we need to create tasks to get our job done. To keep it simple I will use two tasks i.e. one to create Postgres Table and another to load the Data to the Table our dag will look like this.

In this Python File will write a logic to extract data from API → Do Quality Checks →Transform Data.
- yesterday = today — datetime.timedelta(days=1) → Defines the number of days you want data for, change as you wish since our job is the daily load I have set it to 1.
- def spotify_etl() → Core function which returns the Data Frame to the DAG python file.
- This file needs to be placed inside the dags folder
This is the most important section you need to pay attention to. First, learn the basics about airflow DAG’s here it might take around 15 mins or you can search for it on youtube. After the basics please follow the below guideline.
- from airflow.operators.python_operator import PythonOperator → we are using the python operator to perform python functions such as inserting DataFrame to the table.
- from airflow.providers.postgres.operators.postgres import PostgresOperator → we are using the Postgres operator to create tables in our Postgres database.
- from airflow. hooks.base_hook import BaseHook → A hook is an abstraction of a specific API that allows Airflow to interact with an external system. Hooks are built into many operators, but they can also be used directly in DAG code. We are using a hook here to connect Postgres Database from our python function
- from spotify_etl import spotify_etl → Importing spotify_etl function from spotify_etl.py
Setting up the default arguments and interval time. We can change the interval time start date according to our needs.

Understanding Postgres connection and task.
- conn = BaseHook.get_connection(‘[Your Connection ID]’) → Connects to your Postgres DB.
- df.to_sql(‘[Your Table Name]’, engine, if_exists=’replace’) → Loads the DF to the table
- create_table >> run_etl → Defining the flow of the task

Head to the Airflow UI and click connection.

Then create a connection.
- The connection id: postgre_sql would be the one we used in our code.
- Connection Type: Postgres
- Host: Postgres
- Schema: spotify_db, you can use your own name but make sure to check in the proper database when validating.
- Login: airflow
- Password: airflow
- Port: 5432

Now its time to deploy :)
Check for your Dag in the dags section


After activation now run the dag by triggering.

After completion check for the logs.

Now we will validate by connecting to the Postgres database. Open terminal and execute: **pgcli -h localhost -p 5432 -u airflow -d spotify_db.**It will prompt for a password, enter airflow. Here spotify_db is our database name or schema of connection.

Type \d to see the tables.

We can see our table is created and now let's check the data.
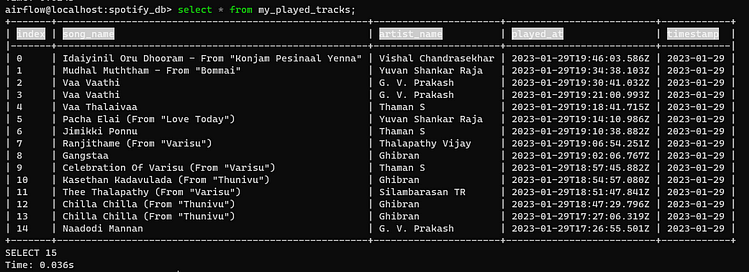
Finally, we have made it :)
Now our requirement is to automate this entire process for demonstration purposes let me change the airflow interval time to 3 mins and listen to some music🎵🎵🎵.
Now the current timestamp is shown below, let’s check after some time.

Hurray 🥳 we have made it.

The new song that I just listened to has been uploaded to our database automatically.
Let’s check the logs and task details. It’s a scheduled task.


Note: We may need to change the token in our ETL python file since it expires after some time. There are some limitations to this project they can be overcome by using a refresh token to automatically renew the token and we can set up the airflow in cloud services to run 24/7 and pick data once a day making it a Daily load but to make this beginner-friendly I haven't covered those I will let those as TODO 😉.
Github Repo:https://github.com/sidharth1805/Spotify_etl. I hope you would have enjoyed the guided project a lot. I am pretty sure that you will face a lot of issues while doing the project Stack overflow is our best friend and feel free to connect with me on LinkedIn for any further questions. Follow me on medium to learn more about Data engineering stuff.