This is the official Tensorflow Object Detection API made simpler to use. With this repository you can train, validate and export you models as well as make them detect on a camera or images.
- Minimum memory requirement: minimized the overall memory requirement to be ~22Mb by keeping only the files needed to run the Object Detection API. This repository also includes pycocotools so you do not need to download it
- Simpler scripts: modified the train and eval scripts to be hopefully simpler to be used
- Simpler configuration: you just need to define a single "model.config" file in ./experiments/exp_folder. The model.config file inside the exp_1 folder is the actual model.config used to create the pre-trained model of the ssd_mobilenet_v2 on COCO by Tensorflow
- Smarter evaluation: while the original repository continues to evaluate and keeps only the latest N ckpts, this code saves the best ckpt accordingly to a specific metric which can be decided. The default is to save the ckpt with the best mAP but you can change it as you want. The details are in the Eval section below.
- Faster training: modified the post_processing code in order to make it faster if the non maximal suppression for the hard mining procedure is ~1.0 as suggested in https://github.com/tensorflow/models/pull/4874/commits
Follow the requirements and installation procedure in the requirements.txt file. In this file you can install and setup Tensorflow, Object Detection API, NVIDIA drivers, CUDA 9.0 or other versions, cuDNN 7.0 or other versions with or without sudo rights. If you don't need some of the requirements you can skip the corresponding parts.
- Data: create or copy the tf_records of the data and place them into the ./data folder. I placed some fake tf_records in sample_tf_records just to give an example. If you have a custom dataset composed by xmls annotations you can use the ./create_tf_records.py script. You will need to change the classes which are defined inside the script. If you want to set a specific weight to a class you can do it here
- Pretrained models: download the ckpt of the pre-trained model that you want to use from here https://github.com/tensorflow/models/blob/master/research/object_detection/g3doc/detection_model_zoo.md. The ssd_mobilenet_v2 trained on COCO can be found at https://drive.google.com/file/d/1ZYUlqMeVIJY7hzdH5N3l3FjqotDGCjOm/view?usp=sharing. Unzip it and place it ./object_detection/weights folder
- Experiment folder: I created an initial experiment folder called "exp_1" which contains an example of experiment setting. You can use it or create a new experiment folder into the ./experiments folder. Inside each experiment folder you will need to create two files: the definition of the dataset classes with the "dataset.pbtxt" file and the configuration file "model.config" explained just below. In the experiment folder you will have all the things related to a specific experiment
- Dataset definition: an example of how to define your dataset is ./experiments/exp_1/dataset.pbtxt where you can find the definition of the COCO dataset. You can copy/paste that file into your experiment folder and change it to reflect the classes in your dataset
- Configuration file: you can find an example of configuration file in ./experiments/exp_1/model.config. You can copy/paste it into your experiment folder and change the paths and hyperparameters according to your needs. The important paths are: fine_tune_checkpoint, input_path, label_map_path while the important hyperparamenters include num_classes, all the anchor_generator params, image_resizer params, use_dropout and dropout_keep_probability, l2_regularizer/weight, feature_extractor/type, all the post_processing params, batch_size, all the optimizer params, all the data_augmentation_options, num_readers.
Once you have created the model.config file, just run:
python train.py --train_dir=./experiments/exp_1/
To run on a specific GPU, say GPU 0:
CUDA_VISIBLE_DEVICES=0 python train.py --train_dir=./experiments/exp_1/
To run on multiple GPUs, say 2 GPUS with ID=0,1:
CUDA_VISIBLE_DEVICES=0,1 python train.py --train_dir=./experiments/exp_1/ --num_clones=2 --ps_tasks=1
A folder called "train_logs" will appear in your train_dir. All the ckpts and summaries will be saved there.
To run the validation process:
python eval.py --train_dir=./experiments/exp_1/
To run on a specific or multiple GPUS see the Training just above.
To run the validation process on CPU:
CUDA_VISIBLE_DEVICES="" python eval.py --train_dir=./experiments/exp_1/
This is usually done if you have just one GPU so you will launch the training script on GPU while the validations script on CPU. Keep in mind that the validation process on CPU could be quite slow. If it is too slow then you should reduce the amount of GPU memory allocated for the training script and perform validation on GPU.
A folder called "eval_logs" will appear in your eval_dir. Also a folder called "best_ckpt" will appear in your train_dir. The evaluation process will automatically save the best ckpt according to the metric that you want. The default is to save the ckpt with the highest mAP. You can change this in the file ./object_detection/eval_util.py at line 381 to save the ckpt with the minimum total_loss or you can modify the code to save the ckpt with any metric you want.
To check both the train eval processes for a specific experiment, say exp_1, run:
tensorboard --logdir=./experiments/exp_1
Here you can check also the PR curves in the PR_CURVES section. If you want to compare all the experiments together:
tensorboard --logdir=./experiments/
Which will help you to know how to change things in order to make your models better.
If you have an already trained model or you want to try out your freshly trained one you must extract the inference graph. You can do it with the function export_inference_graph.py. Say that you want to export the best ckpt that you have in experiments/exp_1/best_ckpt. You have to know the name of the ckpt which is the iteration at which the ckpt was saved, like 534560 for example. It is best to create a folder called "exported_graph" into your experiment folder. Then you can create the inference graph in this way:
python export_inference_graph.py --conf=./experiment/exp_1/model.config --ckpt=./experiments/exp_1/training_logs/best_ckpt/model-534560.ckpt --output_dir=./experiments/exp_1/exported_graph/
If you want to change parameters like the score or iou threshold you can use:
python export_inference_graph.py --conf=./experiment/exp_1/model.config --ckpt=./experiments/exp_1/training_logs/best_ckpt/model-534560.ckpt --score_th=0.25 --iou_th=0.6 --output_dir=./experiments/exp_1/
If you want to modify other parameters like the maximum number of objects which can be detected take a look at the code. If you want to extract the graph of the pre-trained ssd_mobilenet_v2 model just to try it out:
python export_inference_graph.py --conf=./object_detection/samples/ssd_mobilenet_v2_coco.config --ckpt=./object_detection/weights/ssdlite_mobilenet_v2_coco_2018_05_09/model.ckpt --output_dir=./experiments/exp_1/exported_graph/
Once you have exported the graph you can delete all the files that were created but "frozen_inference_graph.pb".
You can now run the inference on the camera or on a image folder. Modify also the file ./object_detection/inference_utils/class_names_and_colors.py to be similar to your dataset.pbtxt. Also you can assign a color to each class.
You have just to declare which frozen_graph you want to use by passing the -f flag. If you want to use the ssd_mobilenet_v2 pre-trained on COCO just run:
python detect_on_camera.py -f=./experiments/exp_1/exported_graph/frozen_inference_graph.pb
Which will launch the detection on CPU with default parameters. If you want to use GPU 0:
CUDA_VISIBLE_DEVICES=0 python detect_on_camera.py -f=./experiments/exp_1/exported_graph/frozen_inference_graph.pb
If you want to change other parameters like score or iou threshold, height, width, delay, camera:
CUDA_VISIBLE_DEVICES=0 python detect_on_camera.py -f=./experiments/exp_1/exported_graph/frozen_inference_graph.pb --score_thresh=0.25 --width=500 --height=500 --delay=25 --address=0
The --address flag refers to the camera address which when "0" should be the default webcam of your PC. Here you can define also a streaming address. The delay is set as 25ms as default. You can change it to 1ms to make the model go very fast, >>>1ms to make it really slow or even to 0 if you want the inference to wait for a key press at each frame.
You have just to declare which frozen_graph you want to use by passing the -f flag and also the path of the folder containing the images with the -i flag as:
python detect_jpg_folder.py -f=./experiments/exp_1/exported_graph/frozen_inference_graph.pb -i=./data/sample_jpg_folder/
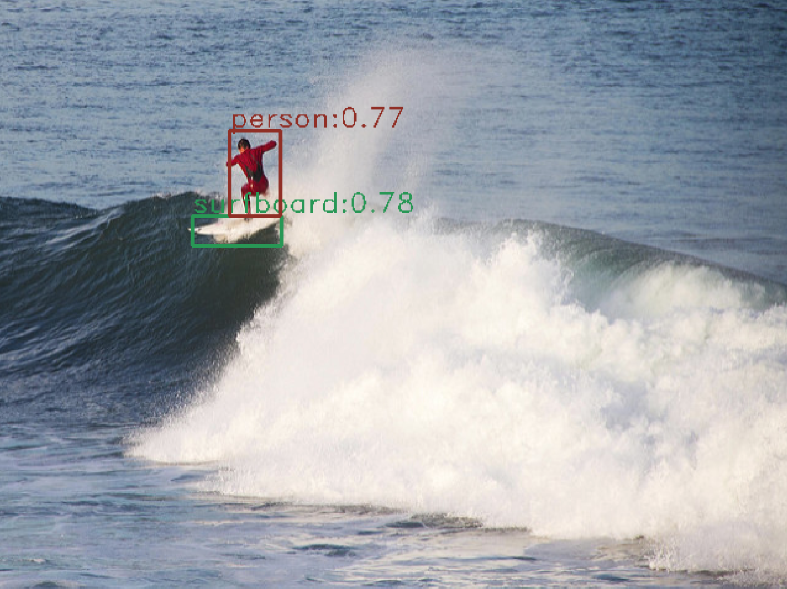
Which will detect all the images contained in the folder one after the other. If you want to change GPU or parameters see the previous detection on camera line. If you run it as it is it will detect the image "surf.jpg" which is the only image in the ./data/sample_jpg_folder/ folder.