Covid-19 is like the bad habit you had when you were a child and is now not willing to leave at any cost. Obviously, we all have been a victim of a situation like this. But this one's different.
This one's killing people. For the past few months, all we have heard are numbers, stating the number of deceased people in an area, or the number of affected people. And the worst part is, this number is increasing so rapidly that it has forced all of us to stay at home and live our life normally. Yeah, I know. It's just not possible. Also, many have lost their jobs since the pandemic, and there is still no positive sign from the research team.
There are numerous agencies working on testing patients for Covid-19, and giving them proper medication for better health, if and when required. But the problem is, the test takes up to 3-4 days to finalize the report of a patient, which is quite risky as the disease is very communicative(unlike your crush from high school). So, that's when it hit me, What if there could be a better solution for testing a patient, that doesn't take 3-4 days to produce a report??
After a bit of research, I came across a kaggle dataset, that had chest X-Ray Images of different people and the images were mainly classified into 3 classes: ,,. Now, what appeared to be just a group of images to some people, to a Data Science Enthusiast like me, saw a classification problem. Before diving into the full implementation, there are a few libraries that need to be imported for proper functioning. Below is a code snippet for the same.
%matplotlib inline
import os
import shutil
import random
import torch
import torchvision
import numpy as np

from PIL import Image
from matplotlib import pyplot as plt
torch.manual_seed(0)
from torch.autograd import Variable
print('Using PyTorch version', torch.__version__)
If the above code works perfectly, the output will be displayed as below:
Using PyTorch version 1.6.0+cpuI started working on the dataset and the first and foremost action to perform is to split the data into training and testing sets. Below is a code snippet of how I performed the task.
class_names = ['normal', 'viral', 'covid']
root_dir = 'archive/COVID-19 Radiography Database'
source_dirs = ['NORMAL', 'Viral', 'COVID-19']

if os.path.isdir(os.path.join(root_dir, source_dirs[1])):
    os.mkdir(os.path.join(root_dir, 'test'))

    for i, d in enumerate(source_dirs):
        os.rename(os.path.join(root_dir, d), os.path.join(root_dir, class_names[i]))

    for c in class_names:
        os.mkdir(os.path.join(root_dir, 'test', c))

    for c in class_names:
        images = [x for x in os.listdir(os.path.join(root_dir, c)) if x.lower().endswith('png')]
        selected_images = random.sample(images, 30)
        for image in selected_images:
            source_path = os.path.join(root_dir, c, image)
            target_path = os.path.join(root_dir, 'test', c, image)
            shutil.move(source_path, target_path)
The next course of action after preparing the dataset folder is to create a Custom Dataset Class that is used to iterate through the dataset. This custom class inherits an abstract class Dataset
and overrides the two important methods:
__len__so thatlen(dataset)returns the size of the dataset.__getitem__to support the indexing such thatdataset[i]can be used to get the ith sample
Our dataset will take an optional argument transform so that any required processing can be applied to the sample.
Below is how I created my custom class:
class ChestXRayDataset(torch.utils.data.Dataset):
    def __init__(self, image_dirs, transform):
        def get_images(class_name):
            images = [x for x in os.listdir(image_dirs[class_name]) if x[-3:].lower().endswith('png')]
            print(f'Found {len(images)} {class_name} examples')
            return images

        self.images = {}
        self.class_names = ['normal', 'viral', 'covid']

        for class_name in self.class_names:
            self.images[class_name] = get_images(class_name)

        self.image_dirs = image_dirs
        self.transform = transform


    def __len__(self):
        return sum([len(self.images[class_name]) for class_name in self.class_names])


    def __getitem__(self, index):
        class_name = random.choice(self.class_names)
        index = index % len(self.images[class_name])
        image_name = self.images[class_name][index]
        image_path = os.path.join(self.image_dirs[class_name], image_name)
        image = Image.open(image_path).convert('RGB')
        return self.transform(image), self.class_names.index(class_name)
One encountered issue was that the samples were not of the same size. Most neural networks expect the images of a fixed size. Therefore, we perform some preprocessing over the train and test dataset as shown below:
train_transform = torchvision.transforms.Compose([
    torchvision.transforms.Resize(size = (224,224)),
    torchvision.transforms.RandomHorizontalFlip(),
    torchvision.transforms.ToTensor(),
    torchvision.transforms.Normalize(mean =[0.485,0.456,0.406],std=[0.229,0.224,0.225]),
])
test_transform = torchvision.transforms.Compose([
torchvision.transforms.Resize(size = (224,224)),
torchvision.transforms.ToTensor(),
torchvision.transforms.Normalize(mean =[0.485,0.456,0.406],std=[0.229,0.224,0.225]),
])Next, we create a dictionary with the keys as the different class names(normal, viral, and COVID), and the values to each key would be their corresponding directory in which the images of that class are stored. After that, we create 2 objects of the custom dataset class by passing the train and test dictionaries with their respective transform as parameters. Below is the code snippet for the same.
train_dirs = {
    'normal': 'archive/COVID-19 Radiography Database/normal',
    'viral': 'archive/COVID-19 Radiography Database/viral',
    'covid': 'archive/COVID-19 Radiography Database/covid'
}

train_dataset = ChestXRayDataset(train_dirs,train_transform)
test_dirs = {
'normal': 'archive/COVID-19 Radiography Database/test/normal',
'viral': 'archive/COVID-19 Radiography Database/test/viral',
'covid': 'archive/COVID-19 Radiography Database/test/covid'
}
test_dataset = ChestXRayDataset(test_dirs,test_transform)If everything works fine, the below output gets displayed:
For the training object:
Found 1311 normal examples
Found 1315 viral examples
Found 189 covid examples
For testing object:
Found 30 normal examples
Found 30 viral examples
Found 30 covid examples
The next course of action is to pass the objects created in the previous step, to the dataloader with certain batch size. The purpose of the dataloader is to allow an easier implementation of chunk-reading and dynamic batch size (e.g., by yielding a batched sample at each time). Below is the code snippet of how I defined my dataloader
batch_size = 6

dl_train = torch.utils.data.DataLoader(train_dataset, batch_size=batch_size, shuffle=True)
dl_test = torch.utils.data.DataLoader(test_dataset, batch_size=batch_size, shuffle=True)

print('Number of training batches', len(dl_train))
print('Number of test batches', len(dl_test))
If everything works fine, the below output gets displayed:
Number of training batches 470
Number of test batches 15
Now, it's time for some visualization. Let's create a function that would take the true labels, the predicted labels, and a set of images passed through a dataloader iterator, and display a set of images and if the prediction is correct i.e if the predicted label of the image matches with the true label of the image, then the predicted label would be displayed on the side of the image in green color and if the prediction is wrong, the predicted label would be displayed in red color. Since we have not trained our model, we are going to pass the true labels as the predicted labels for now.
Below is the code snippet for the same:
class_names = train_dataset.class_names

def show_images(images, labels, preds):
    plt.figure(figsize=(8, 4))
    for i, image in enumerate(images):
        plt.subplot(1, 6, i + 1, xticks=[], yticks=[])
        image = image.numpy().transpose((1, 2, 0))
        mean = np.array([0.485, 0.456, 0.406])
        std = np.array([0.229, 0.224, 0.225])
        image = image * std + mean
        image = np.clip(image, 0., 1.)
        plt.imshow(image)
        col = 'green'
        if preds[i] != labels[i]:
#             print("label",labels[i])
            col = 'red'

        plt.xlabel(f'{class_names[int(labels[i].numpy())]}')
        plt.ylabel(f'{class_names[int(preds[i].numpy())]}', color=col)
    plt.tight_layout()
    plt.show()
Now, we iterate through the dataloader to pass on a batch of images and pass it to the function that we just created.
images,labels = next(iter(dl_train))
show_images(images,labels,labels)
If everything works fine, you will see the output as follows:

Now, I always thought of creating my own NN model for a task that seemed so promising, but then I decided to go with a pre-trained model and then using transfer learning to solve the classification problem. The first name that came across my mind was Resnet18 and as Ian Goodfellow and Andrew Ng said, "That's what I think, would work perfectly here". And since I was using Pytorch, it was quite easy for me to get the resnet18 pre-trained model. Below is the code snippet to how I got the pre-trained resnet model.
resnet18 = torchvision.models.resnet18(pretrained=True)
print(resnet18)
If everything works fine, the network architecture of Resnet18 will be displayed.
Next, let's modify the last FC layer of the pre-trained model that has 512 input features and 1000 output features as the number of classes on which resnet was trained was 1000. But, in our case, it is just three. Then, we assign a CrossEntropy Loss to the model as it was the obvious choice for a classification task and use Adam as the optimizer with a learning rate of 4e-5
Below is the code snippet for the same:
resnet18.fc = torch.nn.Linear(in_features=512, out_features=3)
loss_fn = torch.nn.CrossEntropyLoss()
optimizer = torch.optim.Adam(resnet18.parameters(), lr=4e-5)
Next, let's create another function that would make predictions during training by iterating the dataloader and passing a batch of images to the modified ResNet model for prediction, and display the results using the function that we previously created. Below is the code snippet for the predict function:
def show_preds():
    resnet18.eval()
    images, labels = next(iter(dl_test))
    outputs = resnet18(images)
    _, preds = torch.max(outputs, 1)
    show_images(images, labels, preds)
Then we create another function for the final part i.e the training of the model. We simply have to loop over our data iterator, and feed the inputs to the network and optimize.
Below is the code snippet of how I created the train function for training the model.
def train(epochs):
    print('Starting training..')
    for e in range(0, epochs):
        print('='*20)
        print(f'Starting epoch {e + 1}/{epochs}')
        print('='*20)

        train_loss = 0.
        val_loss = 0.

        resnet18.train() # set model to training phase

        for train_step, (images, labels) in enumerate(dl_train):
            optimizer.zero_grad()
            outputs = resnet18(images)
            loss = loss_fn(outputs, labels)
            loss.backward()
            optimizer.step()
            train_loss += loss.item()
            if train_step % 20 == 0:
                print('Evaluating at step', train_step)

                accuracy = 0

                resnet18.eval() # set model to eval phase

                for val_step, (images, labels) in enumerate(dl_test):
#                     print(type(images),images)
                    outputs = resnet18(images)
                    loss = loss_fn(outputs, labels)
                    val_loss += loss.item()

                    _, preds = torch.max(outputs, 1)
                    accuracy += sum((preds == labels).numpy())

                val_loss /= (val_step + 1)
                accuracy = accuracy/len(test_dataset)


                print(f'Validation Loss: {val_loss:.4f}, Accuracy: {accuracy:.4f}')

                show_preds()

                resnet18.train()

                if accuracy >= 0.95:
                    print('Performance condition satisfied, stopping..')
                    break

        train_loss /= (train_step + 1)
        print(f'Training Loss: {train_loss:.4f}')
    print('Training complete..')
Let's call the train function py passing epochs=1:
train(epochs=1)If everything works fine, the training will start and an output somewhat like this will be displayed:
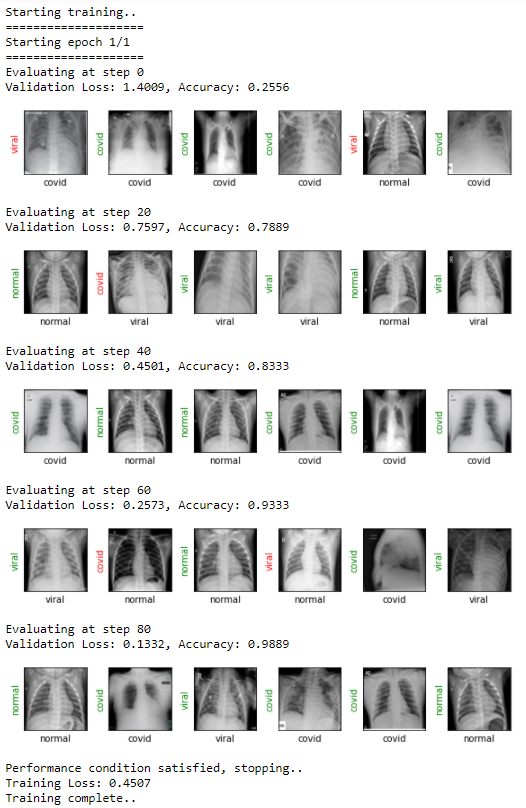
Congratulations, the training is complete and our model is now ready to be saved and tested. Lets first save the model:
torch.save(resnet18,'./model.pth')Remember, we created a function for predictions. Now is the perfect time to call it.
show_preds()Output:

Till now, we have trained our model on different batches of images. Now its time to test it on a single image input. To do that, we need to first transform the input, the same way we transformed the testing images. After that, we load the weights of the saved model, change the mode to evaluation, and pass the image as an input to produce an output tensor. Then, using a dictionary mapping, we return the predicted label.
model = torch.load('./model.pth')
model.eval()
loader = torchvision.transforms.Compose([
torchvision.transforms.Resize(size = (224,224)),
torchvision.transforms.ToTensor(),
torchvision.transforms.Normalize(mean =[0.485,0.456,0.406],std=[0.229,0.224,0.225]),
])
def image_loader(image_name):
"""load image, returns cuda tensor"""
image = Image.open(image_name).convert('RGB')
image = loader(image).float()
image = Variable(image, requires_grad=True)
image = image.unsqueeze(0)
return image
#pass the path of the image to be tested
image = image_loader('archive/COVID-19 Radiography Database/test/viral/Viral Pneumonia (416).png')
res_dict = {0:"Normal",1:"Viral",2:"Covid"}
output = model(image)
# print(output)
_, preds = torch.max(output, 1)
# print(preds)
print(res_dict[preds.tolist()[0]])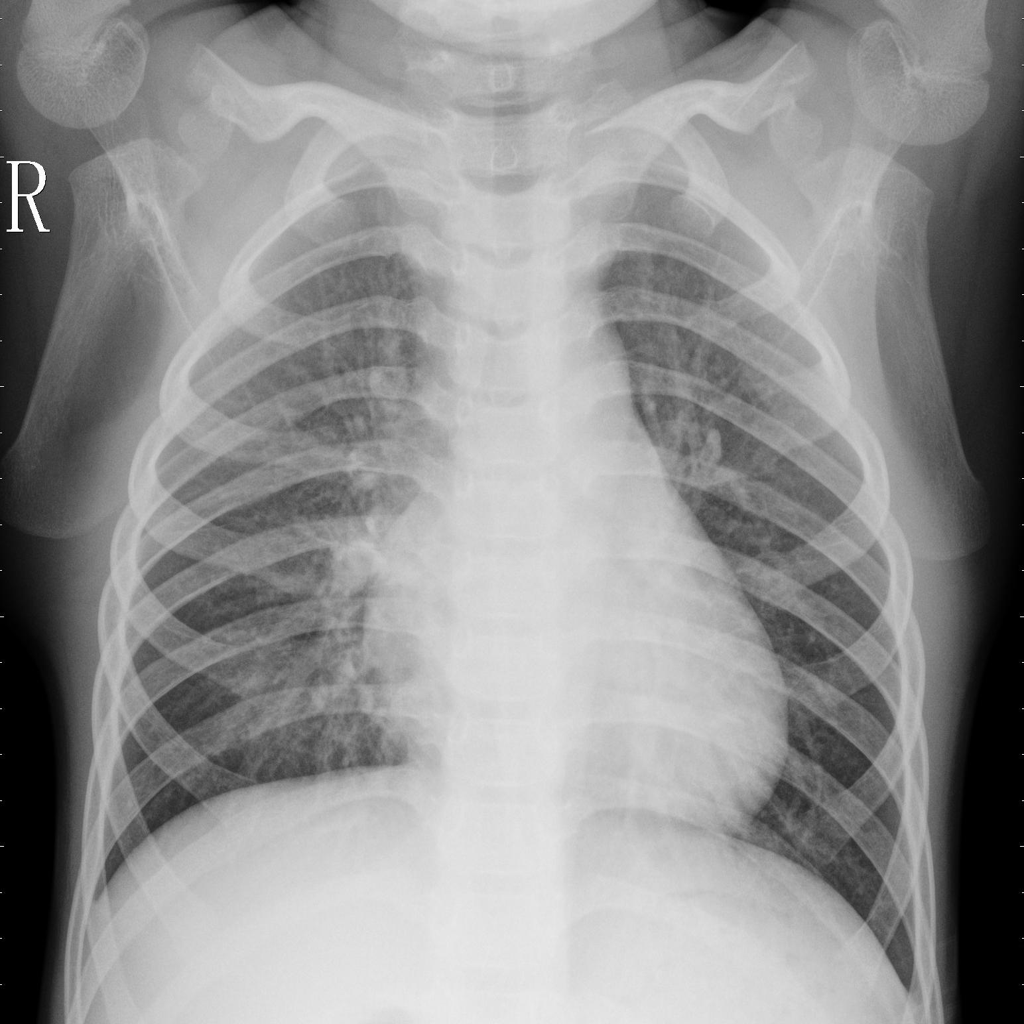
ViralRemember one thing, while creating the output dictionary, we need to take care of the order of the classes being assigned at the time of training. Here [0] corresponds to Normal, [1] corresponds to Viral, and [2] corresponds to COVID.
That's it. We have successfully created a classification model that would take a Chest X-Ray of a person and would predict whether the person is normal i.e healthy or has Viral or is Covid affected. Research is the need of the hour and it feels good to at least try to be a part of the group that wants to make our lives safer and healthier.