- Class Facebook page
- Assignment
- A build of Infinite Forms
- All about Infinite Forms
- A spotify playlist of music to listen to while coding
- Email: bryan.duggan@dit.ie
- Twitter: @skooter500
- My website & other ways to contact me
- Week 5 - CA proposal & Git repo
- Week 11 - Lab Test - 20%
- Week 13 - CA Submission & Demo - 50%
This is video of what you will be making in Unity for the lab test:
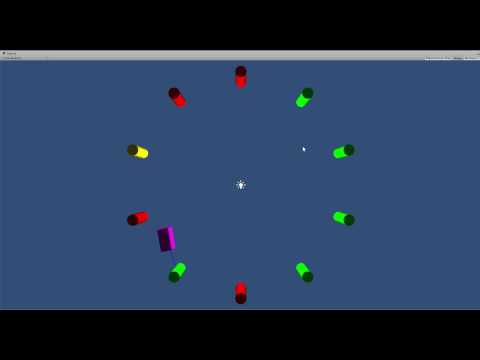
You don’t have to include the soundtrack (unless of course you want to).
What is happening:
There are 10 “traffic lights” arranged in a circle of radius 10 centred around the origin (0,0,0). Each traffic light cycles through green, yellow and red and then back to green again. Traffic lights stay green for a random time of between 5 and 10 seconds. Traffic lights go yellow for exactly 4 seconds always. Traffic lights stay red for a random time of between 5 and 10 seconds and then go back to green again. When the program starts, each traffic light is set to be red, yellow or green randomly. The purple “car” picks a green traffic light to go to at random. It should only ever go to a green traffic light. When it arrives at a green traffic light it should pick another green traffic light to arrive at. If the traffic light it's heading for turns yellow or red when it's on the way, it should pick a different traffic light to go to.
To get full marks, you should use steering behaviours and at least one finite state machine in your solution. Also you should generate the traffic lights procedurally. Other equally complex and flexible solutions are also acceptable. You can use any of the example code in this repository in your solution.
Don't fork this repository, instead create a new empty project in Unity and commit all your code to a new public git repository.
You have until 12 midnight to submit your solution.
| Description | Marks |
|---|---|
| Git setup | 10 marks |
| Implementing the positions of the traffic lights | 10 marks |
| Implementing the traffic light AI | 30 marks |
| Implementing the car movement | 20 marks |
| Getting the car to pick random green traffic lights to go to | 20 marks |
| Correct use of git throughout the project | 10 marks |
- https://github.com/skooter500/GE2-Lab-Test-2019
- https://github.com/skooter500/GE2-LabTest2-2017
- https://github.com/skooter500/GE2-2017-Lab-Test
- https://github.com/skooter500/GE2-Labtest1-2018
I added a new behaviour to the repo called ObstacleAvoidance.
Create a new scene and create a boid that has Wander and ObstacleAvoidance behaviours enabled. Create an environment from primitives such as cubes and spheres that the your boid can explore. You might have to experiment with the parameters on ObstacleAvoidance to get the boid to explore without colliding. Check this video out for an example of how it might look:
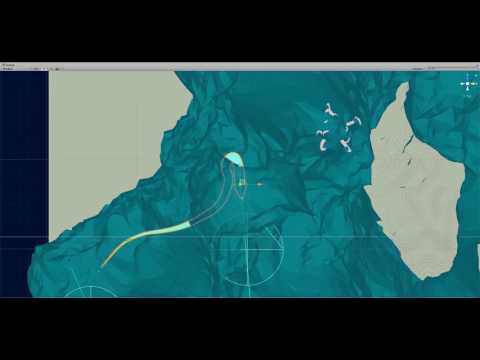
Want an interesting challenge ;-) Place the exploring boids in a this procedural environment:

Try this lab test from a couple of years ago
- Refactor the code we have been writing to use components
- Learn how to refactor a big class that does many things into lots of smaller classes that do one thing each
- Find some 3D models & art assets for your assignment & get them loaded into a scene in Unity
- Set up a git repo for your assignment
Out Boid class is getting big so now it's time to refactor the code so that each behaviour is a seperate MonoBehaviour.
Clone/pull the repo for the course
- Make an abstract base class called SteeringBehaviour that extends MonoBehavior
- Add one abstract method
public abstract Vector3 Calculate() - Add a public field for weight of type float and also add a field for the Boid (the owner of the behaviour)
- Take each of the behaviours we wrote (seek, arrive, flee, path following, PlayerSteering) and make each of them extend SteeringBehaviour. Do the calculation of the force in Calculate
- Remove the boolean flags for the behaviours. They are not needed any more. Instead each boid will use whatever behaviours are attached to it.
- Give the Boid a field of type
SteeringBehaviour[] - In the setup method of the Boid class, call GetComponents to get all the attached SteeringBehaviours
- Assign the boid field of each attached behaviour
- In the Boid Update method, iterate over the activated behaviours and sum the generated forces * the weights
- This will become more useful when we combine the behaviours together
Try this lab test from last year
Update your fork of the course repo to get the Pursue code we wrote in the class on Friday.
Create a new scene and make this predator prey simulation. The prey will follow a path until the predator comes into range. When the predator is is range the prey will attack the predator by shooting at it. It only shoots at the predator if it is inside the field of view. The predator will get close to the prey, but will flee from the prey if the prey attacks it. You can use colliders and then disable and enable certain behaviours to implement the simulation.

To draw the "Lazers" you can use Debug.DrawLine from Update
- Pursue
- Offset
Update your fork of the repo with the latest code from the master branch of my repo. To do this, cd to the folder where you have your fork cloned and type:
git checkout master
git pull upstream master
This will get the code we wrote last week. Open the Seek scene and you will see a boid that implements seek, arrive and player steering behaviours in the BigBoid.cs class. Today you can implement a path following behaviour for the boid.
Check out this video:
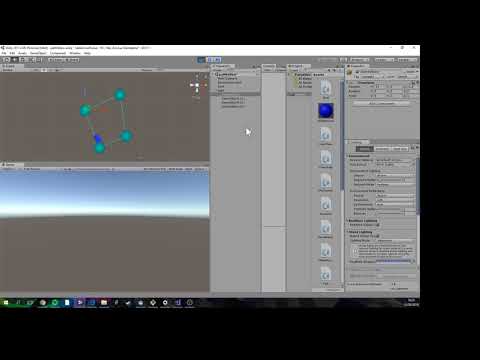
The scene contains a game object object with a script called Path attached. The path script implements the method OnDrawGizmos to draw lines between the waypoints on the path and to draw a sphere at each of the waypoints. The blue box is following the path. Today you can try and program this behaviour.
- Implement the
Pathscript that contains apublic List<Vector3> waypointscontaining the waypoints. The 0th waypoint should be the position of the path gameobject itself and the positions of the attached children should be used to set the subsequent waypoints. You can populate this list inAwake. - Add a bool flag on the
Pathclass calledIsLoopedto indicate whether the path should loop back to the 0th waypoint when the Boid reaches the last waypoint. If this flag is set to be false, then don't draw a line gizmo back to the 0th waypoint. - In the scene, create a path using the
Pathscript you made. - Add a a public field to the BigBoid class for the Path and drag the Path you made onto this in the Unity editor.
- Now write code for a behaviour in BigBoid called
FollowPathto get the Boid to move from waypoint to waypoint on the path using Seek and Arrive. If theIsLoopedflag is true on the path, then the Boid should Seek the 0th waypoint again when it reaches the last waypoint. If this flag is set to be false, then the Boid should Arrive at the last waypoint. You will need to add a method called FollowPath and a boolean flag to indicate that the FollowPath behaviour is enabled.
- Implement a behaviour called
Fleethat causes the BigBoid to flee from a target when the target comes in range. To do this, add a method calledFleeand a bool flag calledFleeEnabledon the BigBoid class. You will also have to update theCalculateForcesmethod. Set up your scene with a target game object and move the target around the scene and make sure the Flee force gets activated when the target comes in range.
- Boid integration
- Seek
- Arrive
- PlayerSteering
- Banking
- No lab because of the strike